Table of Contents
Advertisement
Quick Links
Advertisement
Table of Contents

Related Manuals for DELVCAM DELV-WFORM-7SDI


Summary of Contents for DELVCAM DELV-WFORM-7SDI
- Page 1 Delvcam DELV-WFORM-7SDI User Guide ...
-
Page 2: Important Safety Instructions
IMPORTANT SAFETY INSTRUCTIONS: Please read manual before using this product. Please keep manual for future reference. Please read the cautions to prevent possible danger and loss of property. Please enjoy the benefits of convenience, safety, and space-saving from this TFT LCD monitor in different ways. -
Page 3: Table Of Contents
Contents PRODUCT DESCRIPTION --------------------- 3 INSTALLATION OF SUNSHADE COVER AND BATTERY PLATE---------------------------5 DV BATTERY MOUNT PLATE---------------- 6 WIRING INSTRUCTIONS-----------------------7 SETTING MENU ---------------------------------- 8 ACCESSORIES ------------------------------------11 PARAMETER --------------------------------------12 TROUBLESHOOTING --------------------------12 * Advanced functions are only available for product model with"/P2"&"/S2".. -
Page 4: Product Description
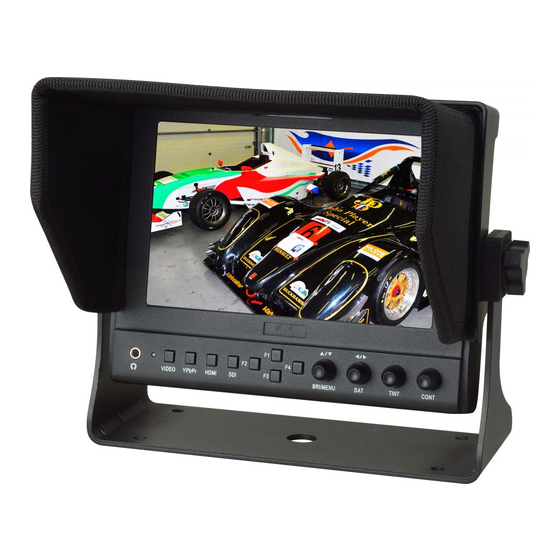
PRODUCT DESCRIPTION 1.TALLY (indicator light). 2.Earphone jack. 3.Power indicator light: ON/OFF (Light turns to red when power on). 4.VIDEO: Indicator lights up when signal switch to video state. -
Page 5: Pin Number
10.Knob SAT: Press the knob to select main MENU options; rotate knob to confirm the selection and adjust parameter values. Default as Saturation function. 11.Knob TINT: Default as Tint function. 12.Knob CONT: Default as Contrast function. 1. -
Page 6: Installation Of Sunshade Cover
INSTALLATION OF SUNSHADE COVER AND BATTERY PLATE Installation of sunshade cover: ① As shown, buckle the sunshade cover on the device. ② As shown, cover buttoned into the appropriate slot, and fastened in accordance with the order of the both sides. ... -
Page 7: Dv Battery Mount Plate
DV BATTERY MOUNT PLATE: Standard mounts process Following three types of battery plates are suitable for this device, model F970, QM91D, DU21 & LP-E6 (choose 2 out of 4). MODEL: F-970 MODEL: QM91D MODEL: DU21 MODEL: LP-E6 ... -
Page 8: Wiring Instructions
Please refer to GP-L130AB type V-mount battery plate (optional): battery specifications. V-mount Battery Plate Adaptor Panel Please refer to Anton Bauer mount battery plate (optional): ... -
Page 9: Setting Menu
SETTING MENU Before setting the functions, please make sure the device is connected correctly. When power on, press BRI/MENU knob on the device, function menus will pop-up on the screen. After confirm the option value, then press BRI/MENU knob to return to the previous, and press the BRI/MENU knob again to exit the menu settings. - Page 10 ITEMS OPTIONS Center Marker ON/OFF Aspect Marker OFF, 16:9, 4:3, 14:9, 13:9,15:9,1.85:1, 2.35:1 Screen Markers OFF, 95%,93%,90%,88%,85%, 80% Marker Color Red, Green, Blue, White, Black Marker Mat OFF, 1-6 Thickness ITEMS OPTIONS Language English /Chinese...
- Page 11 Function of buttons and knobs can be customized by users’ needs. Functions of F1-F4 buttons can also be customized: Center Marker, Screen Marker, Check Field, Color Bar, Camera, PIP, Image Flip, Zoom, Pixel-to-Pixel, Freeze Input, Underscan, H/V delay * Peaking, False Color, Exposure, Histogram, Level Meter and Wave/Vector.
-
Page 12: Accessories
ACCESSORIES: Standard Accessories: 1. Sun Shade Cover 1 Piece 2. Gimbal bracket 1 Piece 3. Battery Plate (F-970/QM91D/DU21/LP-E6) 2 Pieces (Choose 2 out of 4) 4. HDMI A/C cable 1 Piece 5. Power & TALLY cable 1 Piece ... -
Page 13: Parameter
PARAMETERS: Panel Size 7’’ LED backlit Resolution 1280× 800 Brightness 400cd/㎡ Contrast 800:1 Viewing Angle 178° / 178° (H/V) Input Voltage DC12V (XLR DC Connection) Input Signal (optional) HDMI, YPbPr, AV and 3G-SDI Current 900mA Power Consumption ≤11W Size:(LWD) 191.5×... - Page 14 * Advanced functions are only available for product model with"/P2"&"/S2"..
Need help?
Do you have a question about the DELV-WFORM-7SDI and is the answer not in the manual?
Questions and answers