Table of Contents
Advertisement
Advertisement
Table of Contents
Troubleshooting

Related Manuals for Comtrol DeviceMaster PRO


Summary of Contents for Comtrol DeviceMaster PRO
- Page 1 Installation and Configuration Guide...
- Page 2 Copyright © 2001 - 2009. Comtrol Corporation. All Rights Reserved. Comtrol Corporation makes no representations or warranties with regard to the contents of this document or to the suitability of the Comtrol product for any particular purpose. Specifications subject to change without notice. Some software or features may not be available at the time of publication.
-
Page 3: Table Of Contents
2-Port (Serial Terminal) 1E/2E Models ..........................20 2-Port (DB9) 1E/2E Models..............................22 4-Port and 8-Port Models................................24 16-Port (DeviceMaster RTS - External Power Supply)....................26 16-Port (DeviceMaster PRO) ..............................28 16/32-Port Rack Mount Models (Internal Power Supply).....................30 DeviceMaster Installation and Configuration Guide: 2000506 Rev. B Table of Contents - iii... - Page 4 Table of Contents Initial Configuration............................33 PortVision Plus Requirements ..............................33 Installing PortVision Plus .................................33 Configuring the Network Settings ............................34 Checking the SocketServer Version............................36 Uploading SocketServer ................................37 Device Driver Installation ..........................39 Linux Installation..................................39 Windows Installation .................................39 Windows Vista: NS-Link Installation..............................40 Windows XP and Windows Server 2003: NS-Link Installation ....................41 Windows 2000: NS-Link Installation ..............................
- Page 5 Table of Contents DeviceMaster 1E (Serial Terminals) Cables and Loopbacks..................63 Serial Terminal (4) Null-Modem Cables (RS-232)......................... 63 Serial Terminal (4) Null-Modem Cables (RS-422)......................... 63 Serial Terminal (4) Straight-Through Cables (RS-232/485)....................64 1E Loopback Signals ....................................64 DeviceMaster 2E (Serial Terminals) Cables and Loopbacks..................65 Serial Terminal (8) Null-Modem Cables (RS-232).........................
- Page 6 4-Port (DB9)........................................94 8-Port (DB9)........................................94 16-Port (RJ45) External Power Supply .............................. 94 16-Port (RJ45) Internal Power Supply ............................... 94 DeviceMaster PRO 16-Port (RJ45) ............................... 94 DeviceMaster Serial Hub 16-Port (DB9)............................94 DeviceMaster RTS 32-Port (RJ45) ................................ 95 Notices ......................................96 Radio Frequency Interference (RFI) (FCC 15.105) ........................
-
Page 7: Introduction
Hardware Installation on Page 13 detailed installation procedures for your DeviceMaster model. Step 2: Install Comtrol recommends connecting the DeviceMaster to a PC or laptop running Windows® PortVision Plus 2000/XP/2003/Vista so that you can install PortVision Plus for easy IP address configuration. -
Page 8: Step 5: Configure Ns-Link Port Properties Page
Hardware Installation on Page 13 detailed installation procedures for your DeviceMaster model. Step 2: Install Comtrol recommends connecting the DeviceMaster to a PC or laptop running Windows® PortVision Plus 2000/XP/2003/Vista so that you can install PortVision Plus for easy IP address configuration. -
Page 9: Ns-Link Tty Port Installation Overview
Hardware Installation on Page 13 detailed installation procedures for your DeviceMaster model. ® Step 2: Install Comtrol recommends connecting the DeviceMaster to a PC or laptop running Windows PortVision Plus 2000/XP/2003/Vista so that you can install PortVision Plus for easy IP address configuration. See... -
Page 10: Step 4: Update Socketserver
Step 4: Update SocketServer Step 4: Update If necessary, update SocketServer. You can use Checking the SocketServer Version on Page SocketServer and then refer to Locating Software and Documentation on Page 10 to locate the latest version on the web site. See Uploading SocketServer on Page 37 if you need to update SocketServer. -
Page 11: Developer's Kit
Comtrol sales representative. Note: The DeviceMaster PRO is shipped with the Developer’s Kit. The DeviceMaster RTS supports the Developer’s Kit. The DeviceMaster Serial Hub is not supported in the Developer’s Kit. DeviceMaster Installation and Configuration Guide: 2000506 Rev. B... - Page 12 Developer’s Kit 12 - Introduction DeviceMaster Installation and Configuration Guide: 2000506 Rev. B...
-
Page 13: Hardware Installation
DeviceMaster PRO DB9 serial ports with dual 8† 4-Port and 8-Port Models on Page 24 Ethernet†† ports Default Network Settings RJ45 serial ports with dual 16-Port (DeviceMaster PRO) on Page 28 IP address: Ethernet†† ports 192.168.250.250 DeviceMaster RTS Subnet mask: 255.255.0.0... -
Page 14: 1-Port - Enclosed Models
1-Port - Enclosed Models 1-Port - Enclosed Models Use the following procedure to install the DeviceMaster 1-Port. 1. Record the MAC address and serial number of the DeviceMaster on the customer service label provided. You may need the MAC address during driver configuration. The MAC address (starts with 00 C0 4E) and serial number are located on a label on the DeviceMaster. - Page 15 Screw Terminal Power Connector screw terminal and the DC return wire into the return screw terminal. Return Earth Gnd If you purchased the Comtrol power supply 5-30VDC (separately), the wires are identified below: Positive Red = 5-30VDC positive Wire gauge:...
-
Page 16: 1-Port - Embedded Model
1-Port - Embedded Model 1-Port - Embedded Model Installing the DeviceMaster 1-Port Embedded system follows these basic steps: • Building the serial ribbon cable (below). • Mounting the Embedded on Page 17 and installing light pipes. • Attaching the Network and Serial Cables on Page •... -
Page 17: Mounting The Embedded
Mounting the Embedded Mounting the Use the following procedure to mount the DeviceMaster 1-Port Embedded with the 5- Embedded 30VDC power supply. Observe proper ESD techniques when handling the DeviceMaster. 1. Carefully remove the DeviceMaster from the anti-static bag, following standard electrostatic device handling procedures. -
Page 18: Attaching The Network And Serial Cables
2. Insert the DC positive wire into the positive Screw Terminal Power Connector screw terminal and the DC return wire into the return screw terminal. Return Earth Gnd If you purchased the Comtrol power supply 5-30VDC (separately), the wires are identified below: Positive • Red = 5-30VDC positive Wire gauge: •... - Page 19 Connecting the Power and Verifying Installation 5. Plug the screw terminal power connector into the DeviceMaster. 6. Connect the power supply to a power source. 7. Plug the screw terminal power connector into JP1 on the DeviceMaster by aligning the scalloped sides.
-
Page 20: 2-Port (Serial Terminal) 1E/2E Models
White = 5-30VDC return • Black = chassis ground If you did not purchase a power supply from Comtrol for the DeviceMaster, see Port (Serial Terminals) Power Supply on Page 88 for power requirements. Use a small flat head screw driver to lock the wires into place. - Page 21 2-Port (Serial Terminal) 1E/2E Models Do not connect RS-422/485 devices until the appropriate port interface type has been configured. The default port setting is RS-232. 5. Verify that the Status LED has completed the boot cycle and network connection for Caution the DeviceMaster is functioning properly using the following table.
-
Page 22: 2-Port (Db9) 1E/2E Models
The DeviceMaster will Return† continue to operate if one of Positive† Positive† the two connected power supplies should fail. Chassis If you purchased the Comtrol Ground† power supply (separately), the wires are identified below: • Red = 6-30VDC positive •... - Page 23 2-Port (DB9) 1E/2E Models 4. Use the appropriate method for network attachment of your DeviceMaster 2-port: DeviceMaster 1E: Connect the 10/100 port to the same Ethernet network segment as the host PC using a standard network cable. DeviceMaster 2E: Connect the DeviceMaster 2E using one of these methods: •...
-
Page 24: 4-Port And 8-Port Models
4” flathead machine) or place the DeviceMaster on a stable surface. DeviceMaster RTS Larger Picture, Page 93 Larger Picture, Page 93 DeviceMaster PRO and DeviceMaster Serial Hub Larger Picture, Page 93 Failure to use the correct screws can damage the PCB and void the warranty. Do NOT use screws that exceed the length of the screws provided with the mounting bracket kit. - Page 25 4-Port and 8-Port Models 5. Verify that the PWR LED has completed the boot cycle and network connection for the DeviceMaster is functioning properly using the table below. 4-Port and 8-Port LED Descriptions LED on the front panel of the DeviceMaster is lit, indicating you have power and it has completed the boot cycle.
-
Page 26: 16-Port (Devicemaster Rts - External Power Supply)
Caution ambient temperature. Be sure to install the DeviceMaster in an environment that is compatible with the maximum rated ambient temperature. See http:// www.comtrol.com/products/specifications/99450-3 for temperature specifications. • Make sure that the mechanical loading is level to avoid a hazardous condition;... - Page 27 16-Port (DeviceMaster RTS - External Power Supply) 5. Verify that the PWR LED has completed the boot cycle and network connection for the DeviceMaster RTS is functioning properly using the table below. DeviceMaster RTS 16-Port (External Power Supply) LED Descriptions Red LED on the front panel of the DeviceMaster is lit, indicating you have power and it has completed the boot cycle.
-
Page 28: 16-Port (Devicemaster Pro)
Do not defeat the grounding means and verify that the DeviceMaster is reliably grounded when mounting within the rack. 3. Connect the DeviceMaster PRO to the same Ethernet network segment as the host PC using one of the following methods. - Page 29 DeviceMaster is functioning properly using the table below. DeviceMaster PRO 16-Port LED Description Red LED on the front panel of the DeviceMaster PRO is lit, indicating you have power and it has completed the boot cycle. Note: The LED flashes while booting and it takes approximately 15 (Front seconds for the Bootloader to complete the cycle.
-
Page 30: 16/32-Port Rack Mount Models (Internal Power Supply)
Caution ambient temperature. Be sure to install the DeviceMaster in an environment that is compatible with the maximum rated ambient temperature. Refer to the appropriate link for temperature specifications. DeviceMaster RTS 16-port: http://www.comtrol.com/products/specifications/ 99455-8 DeviceMaster RTS 32-port: http://www.comtrol.com/products/specifications/ 99456-5 DeviceMaster Serial Hub: http://www.comtrol.com/products/specifications/... - Page 31 16/32-Port Rack Mount Models (Internal Power Supply) 3. Connect the DeviceMaster port labeled 10/100 NETWORK to the same Ethernet network segment as the host PC using a standard network cable. DeviceMaster RTS Page 94 Larger picture, Larger picture, Page 94 DeviceMaster Serial Hub Larger picture, Page 94 If you plan on using the NS-Link device driver, make sure that you do not connect...
- Page 32 16/32-Port Rack Mount Models (Internal Power Supply) 32 - Hardware Installation DeviceMaster Installation and Configuration Guide: 2000506 Rev. B...
-
Page 33: Initial Configuration
Initial Configuration There are several ways to configure network information. Comtrol Technical Support ® recommends connecting the DeviceMaster to a PC or laptop running Windows installing PortVision Plus for initial configuration. This section shows you how to: • Install PortVision Plus •... -
Page 34: Configuring The Network Settings
3. If this is the first time you have opened PortVision Plus, click Scan and then Yes to locate DeviceMasters on the network. Note: PortVision Plus will locate all Comtrol DeviceMaster models, including: DeviceMaster 500. DeviceMaster AIR, DeviceMaster PRO, DeviceMaster RTS, DeviceMaster Serial Hub and DeviceMaster UP. - Page 35 Configuring the Network Settings 5. Optionally, rename the DeviceMaster in the Device Name field. 6. Change the DeviceMaster network properties as required for your site. • If you want to run the DeviceMaster using the MAC addressing scheme, click Disable IP. •...
-
Page 36: Checking The Socketserver Version
DeviceMaster platform, which provides an interface to TCP/IP socket mode configuration and services. Comtrol recommends verifying that your DeviceMaster contains the latest SocketServer version before setting up the secure COM port redirector or configuring socket ports to avoid installation problems. -
Page 37: Uploading Socketserver
Uploading SocketServer Uploading SocketServer Use this section to upload a new version of SocketServer on the DeviceMaster using PortVision Plus. Technical Support recommends updating SocketServer before setting up the secure COM ports redirector or to configure the sockets using the SocketServer web page to avoid configuration problems. - Page 38 Uploading SocketServer 38 - Initial Configuration DeviceMaster Installation and Configuration Guide: 2000506 Rev. B...
-
Page 39: Device Driver Installation
CD Installation: Use the CD to check the driver version on the CD against the latest released version. Open the /html/default.htm file to use the menu system. • Download the latest device driver: http://www.comtrol.com/support/ download.asp?partnumber=1800026. Windows Installation This subsection provides an installation overview for the NS-Link device driver for the Windows 2000, Windows XP, Windows Server 2003, and Window Vista operating systems. -
Page 40: Windows Vista: Ns-Link Installation
9. Click Finish to complete this part of the installation process. 10. At the Windows needs to install driver software for your Comtrol NS-Link Port, click Locate and install driver software automatically (Recommended) and Next. 11. If necessary, click Install this driver software anyway to proceed. -
Page 41: Windows Xp And Windows Server 2003: Ns-Link Installation
Windows XP and Windows Server 2003: NS-Link Installation Windows XP and After locating the latest driver (Page 39) and extracting the files, use this procedure to Windows Server 2003: install and configure the NS-Link device driver for your DeviceMaster. NS-Link Installation 1. -
Page 42: Windows 2000: Ns-Link Installation
7. Click Have Disk, Browse to locate the unzipped installation files or enter the path, and then click Ok. For example, if you extracted the driver to the default subdirectory, enter: C:\Comtrol. Note: You do not need to select a specific .inf file, the driver uses the appropriate file for your DeviceMaster installation. -
Page 43: Configuring The Ns-Link Driver For Windows
Configuring the NS-Link Driver for Windows Configuring the NS-Link Driver for Windows The DeviceMaster must be connected to the local network segment or directly to a NIC on the host system to operate in MAC mode to perform the following procedure. 1. -
Page 44: Configuring Com Port Properties For Windows
Configuring COM Port Properties for Windows Configuring COM Port Properties for Windows The following is a COM port properties configuration overview. Use the NS-Link User Guide for Windows (also available on the CD) or the NS-Link Help system for detailed configuration information. -
Page 45: Secure Com Port Set Up
Secure COM Port Set Up Before configuring security and installing the secure COM port redirector, the following conditions must be met: • The DeviceMaster is connected to the network and powered on (Hardware Installation on Page • The network information has been configured in the DeviceMaster (Configuring the Network Settings on Page •... - Page 46 Encrypted access to the web server via port 443 (https:// URLs) is still allowed. • Administrative commands that change configuration or operating state which are received using the Comtrol proprietary TCP driver protocol on TCP port 4606 are ignored. •...
-
Page 47: Installing The Secure Com Port Redirector
Installing the Secure COM Port Redirector If a CA certificate is uploaded, the DeviceMaster only allows SSL/TLS connections from client applications that provide to the DeviceMaster an identity certificate that has been signed by the CA certificate that was uploaded to the DeviceMaster. This uploaded CA certificate that is used to validate a client's identity is sometimes referred to as a “trusted root certificate”, a “trusted authority certificate”, or a “trusted CA certificate”. -
Page 48: Configuring Secure Redirector Com Ports
Configuring Secure Redirector COM Ports Configuring Secure Redirector COM Ports Use the following procedures to: • Add a DeviceMaster port • Configure the port for the secure port redirector If necessary, refer to the secure port redirector help system for more information. Adding a Secure Port Use the following procedure to add a secure port or ports. -
Page 49: Socket Port Configuration
Socket Port Configuration This section discusses the following topics: • SocketServer Overview • SocketServer Versions on Page 52 • Accessing Socket Configuration on Page 51 SocketServer Overview SocketServer is the name of the TCP/IP socket web page that is integrated in the firmware that comes pre-installed on your DeviceMaster. -
Page 50: Socketserver Architecture
SocketServer Architecture SocketServer Architecture TCP/IP socket mode operation is used to connect serial devices with an application that supports TCP/IP socket communications addressing. DeviceMaster PC or Mainframe Ethernet Hub Ethernet Hub LAN/WAN IP socket application Serial Device TCP/IP Socket Mode Serial tunneling mode is used to establish a socket connection between two DeviceMasters through an ethernet network. -
Page 51: Accessing Socket Configuration
Accessing Socket Configuration Accessing Socket Configuration There are several ways to access the socket configuration pages (SocketServer or NS- Link). Use the method that fits your environment best. • Web Browser • PortVision Plus Web Browser To access the socket configuration page for the DeviceMaster using a web browser, follow this procedure. -
Page 52: Socketserver Versions
SocketServer Versions SocketServer Versions SocketServer Overview discusses the that the default SocketServer web page is the same as the NS-Link web page. If the NS-Link driver is not running (not installed or disabled), the default SocketServer loads when you open a web browser session. Your SocketServer or NS-Link version may be different than these examples. -
Page 53: Connecting Serial Devices
Connecting Serial Devices This section discusses connecting your serial devices to the DeviceMaster. In addition, it provides you with information to build serial or test cables and loopback connectors to test the serial ports. Note: Go to Building the Serial Ribbon Cable on Page 16 for connector information for the DeviceMaster 1-Port Embedded adapter. - Page 54 DeviceMaster 1/4/8/16/32-Port Models 1-Port (Standard) LEDs The amber Status LED on the device is lit, indicating you have power and it has completed the boot cycle. Note: The Status LED flashes while booting and it takes approximately 15 Status seconds for the Bootloader to complete the cycle. When the Bootloader completes the cycle, the LED has a solid, steady light that blinks approximately every 10 seconds.
- Page 55 DeviceMaster 1/4/8/16/32-Port Models LEDs - DeviceMaster Serial Hub 16-Port with DB9 Connectors If the LINK ACT LED (UP or DOWN) is lit, it indicates a working LINK ACT Ethernet connection. When lit, the red 100 (D4) LED indicates a working 100 MB Ethernet connection (100 MB network, only).
-
Page 56: Devicemaster 2-Port With Serial Terminals
DeviceMaster 2-Port with Serial Terminals DeviceMaster 2-Port with Serial Terminals Use the following information to connect the DeviceMaster UP 2-port. 1. Connect your serial devices to the appropriate serial port on the DeviceMaster UP using the appropriate cable. You can build your own cables or loopbacks using the appropriate discussions: •... -
Page 57: Serial Terminal (8) Signals (2E)
Serial Terminal (8) Signals (2E) RS-232† RS-422/RS-485 TxD- TxD+ RxD- RxD+ Full-Duplex RS-485 TRxD- TRxD+ Half-Duplex † RS-232 ground must be connected to the appropriate signal ground terminal. Serial Terminal (8) Use the following drawings or table for signal information. The signals for SERIAL2 are Signals (2E) the same as SERIAL1. -
Page 58: Devicemaster 2-Port (1E/2E) Db9 Connectors
DeviceMaster 2-Port (1E/2E) DB9 Connectors DeviceMaster 2-Port (1E/2E) DB9 Connectors Use the following information to connect the DeviceMaster UP 2-port. 1. Connect your serial devices to the appropriate serial port on the DeviceMaster UP using the appropriate cable. Use the following table and the appropiate discussion to build cables or loopback plugs. -
Page 59: Db9 Serial Cables And Loopback Plugs
DB9 Serial Cables and Loopback Plugs DB9 Serial Cables and Loopback Plugs You can build your own null-modem or straight-through DB9 serial cables for 1-port and 4/8-port models using the following subsections. Note: See DeviceMaster 2-Port with Serial Terminals on Page 56 for 2-port models with DB9 connectors.. -
Page 60: Db9 Null-Modem Cables (Rs-232)
DB9 Null-Modem Cables (RS-232) Wire the following pins together for an RS-422 loopback plug: • Pins 2 to 3 Pin 5 Pin 1 RS-422 Only • Pins 7 to 8 (Back View) Pin 6 Pin 9 DB9 Null-Modem Use the following figure if you need to build an RS-232 null-modem cable. A null-modem Cables (RS-232) cable is required for connecting DTE devices. -
Page 61: Rj45 Serial Cables And Loopback Plugs
RJ45 Serial Cables and Loopback Plugs RJ45 Serial Cables and Loopback Plugs You can build your own null-modem or straight-through RJ45 serial cables using the following subsections. RS-232 RS-422 RS-485 TxD+ TRxD+ Not used Not used Signal GND Not used† Not used†... -
Page 62: Rj45 Null-Modem Cables (Rs-422)
RJ45 Null-Modem Cables (RS-422) RJ45 Null-Modem Use the following figure if you need to build an RS-422 null-modem RJ45 cable. A null- Cables (RS-422) modem cable is required for connecting DTE devices. RJ45 Signal Pins Signal TxD+ RxD+ TxD- RxD- RxD+ TxD+ RxD-... -
Page 63: Devicemaster 1E (Serial Terminals) Cables And Loopbacks
DeviceMaster 1E (Serial Terminals) Cables and Loopbacks DeviceMaster 1E (Serial Terminals) Cables and Loopbacks Use the appropriate discussion to build the following cables: • Serial Terminal (4) Null-Modem Cables (RS-232) on Page 63 • Serial Terminal (4) Null-Modem Cables (RS-422) on Page 63 •... -
Page 64: Serial Terminal (4) Straight-Through Cables (Rs-232/485)
See the NS-Link User Guide for Windows about using Test Terminal or Using minicom to Test Comtrol Ports to test the serial ports. Optionally, this information is on the Software and Documentation CD shipped with the product. Wire the terminals together to create a loopback. -
Page 65: Devicemaster 2E (Serial Terminals) Cables And Loopbacks
DeviceMaster 2E (Serial Terminals) Cables and Loopbacks DeviceMaster 2E (Serial Terminals) Cables and Loopbacks Use the appropriate discussion to build the following cables: • Serial Terminal (8) Null-Modem Cables (RS-232) on Page 65 • Serial Terminal (8) Null-Modem Cables (RS-422) on Page 65 •... -
Page 66: Serial Terminal (8) Straight-Through Cables (Rs-232/485)
NS-Link User Guide for Windows about using Test Terminal or Using minicom to Test Comtrol Ports to test the serial ports. Optionally, this information is on the Software and Documentation CD shipped with the product. Wire the terminals together to create a loopback. -
Page 67: Managing The Devicemaster
Managing the DeviceMaster This section discusses the following DeviceMaster maintenance procedures: • Rebooting the DeviceMaster • Uploading SocketServer to Multiple DeviceMasters on Page 68 • Configuring Multiple DeviceMasters Network Addresses on Page 68 • Using Configuration Files on Page 69 •... -
Page 68: Uploading Socketserver To Multiple Devicemasters
Uploading SocketServer to Multiple DeviceMasters Uploading SocketServer to Multiple DeviceMasters If the Windows NS-Link driver has been installed, make sure that the driver is disabled through the Device Manager before uploading SocketServer. 1. If you have not done so, install PortVision Plus (Installing PortVision Plus on Page and Scan the network. -
Page 69: Using Configuration Files
Using Configuration Files Using Configuration Files If you are deploying multiple DeviceMaster units that share common values, you can save the configuration file (.dmc) from the Main or Configure Device screens in PortVision Plus and load that configuration onto other DeviceMaster units. If you save a configuration file from the Main or Configure Device screen, you can choose what properties you want saved. -
Page 70: Managing Bootloader
Bootloader refers to the operating system that runs on the DeviceMaster hardware during the power on phase, which then loads SocketServer. Note: Typically, you should not update the Bootloader unless advised to do so by Comtrol Technical Support. There are several methods and tools that you can use to check the Bootloader version or update the Bootloader. - Page 71 Uploading Bootloader 3. Right-click the DeviceMaster for which you want to update, click Upload Firmware, browse to the Bootloader .bin file, and then click Open. 4. Click Yes to the Upload Firmware message that warns you that this is a sensitive process.
-
Page 72: Adding A Devicemaster To An Existing Installation
Adding a DeviceMaster to an Existing Installation Adding a DeviceMaster to an Existing Installation Use this procedure to add another DeviceMaster to an existing configuration. 1. Install the DeviceMaster to an Ethernet hub or server NIC. If necessary, see Hardware Installation on Page Note: Technical support recommends installing and testing one DeviceMaster at a time when installing multiple DeviceMasters. -
Page 73: Restoring Factory Defaults (2-Port, Only)
Restoring Factory Defaults (2-Port, Only) Restoring Factory Defaults (2-Port, Only) Use the following procedures to restore the DeviceMaster to the factory defaults. If Technical Support advises you to restore the DeviceMaster factory defaults, depress the Reset/Restore switch for greater than 5 seconds. Restoring the DeviceMaster resets the following to their factory defaults: •... - Page 74 Socket Port 74 - Managing the DeviceMaster DeviceMaster Installation and Configuration Guide: 2000506 Rev. B...
-
Page 75: Redboot Procedures
(for example, Test Terminal (WCom2), HyperTerminal or Minicom) and the DeviceMaster. Test Terminal (WCom2) is available in PortVision Plus or you can also install the Comtrol Utility package. 1. Connect a null-modem cable from an available COM port on your PC to Port 1 on the DeviceMaster. -
Page 76: Establishing A Telnet Connection
Comtrol DeviceMaster Bootloader Version 3.05 RedBoot(tm) environment - built 08:13:02, Apr 4 2008 Platform: Comtrol DeviceMaster (ARM 7TDMI) Portions Copyright (C) 2000. Red Hat, Inc. Portions Copyright (C) 2001-2008 Comtrol Corp. ********************************************* FLASH: 64 blocks of 65536 bytes each FLASH:... -
Page 77: Determining The Network Settings
Determining the Network Settings Determining the Network Settings If you are not sure what the network information is on a DeviceMaster, you can perform the following procedure. 1. Establish communications with the DeviceMaster using the serial (Page 75) method. Default Network Settings 2. -
Page 78: Determining The Bootloader Version
Comtrol DeviceMaster Bootloader Version 3.05 RedBoot(tm) environment - built 08:13:02, Apr 4 2008 Platform: Comtrol DeviceMaster (ARM 7TDMI) Portions Copyright (C) 2000. Red Hat, Inc. Portions Copyright (C) 2001-2008 Comtrol Corp. ********************************************* FLASH: 64 blocks of 65536 bytes each FLASH:... -
Page 79: Uploading Firmware
Uploading Firmware Uploading Firmware Use the appropriate procedure for your environment: • Serial Method on Page 79 • Telnet Method on Page 80 Note: Optionally, you can install PortVision Plus on a Windows system on the network and upload firmware. PortVision Plus is the recommended method for uploading firmware. -
Page 80: Telnet Method
Telnet Method Click Send. 10. When the RedBoot> prompt appears (after approximately one minute for the Bootloader and approximately three minutes for SocketServer), type go. CCCCCCRaw load done: 542721 bytes read Address range: 00000000-00084800, Entry point: 00000000, xyzModem - CRC mode, 4241(SOH)/0(STX)/0(CAN) packets, 8 tries RedBoot>... - Page 81 Comtrol DeviceMaster Bootloader Version 3.05 RedBoot(tm) environment - built 08:13:02, Apr 4 2008 Platform: Comtrol DeviceMaster (ARM 7TDMI) Portions Copyright (C) 2000. Red Hat, Inc. Portions Copyright (C) 2001-2008 Comtrol Corp. ********************************************* FLASH: 64 blocks of 65536 bytes each FLASH:...
-
Page 82: Configuring Passwords
** Comtrol DeviceMaster Bootloader Version 3.05 ** RedBoot(tm) environment - built 08:13:02, Apr 4 2008 ** Platform: Comtrol DeviceMaster (ARM 7TDMI) ** Portions Copyright (C) 2000. Red Hat, Inc. ** Portions Copyright (C) 2001-2008 Comtrol Corp. ********************************************* FLASH: 64 blocks of 65536 bytes each FLASH:... -
Page 83: Redboot Command Overview
The following table is an overview of Redboot commands available. You can access the list of commands online by entering help and pressing the Enter key. For more detailed information, see the eCos Reference Manual that is located on the Comtrol product CD or download it from the web. - Page 84 Redboot Command Overview 84 - RedBoot Procedures DeviceMaster Installation and Configuration Guide: 2000506 Rev. B...
-
Page 85: Hardware Specifications
RoHS compliant products conform to EU Directive 2002/95/EC. These products do not contain any restricted substances (lead, cadmium, hexavalent chromium, mercury, PBB, and PBDE) except as specifically provided in the Directive. Locating DeviceMaster Specifications Specifications can be found on the Comtrol web site at: • DeviceMaster AIR: http://www.comtrol.com/products/family/dmair •... - Page 86 Serial Communications Serial Communications NS-Link control: Data bits 7 or 8 Parity Odd, even, none Stop bits 1 or 2 Flow control Hardware or software Network default values: IP address 192.168.250.250 Subnet mask 255.255.0.0 Gateway 192.168.250.1 TCP/IP and UDP Socket services, BOOTP, TFTP, ICMP, ARP, SNMP (MIB- Network protocols II), Telnet, HTTP, DHCP/RARP/Ping,...
-
Page 87: External Power Supply Specifications
This subsection only provides information for the Power Connector Supply DeviceMaster 1-port 5VDC model. +VDC Comtrol Power Supply: 1-Port 5VDC Input line frequency 47 - 63 Hz Coaxial 5.5±0.1 x 2.1 mm Input line voltage 90 - 132VAC (standard RTS) -
Page 88: 2-Port (Serial Terminals) Power Supply
† Any power supply that meets current consumption, voltage, power, and connector pinouts requirements can be used. 8-Port Power Supply The following table provides the specifications for the Comtrol-supplied power supply for the DeviceMaster +VDC 8-port. V Return - GND... -
Page 89: 16-Port Power Supplies
Ethernet port have internal power supplies. The following tables provide the specifications, if you intend on purchasing your own power supply for your DeviceMaster. External Power Supply: 16-Port DeviceMaster PRO Input line frequency 47 - 63 Hz Input line voltage 90 - 260 Output voltage†... -
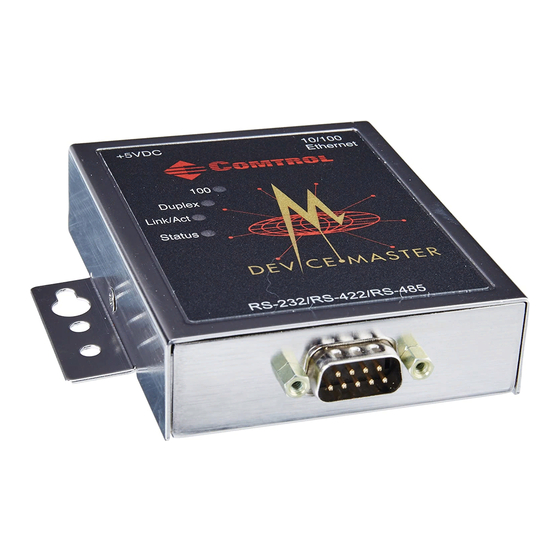
Page 90: Devicemaster Product Pictures
DeviceMaster Serial Hub 16-Port (DB9) on Page 94 • 16-Port (RJ45) Internal Power Supply on Page 94 • DeviceMaster PRO 16-Port (RJ45) on Page 94 • DeviceMaster RTS 32-Port (RJ45) on Page 94 See the appropriate discussion in the Hardware Installation section (Page 13) for information about the LEDs. -
Page 91: 1-Port (Db9) 5-30Vdc
1-Port (DB9) 5-30VDC 1-Port (DB9) 5-30VDC This illustrates the DeviceMaster 1-Port 5-30VDC. Note: The supported input voltage (5VDC or 5-30VDC) is printed on the top and bottom of the DeviceMaster. DeviceMaster Installation and Configuration Guide: 2000506 Rev. B Hardware Specifications - 91... -
Page 92: 1-Port Embedded
1-Port Embedded 1-Port Embedded This illustrates the DeviceMaster 1-port Embedded system that uses a 5-30VDC power supply. See 1-Port 5-30VDC Power Supply on Page 87 so that you can provide a power supply for the DeviceMaster. 2-Port (Single Ethernet The DeviceMaster 2-port 1E with serial terminals uses a 5-30VDC power supply. See Port) with Serial Port (Serial Terminals) Power Supply on Page 88 for information about the power supply. -
Page 93: 2-Port (Single Ethernet Port) Db9
2-Port (Single Ethernet Port) DB9 2-Port (Single Ethernet The DeviceMaster 2-port 1E DB9 uses a 5-30VDC power supply. See 2-Port (Serial Port) DB9 Terminals) Power Supply on Page 88 for information about the power supply. 2-Port (Dual Ethernet The DeviceMaster 2-port 2E DB9 uses a 5-30VDC power supply. See 2-Port (Serial Ports) DB9 Terminals) Power Supply on Page 88... -
Page 94: 16-Port (Rj45) External Power Supply
16-Port (RJ45) Internal The power switch for this model is on the other side of the unit. Power Supply DeviceMaster PRO 16- The power connector for this model is on the other side of the unit. Port (RJ45) NEW GRAPHIC NEEDED DeviceMaster Serial The power switch for this model is on the other side of the unit. -
Page 95: Devicemaster Rts 32-Port (Rj45)
This device must accept any interference received, including interference that may cause undesired operation. Modifications (FCC Changes or modifications to this equipment not expressly approved by Comtrol 15.21) Corporation may void the user's authority to operate this equipment. Serial Cables (FCC This equipment is certified for Class A operation when used with unshielded cables on 15.27) -
Page 96: Important Safety Information
Important Safety Information 96 - Hardware Specifications DeviceMaster Installation and Configuration Guide: 2000506 Rev. B... -
Page 97: Troubleshooting And Technical Support
• Verify that you are using the correct types of cables on the correct connectors and that all cables are connected securely. Note: Most customer problems reported to Comtrol Technical Support are eventually traced to cabling or network problems. •... - Page 98 For example, to reference COM20, use \\.\COM20 as the file or port name. • If using a driver for Windows, you can use one of the Comtrol tools, which are discussed in the NS-Link User Guide. Device Advisor, which helps identify problems is a tab in the Advisor window of the Windows driver.
-
Page 99: General Troubleshooting
Contact Technical Support. The NS-Link driver uses Port 4606 (11FE h) to communicate with the DeviceMaster. Can ping the Comtrol When using a “sniffer” to track NS-Link packets, filtering for device, but cannot open Port 4606 will easily track the packet. The packet should also... - Page 100 General Troubleshooting General Condition Explanation/Action DeviceMaster The problem is caused by a L2 bridging feature called continuously reboots Spanning Tree Algorithm (STA) in the Switch. This feature is when connected to some enabled by default in some switches. This features causes Ethernet switches time-out problems on certain L2 protocols, such as our MAC mode.
-
Page 101: Daisy-Chaining Devicemaster 2E/4/8/16-Port Units
Comtrol has tested with seven DeviceMaster 2E/4/8/16 units daisy-chained together using 10 foot CAT5 cables, but this is not the theoretical limit. You may experience a performance hit on the devices at the end of the chain, so it is recommended that you overload and test for performance in your environment. -
Page 102: Technical Support
Technical Support since they will request that you perform, some or all of the procedures before they will be able to help you diagnose your problem. If you need technical support, use one of the following methods. Comtrol Contact Information Downloads http://www.comtrol.com/downloads Web site http://www.comtrol.com... -
Page 103: Index
Index commands #!DM 75 Comtrol Utilities DeviceMaster to existing installation 72 downloading latest 11 address configuration IP configuring 34 network MAC format 43 Redboot agency overview 7 notices 95 serial method 75 associating telnet 76 MAC address in NS-Link 43... - Page 104 Index devices hardware MAC address 43 how to connect 53 help command how to daisy-chain Redboot 83 16-port models (external power supply) 2-port 2E model installation 16-port 28 serial terminal 4-port models external power supply 8-port models internal power supply disable 1-port loading...
- Page 105 Index loopback plugs PortVision Plus DB9 59 changing network settings 34 RJ45 62 downloading latest 10 serial terminal (4) 64 installation 33 serial terminal (8) 66 power supply 1-port (5VDC) 87 8-port 88 specification MAC address 16-port associating in NS-Link 43 1-port (5-30VDC) format 43 2-port...
- Page 106 Index serial terminals (4) subnet mask loopback plugs 64 default 13, 34, 77, null-modem cables 63 signals 56 straight-through cables 64 Technical Support serial terminals (8) telnet command 83 loopback plugs 66 telnet method null-modem cables 65 configuration 76 signals 57 updating firmware 80 straight-through cables 66 terminal...
Need help?
Do you have a question about the DeviceMaster PRO and is the answer not in the manual?
Questions and answers