
Related Manuals for Xterra ERG400


Summary of Contents for Xterra ERG400
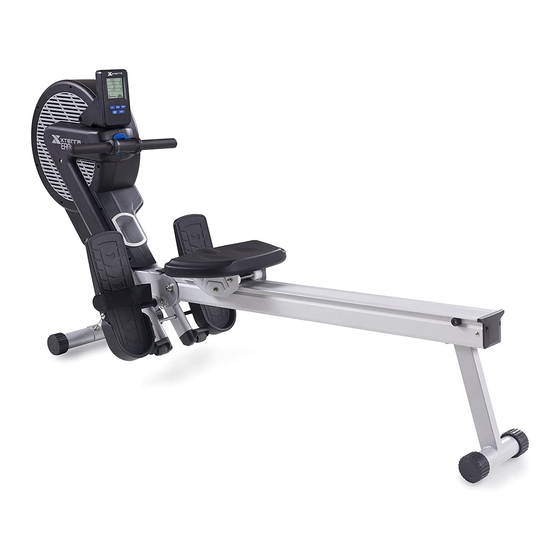
- Page 1 ERG400 ROWER OWNER’S MANUAL PLEASE CAREFULLY READ THIS ENTIRE MANUAL BEFORE OPERATING YOUR NEW ROWER...
-
Page 3: Table Of Contents
Congratulations On Your New Rower and Welcome to the XTERRA Fitness Family! Thank you for your purchase of this quality fitness rower from XTERRA Fitness. Your new fitness rower has been manufactured by one of the leading fitness manufacturers in the world. -
Page 4: Product Registration
Serial Number Register Your Purchase The self-addressed product registration card must be completed in full and returned to XTERRA Fitness. You can also go to www.xterrafitness.com/warrantyreg.html to register online. Power This product uses an external power supply. The power supply must be plugged into the power jack, located on the front of the unit near the stabilizer tube. -
Page 5: Important Safety Instructions
Failure to follow all guidelines may compromise the effectiveness of the exercise experience, expose yourself (and possibly others) to injury, and reduce the longevity of the equipment. SAVE THESE INSTRUCTIONS - THINK SAFETY! CAUTION!! Please be careful when unpacking the carton. ERG400 Rower... -
Page 6: Assembly Tools
ERG400 Assembly Pack Checklist Hardware Step 1 ALL OTHER PARTS PRE-ASSEMBLED ON UNIT #93. 3/8” x 59mm #94. 3/8” x 23 x 1.5T #95. 3/8” x 12.5T Carriage Bolt Curved Washer Cap Nut (2 pcs) (2 pc) (2 pcs) ASSEMBLY TOOLS #96.Wrench... -
Page 7: Erg400 Assembly Instructions
ERG400 Assembly Instructions Stabilizer Tubes & Wheel Covers Hardware Step 1 #93. 3/8” x 59mm Carriage Bolt (2 pcs) #94. 3/8” x 23 x 1.5T Curved Washer (2 pc) #95. 3/8” x 12.5T Cap Nut (2 pcs) 1. Mount the Front Stabilizer (6) onto the Main Frame (1) by using two Carriage Bolts (93) going through Front Stabilizer (6) and Main Frame (1), two Curved Washers (94) and one Cap Nut (95). - Page 8 1. Pull up the Main frame (1) as shown in figure 2 and install the Rear Stabilizer (3) on the end of the Aluminum Track (2). Use Combination M5 Allen Wrench & Phillips Head Screw Driver (97) to tighten with four But- ton Head Socket Bolts (92) and four Flat Washers (69). ERG400 Rower...
- Page 9 1. Pull out Locking Pin (60) of the Aluminum Track (2) and put on level, then return the Locking Pin (60) and lock well. Pull up the unit as shown in the figure in circled box when returning the Locking Pin (60). ERG400 Rower...
- Page 10 Axle Bushings (73) and Pedals (72) on both ends (make sure pedals are correct for each side) and use Combination M5 Allen Wrench & Phillips Head Screw Driver (97) to tighten the shaft with two Flat Washers(69) and two Button Head Socket Bolts(92). ERG400 Rower...
- Page 11 Phillips Head Screws (45). 2. Secure two Rubber Foots(82) at both ends of the aluminum track with two Phillips Head Screws(83). 3. Secure Protective Cap (84) at of the aluminum track with two Phillips Head Screws (45). ERG400 Rower...
-
Page 12: Operation Of Your Console
Operation of Your Console ERG400 Console Total Workout Time Number of Strokes Distance Rowed Calories Burned Watts Produced Strokes Per Minute Resistance Level Program Selected Program Profile Rowing Position Key Functions START 1. Pressing this key under nonoperational mode, starts P0 exercise mode. -
Page 13: Program Operation
5. Once a User program is created, it will be saved until any future adjustments are made to that program. Changing Distance KM to Mile 1. Press the UP and ENTER keys at the same time to change KM to Mile. ERG400 Rower... - Page 14 The eight vertical blocks represent resistance. Each block represents two levels of resistance, with a maximum of sixteen levels of resistance Program Profiles P1 - Polling P2 - Valley P3 - Fat Burn P4 - Ramp P5 - Mountain P6 - Mountain (2) ERG400 Rower...
-
Page 15: Manufacturer's Limited Warranty
Effective August 1, 2012 - ROWER LIMITED WARRANTY XTERRA Fitness Inc. warrants all its home use rower parts for a period of time listed below, from the date of retail sale, as determined by a sales receipt or in the absence of a sales receipt, eighteen (18) months from the original factory shipping date. XTERRA Fitness’s responsibilities include providing new or remanufactured parts, at XTERRA Fitness’s option, and technical support to our independent... - Page 16 3000 Nestle Road Jonesboro, AR 72401 - Phone:870-336-4286 - Fax:870-935-7611 www.xterrafitness.com ©2014 All RIghts Reserved. ERG400 Owner’s Manual...
Need help?
Do you have a question about the ERG400 and is the answer not in the manual?
Questions and answers