Table of Contents
Advertisement
Advertisement
Table of Contents

Related Manuals for Xterra MBX1500


Summary of Contents for Xterra MBX1500
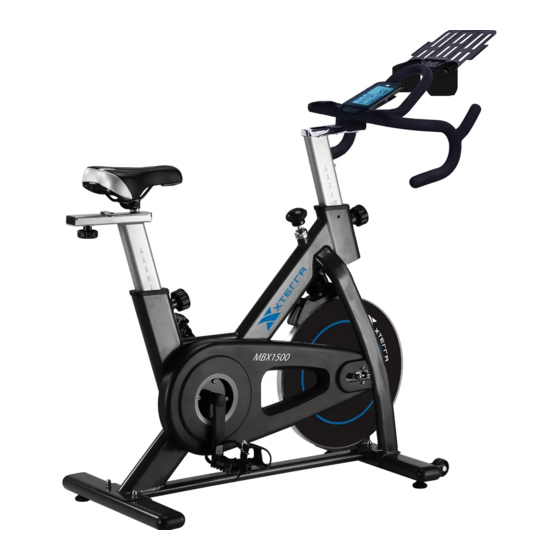
- Page 1 OWNER`S MANUAL Indoor Cycle Trainer Model No. 16204071500 Assembly Operation Exercise Parts Warranty CAUTION: You must read and understand this owner’s manual before operating unit. PLEASE CAREFULLY READ THIS ENTIRE MANUAL BEFORE OPERATING YOUR NEW INDOOR CYCLE!
-
Page 2: Table Of Contents
TABLE OF CONTENTS Important Safety Instructions ..............4 MBX1500 Assembly Instructions ............8 Operation of Your New Indoor Cycle ............ 13 General Maintenance ................. 21 Exploded View Diagram ..............22 Parts List .................... 23 Troubleshooting ................. 25 Training Guidelines ................26 Manufacturer’s Limited Warranty ............ - Page 3 If you have any questions or problems with the parts included with your Xterra MBX1500 Indoor Cycle, please do not return the product. Contact us FIRST! If a part is missing or defective call us toll free at 1-888-707-1880.
-
Page 4: Important Safety Instructions
IMPORTANT SAFETY INSTRUCTIONS WARNING - Read all instructions before using this equipment. Read the OWNER’S OPERATING MANUAL and all accompanying literature and follow it carefully before using your Indoor Cycle Trainer. If dizziness, nausea, chest pains, or any other abnormal symptoms are experienced while using this equipment, STOP the workout at once. - Page 5 WARNING DECAL REPLACEMENT The decal shown below has been placed on the indoor cycle trainer. If the decal is missing or illegible, please call our Customer Service Department toll-free at 1-888-707-1880 to order a replacement decal. customerservice@dyaco.ca Dyaco Canada Inc 2020...
- Page 6 MBX1500 PRE-ASSEMBLY CHECK LIST PART NO. DESCRIPTION Q’TY Left Pedal Right Pedal Rear stabilizer Seat post Sliding tube Seat Front stabilizer Main frame Handlebar post Handlebar Tablet rack Computer Hardware pack User manual customerservice@dyaco.ca Dyaco Canada Inc 2020...
- Page 7 HARDWARE PACKING LIST PS1998 HARDWARE PACK Inner hexagon spanner (6#) Crosshead spanner NO. (PS1998) (mm) Part No Description Carriage bolt Flat washer φ8 Domed nut M8 Quick release knob fixed baffle fixed knob Spanner Inner hexagon spanner Above described parts are all the parts you need to assemble this machine. Before you start to assemble, please check the hardware packing to make sure they are included.
-
Page 8: Mbx1500 Assembly Instructions
MBX1500 ASSEMBLY INSTRUCTIONS This manual is designed to help you easily assemble, adjust and use this machine. Please read this manual carefully. For the sake of familiarizing yourself with the parts identified in the instruction, first study the overview drawing. - Page 9 STEP 2 1.Loosen the nuts from underneath the seat (13). Attach the seat (13) to sliding tube (12) and secure using the nut that you have previously loosened from the seat (13). 2.Insert the sliding tube (12) into the seat post (10). Secure using a club knob (19) and flat washer (20) which are pre-assembled on the seat post (10).
- Page 10 STEP 3 1. Insert the handlebar post (17) to the main frame (16). Secure using a quick release knob (7). 2. Attach the handlebar (18) to the handlebar post (17). Secure using three sets of allen screw(23) and spring washer(24) which are pre-assembled on the handlebar post(17). 3.
- Page 11 STEP 4 1.Attach the left pedal (1L) to the left crank (33). 2.Attach the right pedal (1R) to the right crank (36). Note: The right pedal should be threaded on clockwise and the left pedal on counter- clockwise. ENSURE THAT ALL BOLTS AND NUTS ARE TIGHTENED BEFORE USING THE MACHINE customerservice@dyaco.ca Dyaco Canada Inc 2020...
- Page 12 ADJUSTING THE TENSION 1.Turn the tension knob (30) clockwise to increase the tension. 2.Turn the tension knob (30) counter-clockwise to decrease the tension. IMPORTANT: Press the tension knob (30) to stop the flywheel. customerservice@dyaco.ca Dyaco Canada Inc 2020...
-
Page 13: Operation Of Your New Indoor Cycle
OPERATION OF YOUR INDOOR CYCLE MBX1500 CONSOLE DISPLAY FUNCTION: ITEM DESCRIPTION . In SCAN mode, press MODE key to choose functions. . Automatically scan through each mode in sequence every 6 seconds. SCAN . The sequence of display when press MODE key : TIME→... - Page 14 KEY FUNCTION: ITEM DESCRIPTION . Press SET Key to increase value. Press and hold the key to increase value faster. . TIME setting range: 00:00~99:00 (Each increment is 1:00) . CAL setting range: 0~9990 (Each increment is 10) . DIST setting range: 0.00~99.50 (Each increment is 0.5) .
- Page 15 Recovery 1. The RECOVERY key will only be valid if pulse is detected. 2. TIME will show "0:60" (seconds) and counts down to 0. Computer will show F1 to F6 after the countdown to test heart rate recovery status. User can find the heart rate recovery level based on the chart below.
- Page 16 Wireless sensor match to the console 1. Press the MODE and SET key for 2 seconds to enter the Pairing Mode in the standby mode. 2. Start pedaling the bike, the screen will display the sensor ID number after 3 seconds, then press MODE key to save the ID number in the console.
- Page 17 APP CONNECTIONS: Supports iConsole, Kinomap and Zwift, downloaded on Google Play or APP Store 1. This console can connect to certain APPs on smart devices via Bluetooth. 2. Once the console is connected via Bluetooth, the console will not display feedback, the console will restart after Bluetooth is disconnected from an affiliated APP.
- Page 18 Kinomap APP Connection Steps 2-1. Open Kinomap App and navigate to the home page. Press the More key on the bottom right of the screen to add new equipment. 2.2. Press Equipment Management, then press the "+" symbol in the upper right corner to start adding new equipment.
- Page 19 Zwift APP Connection Steps 3.1. Open Zwift App and select user. 3.2. Zwift will ask you to pair your equipment. Select SPEED SENSOR. 3.3. Zwift will ask you to select a wheel size. Select 700X23c. Then press “OK”. Zwift will use cadence with wheel size to calculate workout metrics.
- Page 20 USER DIRECTION HOW TO USE THE EXERCISE BIKE HOW TO ADJUST THE SEAT The seat can be adjusted forward or backward to the position that is the most comfortable. To adjust the seat, unlock the seat adjustment knob, slide the seat to the desired position, and lock the seat carriage to main frame with seat adjustment knob.
-
Page 21: General Maintenance
GENERAL MAINTENANCE The safety of this product can be maintained only if regular periodic checks are made. Most checks can be performed once a week. However, some checks should be made before each workout, and are indicated as such below. Checks ... -
Page 22: Exploded View Diagram
EXPLODED VIEW DIAGRAM customerservice@dyaco.ca Dyaco Canada Inc 2020... -
Page 23: Parts List
Parts List Part No. Description 0715001L Left pedal 0715001R Right pedal 0715002 End cap for stabilizer 0715003 Carriage bolt M8*52 0715004 Rear stabilizer 0715005 Flat washer φ8 0715006 Domed nut M8 0715007 Quick release knob 0715008 Plastic spacer 0715009 End cap1 0715010 Seat Post 0715011... - Page 24 Part No. Description 0715045 Little chain cover 0715046 Axle for crank 0715047 Long bushing for crank 0715048 Short bushing for crank 0715049 Inner chain cover 0715050 Belt 0715051 Belt pulley 0715052 Washer 0715053 Elastic cylindrical pin 0715054 Limit shaft sleeve 0715055 Spring for brake 0715056...
-
Page 25: Troubleshooting
TROUBLESHOOTING Problem Cause Correction Monitor does not Batteries weak or dead Replace batteries display Wireless sensor battery Replace the sensor battery weak or dead No speed or distance Wireless sensor not paired Need to pair sensor with console displays on the monitor Monitor not working Replace monitor properly... -
Page 26: Training Guidelines
TRAINING GUIDELINES EXERCISE Exercise is one of the most important factors in the overall health of an individual. Listed among its benefits are: Increased capacity for physical work (strength endurance) Increased cardiovascular (heart and arteries/veins) and respiratory efficiency ... - Page 27 Progression As your become fitter, a higher intensity of exercise is required to create an overload and therefore provide continued improvement Overload This is where you exercise at a level above that which can be carried out comfortably. The intensity, duration and frequency of exercise should be above the training threshold and should be gradually increased as the body adapts to the increasing demands.
- Page 28 The following table is a guide to those who are “starting fitness”. Target heart Rate 10 Second Count Beats per Minute 138 132 132 126 120 114 114 108 Pulse Count The pulse count (on your wrist or carotid artery in the neck, taken with two index fingers) is done for ten seconds, taken a few seconds after you stop exercising.
- Page 29 “stale’, bring in periods of lighter exercise to allow the body to recuperate and restore its reserves. You will enjoy your program more and feel better for it. Muscle Soreness For the first week or so, this may be the only indication you have that you are on an exercise program.
- Page 30 STRETCHING Stretching should be included in both your warm up and cool down, and should be performed after 3-5 minutes of low intensity aerobic activity or callisthenic type exercise. Movements should be performed slowly and smoothly, with no bouncing or jerking. Move into the stretch until slight tension, not pain, is felt in the muscle and hold for 20-30 seconds.
- Page 31 TOUCHES INNER THIGH STRETCH Slowly bend forward from your waist, Sit with the soles of your feet together with letting your back and shoulders relax as your knees pointing outward. Pull your feet you stretch toward your toes. Reach as close into your groin as possible. Gently down as far as you can and hold for 15 push your knees towards the floor.
-
Page 32: Manufacturer's Limited Warranty
MANUFACTURER’S LIMITED WARRANTY Dyaco Canada Inc. warrants all its indoor cycle parts for a period of time listed below from the date of retail sale, as determined by sale receipt. Dyaco Canada Inc.’s responsibilities include providing new or remanufactured parts, at Dyaco Canada Inc.’s option.
Need help?
Do you have a question about the MBX1500 and is the answer not in the manual?
Questions and answers