Table of Contents
Advertisement
Quick Links
Model: TPA101-4
Photographs are not to scale.
Specifications subject to
change without prior notice.
WARNING
FOR YOUR SAFETY
If you smell gas:
.
Shut off gas to the appliance.
.
Extinguish any open flame.
.
Open barbecue lid or hood.
.
If odour continues, discontinue use and contact your local
dealer.
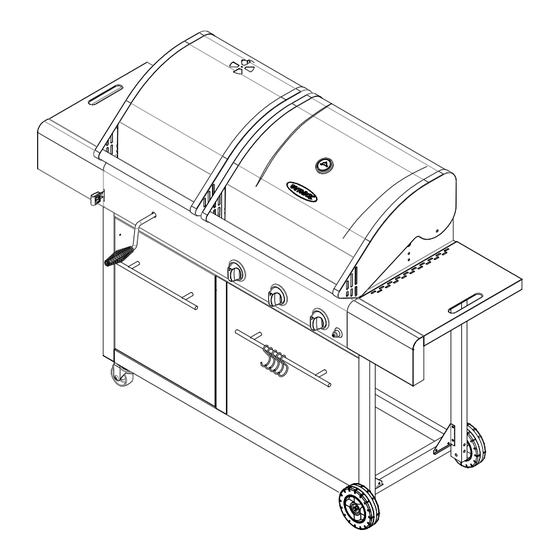
Assembly and Operating Instructions for
Outback® Combi Gas Charcoal Barbecue
For outdoor use only. Not for commercial use.
•
Read instructions before using the appliance. Failure to follow instructions could result in death, serious
•
bodily injury, and/or property loss.
Warning: accessible parts may be very hot. Keep young children and pets away.
•
Do not move the appliance during use.
•
Turn off the gas supply at the gas bottle after use.
•
Any modification of the appliance, misuse, or failure to follow the instructions may be dangerous and will
•
invalidate your warranty. This does not affect your statutory rights.
Retain these instructions for future reference.
•
Leak test annually, and whenever the gas bottle is removed or replaced. Check that the hose connections
•
are tight and leak test each time you reconnect the gas bottle.
For Flare-up control please refer to the 'OPERATION' section of this manual.
•
FOR YOUR SAFETY
.
Do not store or use petrol or other flammable vapours or
liquids in the vicinity of this or any other appliance.
.
A gas bottle not connected for use must not be stored in the
vicinity of this or any other appliance.
EN (Europe)
0359
Advertisement
Table of Contents

Subscribe to Our Youtube Channel
Related Manuals for Outback TPA101-4


Summary of Contents for Outback TPA101-4
- Page 1 Assembly and Operating Instructions for Outback® Combi Gas Charcoal Barbecue EN (Europe) Model: TPA101-4 Photographs are not to scale. Specifications subject to change without prior notice. 0359 For outdoor use only. Not for commercial use. • Read instructions before using the appliance. Failure to follow instructions could result in death, serious •...
-
Page 2: Package Contents List
Package Contents List A. Hood and Body Assembly – B. Left Front Leg – 1pc. C. Left Rear Leg – 1pc. 1pc. D. Side Support – 2pcs. E. Right Front Leg – 1pc. F. Right Rear Leg – 1pc. G. Lockable Caster – 1pc. H. - Page 3 Package Contents List S. Charcoal Bin Back Panel – T. Charcoal Bin Front Panel – U. Charcoal Bin Handle – 1pc. 1pc.a 1pc. V. Front Trim Panel – 1pc. W. Front Support – 1pc. X. Charcoal Bin Slider – 2pcs. Y.
-
Page 4: Hardware Pack Contents
Hardware Pack Contents Code Description 5/32-in. x 10 Round Head Screw 5/32-in. Lock Washer 1/4-in. x 15 Round Head Screw 1/4-in. Lock Washer Allen Key 1/4-in. Nut 1/4-in. Flat Washer 1/4-in. x 61 Round Head Screw 5/32-in. x 6 Flat Head Screw 5/32-in. - Page 5 Assembly 1. Trolley Frame Assembly. Fig. 1 Use 4 x Round Head Screws (CC) and 4 x Lock Washers (DD) to attach left Side Support (D) to Left Front Leg (B) and Left Rear Leg (C). Ensure that the flat side faces inwards and the wide lip faces downwards.
- Page 6 Assembly 3. Bottom Panel Assembly Fig. 5 a) Attach the left legs to the Bottom Panel (I) by threading 4 x Round Head Screws (HH) through 4 x Lock Washers (DD), 4 x Flat Washers (GG) to screwing into bottom panel tightly. See Fig. 5. b) Repeat the above procedure to attach the right legs onto the bottom panel.
- Page 7 Assembly 6. Charcoal Bin Assembly Fig.10 Back view a). Attach Charcoal Bin Left (Q) and Right (R) Side Panels to Charcoal Bin Back Panel (S) by securely hooking back panel tabs into side panel slots. See Fig. 9. b). Place Charcoal Bin Back Panel (S) on a flat level surface.
- Page 8 Assembly Fig. 13 7. Front Trim Panel Assembly a). Position the Front Trim Panel (V) against the right side of the charcoal bin front panel. Insert the front trim panel hinge pin into the hole on the bottom of the charcoal bin front panel. The tab at the top of the front trim panel goes against the back surface of charcoal bin front panel.
- Page 9 Assembly 10. Rear Support Assembly Fig. 16 Use 4 x Round Head Screws (AA) and 4 x Lock Washers (BB) to attach Rear Support (Z) to left / right rear legs. See Fig. 16. NOTE: Ensure the flat side of the rear support faces outwards.
- Page 10 Assembly 12. Barbecue Body Assembly Fig. 18 NOTE: It requires 2 people to lift the barbecue body. a). Carefully place the Hood and Body Assembly (A) onto the trolley assembly. See Fig. 18. WARNING: DO NOT RELEASE THE BARBECUE BODY WHILE THE BARBECUE HAS NOT BEEN PROPERLY SEATED.
- Page 11 Assembly 14. Electronic Ignition Battery Fig. 21 Installation Unscrew the electronic ignition button. Insert the battery (not supplied) into the battery compartment with the positive terminal (+) facing outward. Screw the electronic ignition button back into place. See Fig. 21. Note: The control knobs can be tightened using the Allen Key (EE) if they loosen during use.
-
Page 12: Leak Testing
Turn off the gas supply at the gas bottle Retighten all joints Repeat test If bubbles form again do not use the barbecue and contact your local Outback distributor for assistance. Always wipe the mixed solution (½ water and ½ liquid detergent / soap) from all joints and... - Page 13 Important Information Please read these instructions carefully before assembly and use of your barbecue. Retain these instructions for future reference. • This product is for outdoors use only. Do not use indoors. • Remove plastic wrap from any part before lighting. •...
-
Page 14: Gas, Regulator And Hose
Gas, Regulator and Hose This barbecue can use either propane or butane or propane / butane mixed LPG (liquid petroleum gas) bottled gas. Propane bottles, will supply gas all year round, even on cold winter days. Butane bottles will supply sufficient gas in summer, but it may affect the performance of the barbecue and restrict the heat output available from the burners, particularly once the gas temperature starts to fall below +10 °... -
Page 15: Installation
Installation Selecting a Location This barbecue is for outdoor use only and should be placed in a well-ventilated area, and on a safe and even surface. Never place your barbecue below ground level. Take care to ensure that it is not placed UNDER any combustible surface. The sides of the barbecue should NEVER be closer than 1 metre from any combustible surface, including trees and fences and make sure that there are no heat sources near the barbecue (cigarettes, open flame, spark etc.). -
Page 16: Operation
Operation Warnings •Before proceeding, make certain that you understand the IMPORTANT INFORMATION section of this manual. •Your barbecue is not designed to be used with more than 50% of the cooking area as a solid plate — this includes baking dishes. Full coverage will cause excessive build-up of heat and damage the barbecue. - Page 17 Operation Lighting the Charcoal Grill (For Charcoal Grill Users Only) Open the barbecue lid before lighting. Never light your barbecue with the lid closed. · Raise the hinged section of charcoal grill to add charcoal to the charcoal tray. Turn ·...
- Page 18 Operation Crank Handle (For Charcoal Grill Users Only) By turning the crank handle, the charcoal tray can be raised or lowered to adjust the cooking heat at any time while cooking. Raising tray increases the heat, and lowering tray reduces heat. Raise the tray after unit has cooled down completely to make it easier to brush the ashes into the ash tray.
-
Page 19: Care And Maintenance
In order to extend the life and maintain the condition of your barbecue, we strongly recommend that the unit be covered when left outside for any length of time, especially during the winter months. Heavy-duty Outback® barbecue covers and other accessories are available from your local Outback® stockist Even when your barbecue is covered for its protection, it must be inspected on a regular basis as damp or condensation can form which may result in damage to the barbecue. - Page 20 Care and Maintenance Burner Provided that they are operating correctly, in normal usage, burning off the residue after cooking will keep the burners clean The burners should be removed and cleaned annually, or whenever heavy build-up is found, to ensure that there are no signs of blockage (debris, insects) in either the burner portholes or the primary air inlet of the burners.
-
Page 21: Technical Specifications
Technical Specifications Name Heat Input Burners Injector Gas/Pressure Approval 0.92mm Butane:28-30 mbar Propane: 37 mbar Gas Charcoal CE0359 10.55kW 0.92mm LPG mixture:30 mbar Combi 359CL1114 0.89mm LPG mixture:37 mbar 0.84mm LPG mixture:50 mbar Gas Consumption: Gas Charcoal Combi: 770g/h Countries of Use: 3+ (28-30/37) BE, CH, CY, CZ, ES, FR, GB, GR, IE, IT, LT, LU, LV, PT, SK, SI I3B/P(30) BE, CY, DK, EE, FI, FR, HU, IT, LT, NL, NO, SE, SI, SK, RO, HR, TR, BG, IS,... -
Page 22: Parts Diagram
Parts Diagram 3 0 0 4 0 0 5 0 0 2 0 0 6 0 0 1 0 0 7 0 0 8 0 0 Important: Keep this Instruction Manual for future reference and part replacement. To make sure you obtain the correct replacement parts for your gas grill, please refer to the parts list on next page. -
Page 23: Parts List
Parts List Code Description Code Description Hood (Gas Side) Control Knob Bezel Hood (Charcoal Side) Knob Air Vent Front Support Hood Screws Left Side Shelf Heat Indicator Side Support Logo Right Side Shelf Hood Bumper Left Rear Leg Charcoal Tray Raising Bracket A Left Front Leg Charcoal Tray Raising Bracket B Right Front Leg... - Page 24 Parts List Code Description Code Description Front Panel Grease Cup Towel Hook Middle Upper Support Wheel Middle Lower Support Axle Main Burner Igniter Wire A Rear Support Main Burner Igniter Wire B Left Side Shelf Fascia Main Burner Igniter Wire C Right Side Shelf Fascia Main Burner Hinge...
-
Page 25: Troubleshooting
Troubleshooting Problem Possible Cause Solution Burner will not light LP gas bottle is empty Replace with full bottle using the ignition system Faulty regulator Have regulator checked or replaced Obstructions in burner Clean burner Obstructions in gas jets or gas Clean jets and gas hose hose Electrode or ignition button wire...
Need help?
Do you have a question about the TPA101-4 and is the answer not in the manual?
Questions and answers