Advertisement
Quick Links
3c
Fig. A
AEROSTAR 1992-97, BRONCO II 1989-90, EXPLORER 1991-94, RANGER 1989-94,
CROWN VICTORIA 1991-94, GRAND MARQUIS 1991-94, ECONOLINE 1992-96, ESCORT
1991-96, TRACER (sedan) 1991-96, F-SERIES PICKUP 1992-96, BRONCO 1992-96,
TAURUS 1990-95, SABLE 1990-95, TEMPO 1989-94, TOPAZ 1989-94, THUNDERBIRD
1989-97, COUGAR 1989-97, CONTINENTAL 1988-94, MARK VII 1990-92, TOWN CAR
1990-94, MARK VIII 1993-95, ASPIRE, B-SERIES PICKUP, CONTOUR, MYSTIQUE,
MUSTANG, PROBE, WINDSTAR, MPV, MX3, MX6, PROTEGE, 626, CAPRI XR2,
VILLAGER, QUEST: For DIN units, using the scored lines on the back of the Faceplate as a
guide, cut and remove the shaft supports and mounting clips. Slide the DIN cage into the dash
(through the Faceplate) and secure by bending the metal locking tabs down. Slide the
aftermarket head unit into the cage until secure. (see Fig. A). For 2-Shaft units, make wiring
connections and slide the aftermarket unit into the dash. Slide the Shaft Supports over the
radio shafts and position them along the inner lip of the radio opening. Place the aftermarket
faceplate against the outer lip of the radio opening and secure with shaft nuts. (see Fig. B)
4
A
B
C
D
A) Strip wire ends back ½"
B) Twist ends together
C) Solder
D) Tape
Locate the factory wiring harness in the
dash. Metra recommends using the
proper mating adaptor and making
connections as shown. (Isolate and
individually tape off the ends of any
unused wires to prevent electrical short
circuit).
22
Fig. B
5
(Taurus / Sable
application
shown)
Re-connect the battery terminal and test the unit
for proper operation. Mount the head unit/kit
assembly to the sub-dash with those screws
previously removed.
rev. 130103
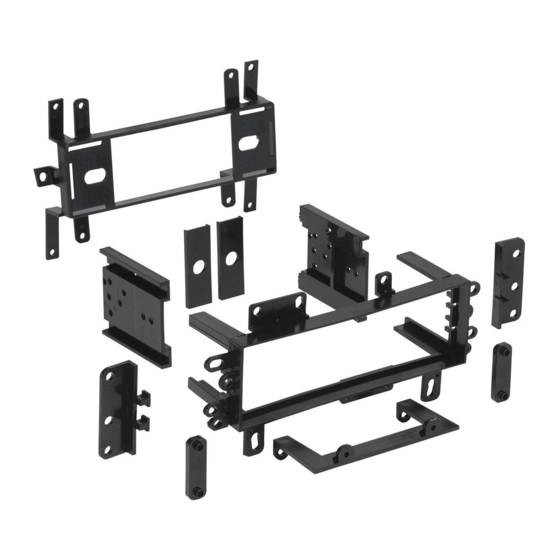
KIT COMPONENTS
Radio Housing #1
99-5700
AT-509FD
AW-509FD
Radio Housing #2
DW-5510
INSTALLATION
Faceplate
INSTRUCTIONS
Bracket Set #1
(Econoline)
Bracket #2
(Escort/Lynx)
APPLICATIONS
Spacer Set #1
FORD/JEEP/LINCOLN/MAZDA/MERCURY 1975-00
Shaft
Supports
(SEE INSIDE FOR SPECIFIC APPLICATIONS)
Snap Spacers
ISO-DIN
Brackets
(4) #8 x ¾" Phillips
Pan-head Screws
(2) #6 Self-tapping Screws
TOOLS REQUIRED
Phillips screwdriver
Cutting tool
1-800-221-0932
86-5618 - Head unit
© COPYRIGHT 2001 METRA ELECTRONICS CORPORATION
removal keys
INST 5700
www.metraonline.com
Advertisement

Related Manuals for Metra Electronics 99-5700


Summary of Contents for Metra Electronics 99-5700
-
Page 1: Installation Instructions
(Isolate and individually tape off the ends of any unused wires to prevent electrical short circuit). 1-800-221-0932 www.metraonline.com 86-5618 - Head unit © COPYRIGHT 2001 METRA ELECTRONICS CORPORATION rev. 130103 removal keys... - Page 2 TABLE OF CONTENTS ALL VEHICLES PAGE PAGE PAGE FORD MERCURY (cont.) JAGUAR Fig. A Aerostar 1992-97......1 Cougar 1989-97..... 12 XJ6 19868-93....... 22 LANCIA Aerostar 1985-91......1 Cougar 1983-88..... 12 Aspire 1994-97......2 Grand Marquis 1991-94..5 Beta 1979-81...... 22 MASERATI Bronco 1992-96......
- Page 3 MERCURY Tracer (hatchback) 1989-90 FORD Aerostar 1992-97 Disconnect the negative battery terminal to Disconnect the negative battery terminal to Cut and remove the shaft supports from the Cut and remove the shaft supports from the Skip to step #3c in the Skip to step #3c in the prevent an accidental short circuit.
- Page 4 FORD Aspire 1994-97 MAZDA Protege 1995-00 Disconnect the negative battery terminal to Cut and remove the shaft supports from the Disconnect the negative battery terminal to Cut and remove the shaft supports from the Skip to step #3c in the Skip to step #3c in the prevent an accidental short circuit.
- Page 5 MAZDA MPV 1996-99 FORD Bronco (full size) / F-Series Pickup 1987-91 "D" Disconnect the negative battery terminal to Cut and remove the shaft supports from the Skip to step #3c in the prevent an accidental short circuit. Unsnap Faceplate. "F" Installation Instructions for ALL VEHICLES the side trim pieces from the factory head on Page #22.
- Page 6 FORD Bronco II / Ranger 1985-88 LINCOLN Mark VIII 1993-95 "D" "F" Disconnect the negative battery terminal to Cut and remove all mounting tabs on Radio Disconnect the negative battery terminal to Cut and remove the shaft supports from the Skip to step #3c in the prevent an accidental short circuit.
- Page 7 LINCOLN Continental 1985-87 FORD Crown Victoria 1991-94 MERCURY Grand Marquis 1991-94 "D" "F" Disconnect the negative battery terminal to Cut and remove all mounting tabs on Radio prevent an accidental short circuit. Remove Housing #2 EXCEPT tabs "D" and "F". Disconnect the negative battery terminal to Cut and remove the shaft supports from the (2) #8 Phillips screws below the radio...
- Page 8 FORD Econoline 1992-96 JEEP Wrangler 1986-96 "B" Disconnect the negative battery terminal to Cut and remove the shaft supports from the Disconnect the negative battery terminal to Cut and remove all mounting tabs on Radio Skip to step #3c in the prevent an accidental short circuit.
- Page 9 JEEP Cherokee 1996 FORD Escort / MERCURY Tracer 1991-96 "E" Disconnect the negative battery terminal to Disconnect the negative battery terminal to Cut and remove all mounting tabs on Radio Cut and remove the shaft supports from the Skip to step #3c in the prevent an accidental short circuit.
- Page 10 FORD F-Series Pickup / Bronco 1992-96 FORD Windstar 1995-98 Disconnect the negative battery terminal to Cut and remove the shaft supports from the Disconnect the negative battery terminal to Cut and remove the shaft supports from the Skip to step #3c in the Skip to step #3c in the prevent an accidental short circuit.
- Page 11 FORD Thunderbird / MERCURY Cougar 1989-97 FORD Mustang 1994-00 Disconnect the negative battery terminal to Disconnect the negative battery terminal to Cut and remove the shaft supports from the Cut and remove the shaft supports from the Skip to step #3c in the Skip to step #3c in the prevent an accidental short circuit.
- Page 12 FORD Taurus / MERCURY Sable 1990-95 FORD Tempo / MERCURY Topaz 1989-94 Disconnect the negative battery terminal to Cut and remove the shaft supports from the Disconnect the negative battery terminal to Cut and remove the shaft supports from the Skip to step #3c in the Skip to step #3c in the prevent an accidental short circuit.
Need help?
Do you have a question about the 99-5700 and is the answer not in the manual?
Questions and answers