Table of Contents
Advertisement
Available languages
Available languages
Quick Links
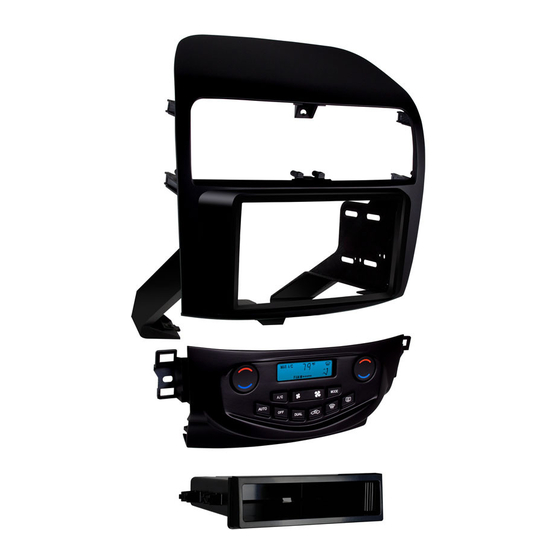
KIT COMPONENTS
• A) Radio trim panel • B) Radio brackets • C) Climate control • D) Pocket • E) (8) #8 x 3/8" Phillips screws • F) (2) #10 x 3/4" Phillips screws
• G) (2) #8 Speed clips • H) (8) PC-7871B Panel clips• Wire harness (not shown)
A
B
The World's best kits.
®
Acura TSX 2004-2008
KIT FEATURES
• ISO DIN radio provision with pocket
• ISO DDIN radio provision
• Painted matte black
C
D
F
G
MetraOnline.com
E
H
© COPYRIGHT 2018 METRA ELECTRONICS CORPORATION
99-7809B
I N S TA L L AT I O N I N S T R U C T I O N S
TABLE OF CONTENTS
Dash Disassembly . ............................................. 2-4
- ISO DIN radio provision with pocket . ................5
- ISO DDIN radio provision . ...................................6
Wiring Instructions . ...............................................7
Kit Programming ...................................................8
WIRING & ANTENNA CONNECTIONS
Wiring Harness: Included
Antenna Adapter: Not required
Steering wheel control interface: ASWC-1
(sold separately)
TOOLS REQUIRED
• Panel removal tool • Phillips screwdriver
• 5/16" socket wrench • Rotary cutting tool
CAUTION!
All accessories, switches, climate
controls panels, and especially air bag indicator
lights must be connected before cycling the
ignition. Also, do not remove the factory radio
with the key in the on position, or while the
vehicle is running.
REV. 4/30/18 INST99-7809B
Advertisement
Chapters
Table of Contents

Related Manuals for Metra Electronics 99-7809B


Summary of Contents for Metra Electronics 99-7809B
-
Page 1: Table Of Contents
Also, do not remove the factory radio with the key in the on position, or while the vehicle is running. The World’s best kits. MetraOnline.com ® © COPYRIGHT 2018 METRA ELECTRONICS CORPORATION REV. 4/30/18 INST99-7809B... -
Page 2: Dash Disassembly
DASH DISASSEMBLY Attention! Turn the fan speed all the way up, 3. Unclip and remove the hazard button and then turn the recirculation button off, above the factory radio, and remove (1) prior to turning the vehicle off and removing Phillips screw exposed between the a/c the radio/climate control assembly. vents. (Figure C) 1. Unclip and remove the (2) trim 4. Unclip and remove the pocket below the panels on either side of the radio. The radio. (Figure D) driver side trim will have the cabin temperature sensor attached to it Continued on the next page (Figures A, B) Note: Complete removal should not be necessary. If you do remove this (Figure A) (Figure C) trim it must be reconnected prior to programming the new climate controls. - Page 3 DASH DISASSEMBLY (CONT) 5. Remove (2) 5/16” bolts under the radio facing up that secure the radio brackets. (Figure E) 6. Unclip, unplug and then remove the factory radio/climate control assembly. (Figure F) 7. Remove the a/c vents from the factory panel and set aside for kit assembly. (Figure G) Continued on the next page (Figure E) (Figure F) (Figure G) REV. 4/30/2018 INST99-7809B...
- Page 4 DASH DISASSEMBLY (CONT) 8. Using a rotary cutting tool, cut and remove the plastic shaded areas from the radio cavity. (Figures H, I) Continue to Kit Assembly Remove this shaded Remove this shaded area first area second (Figure H) (Figure I) 1.800.221.0932 MetraOnline.com...
-
Page 5: Kit Assembly
KIT ASSEMBLY ISO DIN radio provision with pocket 1. Attach the (8) PC-7871B panel clips to the 8. Locate the factory wiring harness and 99-7809 radio trim panel. antenna plug in the dash and make all necessary connections to the radio. Metra 2. Attach (1) #8 speed clip provided to each recommends using the proper mating radio bracket as shown. (Figure A) adapters from Metra and/or AXXESS. Note: T his will be the lower mounting point 9. Plug in and clip the Metra climate control where the factory 5/16” screws were removed. assembly into the dash. (Figure D) 3. Attach the radio brackets to the radio trim 10. Proceed to the Wiring Instruction... -
Page 6: Iso Ddin Radio Provision
KIT ASSEMBLY ISO DDIN radio provision 1. Attach the (8) PC-7871B panel clips to the 6. Locate the factory wiring harness and 99-7809 radio trim panel. antenna plug in the dash and make all necessary connections to the radio. Metra 2. Attach (1) #8 speed clip provided to each recommends using the proper mating radio bracket as shown. (Figure A) adapters from Metra and/or AXXESS. Note: This will be the lower mounting 7. Plug in and clip the Metra climate control point where the factory 5/16” screws assembly into the dash. (Figure D) were removed. 8. Proceed to the Kit Programming section 3. Attach the radio brackets to the radio of this manual before mounting the... -
Page 7: Wiring Instructions
WIRING INSTRUCTIONS Please disregard the white/red, white/ From the 20-pin harness: • Connect the White/Black wire to the left Additional 12-pin harness black, and black wires with bullet front negative speaker output. (ASWC harness) • Connect the Red wire to the ignition wire connectors coming from the 6-way plug. of the aftermarket radio. • Connect the Gray wire to the right front This 12-pin harness is to be used in These are not used in any of the current 99- positive speaker output. -
Page 8: Kit Programming
**** Note: Factory clock and cabin temperature display at the top of the dash will be lost. The new radio will have a clock on the radio display, and the new Metra climate control display will show the temperature information. Metra recommends MECP certified technicians Note: Press and hold the “Dual” button for 5 seconds to switch the temp display between Fahrenheit and Celsius. The World’s best kits. MetraOnline.com ® © COPYRIGHT 2018 METRA ELECTRONICS CORPORATION REV. 4/30/18 INST99-7809B... - Page 9 Además, no quite el radio de fábrica con la llave en la posición o de encendido ni con el vehículo funcionando. The World’s best kits. MetraOnline.com ® © COPYRIGHT 2018 METRA ELECTRONICS CORPORATION REV. 4/30/18 INST99-7809B...
-
Page 10: Desmontaje Del Tablero
DESMONTAJE DEL TABLERO Atención! Gire la velocidad del ventilador hasta 3. Desenganche y quite el botón de las luces intermitentes que está arriba el final y, a continuación, apague el botón de recirculación antes de apagar el vehículo y del radio de fábrica, y quite (1) tornillo retirar el radio/esamble de control de clima . Phillips expuesto entre las rejillas del aire acondicionado. (Figura C) 1. Desenganche y quite los (2) paneles laterales de la moldura a cada lado del 4. Desenganche y quite la cavidad de abajo radio. El panel del lado del conductor del radio. (Figura D) tendrá el sensor de la temperatura de la cabina unido. (Figura A, B) Continúa en la siguiente página Nota: No será necesaria la remoción completa. Si retira este panel, debe (Figura A) (Figura C) reconectarlo antes de programar los... - Page 11 DESMONTAJE DEL TABLERO (CONT) 5. Quite los (2) pernos de 5/16” debajo del radio que están orientados hacia arriba que sujetan los soportes del radio. (Figura E) 6. Desenganche, desconecte y quite el ensamble del radio de fábrica/control del clima. (Figura F) 7. Quite las rejillas del aire acondicionado del panel de fábrica y guárdelas para el ensamble del kit. (Figura G) (Figura E) (Figura F) (Figura G) Continúa en la siguiente página REV. 4/30/2018 INST99-7809B...
- Page 12 DESMONTAJE DEL TABLERO (CONT) 8. Usando un cortador giratorio, corte y quite las áreas sombreadas de la cavidad del radio. (Figuras H, I) Continúe con el Ensamble del Kit Quite primero el área Quite esta área sombreada sombreada después (Figura H) (Figura I) 1.800.221.0932 MetraOnline.com...
-
Page 13: Ensamble Del Kit
ENSAMBLE DEL KIT Provisión de radio ISO DIN con cavidad 1. Coloque los (8) ganchos del panel 8. Localice el arnés de cableado de fábrica PC-7871B en el panel de la moldura del y el conector de la antena en el tablero radio 99-7809. y haga todas las conexiones necesarias al radio. Metra recomienda que use 2. Coloque (1) gancho de velocidad #8 adaptadores adecuados de acoplamiento suministrado en cada soporte del radio de Metra y/o de AXXESS. como se muestra. (Figura A) 9. Conecte y enganche el ensamble del Nota: E ste será el punto inferior de control de clima Metra en el tablero. -
Page 14: Provisión De Radio Iso Ddin
ENSAMBLE DEL KIT Provisión de radio ISO DDIN 1. Coloque los (8) ganchos del panel 6. Localice el arnés de cableado de PC-7871B en el panel de la moldura del fábrica y el conector de la antena en radio 99-7809. el tablero y haga todas las conexiones necesarias al radio. Metra recomienda 2. Coloque (1) gancho de velocidad #8 que use adaptadores adecuados de suministrado en cada soporte del radio acoplamiento de Metra y/o de AXXESS. como se muestra. (Figura A) 7. Conecte y enganche el ensamble del Nota: Este será el punto inferior de control de clima Metra en el tablero. montaje donde se quitaron los tornillos (Figura D) de 5/16”... -
Page 15: Instrucciones De Conexiones De Cables
INSTRUCCIONES DE CONEXIONES DE CABLES Por favor ignore los cables blanco/rojo, Desde el arnés de 20 pins: • Conecte el cable blanco/negro con la Arnés de 12 pins adicional blanco/negro y negro con conectores tipo salida negativa de la bocina izquierda (Arnés ASWC) • Conecte el cable rojo con el cable bala que vienen del conector de 6 vías. No delantera. -
Page 16: Programación Del Kit
Metra mostrará la información de la temperatura. de Certificación en Electrónica Móvil (Mobile Electronics Nota: Mantenga presionado el botón “Dual” durante 5 segundos para cambiar la visualización de temperatura entre Certification Program, MECP). Fahrenheit y Celsius. The World’s best kits. MetraOnline.com ® © COPYRIGHT 2018 METRA ELECTRONICS CORPORATION REV. 4/30/18 INST99-7809B...
Need help?
Do you have a question about the 99-7809B and is the answer not in the manual?
Questions and answers