Advertisement
Available languages
Available languages
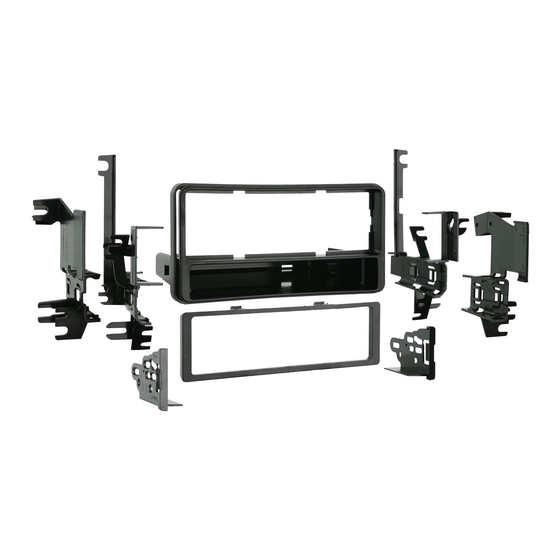
KIT COMPONENTS
• A) Radio housing • B) Bracket set 1 • C) Bracket set 2 • D) ISO brackets • E) Trim plate
A
B
The World's best kits.
®
Scion xA 2004-2006, xB 2004-2015,
tC 2005-2010, xD
KIT FEATURES
• DIN radio provision with pocket
• ISO DIN radio provision with pocket
C
D
MetraOnline.com
2008-2014
E
© COPYRIGHT 2017 METRA ELECTRONICS CORPORATION
99-8209
I N S TA L L AT I O N I N S T R U C T I O N S
TABLE OF CONTENTS
- Scion xA 2004-2006 ...........................................2
- Scion xB 2004-2007............................................3
- Scion xB 2008-2015 ............................................3
- Scion tC 2005-2010 .............................................4
- Scion xD 2008-2014 ............................................5
- DIN radio provision with pocket........................6
- ISO DIN radio provision with pocket .................7
WIRING & ANTENNA CONNECTIONS (sold separately)
Wiring Harness: 70-1761
Antenna Adapter: Not required
TOOLS REQUIRED
• Panel removal tool • Phillips screwdriver
• 10mm socket wrench
CAUTION!
All accessories, switches, climate
controls panels, and especially air bag indicator
lights must be connected before cycling the
ignition. Also, do not remove the factory radio
with the key in the on position, or while the
vehicle is running.
REV. 9/19/17 INST99-8209
Advertisement
Chapters

Related Manuals for Metra Electronics 99-8209


Summary of Contents for Metra Electronics 99-8209
-
Page 1: Table Of Contents
Also, do not remove the factory radio with the key in the on position, or while the vehicle is running. The World’s best kits. MetraOnline.com ® © COPYRIGHT 2017 METRA ELECTRONICS CORPORATION REV. 9/19/17 INST99-8209... -
Page 2: Dash Disassembly
DASH DISASSEMBLY Scion xA 2004-2006 1. Pull outward on the (3) climate control knobs and remove. (Figure A) 2. Remove (2) Phillips screws from behind the outer two climate knobs. (Figure B) 3. Unsnap and remove the trim pieces on each side of the climate control/ashtray/ pocket assembly. -
Page 3: Scion Xb 2004-2007
DASH DISASSEMBLY Scion xB 2008-2015 Scion xB 2004-2007 1. Unclip and remove the trim panel 1. Pull outward on the (3) climate control around the radio including the A/C knobs and remove. (Figure A) vents. (Figure A) 2. Remove (2) Phillips screws from behind the outer (2) knobs. -
Page 4: Scion Tc 2005-2010
DASH DISASSEMBLY Scion tC 2005-2010 1. Unsnap trim from around shifter, not necessary to completely remove. (Figure A) 2. Unsnap and remove panel from around radio, including climate controls and radio door. (Figure B) 3. Remove (2) 10mm nuts from the top mounting locations and (2) Phillips screws from the bottom mounting locations to remove the radio. -
Page 5: Scion Xd 2008-2014
DASH DISASSEMBLY Scion xD 2008-2014 1. Unclip radio trim panel. Unplug and remove panel. (Figure A) 2. Remove (4) Phillips screws securing the radio. Unplug and remove radio. (Figure B) 3. Remove factory brackets from radio. Retain brackets for use during kit assembly. -
Page 6: Kit Assembly
KIT ASSEMBLY DIN radio provision with pocket 1. Slide the brackets onto the sides of the radio housing until the side clips engage. (Figure A) Note: Use bracket set 1 for xA, xB, and tC. Use bracket set 2 for the 2008 xB and xD. 2. For bracket set 1 cut and remove all mounting tabs except the tabs being used for your application. (Figure B) side clips Note: Tabs are marked xA, xB and tC. For bracket set 2 skip to (Figure A) -
Page 7: Iso Din Radio Provision With Pocket
KIT ASSEMBLY ISO DIN radio provision with pocket 1. Slide the brackets onto the sides of the radio housing until the side clips engage. (Figure A) Note: Use bracket set 1 for xA, xB, and tC. Use bracket set 2 for the 2008 xB and xD. 2. For bracket set 1 cut and remove all mounting tabs except the tabs being used for your application. (Figure B) side clips Note: Tabs are marked xA, xB and tC. For bracket set 2 skip to (Figure A) - Page 8 Log onto www.installerinstitute.com or call 800-354-6782 for more information and take steps toward a better tomorrow. Metra recommends MECP certified technicians The World’s best kits. MetraOnline.com ® © COPYRIGHT 2017 METRA ELECTRONICS CORPORATION REV. 9/19/17 INST99-8209...
- Page 9 Además, no quite el radio de fábrica con la llave en la posición o de encendido ni con el vehículo funcionando. The World’s best kits. MetraOnline.com ® © COPYRIGHT 2017 METRA ELECTRONICS CORPORATION REV. 9/19/17 INST99-8209...
-
Page 10: Desmontaje Del Tablero
DESMONTAJE DEL TABLERO Scion xA 2004-2006 1. Jale hacia afuera las (3) perillas de control de clima y quítelas. (Figura A) 2. Quite los (2) tornillos Phillips de la parte de atrás de las dos perillas exteriores del clima. (Figura B) 3. -
Page 11: Scion Xb 2004-2007
DESMONTAJE DEL TABLERO Scion xB 2008-2015 Scion xB 2004-2007 1. Desenganche y quite el panel de moldura 1. Jale hacia afuera las (3) perillas de que rodea el radio, incluyendo las rejillas control de clima y quítelas. (Figura A) del aire acondicionado. (Figura A) Quite los (2) tornillos Phillips de la parte de atrás de las perillas exteriores (2). -
Page 12: Scion Tc 2005-2010
DESMONTAJE DEL TABLERO Scion tC 2005-2010 1. Suelte a presión la moldura que rodea la palanca de velocidades (no es necesario quitarla por completo). (Figura A) 2. Suelte a presión y quite el panel que rodea el radio, incluyendo los controles del clima y la puerta del radio. -
Page 13: Scion Xd 2008-2014
DESMONTAJE DEL TABLERO Scion xD 2008-2014 Desenganche el panel de moldura del radio. Desconecte y retire el panel. (Figura A) 2. Retire los (4) tornillos Phillips que sostienen el radio. Desconecte y retire el radio. (Figura B) 3. Quite los soportes de fábrica del radio. Guarde los soportes para usarlos al ensamblar el kit. -
Page 14: Ensamble Del Kit
ENSAMBLE DEL KIT Provisión de radio DIN con cavidad 1. Deslice los soportes en los lados de la carcasa del radio hasta que los ganchos laterales entren a presión. (Figura A) Nota: Use juego de soportes 1 para xA, xB, y tC. Use juego de soportes 2 para el 2008 xB y xD. ganchos 2. Para juego de soportes 1 corte y quite todos las pestañas de laterales montaje EXCEPTO las pestañas que se utiliza para su aplicación. -
Page 15: Provisión De Radio Iso Din Con Cavidad
ENSAMBLE DEL KIT Provisión de radio ISO DIN con cavidad 1. Deslice los soportes en los lados de la carcasa del radio hasta que los ganchos laterales entren a presión. (Figura A) Nota: Use juego de soportes 1 para xA, xB, y tC. Use juego de soportes 2 para el 2008 xB y xD. 2. Para juego de soportes 1 corte y quite todos las pestañas de ganchos montaje EXCEPTO las pestañas que se utiliza para su aplicación. - Page 16 800-354-6782 para obtener más información y avance hacia un futuro mejor. Metra recomienda técnicos con certificación del Programa de Certificación en Electrónica Móvil (Mobile Electronics Certification Program, MECP). The World’s best kits. MetraOnline.com ® © COPYRIGHT 2017 METRA ELECTRONICS CORPORATION REV. 9/19/17 INST99-8209...
Need help?
Do you have a question about the 99-8209 and is the answer not in the manual?
Questions and answers