Table of Contents
Advertisement
INSTALLATION INSTRUCTIONS FOR PART 99-5815
FORD/LINCOLN/MERCURY
(See specific model/year list inside)
99-5815
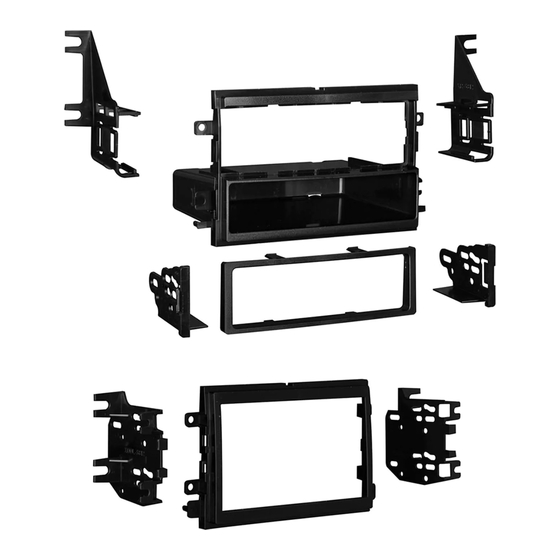
KIT FEATURES
• DIN Radio Provision with Pocket
• ISO Mount Radio Provision with Pocket
• Double DIN Radio Provision
• Stacked ISO Mount Units Provision
KIT COMPONENTS
A) Radio Housing (DIN and ISO DIN) • B) ISO Brackets • C) ISO Trim Plate
brackets
• D) Side
• E) Radio Housing (Double DIN and Stacked ISO DIN) • F) Double DIN
Brackets • G) (8) Spacers • H) (4) Screws
A
F
1-800-221-0932
© COPYRIGHT 2004-2009
APPLICATIONS
C
B
WIRING AND ANTENNA CONNECTIONS
(Sold Separately)
Harness:
• Please see www.metraonline.com for
G
specific interface applications
Antenna Adapter:
• 40-CR10 - Chrysler antenna adapter 2002-up
H
TOOLS REQUIRED:
Cutting Tool • Panel Removal Tool
• Phillips Screwdriver • Socket Set
METRA ELECTRONICS CORPORATION
D
www.metraonline.com
E
Advertisement
Table of Contents

Related Manuals for Metra Electronics 99-5815


Summary of Contents for Metra Electronics 99-5815
- Page 1 INSTALLATION INSTRUCTIONS FOR PART 99-5815 APPLICATIONS FORD/LINCOLN/MERCURY (See specific model/year list inside) 99-5815 KIT FEATURES • DIN Radio Provision with Pocket • ISO Mount Radio Provision with Pocket • Double DIN Radio Provision • Stacked ISO Mount Units Provision KIT COMPONENTS A) Radio Housing (DIN and ISO DIN) •...
-
Page 2: Table Of Contents
99-5815 T ABLE OF CONTENTS Dash Disassembly Ford Edge 2007......................1 Ford F-150 2004-2006 / Expedition 2007 ..............1 Lincoln Mark LT 2005-2007 ...................1 Ford Mustang 2005-2007....................2 Ford Five Hundred 2005-2007..................3 Mercury Sable 2008 ......................3 Ford Taurus 2008 ......................3 Mercury Montego 2005-2007..................3 Ford Fusion 2006-2007....................4... -
Page 3: Ford Edge 2007
99-5815 DASH DISASSEMBL Y FORD F-150 2004-2007 LINC0LN MARK L T 2005-2006 FORD EXPEDITION 2007 FORD EDGE 2007-09 isconnect the negative battery ter- minal to prevent an accidental short circuit. Unsnap and remove entire panel sur- rounding the radio and climate con- trols. -
Page 4: Ford Mustang 2005-2007
99-5815 DASH DISASSEMBL Y FORD MUSTANG 2005-2009 Note: Refer also to the instructions included with the aftermarket radio. Disconnect the negative battery termi- nal to prevent an accidental short cir- cuit. Remove the small rectangular shifter lever trim panel if equipped... -
Page 5: Ford Five Hundred 2005-2007
99-5815 DASH DISASSEMBL Y FORD FIVE-HUNDRED 2005-2007/FORD TAURUS 2008-09 MERCURY MONTEGO 2005-2007, MERCURY SABLE 2008-09 Note: Refer also to the instructions included with the aftermarket radio. Disconnect the negative battery termi- nal to prevent an accidental short cir- cuit. Unclip and remove the small rectan- gular trim around shift lever. -
Page 6: Ford Fusion 2006-2007
99-5815 DASH DISASSEMBL Y FORD FUSION 2006-2007 MERCURY MILAN 2006-2008 isconnect the negative battery ter- minal to prevent an accidental short circuit. Unsnap and remove entire panel sur- rounding the radio and climate con- trols. (Figure A) Remove (4) 9/32" screws to remove the factory radio. -
Page 7: Ford Freestyle 2005-2007
99-5815 DASH DISASSEMBL Y FORD FREESTYLE 2005-2007 FORD T AURUS X 2008-09 isconnect the negative battery ter- minal to prevent an accidental short circuit. Unclip and remove entire panel sur- rounding the radio and a/c controls. (Figure A) Remove (4) 9/32” screws from radio to remove. -
Page 8: Ford Freestar 2004-2007
99-5815 DASH DISASSEMBL Y FORD FREEST AR 2004-2007 MERCURY MONTEREY 2004-2007 isconnect the negative battery ter- minal to prevent an accidental short circuit. Unsnap and remove entire panel sur- rounding the radio and climate con- trols. (Figure A) Remove (4) 9/32" screws to remove the factory radio. -
Page 9: Ford Focus 2005-2007
99-5815 DASH DISASSEMBL Y FORD FOCUS 2005-2007 isconnect the negative battery ter- minal to prevent an accidental short circuit. Unsnap and remove entire panel sur- rounding the radio and climate con- trols. (Figure A) Remove (4) 9/32" screws to remove the factory radio. -
Page 10: Ford Explorer 2006-07
99-5815 DASH DISASSEMBL Y FORD EXPLORER/EXPLORER SPORT TRAC 2006-2009 MERCURY MOUNT AINEER 2006-2009 isconnect the negative battery ter- minal to prevent an accidental short circuit. Open center console and remove (2) Phillips screws then unclip and remove entire panel surrounding shifter. -
Page 11: Ford F Series Super Duty 2005-2007
99-5815 DASH DISASSEMBL Y FORD F SERIES SUPER DUTY 2005-2007 isconnect the negative battery ter- minal to prevent an accidental short circuit. Unsnap and remove entire panel surrounding the radio and climate controls. (Figure A) Remove (4) 9/32" screws to remove the factory radio. -
Page 12: Ford Super Duty 2008
99-5815 DASH DISASSEMBL Y FORD SUPER DUTY 2008-09 isconnect the negative battery ter- minal to prevent an accidental short circuit. Unclip and remove the power outlet panel and the blank panel on the left and right side of the radio trim panel. -
Page 13: Lincoln Navigator 2007
99-5815 DASH DISASSEMBL Y LINCOLN NAVIGATOR 2007-09 Disconnect the negative battery ter- minal to prevent an accidental short circuit. Unclip and remove the panel sur- rounding the shifter. (Figure A) Remove (2) 9/32” screws from the bottom of the radio/climate control trim panel. -
Page 14: Lincoln Mkx 2007
99-5815 DASH DISASSEMBL Y LINCOLN MKX 2007-09 Disconnect the negative battery ter- minal to prevent an accidental short circuit. Open center console lid and unclip and remove the center console trim panel surrounding the shifter. (Figure A) Remove (2) Phillips screws from the storage bin then unclip and remove the bin. -
Page 15: Lincoln Mkz 2007
99-5815 DASH DISASSEMBL Y LINCOLN MKZ 2007-09/LINCOLN ZEPHYR 2006 Disconnect the negative battery ter- minal to prevent an accidental short circuit. Unclip and remove the top of the center console. (Figure A) Open ashtray door and remove ash- tray then remove (1) Phillips screw from inside ashtray cavity. - Page 16 99-5815 DASH DISASSEMBL Y LINCOLN MKZ 2007-09/LINCOLN ZEPHYR 2006 Remove (2) 9/32” from the bottom of the radio trim panel assembly and (2) 9/32” screws from inside the vents. (Figure D) Unclip the radio trim panel/radio assemmbly. Unplug and remove assembly.
-
Page 17: Din Radio Provision With Pocket
99-5815 KIT ASSEMBL Y DIN RADIO PROVISION WITH POCKET NOTE: Refer also to the instructions included with the aftermarket radio. a) For the Ford Edge/Expedition 2007, Explorer 2006-07, Fusion 2006-07, Mustang 2007 and the Super Duty 2008 attach the includ- ed spacers to the back of the radio housing mounting tabs. -
Page 18: Iso Mount Radio Provision With Pocket
99-5815 KIT ASSEMBL Y ISO MOUNT RADIO PROVISION WITH POCKET NOTE: Refer also to the instructions included with the aftermarket radio. a) For the Ford Edge/Expedition 2007, Explorer 2006-07, Fusion 2006-07, Mustang 2007 and the Super Duty 2008 attach the includ- ed spacers to the back of the radio housing mounting tabs. -
Page 19: Double Din Radio Provision
99-5815 KIT ASSEMBL Y DOUBLE DIN RADIO PROVISION Note: Refer also to the instructions included with the aftermarket radio. 1 For the 2007 Ford Edge/Expedition, 2006-07 Explorer/Fusion/Mercury Milan, 2004-07 F-150, 2005-07 Five Hundred/Freestyle/Mustang/ Mercury Montego, 2005-07 Lincoln Mark LT and the 2008 Super Duty, cut and remove the rear mounting tabs from the Double DIN Brackets a. -
Page 20: Stacked Iso Mount Units Provision
99-5815 KIT ASSEMBL Y STACKED ISO MOUNT UNITS PROVISION Note: Refer also to the instructions included with the aftermarket radio. 1 For the 2007 Ford Edge/Expedition, 2006-07 Explorer/Fusion/ Mercury Milan, 2004-07 F-150, 2005-07 Five Hundred/ Freestyle/Mustang/Mercury Montego, 2005-07 Lincoln Mark LT... -
Page 21: Final Assembly
99-5815 FINAL ASSEMBL Y FINAL ASSEMBL Y (A) Strip wire ends back 1/2" B) Twist ends together C) Solder D) Tape Locate the factory wiring harness in the dash. Metra recommends using the proper mating adapter and making connections as shown. (Isolate and individ- ually tape off the ends of any unused wires to prevent electrical short circuit.) - Page 22 99-5815 NOTES...
- Page 23 99-5815 NOTES...
- Page 24 99-5815 INSTRUCTIONS 1-800-221-0932 www.metraonline.com REV. 07/23/09 © COPYRIGHT 2004-2009 METRA ELECTRONICS CORPORATION INST99-5815...
Need help?
Do you have a question about the 99-5815 and is the answer not in the manual?
Questions and answers