
Subscribe to Our Youtube Channel
Summary of Contents for Terbly Beam 2R
- Page 1 LED MOVING HEAD MOVING HEAD MOVING HEAD MOVING HEAD USER MANUAL Beam 2R KEEP THIS MANUAL FOR FUTURE NEEDS...
- Page 2 Thank you for your patronage. We are confident that our excellent products and service can satisfy you. For your own safety, please read this user manual carefully before installing the device. In order to install , operate, and maintain the lighting safety and correctly. We suggest that the installation and operation should be done by the verified technician and follow the instruction strictly.
-
Page 3: Safety Instructions
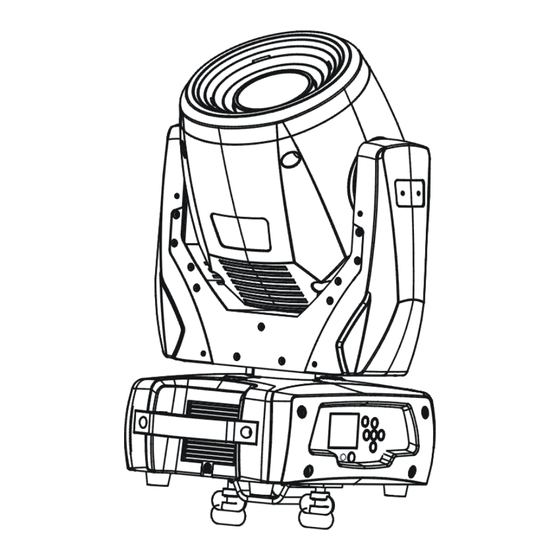
·Preset program: 7 built in programs can be called up via DMX controller · Software-upload by optional accessory via DMX line 2. Overview 1: Lens 2: Display 3: DC Switch 4: Microphone 5: Left-button 6: Down-button 7: Right-button 8: Mode/Esc-button 9: Up-button 10: ENTER-button... -
Page 4: General Guidelines
Important: Damages caused by the disregard of this user manual are not subject to warranty. The dealer will not accept liability for any resulting defects or problems. If the device has been exposed to temperature changes due to environmental changes, do not switch it on immediately. -
Page 5: Installation Instructions
Do not shake the device.Avoid brute force when installing or operating the device. While choosing the installation-spot, please make sure that the device is not exposed to extreme heat, moisture or dust. Please don't project the beam onto combustible substances.The minimum distance between light-output from the projector and the illuminated surface must be more than 5 meter. -
Page 6: Mounting The Device
a hibernation mode that will electronically discontinue all fixture functionality with the exception of a few menu commands. The fixture will continue to enter hibernation mode until the lamp is replaced and the lamp clock has been reset. Before replacing the lamp let the lamp cool down, because during operation, the lamp can reach very high temperature. - Page 7 The installation of the effect has to be built and constructed in a way that it can hold 10 times the weight for 1 hour without any harming deformation. The installation must always be secured with a secondary safety attachment, e.g. an appropriate safety rope.
-
Page 8: Dimensional Drawings
a) Fixed the clamp on the bracket by tighten up the M12 screw on the bracket to the Ф13 hole in the middle of the bracket. b) Insert the quick-lock fasteners of the first Omega holder into the respective holes on the bottom of the device. -
Page 9: Layout Drawings
Layout Drawings: Mounting points Be sure this fixture is kept at least 5m away from any flammable materials (decoration etc.). Always use and install the supplied safety cable as a safety measure to prevent accidental damage and/or injury in the event the clamp fails. Overhead mounting requires extensive experience, including amongst others calculating working load limits, a fine knowledge of the installation material being used, and periodic safety inspection of all installation material and the fixture. -
Page 10: Dmx-512 Connection With Dmx Terminator
Address 1 Address 13 Address 25 6. DMX-512 connection with DMX terminator For installations where the DMX cable has to run a long distance or is in an electrically noisy environment, such as in a discotheque, it is recommended to use a DMX terminator. This helps in preventing corruption of the digital control signal by electrical noise. -
Page 11: Control Board
In the case of the move head, which is a 12 channel fixture, you should set the starting address of the first unit to 1, the second unit to 13 (12 + 1), the third to 25 (13 + 12), and so on. 8. - Page 12 Lamp On/Off ON/OFF Lamp on/off Automatic On ON/OFF Lamp on/off Power on Lamp On via DMX ON/OFF Lamp on via DMX Lamp Off via DMX ON/OFF Lamp off via DMX Max On at Temp. 20~79 ,45 /68~174℉ 113℉ Lamp restart at temp. Lamp Off Temp.
- Page 13 Max Channel = XX Edit User Mode PAN = CH01 Preset User modes Auto Pro Part 1 = Program 1 ~ 10 Program 1 Select programs to be Select Programs Auto Pro Part 2 = Program 1 ~ 10 Program 2 Auto Pro Part 3 = Program 1 ~ 10 Program 3 Program 1 Program Test...
- Page 14 8.1.4 Auto Program With this function, you can run the internal program. You can select the desired program under “Select program”. You can set the number of steps under “Edit program”. You can edit the individual scenes under “Edit scenes”. With this function, you can run the individual scenes either automatically, i.e.
- Page 15 display will show “Time Information”. 2.Press <Up/Down>, the display will show “Total run Time”. 3.Press< ENTER>, the display will show “Total run Time”. 4.The display will show “XXXX” (Hours) ; 5.Press <ENTER> to confirm or press <MODE/ESC> to return to the main menu. Last Run Time With this function, you can display last the running time of the lamp.
- Page 16 3.Press< ENTER>, the display will show “Lamp Off Time”. 4.The display will show “XXXX” (Minute) ; 5.Press <ENTER> to confirm or press <MODE/ESC> to return to the main menu. Last Run Password With this function, you can display the timer password. The time password is 038. 1.Tap <MODE/ESC>button,access the main menu,Tap the <Up/Down>button until “Information”is displayed.
-
Page 17: Lamp Control
Clean Lamp Time With this function you can clear the running time of the lamp. Please clear the lamp time every time you replace the lamp. 1.Tap <MODE/ESC>button,access the main menu,Tap the <Up/Down>button until “Information”is displayed. Press ENTER, the display will show “Information”. Tap the <Up/Down>button until the display will show “Time Information”. - Page 18 higher than the preset value, so even the lamp can not be striked even the menu Lamp is turned to ON, as the lamp switch is compelled to turned off. ·When the temperature unit after the temperature value come to lowercase letter “c” or “f”, it means menu Lamp is turned to ON, but the lamp is not full dimming up.
- Page 19 8.3.4 Lamp off via external controller With this function you can select if you can switch the lamp off via an external controller (DMX-channel of internal programs, value 224-239). Select “ON” by turning the encoder if you wish to enable this function or “OFF” if you don’t. 1.Tap <MODE/ESC>button,...
- Page 20 8.4 PERSONALITY 8.4.1 Status settings Address via DMX With this function, you can adjust the desired DMX-address via an external controller. 1.Tap <MODE/ESC>button,access the main menu,Tap the <Up/Down>button until “Personality”is displayed. Press ENTER, the display will show “Personality”. Tap the <Up/Down>button until the display will show “Status setting”.
- Page 21 With this function you can reverse the Tilt-movement. 1.Tap <MODE/ESC>button,access the main menu,Tap the <Up/Down>button until “Personality”is displayed. Press ENTER, the display will show “Personality”. Tap the <Up/Down>button until the display will show “Status setting”. Press ENTER, the display will show “Status setting”. 2.Press <Up/Down>, the display will show “Tilt Reverse”.
- Page 22 display will show “Status setting”. 2.Press <Up/Down>, the display will show “Movement Speed”. 3.Press< ENTER>, the display will show “Movement Speed”. 4.The display show “Speed 1”,Press <Up/Down>, the display will show “Speed 2”, “Speed 3”, “Speed 4”. 5.Press <ENTER> to confirm or press <MODE/ESC> to return to the main menu. Mic Sensitivity With this function, the default is 70%, you can select the desired microphone sensitivity from 0 % to 99 %.
- Page 23 remote control of devices connected to the DMX-bus. ANSI E1.20-2006 by ESTA specifies the RDM standard as an extension of the DMX512 protocol. Manual settings like adjusting the DMX starting address are no longer needed. This is especially useful when the device is installed in a remote area. RDM ready and conventional DMX devices can be operated in one DMX line.
- Page 24 5.Press <ENTER> to confirm or press <MODE/ESC> to return to the main menu. 8.4.4 Temperature C/F With this function, Display the temperature for Celsius or Fahrenheit. 1.Tap <MODE/ESC>button,access the main menu,Tap the <Up/Down>button until “Personality”is displayed. Press ENTER, the display will show “Personality”. 2.Press <Up/Down>, the display will show “Temperature C/F”.
- Page 25 8.6 Effect Adjust 8.6.1 Test channel With this function you can test each channel on its (correct) function. 1.Tap <MODE/ESC>button, access the main menu, Tap the <Up/Down>button until“Effect Adjust”is displayed. Press ENTER, the display will show “Effect Adjust”. 2.Press <Up/Down>, the display will show “Test Channel”. 3.Press<...
- Page 26 8.7.1 User mode With this function, you can create user defined channel orders. 8.7.2 Edit User mode With this function, you can adjust the rest user defined channel order. 1.Tap <MODE/ESC>button, access the main menu, Tap the <Up/Down>button until“Users mode set”is displayed. Press ENTER, the display will show “Edit User Moed”. 2.The display show “User Mode”frist channel, Press <Up/Down>...
- Page 27 • Turn the encoder to select “Slave 1”, “Slave 2” or “Slave 3”. • Press the Enter button to confirm. • Press the MODE/ESC button in order to return to the main menu. 2. Automatic Program Run • Select “Function Mode” by turning the encoder. •...
-
Page 28: Instructions On Use
• Press the MODE/ESC button in order to return to the main menu. Example: Program 2 includes scenes: 10, 11, 12, 13 Program 4 includes scenes: 8, 9, 10 Program 6 includes scenes: 12, 13, 14, 15 Auto Pro Part 1 is Program 2; Auto Pro Part 2 is Program 3;... - Page 29 Color Wheel Fine : 0-255 Color Wheel colour change to any position Fine Fixed gobos, cont. rotation Open 8-15 Rot. gobo 1 16-23 Rot. gobo 2 24-31 Rot. gobo 3 32-39 Rot. gobo 4 40-47 Rot. gobo 5 48-55 Rot. gobo 6 56-63 Rot.
- Page 30 160-167 Macro 5 168-175 Macro 6 176-183 Macro 7 184-191 Macro 8 192-199 Macro 9 200-207 Macro 10 208-215 Macro 11 216-223 Macro 12 224-231 Macro 13 232-239 Macro 14 240-247 Macro 15 248-255 Macro 16 Rotating prism: 0-127 Prism indexing 128-189 Forwards prism rotation from fast to slow 190-193 No rotation 194-255 Backwards prism rotation from slow to fast...
-
Page 31: Error Message
0-19 colour change normal 20-29 colour change to any position 30-39 colour & gobo change to any position 40-59 Lamp on 60-79 Lamp switch off 80-84 All motor reset 85-87 Scan motor reset 88-90 Colors motor reset 91-93 Gobo motor reset 94-96 Shutter &... -
Page 32: Cleaning And Maintenance
malfunction (sensor failed or magnet missing) or the stepping-motor is defective (or its driving IC on the main PCB). The color wheel is not located in the default position after the reset. 02Er (Fixed gobos error) This message will appear after the reset of the fixture if the magnetic-indexing circuit malfunction (sensor failed or magnet missing) or the stepping-motor is defective (or its driving IC on the main PCB). -
Page 33: Technical Specifications
alcohol or solvents. There are no serviceable parts inside the device except for the lamp. Please refer to the instructions under “Installation instructions”. Should you need any spare parts, please order genuine parts from your local dealer. 12. TECHNICAL SPECIFICATIONS Power supply: AC 100-240V~,50/60Hz Power consumption: 210W Lamp: PLATINUM 2R...
Need help?
Do you have a question about the Beam 2R and is the answer not in the manual?
Questions and answers