
Related Manuals for DMP Electronics eBox-2300SX-NWP


Summary of Contents for DMP Electronics eBox-2300SX-NWP
- Page 1 User’s Manual DM&P Group eBox-2300SX-NWP User’s Manual DMP ELECTRONICS INC. DMP Electronics Inc. E-mail: info@compactpc.com.tw Http://www.compactpc.com.tw...
- Page 2 DMP Electronics reserves the right to make any modification to this manual or the information contained herein at any time without notice. The software described herein is governed by the terms of a separated user license agreement or label sticker.
- Page 3 The serial number of this product is located at the rear panel of your eBox-2300SX-NWP. Refer to the model and serial number when you contact your nearest dealer or DMP offices for services. The Model No. of this product is also indicated on the product label of your gift box as: eBox-2300SX-NWP.
- Page 4 User’s Manual AFETY NFORMATION WARNING Do not expose eBox-2300SX-NWP to rain or moisture, in order to prevent shock and fire hazard. Never install eBox-2300SX-NWP in wet locations. Do not open the cabinet to avoid electrical shock. Refer to your nearest dealer for qualified personnel servicing.
- Page 5 User’s Manual EGULATORY FCC C LASS This equipment has been tested and found to comply with the limits for a Class A digital device, pursuant to Part 15 of the FCC Rules. These limits are designed to provide reasonable protection against harmful interference when the equipment is operated in a commercial environment.
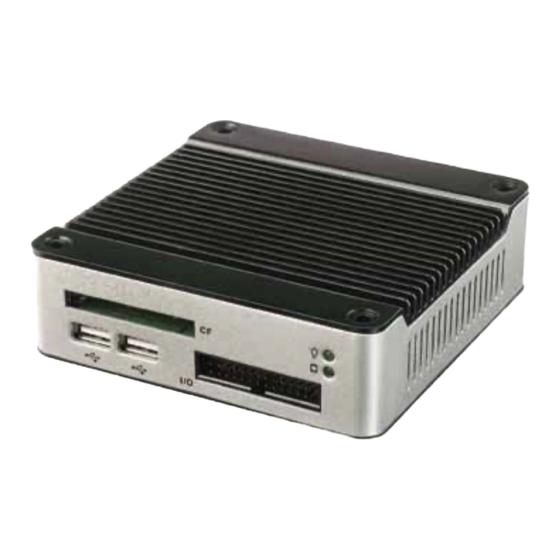
- Page 6 RODUCT ESCRIPTION With this product, herewith also known as eBox-2300SX-NWP, which is a simplified & an economical design of an embedded device. The basic specification of this product comprises of the x86 technology design, and with onboard 128MB System memory, VGA Display, USB, PS2 Keyboard, PS2 Mouse, and LAN Interfaces.
-
Page 7: Table Of Contents
User’s Manual If there is other particular issue not listed in the above conditions, both parties agreed to follow the General Law of Commerce with fair and reasonable discussion in handling and resolving the argument. Table of Content Chapter 1 Product Package…………………………………………….…..1 1.1 Unpack and I/O Connecting…………………………………...2... -
Page 8: Chapter 1 Product Package
User’s Manual Chapter 1. Product Package 1. eBox-2300SX-NWP x 1。 2. Power-15W-3pin x 1。 3. Wireless Antenna x 1 (optional)。 DMP Electronics Inc. E-mail: info@compactpc.com.tw Http://www.compactpc.com.tw... -
Page 9: Unpack And I/O Connecting
User’s Manual 1.1 Unpack and I/O Connecting Overview Of eBox-2300SX-NWP DMP Electronics Inc. E-mail: info@compactpc.com.tw Http://www.compactpc.com.tw... -
Page 10: Peripherals
User’s Manual Chapter 1.2 DMP Electronics Inc. E-mail: info@compactpc.com.tw Http://www.compactpc.com.tw... -
Page 11: Chapter 2 Booting Up The System
User’s Manual Chapter 2. Booting Up the system 2.1 Boot-up Screen When you first power on the system, you are welcomed by the boot-up screen with running system bar on the bottom which indicate the loading status as shown on figure (2.1): DMP Electronics Inc. -
Page 12: The Stand By Mode
User’s Manual (2.1) 2.2 The Stand-By Mode If the LAN cable is connected to your system, An IP address for your system will be automatically obtained from your DHCP server. No additional configuration is necessary and the system is ready to be connected remotely for servicing. Your screen should look similar as below (figure 2-2): (2-2)... -
Page 13: Chapter 3 Setup Mode
User’s Manual Chapter 3 Setup mode 3.1 Enter the Setup mode Press <F3> key anytime will bring you to the Network Settings setup mode. You will be able to choose from Wired or Wirelss connection on this screen shown as below... -
Page 14: Manual Ip Setup
User’s Manual 3.1.2 Manual IP setup: After you have choosed “Wired” Tab, use the arrow key to move to Change Settings option (see figure 3.1.2), then press <Enter>. (figure 3.1.2) When you see a screen of Change IP Address as shown below (figure 3.1.3), use the arrow key to move between different section of IP Address, Subnet Mask, or Default Gateway and hit <Enter>... -
Page 15: Wireless
User’s Manual (figure 3.1.3) 3.1.4 Wireless: This option enable you to choose the Wireless connection. Use the arrow key to move your selection to “Wireless” and press <Enter>. After choosing this Wireless mode, move the arrow key to the WiFi Networks option, and press <Enter>... -
Page 16: Wifi Network Connect
User’s Manual If Wireless Access Point (AP) is detected (e.g 3Com) as shown on (figure 3.1.5) below, you may move the arrow key to choose from available AP by pressing <Enter>. (figure 3.1.5) 3.1.6 WiFi Network Connect Use Automatic: Uncheck this box (if it is checked) by press the <Space> key Move the arrow key to choose Connect and press <Enter>... -
Page 17: Network Key
User’s Manual (figure 3.1.6) 3.1.7 Network Key When a screen of Network Key pop-up as (figure 3.1.7) shown below, you will be asking to provide the Network Authentication key for security reason. Fill in the blank space with your Network Key and choose <OK>. Please consult with your network system administrator if you need assist on this. - Page 18 User’s Manual As figure (3.1.8) illustrated, after you have provided the Network key, the system will try to connect and negotiated with available Wireless Access Point. If the information you key-in is correct, the system will be indicated as ready for service by the “Status” showing (e.g Connected to 3Com ).
-
Page 19: Chapter 4 Using Vista Connection
User’s Manual (figure 3.1.9) Chapter 4 Using Vista Connection 4.1 Starting Connection Using Vista to connect to network projector is simple and easy. The following section will provide detailed descriptions with illustration on how to use your Vista to connect to eBox-2300SX-NWP. - Page 20 User’s Manual (figure 4.1.1) When you are first time trying to use the Network Projector, a screen will pop-up asking for your permission for further access as shown on Figure (4.1.2). Simply click on <Yes> to go ahead to the next step.
-
Page 21: Search For A Projector
User’s Manual Next, you will be given an option to choose from the way to connect to the network projector as shown below. (Figure 4.1.3) (Figure 4.1.3) 4.1.31 Search for a Projector: This option is for automatically search for projectors that are connected to your network. -
Page 22: Enter The Projector Address
User’s Manual (Figure 4.1.31) 4.1.32 Enter the projector address: Choose this option if you know the network address of the projector that you want to use. You will see the following screen as shown (Figure 4.1.32). DMP Electronics Inc. - Page 23 (Figure 4.1.32) Network Address: typing in the network address (For example, http://192.168.1.192) that appears on the Stand By mode of the eBox-2300SX-NWP. Projector Password: enter the four-digit Password (e.g 0007) which appears on the Stand By mode of the eBox-2300SX-NWP.
-
Page 24: Chapter 5 Warranty: Terms And Conditions
5.3 Shipping Policy The Purchaser must pre-pay shipping for any defective system or parts returned under the warranty. DMP Electronics Inc. shall not be liable for risk of loss or damage during shipment of your returned system or parts if you fail to insure the shipment. -
Page 25: Chapter 6 Technical Supporting
User’s Manual Chapter 6 Technical Supporting Thank you for your supporting. If you have any technical problem using our product, please feel free to contact us: Customer Service: +886-2-2298-0770 DMP Electronics Inc. Monday to Friday: AM 08:30 ~ PM 17:30 Or E-mail to: info@compactpc.com.tw...
Need help?
Do you have a question about the eBox-2300SX-NWP and is the answer not in the manual?
Questions and answers