Table of Contents
Advertisement
Quick Links
Advertisement
Table of Contents

Related Manuals for Konica Minolta Fax Kit (FX-3)


Summary of Contents for Konica Minolta Fax Kit (FX-3)
-
Page 1: User Manual
User Manual www.konicaminolta.net Fax Kit ( FX-3 ) -
Page 2: Table Of Contents
Contents Contents Introduction User Manual...1-2 Introduction ...1-2 We Want You to Be a Satisfied Customer...1-2 Explanation of Manual Conventions ...1-3 ® Energy Star What is an ENERGY STAR Safety Information...1-5 Warning and Precaution Symbols ...1-5 Meaning of Symbols ...1-5 WARNING ...1-6 CAUTION ...1-7 Precautions for Routine Use...1-8 Miscellaneous...1-8... - Page 3 To redial the last recipient called ... 3-10 Transmission Settings ... 3-11 Adjusting the Fax Resolution ... 3-11 To specify the resolution ... 3-11 Basic Faxing ... 3-12 To fax using the Automatic Document Feeder... 3-12 To fax documents positioned on the Original Glass ... 3-13 If the Memory Becomes Full While Scanning Fax Documents...
- Page 4 Contents Relay Initiation Transmission...4-14 To fax using relay initiation transmission...4-14 Relay Broadcast Transmission...4-16 Polling Transmission ...4-17 To set up polling transmission ...4-17 To delete a document from the polling transmission setup ...4-19 Canceling (Deleting) a Document Queued in the Memory for Transmission ...4-20 To cancel a queued document ...4-20 Reception Methods ...4-22...
- Page 5 Specifying the Setting for “SPEED DIAL” ... 6-8 To program a speed dial number ... 6-8 To change/delete a programmed speed dial number ... 6-10 Specifying the Setting for “GROUP DIAL” ... 6-12 To program a group of fax numbers ... 6-12 To change/delete a programmed group of fax numbers ...
- Page 6 Contents Specifying the Setting for “LINE MONITOR” ...6-44 Specifying the Setting for “PSTN/PBX” ...6-45 To specify the telephone wiring system...6-45 Setting Up the Report Output ...6-46 Selecting the “REPORTING” menu ...6-46 Specifying the Setting for “ACTIVITY REPORT” ...6-47 Specifying the Setting for “RESERV.REPORT” ...6-47 Specifying the Setting for “TX RESULT REPORT”...
- Page 7 Contents Fax Kit (FX-3)
-
Page 8: Introduction
Introduction... -
Page 9: User Manual
User Manual The User Manual for this machine is divided into two parts: the Di1611/Di2011 User Manual and the Fax Kit (FX-3) User Manual. Read the necessary description according to the required use. The Fax Kit (FX-3) User Manual contains precautions on the use of this machine. Be sure to read this manual before using the machine. -
Page 10: Explanation Of Manual Conventions
1.3 Explanation of Manual Conventions Explanation of Manual Conventions The marks and text formats used in this manual are described below. WARNING Failure to observe instructions highlighted in this manner may result in fatal or critical injuries. ➜ Observe all warnings in order to ensure safe use of this machine. CAUTION Failure to observe instructions highlighted in this manner may result in serious injuries or property damage. -
Page 11: Energy Star
1.4 Energy Star® ® Energy Star ® As an ENERGY STAR Partner, we have determined that this machine meets the ® ENERGY STAR Guidelines for energy efficiency. ® What is an ENERGY STAR Product? ® An ENERGY STAR product has a special feature that allows it to automatically ®... -
Page 12: Safety Information
1.5 Safety Information Safety Information This section contains detailed instructions on the operation and maintenance of this machine. To achieve optimum utility of this device, all operators should carefully read and follow the instructions in this manual. Please keep this manual in a handy place near the machine. -
Page 13: Warning
WARNING • Do not modify this product, as a fire, electrical shock, or breakdown could result. If the product employs a laser, the laser beam source could cause blindness. • Do not attempt to remove the covers and panels which have been fixed to the product. Some products have a high-voltage part or a laser beam source inside that could cause an electrical shock or blindness. -
Page 14: Caution
1.5 Safety Information Connect the power cord to an electrical outlet that is equipped with a grounding terminal. CAUTION • Do not use flammable sprays, liquids, or gases near this product, as a fire could result. • Do not leave a toner unit or drum unit in a place within easy reach of children. Licking or ingesting any of these things could injure your health. -
Page 15: Precautions For Routine Use
Precautions for Routine Use • Do not store toner units, PC drum units, and other supplies and consumables in a place subject to direct sunlight and high temperature and humidity, as poor image quality and malfunction could result. • Do not attempt to replace the toner unit and PC drum unit in a place exposed to direct sunlight. -
Page 16: For New Zealand Users
1.5 Safety Information The Facsimile has been approved in accordance with Council Decision 1999/5/ EC for pan-European single terminal connection to the public switched telephone network (PSTN). However, due to differences between the individual PSTNs provided in different countries, the approval does not, of itself, give an unconditional assurance of successful operation on every PSTN network terminal point. -
Page 17: Notice For Ni-Mh Batteries
1.5 Safety Information Notice for Ni-MH Batteries Ni-MH (Nickel Metal Hydride) Batteries are installed inside machine as back up memory batteries. Please dispose according to local, state and federal regulations. 1-10 Fax Kit (FX-3) -
Page 18: Precautions
Precautions... -
Page 19: Part Names And Their Functions
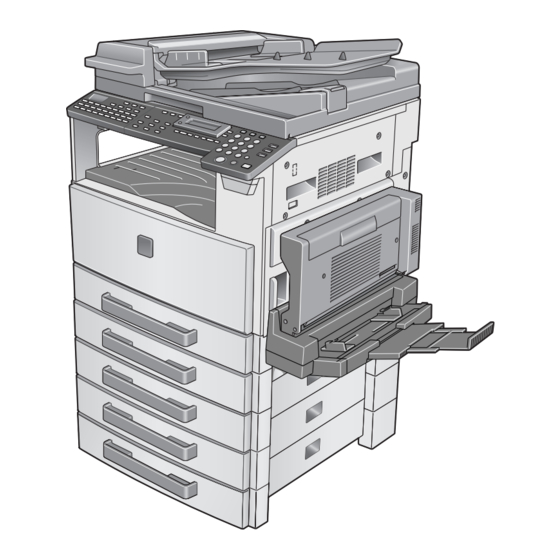
Part Names and Their Functions Main Unit Part Name Power Switch Parallel Interface Connector RJ45 Connector for Networking Printer USB Connector Document Scales Original Cover (optional) Original Glass Control Panel Telephone Line Connector (LINE) External Telephone Connector (TEL) * For details on parts other than those described above, refer to the Di1611/Di2011 User Manual. 2.1 Part Names and Their Functions Description Used to turn the machine on and off. -
Page 20: Names Of Control Panel Parts And Their Functions
2.2 Names of Control Panel Parts and Their Functions Names of Control Panel Parts and Their Functions Control Panel Parts and Their Functions Part Name “Error” indicator [Printer] key/indicator [Status] key [Utility] key Display [No/C] key [Yes] key [Auto Paper/Auto Size] key Fax Kit (FX-3) Function Flashes when an error has occurred. - Page 21 2.2 Names of Control Panel Parts and Their Functions Part Name [Zoom] key, [M] and [L] keys [Paper] key [Auto/Photo] key, [ ] and ] keys [Erase] key [File Margin] key [Finishing] key [X/Y Zoom] key [Neg. Pos.] key [Copy] key [Copy Program] key [Book Separation] key [Original] key...
- Page 22 2.2 Names of Control Panel Parts and Their Functions Part Name [Scan] key [Fax] key [Copy] key [Access] key [Energy Saver] key [Interrupt] key [123/ABC] key [Panel Reset] key [Stop] key Fax Kit (FX-3) Function Press to enter Scan mode. The indicator lights up in green to indicate that the machine is in Scan mode.
- Page 23 2.2 Names of Control Panel Parts and Their Functions Part Name [Start] key 10-Key Pad Function • Starts copying. • Starts a fax transmission. • Queues a copy job if pressed while the machine is warming • The indicator lights up in green to indicate that the machine is ready to start copying, or it lights up in orange to indicate that the machine is not ready to start copying.
- Page 24 2.2 Names of Control Panel Parts and Their Functions Part Name “Memory TX” indicator “Auto RX” indicator [Resolution] key [Speaker] key [Phone Book] key [Redial/Pause] key [Speed Dial] key [Function] key One-touch key Fax Kit (FX-3) Auto RX Resolution Phone Book Speed Dial Redial/ Memory TX Speaker...
-
Page 25: Display Indications
Display Indications In Fax mode: Display Indication Mode or function name Messages Symbol list: Symbol Dialing Ringing Sending Receiving In standby for timer transmission In standby for polling transmission In standby for mailbox reception In standby for memory reception or polling reception 2.3 Display Indications Description •... -
Page 26: Entering Text
2.4 Entering Text Entering Text When specifying the user name or programming one-touch dial keys with the recipient name, letters, accented characters, numbers and symbols can be entered. Key operation: 10-Key Pad: Used to enter numbers, letters, and symbols. List of characters available with each key of the 10-Key Pad: 10-Key Pad Available characters* . -
Page 27: Inputting Example
Inputting Example To enter the name “NJ Office” * The cursor (_) flashes alternately with the character at its current location. Press the [123/ABC] key. Press the [6] key twice. Press the [5] key once. Press the [0] key once. Press the [6] key three times. - Page 28 2.4 Entering Text Correcting text and input precautions To erase all entered text, press the [Panel Reset] key. To delete only part of the entered text, use the [ ] and [Ö ] keys to move the cursor (_) to the character that you wish to delete, and then press the [No] key. To change an entered character, use the [ ] and [Ö...
- Page 29 2.4 Entering Text 2-12 Fax Kit (FX-3)
-
Page 30: Faxing
Faxing... -
Page 31: Dialing
This machine is a G3 fax. Faxes can only be sent or received with this machine if the recipient’s or sender’s machine complies with the G3 standard. Dialing The recipient’s fax number can be dialed using any of the seven different dialing methods described below. -
Page 32: To Fax Using One-Touch Dialing
3.1 Dialing Press the [Start] key to begin scanning and sending the fax. To fax using one-touch dialing If one-touch dial keys have already been programmed with fax numbers, the fax number of a recipient can be specified by pressing just the corresponding one- touch dial key. -
Page 33: To Fax Using Speed Dialing
To fax using speed dialing If speed dial numbers have already been programmed, the fax number of a recipient can be specified quickly by entering the corresponding speed dial number. For details on programming speed dial numbers, refer to “Specifying the Setting for “SPEED DIAL””... -
Page 34: To Fax Using Group Dialing
3.1 Dialing To fax using group dialing If one-touch dial keys have already been programmed with a group of fax numbers, the fax numbers of all recipients in the group can be specified by pressing just the corresponding one-touch dial key. For details on programming one-touch dial keys with a group of fax numbers, refer to “Specifying the Setting for “GROUP DIAL””... -
Page 35: To Fax Using Chain Dial
To fax using chain dial Faxes can be sent to recipients that are specified using any combination of one- touch dial keys, speed dial numbers, direct input using the 10-Key Pad, and the [Redial] key. As an example, the following procedure describes how to specify recipients using one-touch keys, then using the 10-Key Pad. -
Page 36: To Fax Using Program Dialing
3.1 Dialing To fax using program dialing If one-touch dial keys have already been programmed with fax numbers and a transmission/reception function (such as timer transmission or polling reception), that function can be carried out by pressing just the corresponding one-touch dial key. -
Page 37: To Fax Using The Phone Book
To fax using the phone book The phone book contains all programmed one-touch dialing and speed dialing numbers, allowing you to search for and select the recipient that you wish to send the fax to. Press the [Fax] key to enter Fax mode. Load the document into the Automatic Document Feeder. -
Page 38: Fax Kit (Fx-3)
3.1 Dialing To search the phone book Press the [Phone Book] key. Using the [ ] and [Ö ] keys, select Ö “SEARCH”, and then press the [Yes] key. A screen appears, allowing you to enter the text to be searched for. Using the 10-Key Pad, enter the first few characters of the name programmed for the desired... -
Page 39: To Redial The Last Recipient Called
Using the [L] and [M] keys, select the desired recipient. ❍ If the desired recipient name does not appear in the search results, press the [No] key twice to return to the screen allowing you to enter the search text, and then try searching for different text. -
Page 40: Transmission Settings
“S/F” in the next screen. Note Depending on the recipient’s fax machine, faxes sent with the Super Fine or Super Fine + Half Tone setting may not be sent as specified, and instead are sent with the Fine or Half Tone setting. -
Page 41: Basic Faxing
Basic Faxing To fax using the Automatic Document Feeder Press the [Fax] key. The machine enters Fax mode, and the fax screen appears. Load the document to be faxed into the Automatic Document Feeder. ❍ Adjust the Document Guide Plates to fit the size of the document. -
Page 42: To Fax Documents Positioned On The Original Glass
“CANCEL RESERV.” from the “FUNCTION” menu (p. 4-20). While faxing, if the recipient’s fax machine is busy or does not answer for any other reason, such as a transmission error, the fax is not sent correctly, the transmission result report is printed. - Page 43 If necessary, change the “Resolution” setting (p. 3-11). Using the 10-Key Pad, enter the fax number of the recipient, and then press the [Yes] key. ❍ The fax number of a previously programmed recipient can also be specified. Refer to “Dialing” on page 3-2. Press the [Start] key.
-
Page 44: If The Memory Becomes Full While Scanning Fax Documents
3.3 Basic Faxing If the Memory Becomes Full While Scanning Fax Documents If the memory becomes full while scanning a document for memory transmission, only the pages that have been scanned are sent. With a queued transmission (a fax transmission requested while another fax transmission job is being performed) or timer transmission, if the memory becomes full while scanning the document, a message appears, allowing you to select whether to send just the scanned pages or cancel the transmission. -
Page 45: Confirmation Mode
Confirmation Mode Checking the Machine’s Counters The number of operations performed since this machine was installed can be checked using the functions available when the [Status] key is pressed. Items that can be checked with machine counter menu: MACHINE COUNTER Description TOTAL COUNT This count shows the total number of prints made since this machine was... -
Page 46: Checking Transmission Results
3.4 Confirmation Mode Using the [L] and [M] keys, select the counter that you wish to check. Press the [Yes] key. The “TOTAL PAGE” appears. Press the [No] key. The main screen appears. Checking Transmission Results The transmission result information for a maximum of 60 sent and received documents is saved. - Page 47 Press the [Yes] key. Using the [L] and [M] keys, display the desired transmission results to check them. ❍ In the transmission result screen, “TX” indicates sent faxes, and “RX” indicates received ones. ❍ If the [No] key is pressed twice while the transmission results are displayed, the main screen appears.
-
Page 48: Outputting A Report/List
3.4 Confirmation Mode Outputting a report/list The various reports and lists of programmed settings can be printed using the functions available when the [Status] key is pressed. Paper of the following sizes can be used to output the reports. However, when printing on A5 C, B5 C, or Invoice (8-1/2 × 5-1/2) C paper, the report may be divided among several sheets of paper. -
Page 49: Transmission Result Report
Transmission Result Report The document number, recipient name, date sent, starting time of transmission, number of document pages, time required, mode, and transmission result are printed. SESSION FUNCTION DESTINATION STATION 0001 AAA NEWYORK 012345678 NG PAGE:1.3.5.7 Reception Result Report The document number, caller name, date received, starting time of reception, number of pages received, time required, mode, and reception result are printed. -
Page 50: Memory Data List
3.4 Confirmation Mode Memory Data List This is a list of documents stored in the memory and waiting to be sent, and documents specified for timer transmission, batch transmission or polling reception. The document number, type of operation being performed, time, recipient/caller name, and number of document pages are printed. -
Page 51: Relay Box List
3.4 Confirmation Mode Relay Box List The status and settings for the 5 relay boxes can be printed and checked. Machine Status List The current machine settings are printed. Configuration Page The list of the printer settings is printed. PCL Font List This function is only available when the Printer Controller (optional) is installed. -
Page 52: Fax Transmission/Reception Methods
Fax Transmission/ Reception Methods... -
Page 53: Transmission Methods
Transmission Methods Memory Transmission With memory transmission, the document is scanned, then stored in the memory for transmission (queued transmission). Memory transmission is selected as the default transmission mode. For details on sending faxes through memory transmission, refer to “Basic Faxing” on page 3-12. -
Page 54: Direct Transmission
4.1 Transmission Methods Press the [Memory TX] key, and then check that the Memory TX lamp lights up. Note If the Memory TX lamp is not lit, the direct transmission is selected. Press the [Start] key to begin scanning and sending the fax. ❍... -
Page 55: Manual Transmission
This is useful, for example, if you wish to tell the recipient that you are sending a fax. Note If the recipient’s fax machine is set to receive faxes automatically (automatic reception), a beep is sounded without the recipient answering the phone;... -
Page 56: To Send A Fax Manually
After finishing talking on the phone, the recipient should press the necessary key to start receiving the fax. Once the recipient’s fax machine is ready, a beep is sounded. Press the [Start] key to begin scanning and sending the fax. -
Page 57: Batch Transmission
Batch Transmission Multiple documents can be stored in the memory and faxed together at a specified time. In order to use this function, the corresponding Utility mode function must first be used to program a one-touch dial key with the batch transmission settings (transmission time) (p. -
Page 58: Broadcast Transmission
4.1 Transmission Methods Broadcast Transmission The same document can be sent to multiple recipients at one time. The recipients can be specified by using the one-touch dial keys, the speed dial numbers or group dialing, by selecting from the phone book, or by entering the fax number using the 10-Key Pad. - Page 59 Specify the fax number of the recipient. Repeat the appropriate operations described below until all recipients have been specified. ❍ When using the one-touch dial keys: Press the one-touch dial key programmed with the desired fax number. Press the [Yes] key, and then specify the next recipient.
- Page 60 4.1 Transmission Methods To check the recipients, press the [Yes] key. ❍ If you do not wish to check the recipients, skip to step 9. The recipients specified in step 5 are displayed in the order that they were selected. Check the recipient, and then press the [Yes] key.
-
Page 61: Timer Transmission
Timer Transmission A document can be scanned and stored in the memory to be sent at a specified time. This function is convenient for sending documents with a large number of pages at discounted calling times. Note The time is set for a 24-hour period. If the machine is not programmed with the current time (p. - Page 62 4.1 Transmission Methods Using the 10-Key Pad, enter the desired transmission time, and then press the [Yes] key. ❍ If you wish to correct the time, press the [No] key, and then enter the correct time. Specify the fax number of the recipient.
-
Page 63: Mailbox Transmission
Mailbox Transmission The fax can be sent to a recipient’s mailbox. This is perfect for sending an important document to a specific person. Note Mailbox transmission is compatible with F code transmission. Machines compatible with F codes can be specified as recipients for mailbox transmission. - Page 64 4.1 Transmission Methods Using the 10-Key Pad, enter the mailbox ID of the recipient. ❍ Enter the mailbox ID (SUB) (20 digits or less) registered for the recipient. ❍ The only characters that can be used in the mailbox ID are 0 through 9, and #.
-
Page 65: Relay Initiation Transmission
Documents can be sent from this machine (transmitting station) to another fax machine (acting as a relay station), which then sends the documents to multiple recipients (receiving stations). By relaying the documents through a fax machine closer to the remote recipients, the transmission time and cost for the transmitting station are reduced. - Page 66 4.1 Transmission Methods Specify the relay station, and then press the [Yes] key. ❍ Refer to “Dialing” on page 3-2. A screen appears, allowing you to specify the relay box ID. Using the 10-Key Pad, enter the relay box ID. ❍...
-
Page 67: Relay Broadcast Transmission
Relay Broadcast Transmission If this machine is specified as a relay station, it can receive documents sent from another fax machine (transmitting station), then send the documents to multiple recipients (receiving stations). In order to fax using relay broadcast transmission, a relay box must first be programmed. -
Page 68: Polling Transmission
4.1 Transmission Methods Polling Transmission Documents scanned and saved in the memory can be retrieved by the recipient. Note Polling transmission is compatible with F code transmission. If the memory is full, polling transmission cannot be set. With polling transmission, the recipient incurs the cost of the call. A maximum of 243 recipients can be selected at one time. - Page 69 ❍ To allow multiple polling transmission requests, select “MULTI”. The document is stored in the memory until it has been deleted. Using the 10-Key Pad, enter the 4- digit polling ID, and then press the [Yes] key. ❍ If you do not wish to set a polling ID, skip to step 8.
-
Page 70: To Delete A Document From The Polling Transmission Setup
4.1 Transmission Methods To delete a document from the polling transmission setup Press the [Function] key. Press the [5] key from the 10-Key Pad. Press the [Function] key five times to select “POLLING TX”, and then press the [Yes] key. If polling transmission has been set, a screen appears, allowing you to specify the polling ID. -
Page 71: Canceling (Deleting) A Document Queued In The Memory For Transmission
Canceling (Deleting) a Document Queued in the Memory for Transmission Of the documents stored in the memory and waiting to be sent, a specific document can be selected and deleted. To cancel a queued document Press the [Function] key. Press the [8] key from the 10-Key Pad. - Page 72 4.1 Transmission Methods Press the [Yes] key to delete the displayed job. “FUNCTION” menu appears in the display. To delete another queued job, repeat steps 2 and 4. ❍ If you are finished deleting jobs, press the [No] key to return to the main screen.
-
Page 73: Reception Methods
Were the long beeps not sounded by the caller’s fax machine? ➜ If the caller’s fax machine is set to send automatically, the long beeps may not be sounded. If the telephone receiver is replaced, the fax reception is finished and the machine sounds a beep. -
Page 74: Mailbox Reception
4.2 Reception Methods Mailbox Reception If mailbox numbers and F codes (mailbox IDs and passwords) have already been programmed on this machine, this function can be used to receive only those faxes with an identical mailbox ID and password specified by the caller. Since the received fax can only be retrieved after entering the corresponding mailbox ID, confidential faxes can safely be sent and received. -
Page 75: Polling Reception
Polling Reception Using polling reception, documents set up in other fax machines can be received. Note Polling reception is compatible with F code transmission. To receive a fax using polling reception Press the [Function] key. Press the [6] key from the 10-Key Pad. - Page 76 4.2 Reception Methods Using the 10-Key Pad, enter the polling ID (20 digits or less), and then press the [Yes] key. Using the 10-Key Pad, enter the password (20 digits or less), and then press the [Yes] key. To specify multiple fax numbers, repeat steps 3 through 6.
-
Page 77: Using F Codes
SID: Specify when limiting the recipient/caller with a password. SEP: Specify when calling another fax machine to receive a document set up in it (polling reception). Note The F code function is only available with fax machines that have this function as well. -
Page 78: Using Mailboxes
4.2 Reception Methods Using Mailboxes Specifying mailboxes: Mailboxes can be used if they are set up using the corresponding Utility mode function. Refer to “Mailbox Reception” on page 4-23. F code mailbox transmission/reception: A maximum of 5 mailboxes can be set up. Since a mailbox ID is required in order to retrieve documents received in the different mailboxes, confidential faxes can safely be sent and received. -
Page 79: Specifying F Codes
Specifying F codes When sending faxes F codes can be specified when the 10-Key Pad is being used to enter the fax number of a recipient while sending a fax. Using the 10-Key Pad, enter the fax number of the recipient. Press the [M] key, and then use the 10-Key Pad to enter the SUB. -
Page 80: Using The Utility Mode
Using the Utility Mode... -
Page 81: Utility Mode
Utility Mode There are sixteen menus in the Utility mode. Name MACHINE SETTING PAPER SOURCE SETUP USER MANAGEMENT ADMIN. MANAGEMENT COPY SETTING 1 COPY SETTING 2 FAX REGISTRATION TX OPERATION RX OPERATION COMM. SETTING REPORTING INITIAL USER DATA NETWORK SETTING E-MAIL SETTING1 E-MAIL SETTING2 SCAN SETTING... -
Page 82: Specifying The Machine Settings
5.2 Specifying the Machine Settings Specifying the Machine Settings From the “MACHINE SETTING” menu, various settings for the machine’s operating environment can be specified. Refer to the following table for details on each function. Name AUTO PANEL RESET ENERGY SAVE MODE AUTO SHUT OFF DENSITY (ADF) DENSITY (BOOK) -
Page 83: Selecting The "Machine Setting" Menu
Selecting the “MACHINE SETTING” menu Press the [Utility] key. “MACHINE SETTING” appears. From the 10-Key Pad, press the key ([1] through [0]) for the MACHINE SETTING function that you wish to set. ❍ The MACHINE SETTING functions are as follows: 1 AUTO PANEL RESET 2 ENERGY SAVE MODE 3 AUTO SHUT OFF... -
Page 84: Specifying The Setting For "Buzzer Volume
5.2 Specifying the Machine Settings Specifying the Setting for “BUZZER VOLUME” Select the “BUZZER VOLUME”. ❍ Refer to “Selecting the “MACHINE SETTING” menu” on page 5-4. Press the [ ] and [Ö ] keys to set Ö the buzzer volume to “HIGH”, “LOW”... -
Page 85: Specifying The Setting For "Initial Mode
Specifying the Setting for “INITIAL MODE” Select the “INITIAL MODE”. ❍ Refer to “Selecting the “MACHINE SETTING” menu” on page 5-4. Press the [ ] and [Ö ] keys to Ö select either “COPY” or “FAX”. Press the [Yes] key. 5.2 Specifying the Machine Settings Fax Kit (FX-3) -
Page 86: Setting Up The Paper Sources ("Paper Source Setup" Menu)
5.3 Setting Up the Paper Sources (“PAPER SOURCE SETUP” Menu) Setting Up the Paper Sources (“PAPER SOURCE SETUP” Menu) From the “PAPER SOURCE SETUP” menu, the various settings for the paper trays can be changed. “PAPER SOURCE SETUP” menu: PAPER SOURCE SETUP INCH/METRIC TRAY1 PAPER PAPER TYPE... -
Page 87: Specifying Administrative Settings ("Admin. Management" Menu)
5.4 Specifying Administrative Settings (“ADMIN. MANAGEMENT” Menu) Specifying Administrative Settings (“ADMIN. MANAGEMENT” Menu) From the “ADMIN. MANAGEMENT” menu, various functions for controlling the use of the machine can be set. In order to set an “ADMIN. MANAGEMENT” function, the administrator access number must be entered. “ADMIN. -
Page 88: To Select The "Admin. Management" Menu
5.4 Specifying Administrative Settings (“ADMIN. MANAGEMENT” Menu) To select the “ADMIN. MANAGEMENT” menu Press the [Utility] key. “MACHINE SETTING?” appears. Press the [M] key three times to select “ADMIN. MANAGEMENT?”. From the 10-Key Pad, press the key ([1] through [3]) for the “ADMIN. MANAGEMENT”... -
Page 89: To Set The "Remote Monitor" Function
5.4 Specifying Administrative Settings (“ADMIN. MANAGEMENT” Menu) To set the “REMOTE MONITOR” function Select the “ADMIN. MANAGEMENT” menu. ❍ Refer to “To select the “ADMIN. MANAGEMENT” menu” on page 5-9. Press the [3] key from the 10-Key Pad to select “REMOTE MONITOR”. -
Page 90: Using The Utility Mode (Fax)
Using the Utility Mode (Fax) -
Page 91: Setting Up The Fax Registration
This function can be used to program the relay boxes in order for this machine (acting as a relay station) to receive a document from another fax machine (transmitting station), then transmit the document to multiple recipients (receiving stations). * By installing the optional Network Interface Card, settings can also be specified from the network tool PageScope Light. -
Page 92: Selecting The "Fax Registration" Menu
6.1 Setting Up the Fax Registration Selecting the “FAX REGISTRATION” menu Press the [Utility] key seven times. “FAX REGISTRATION” appears. From the 10-Key Pad, press the key ([1] through [7]) for the “FAX REGISTRATION” function that you wish to set. ❍... -
Page 93: Setting Up One-Touch Dialing ("One-Touch Dial" Function)
Setting Up One-Touch Dialing (“ONE-TOUCH DIAL” function) If the one-touch dial keys are programmed with fax numbers, the recipient can be specified easily and accurately without the need to manually enter the number using the 10-Key Pad. A maximum of 27 settings can be programmed. To program a one-touch dial key Select the “FAX REGISTRATION”. - Page 94 6.1 Setting Up the Fax Registration Press the [M] key, and then use the 10-Key Pad to enter the SUB. ❍ A number up to 20 digits long can be entered for the SUB. ❍ To enter an SID, continue with step 8.
-
Page 95: To Change/Delete A Programmed One-Touch Dial Key
To change/delete a programmed one-touch dial key Select the “FAX REGISTRATION”. ❍ Refer to “Selecting the “FAX REGISTRATION” menu” on page 6-3. Press the [1] key from the 10-Key Pad to select “ONE-TOUCH DIAL”. Press the one-touch dial key that you wish to change or delete. - Page 96 6.1 Setting Up the Fax Registration If the [No] key is pressed, the corresponding settings programmed in group dialing or program dialing are deleted. ❍ If a one-touch dial number used in group dialing or program dialing is deleted, it is also deleted from the corresponding group dialing or program dialing.
-
Page 97: Specifying The Setting For "Speed Dial
Specifying the Setting for “SPEED DIAL” If speed dial numbers are programmed with fax numbers, the recipient can be specified easily and accurately without the need to manually enter the number using the 10-Key Pad. A maximum of 200 fax numbers (001 to 200) can be programmed. To program a speed dial number Select the “FAX REGISTRATION”. - Page 98 6.1 Setting Up the Fax Registration ❍ For details on F codes (SUB and SID), refer to “Using F codes” on page 4-26. Press the [M] key, and then use the 10-Key Pad to enter the SUB. ❍ A number up to 20 digits long can be entered for the SUB.
-
Page 99: To Change/Delete A Programmed Speed Dial Number
To change/delete a programmed speed dial number Select the “FAX REGISTRATION”. ❍ Refer to “Selecting the “FAX REGISTRATION” menu” on page 6-3. Press the [2] key from the 10-Key Pad to select “SPEED DIAL”. Using the 10-Key Pad, enter the speed dial number that you wish to change or delete. - Page 100 6.1 Setting Up the Fax Registration Change the fax number, F codes (SUB and SID), and modem speed as desired. ❍ For details on making changes, refer to “Entering Text” on page 2-9. ❍ For details on changing the F codes (SUB and SID) or modem speed, refer to page 6-4.
-
Page 101: Specifying The Setting For "Group Dial
Specifying the Setting for “GROUP DIAL” A single one-touch dial key can be programmed with a maximum of 50 different fax numbers as one group. Programming a one-touch dial key with a group of fax numbers is convenient when documents are frequently sent to a set group of multiple recipients. -
Page 102: To Change/Delete A Programmed Group Of Fax Numbers
6.1 Setting Up the Fax Registration ❍ With group dialing, a one-touch dial key programmed with a group can be specified. In that case, the number of fax numbers programmed in the specified one-touch dial key (group dial key) is added. When you are finished specifying recipients, press the [Start] key. - Page 103 ❍ If “DELETE” was selected, the group dialing settings are deleted and the “SELECT REGIST.KEY” screen appears again. If you wish to change the name of the group, enter the new name, and then press the [Yes] key. ❍ For details on making changes, refer to “Entering Text”...
-
Page 104: Specifying The Setting For "Program Dial
6.1 Setting Up the Fax Registration Specifying the Setting for “PROGRAM DIAL” If one-touch dial keys have been programmed with fax numbers and a transmission/reception function, that function can be carried out by pressing just the corresponding one-touch dial key. Transmission/reception functions that can be programmed: Broadcast transmission Timer transmission... -
Page 105: To Change/Delete A Programmed Broadcast Transmission
❍ “To fax using mailbox transmission” on page 4-12 ❍ “To receive a fax using polling reception” on page 4-24 ❍ “To fax using relay initiation transmission” on page 4-14 The settings are registered. To specify other program dialing settings, repeat steps 3 through 5. Press the [No] key to finish programming. -
Page 106: To Change/Delete A Programmed Timer Transmission
6.1 Setting Up the Fax Registration To delete the displayed recipient, press the [No] key. To keep the displayed recipient, press the [Yes] key. The next recipient is displayed. When you are finished making changes, press the [Start] key. ❍ Other program dialing settings can be programmed or changed. -
Page 107: To Change/Delete A Programmed Mailbox Transmission
Using the [ ] and [Ö ] keys, select Ö either “EDIT” or “DELETE”, and then press the [Yes] key. ❍ If “EDIT” was selected, the programmed transmission time is displayed. (Continue with step 6.) ❍ If “DELETE” was selected, the program dialing settings are deleted and the “SELECT REGIST.KEY”... - Page 108 6.1 Setting Up the Fax Registration Press the [4] key from the 10-Key Pad to select “PROGRAM DIAL”. Press the one-touch dial key ([24] through [27]) programmed with the mailbox transmission that you wish to change or delete. Press the [No] key. Using the [ ] and [Ö...
-
Page 109: To Change/Delete A Programmed Polling Reception
To change the password, press the [No] key, and then use the 10- Key Pad to enter the new password. Press the [Yes] key. Other program dialing settings can be changed. Press the [No] key to return to the “FAX REGISTRATION” menu. To change/delete a programmed polling reception Select the “FAX REGISTRATION”. -
Page 110: To Change/Delete A Programmed Relay Initiation Transmission
6.1 Setting Up the Fax Registration To delete the displayed recipient, press the [No] key. To keep the displayed recipient, press the [Yes] key. ❍ To add a recipient, in the screen containing “Fin.=START”, specify a recipient using the one-touch dial keys or the speed dial numbers, or by entering a fax number using the 10-Key Pad. - Page 111 Using the [ ] and [Ö ] keys, select Ö either “EDIT” or “DELETE”, and then press the [Yes] key. ❍ If “EDIT” was selected, the specified recipient is displayed. (Continue with step 6.) ❍ If “DELETE” was selected, the program dialing settings are deleted and the “SELECT REGIST.KEY”...
-
Page 112: Specifying The Setting For "Batch Tx
6.1 Setting Up the Fax Registration Specifying the Setting for “BATCH TX” If the batch transmission setting (transmission time) is specified for a one-touch dial key programmed with recipient fax numbers, multiple documents can be stored in the memory and sent out together at the specified time. Note The one-touch dial key must first be programmed with the fax number of the recipient for the batch transmission. -
Page 113: To Change The Batch Transmission Setting
Using the 10-Key Pad, enter the desired transmission time, and then press the [Yes] key. Press the [No] key to return to the “FAX REGISTRATION” menu. To change the batch transmission setting Select the “FAX REGISTRATION”. ❍ Refer to “Selecting the “FAX REGISTRATION” menu” on page 6-3. Press the [5] key from the 10-Key Pad to select “BATCH TX”. -
Page 114: To Delete The Batch Transmission Setting
6.1 Setting Up the Fax Registration Press the [No] key to return to the “FAX REGISTRATION” menu. To delete the batch transmission setting Select the “FAX REGISTRATION”. ❍ Refer to “Selecting the “FAX REGISTRATION” menu” on page 6-3. Press the [5] key from the 10-Key Pad to select “BATCH TX”. -
Page 115: Specifying The Setting For "Mailbox
Specifying the Setting for “MAILBOX” Mailbox IDs must first be specified in order to receive faxes with mailbox reception only if the mailbox ID sent by the caller matches the mailbox ID set on this machine. Note A mailbox ID cannot be the same as a relay box ID. To register a mailbox Select the “FAX REGISTRATION”. -
Page 116: To Delete A Mailbox
6.1 Setting Up the Fax Registration To delete a mailbox Select the “FAX REGISTRATION”. ❍ Refer to “Selecting the “FAX REGISTRATION” menu” on page 6-3. Press the [6] key from the 10-Key Pad to select “MAILBOX”. Using the 10-Key Pad, enter the number of the mailbox that you wish to delete. -
Page 117: Setting Up Relay Boxes ("Relay Box" Function)
Setting Up Relay Boxes (“RELAY BOX” function) A relay box ID must first be set in order for this machine (acting as a relay station) to receive a document from another fax machine (transmitting station), then transmit the document to multiple recipients (receiving stations). - Page 118 6.1 Setting Up the Fax Registration Using the 10-Key Pad, enter the 4- digit password, and then press the [Yes] key. ❍ The password can be set to any number between 0000 and 9999. ❍ If you wish to change the password, press the [No] key, and then enter the new password.
-
Page 119: To Delete The Relay Box
To delete the relay box Select the “FAX REGISTRATION” menu. ❍ Refer to “Selecting the “FAX REGISTRATION” menu” on page 6-3. Press the [7] key from the 10-Key Pad to select “RELAY BOX”. Using the 10-Key Pad, enter the number of the relay box that you wish to delete. -
Page 120: Setting Up The Transmission
6.2 Setting Up the Transmission Setting Up the Transmission From the “TX OPERATION” menu, various functions for sending faxes can be set. TX OPERATION Characteristic/Description SCAN CONTRAST This function can be used to set the default scanning contrast level to one of five settings between “LIGHT”... -
Page 121: Specifying The Setting For "Scan Contrast
Specifying the Setting for “SCAN CONTRAST” Select the “TX OPERATION”. ❍ Refer to “Selecting the “TX OPERATION” menu” on page 6-31. Press the [1] key from the 10-Key Pad to select “SCAN CONTRAST”. Using the [ ] and [Ö ] keys, select Ö... -
Page 122: Specifying The Setting For "Default Tx
6.2 Setting Up the Transmission Using the [ ] and [Ö ] keys, select Ö the desired halftone setting, and then press the [Yes] key. ❍ The halftone settings appear as follows. STD: Standard FINE: Fine S/F: Super Fine The “TX OPERATION” menu appears again. Specifying the Setting for “DEFAULT TX”... -
Page 123: Setting Up The Reception
Setting Up the Reception From the “RX OPERATION” menu, various functions for receiving faxes can be set. RX OPERATION Characteristic/Description MEMORY RX This function can be used to set whether to allow (“ON”) memory reception MODE or not (“OFF”). In cases when confidential faxes are being received, the received document can be stored in the memory and printed at a specified time or when memory reception is set to “OFF”. -
Page 124: Selecting The "Rx Operation" Menu
6.3 Setting Up the Reception Selecting the “RX OPERATION” menu Press the [Utility] key eight times. “RX OPERATION” appears. From the 10-Key Pad, press the key ([1] through [9]) for the “RX OPERATION” function that you wish to set. ❍ The “RX OPERATION”... -
Page 125: Specifying The Setting For "Memory Rx Mode
Specifying the Setting for “MEMORY RX MODE” Select the “RX OPERATION”. ❍ Refer to “Selecting the “RX OPERATION” menu” on page 6-35. Press the [1] key from the 10-Key Pad to select “MEMORY RX MODE”. Using the [ ] and [Ö ] keys, select Ö... -
Page 126: To Cancel Memory Reception
6.3 Setting Up the Reception To cancel memory reception Memory reception is automatically canceled at the specified ending time, and the received documents are printed. If no ending time has been set or if you wish to cancel memory reception before the ending time, follow the procedure described below. -
Page 127: Specifying The Setting For "No.of Rings
Specifying the Setting for “NO.of RINGS” Select the “RX OPERATION”. ❍ Refer to “Selecting the “RX OPERATION” menu” on page 6-35. Press the [2] key from the 10-Key Pad to select “NO.of RINGS”. Using the 10-Key Pad, enter the desired number of rings, and then press the [Yes] key. -
Page 128: Specifying The Setting For "Rx Print
6.3 Setting Up the Reception Specifying the Setting for “RX PRINT” Select the “RX OPERATION”. ❍ Refer to “Selecting the “RX OPERATION” menu” on page 6-35. Press the [4] key from the 10-Key Pad to select “RX PRINT”. Using the [ ] and [Ö ] keys, select Ö... -
Page 129: Specifying The Setting For "Forward
Specifying the Setting for “FORWARD” Select the “RX OPERATION”. ❍ Refer to “Selecting the “RX OPERATION” menu” on page 6-35. Press the [6] key from the 10-Key Pad to select “FORWARD”. Using the [ ] and [Ö ] keys, select Ö... -
Page 130: Specifying The Setting For "Footer
6.3 Setting Up the Reception Specifying the Setting for “FOOTER” Select the “RX OPERATION”. ❍ Refer to “Selecting the “RX OPERATION” menu” on page 6-35. Press the [7] key from the 10-Key Pad to select “FOOTER”. Using the [ ] and [Ö ] keys, select Ö... -
Page 131: Specifying The Setting For "Closed Network
Specifying the Setting for “CLOSED NETWORK” Select the “RX OPERATION”. ❍ Refer to “Selecting the “RX OPERATION” menu” on page 6-35. Press the [9] key from the 10-Key Pad to select “CLOSED NETWORK”. Using the [ ] and [Ö ] keys, select Ö... -
Page 132: Settings Up The Communication
6.4 Settings Up the Communication Settings Up the Communication From the “COMM.SETTING” menu, various functions are available for specifying communication settings. COMM.SETTING Characteristic/Description TONE/PULSE This function can be used to specify the dialing system. If this function is not correctly set to the type of dialing system used, faxes cannot be sent. Select the correct setting after checking which type of dialing system is used by your telephone line. -
Page 133: Specifying The Setting For "Line Monitor
Using the [ ] and [Ö ] keys, select Ö either “TONE” (for tone dialing) or “PULSE” (for pulse dialing), and then press the [Yes] key. If “PULSE” was selected, select either “10pps” or “20pps”, and then press the [Yes] key. The “COMM.SETTING”... -
Page 134: Specifying The Setting For "Pstn/Pbx
6.4 Settings Up the Communication Specifying the Setting for “PSTN/PBX” The connected wiring system can be set to either PSTN (Public Switched Telephone Network) or PBX (Private Branch Exchange). For a PBX system, the outside line access number (or extension number) must be specified. -
Page 135: Setting Up The Report Output
Setting Up the Report Output From the “REPORTING” menu, various functions are available for specifying which reports are automatically printed. REPORTING Characteristic/Description ACTIVITY REPORT Every 60 transmissions/receptions, a report can be printed to show the results of the transmissions/receptions. This function can be used to set whether the report is printed automatically when the 60th transmission/ reception is reached. -
Page 136: Specifying The Setting For "Activity Report
6.5 Setting Up the Report Output If, at any time, you wish to quit setting/changing a “REPORTING” function, press the [No] key. When the message “STOP SETTING?” appears, press the [Yes] key to quit. To exit the “REPORTING” menu, press the [Panel Reset] key. The main screen appears again. -
Page 137: Specifying The Setting For "Tx Result Report
Specifying the Setting for “TX RESULT REPORT” Select the “REPORTING”. ❍ Refer to “Selecting the “REPORTING” menu” on page 6-46. Press the [3] key from the 10-Key Pad to select “TX RESULT REPORT”. Using the [ ] and [Ö ] keys, select Ö... -
Page 138: Specifying Initial User Data
6.6 Specifying Initial User Data Specifying Initial User Data Various settings for the machine’s user data can be specified. Refer to the following table for details on each function. Name Description DATE&TIME The date and time for the machine can be specified. USER FAX NO. -
Page 139: Specifying The Setting For "Date&Time
Specifying the Setting for “DATE&TIME” Select the “INITIAL USER DATA”. ❍ Refer to “Selecting the “INITIAL USER DATA” menu” on page 6-49. Press the [1] key from the 10-Key Pad to select “DATE&TIME”. Using the 10-Key Pad, enter the current time and date. ❍... -
Page 140: Specifying The Setting For "User Fax No
6.6 Specifying Initial User Data Specifying the Setting for “USER FAX No.” Select the “INITIAL USER DATA”. ❍ Refer to “Selecting the “INITIAL USER DATA” menu” on page 6-49. Press the [2] key from the 10-Key Pad to select “USER FAX NO.”. Using the 10-Key Pad, enter the fax number. -
Page 141: Specifying The Setting For "User Name
Specifying the Setting for “USER NAME” Select the “INITIAL USER DATA”. ❍ Refer to “Selecting the “INITIAL USER DATA” menu” on page 6-49. Press the [3] key from the 10-Key Pad to select “USER NAME”. Using the 10-Key Pad, enter the user name for the machine. -
Page 142: Pagescope Light Settings Page
6.6 Specifying Initial User Data PageScope Light Settings Page The various fax settings can also be checked or changed if you log into PageScope Light in Admin. Mode. Refer to “PageScope Light” on page 7-8. Fax Kit (FX-3) 6-53... - Page 143 6.6 Specifying Initial User Data 6-54 Fax Kit (FX-3)
-
Page 144: Appendix
Appendix... -
Page 145: Main Error Messages And Their Remedies
• Communication is not possible because of a problem with the recipient/caller’s fax machine. All redial attempts failed because either the recipient’s line is busy or there was no answer. While sending a fax, the size of... -
Page 146: When Faxing Is Not Performed Correctly
A number specifically for Check the number. telephone calls is being dialed. There is a problem with the Contact the recipient. recipient’s fax machine (it is out of paper, it is not set to receive faxes automatically, it is turned off, etc.). -
Page 147: Faxes Cannot Be Received
There is a problem with the Check that the machine can telephone connection or with make clean copies. If it can, the caller’s fax machine. have the caller send the fax again. The toner is empty. Replace the toner bottle with a new one. -
Page 148: Calls Cannot Be Sent
7.2 When Faxing Is Not Performed Correctly Calls Cannot Be Sent Symptom Nothing can be heard from the connected telephone. After dialing, the ringing cannot be heard. After the [Speaker] key is pressed, it is difficult to hear the recipient/ caller’s voice. -
Page 149: Glossary
Glossary Terms and Definitions Term Automatic redialing Book document F codes G3 communication Internet fax General subscriber line JBIG coding method Manual reception Manual transmission Memory Memory reception Network scanner On-hook dialing Definition If a call cannot be completed, for example if the recipient’s machine is busy, the recipient is automatically called again. - Page 150 7.3 Glossary Term Protocols Touch-tone signals Fax Kit (FX-3) Definition Abbreviation for private branch exchange Exchange equipment installed in a company or a plant to connect a number of telephone sets with multiple station lines in order to enable unrestricted communications between the telephone sets. The necessary rules for communication A signal used on the telephone line;...
-
Page 151: Pagescope Light
PageScope Light What is PageScope Light? PageScope Light is a device control utility program provided by the HTTP server built into the Network Interface Card. This utility can be used with a Web browser as an interface for remotely controlling the machine and Network Interface Card. HTTP server Access Here are some examples of the types of tasks that can be performed with... -
Page 152: System Requirements
7.4 PageScope Light Remote Status Monitoring Check the details of machine trays, information about consumables, or the total number of prints Check the status of jobs that are being printed, or held in the print queue (Jobs can also be deleted if you have logged in to the Administrator mode.) System Requirements PageScope Light can be used in the following system environments. -
Page 153: About The Screen Layout
About the Screen Layout The following screen appears when you access PageScope Light. Note Screen images used in this manual may differ from the actual screen display. They are also subject to change without notice. Logo Logo Status display Administrator password Tabs Menu Information/settings display... -
Page 154: Logging In As An Administrator
7.4 PageScope Light Logging In as an Administrator Some of the settings available in PageScope Light can only be changed by an administrator. These settings are only displayed when you log in to the Administrator mode. Logging In to Administrator Mode Enter the administrator password in the “Admin Password:”... - Page 155 7.4 PageScope Light 7-12 Fax Kit (FX-3)
-
Page 156: Index
Index... - Page 157 Index Activity report ... 6-47 Administrative settings ... 5-8 Batch transmission ... 4-6 Setup ... 6-23 Broadcast transmission ... 4-7 Canceling queued document ... 4-20 Communication settings Monitoring volume ... 6-44 Control panel ... 2-3 Dialing ... 3-2 Direct transmission ... 4-3 Error messages ...
- Page 158 8.1 Index Machine settings ...5-3 Mailbox reception ...4-23 Mailbox setup ...6-26 Mailbox transmission ...4-12 Main unit ...2-2 Manual reception ...4-22 Manual transmission ...4-4 Memory full ...3-15 Memory reception ...4-22 One-touch dialing ...3-3 Setup ...6-4 PageScope Light ...7-8 Paper source Setup ...5-7 Phone book ...3-8 Polling reception ...4-24 Polling transmission ...4-17...
- Page 159 Reception mode ... 6-39 Reduced printing ... 6-38 Tray selection ... 6-41 Relay box setup ... 6-28 Relay broadcast transmission ... 4-16 Relay initiation transmission ... 4-14 Remote monitor ... 5-10 Speed dialing ... 3-4 Setup ... 6-8 Timer transmission ... 4-10 Total count ...
- Page 160 KONICA MINOLTA BUSINESS TECHNOLOGIES, INC. KONICA MINOLTA BUSINESS TECHNOLOGIES, INC. 2004. 2 Marunouchi Center Building, 1-6-1 Marunouchi, Chiyoda-ku, Tokyo, 100-0005, Japan P/N:91264C029H018 Copyright 2004 Printed in China The information contained in this manual is subject to change without notice to incorporate improvements made on the product or products the manual covers.
Need help?
Do you have a question about the Fax Kit (FX-3) and is the answer not in the manual?
Questions and answers