Table of Contents
Advertisement
Advertisement
Table of Contents

Subscribe to Our Youtube Channel
Related Manuals for iSys iTerra Elite ll

Summary of Contents for iSys iTerra Elite ll
- Page 1 Elite ll User Guide...
-
Page 2: Table Of Contents
1. Table of Contents Table of Contents ................................2 Limitation of Liability ............................... 3 iTerra Elite ll Warranty ..............................4 Safety Information ................................5 Unpacking the Printer and Feeder ..........................8 iTerra Elite II Front View ..............................11 iTerra Elite II Rear View ..............................12 Switching the Printer Off ............................... -
Page 3: Limitation Of Liability
The Imaging Systems Group Inc. has been advised of the possibility of such damages. The Imaging Systems Group Inc. 911 28 Street NE Calgary, Alberta, Canada T2A 7X1 www.isys-group.com www.isys-media.com Phone: 1-403-204-5200 Fax: 1-403-204-1971 Toll Free: 1-866-415-4797 e-mail: support@isys-group.com June 2011: Revision 002... -
Page 4: Iterra Elite Ll Warranty
3. iTerra Elite ll Warranty iSys - The Imaging Systems Group Inc. (iSys) warrants the iTerra Elite ll (Product) to be free from defects in materials and workmanship and will remedy any such defect according to the terms of this Limited Warranty. -
Page 5: Safety Information
120 Volt Models Your iSys product has been carefully designed to give you years of safe, reliable performance. As with all electrical equipment, there are a few basic precautions you should take to avoid hurting yourself or damaging the product. - Page 6 June 2011: Revision 002...
- Page 7 June 2011: Revision 002...
-
Page 8: Unpacking The Printer And Feeder
5. Unpacking the Printer and Feeder STEP 1 STEP 2 With two people lift the top (feeder) box off of the Open the feeder box. Remove the feeder. bottom (printer) box. STEP 3 STEP 4 Back of cart Wing Nut Remove the wing nut on the bottom of the feeder Position the feeder at the back of the cart as shown. - Page 9 STEP 5 STEP 6 Internal packing material Open the feeder and remove all packing material. Lift the lid off of the printer box. Close the feeder door. STEP 7 STEP 8 With two people, remove the printer from the box Press button to open lid.
- Page 10 STEP 11 STEP 12 Remove the protective film. Place the drums and toners back into the printer. Lock all four toners into the four drums. STEP 13 STEP 14 Keep the printer level while lowering it onto the feeder; Remove the letter tray shipping lock. ensure you are aligning the printer with the pins located on the top of the feeder.
-
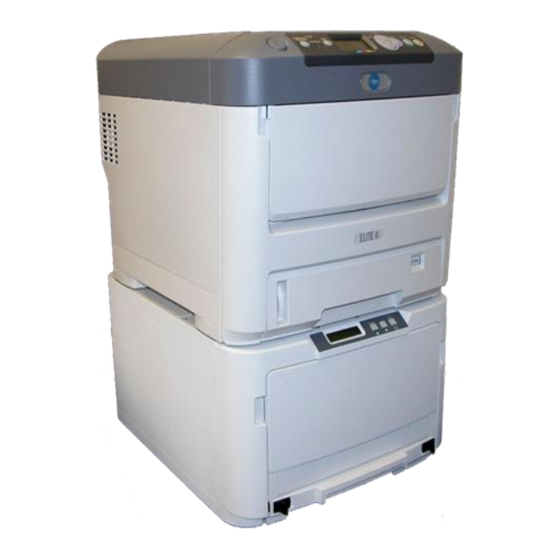
Page 11: Iterra Elite Ii Front View
iTerra Elite II Front View 1. Output stacker, face down 5. Paper level indicator Standard printed copy delivery point. Holds up to 350 6. Front cover release lever sheets at 80g/m². 7. Multi-purpose tray release recess 2. Operator panel 8. Top cover release button Menu driven operator controls and LCD* panel. -
Page 12: Iterra Elite Ii Rear View
iTerra Elite II Rear View This view shows the connection panel, the rear output stacker and the location of the optional duplex (two-sided printing) unit. 1. ON/OFF switch 5. USB interface 2. AC power socket 6. ACC interface (host USB) 3. -
Page 13: Switching The Printer Off
6. Switching the Printer Off 1. Press the Enter button on the control panel to enter the menu. 2. Press the Menu down button and scroll to the Shutdown menu. 3. Press the Enter button. 4. Press the Enter button to continue. 5. -
Page 14: Menu Functions
7. Menu Functions Feeder Operator Panel Display Displays the feeder status and Load Button Press to complete loading any error messages paper Printer Operator Panel 1.Ready LED ON: Ready to receive data 6. Attention LED ON: A warning occurs. Printing may be BLINKING: possible (e.g low toner) BLINKING: An error occurs. -
Page 15: How To Change The Settings: User
How to Change the Settings: User It should be noted that many of these settings can be, and often are, overridden by settings in the Windows printer drivers. However, several of the driver settings can be left at “Printer Setting”, which will then default to the settings entered in these printer menus. -
Page 16: Menus
8. Menus Printer Configuration Menu ITEM EXPLANATION ACTION Tray Count Select an item to display the total number of pages printed Tray1 from the relevant tray. Supplies Life Select item to display the percentage of a consumable Cyan Drum remaining. Magenta Drum Yellow Drum Black Drum... -
Page 17: Print Information Menu
Print Information Menu This menu provides a quick method of listing various items stored within the printer. ITEM ACTION EXPLANATION Configuration Execute Select execute to print out a configuration report. Network Execute Scroll down to this parameter and select execute to print out Network information. -
Page 18: Major Printer Components And Paper Path
9. Major Printer Components and Paper Path Paper Exit Fuser Unit Top Cover Printer Operator Panel Front Cover Cut Sheet Paper Tray Feeder Operator Panel Fan Fold Paper Tray Feeder June 2011: Revision 002... -
Page 19: Feeder Part Names
10. Feeder Part Names Guide Funnel Paper Tray Feed Rollers Guide Channels Load Door Latches Guide Tray Load Door Guide Tray Latches Guide Door Loading Slot June 2011: Revision 002... -
Page 20: Loading Media
11. Loading Media Loading Cut Sheet Paper into the Printer Tray STEP 1 STEP 2 Remove the paper tray from the printer. Fan the paper to be loaded at the edges (1) and in the middle (2) to ensure that all sheets are properly separated, and then tap the edges of the stack on a flat surface to make it flush again (3). - Page 21 • Do not pull the paper tray out during printing (except as described below for the 2nd tray). NOTES: For face down printing, make sure the face up (rear) stacker (a) is closed (the paper exits from the top of the printer). Stacking capacity is approximately 350 sheets for the Elite II, depending on paper weight.
-
Page 22: Media Set Up: Loading Paper Into The Feeder, Option 1
Media Set Up: Loading Paper into the Feeder, Option 1 NOTE: Please ensure the rear face up stacker is open before printing fanfold paper. STEP 1 STEP 2 Guide Door Load Door Guide Door Guide Tray Latches Push the guide tray latches inward and pull the guide tray Open the guide door, load door and guide channels. - Page 23 STEP 5 STEP 6 Guide Channels Media Pull paper towards the front. Ensure the media is flush against the guide channels STEP 7 STEP 8 Use the Guide Width Adjuster (Red Knob) to change Raise the paper between the guide channels until it is the width of the guide if necessary.
- Page 24 STEP 9 STEP 10 Gently turn the roller until the media can be seen and Close the guide channels and the load door. ensure the media is aligned straight. STEP 11 STEP 12 Close the guide door. Slide in the guide tray; ensure the tray is fully latched. When the Require Load message appears, press the “Load”...
-
Page 25: Media Set Up: Loading Paper Into The Feeder, Option 2
Media Set Up: Loading Paper into the Feeder, Option 2 STEP 1 STEP 2 Guide Door Guide Tray Latches Push the guide tray latches inward and pull the guide tray Push the guide tray latches inward and pull the guide forward about 12 inches. - Page 26 STEP 5 STEP 6 Guide Channels Media Tension Rollers Lift tension roller up and slide the paper between both Ensure the media is flush against the guide channels rollers. STEP 7 STEP 8 Use the Guide Width Adjuster (Red Knob) to change Raise the paper between the guide channels until it is the width of the guide if necessary.
- Page 27 STEP 9 STEP 10 Gently turn the roller until the media can be seen and Close the guide channels and the load door. ensure the media is aligned straight. STEP 11 STEP 12 Close the Guide Door Slide in the Guide Tray; ensure the tray is fully latched. When the Require Load message appears, press the “LOAD”...
-
Page 28: Paper Sensor Error Codes
12. Paper Sensor Error Codes 10-11 Code # Location Code # Location Paper Feed Upper Fuser Paper Transport Paper Feed Lower Paper Exit 10 - 11 Load Sensors Please refer to the message list below in the event you receive an error code on the feeder operator panel. Message What To Do Msg: Guide Door Open... -
Page 29: Clearing Paper Jams
Error What Happened Emergency stop (guide door opened during motor Status: Error 00 movement) Status: Error 01 Switch panel communication error Status: Error 02 Internal error Internal error Status: Error 03 Status: Error 10 Media not found over lower load sensor after load Media not positioned between load sensors Status: Error 11 properly after load advance... - Page 30 STEP 3 STEP 4 Lift the image drum, complete with its toner Put the assembly down gently onto a piece of paper cartridge, up and out of the printer to prevent toner from staining surrounding areas and to avoid damaging the green drum surface and cover. CAUTION: The green image drum surface at the base of the Image Drum is very delicate and light sensitive.
- Page 31 STEP 7 STEP 8 To remove a sheet from the central area, separate To remove a sheet in the fuser; push the two retaining the sheet from the belt surface and withdraw the levers (e) towards the rear of the printer t0 release the sheet.
- Page 32 STEP 10 STEP 11 Starting with the cyan image drum unit nearest the fuser, Replace fuser unit into the machine and move replace the four image drums into the drum cavity, locking levers (e) toward the rear of the machine. making sure to locate them in the correct order.
- Page 33 STEP 15 STEP 16 Check inside the cover for sheets in this area and Pull out the paper tray and ensure all paper is stacked remove any that you find, and then close the cover. properly, is undamaged, and that the paper guides are properly positioned against the edge of the paper stack.
-
Page 34: Exit Speed Adjustment
Exit Speed Adjustment If the image is smearing, increase the exit speed. STEP 1 STEP 2 Select Menu on the printer menu, Scroll down the menu and select Calibration. STEP 3 STEP 4 Scroll down the Calibration menu. Select Exit Speed Adjustment. STEP 5 Adjust the exit speed by increasing the number in increments of two. -
Page 35: Maintenance
Maintenance Order Information Only use iSys products to ensure the best quality and performance from your hardware. Using other products may adversely affect your printer's performance and invalidate your warranty. Item Life ELITE II ORDER NO. Toner, black 11,000 Letter @ 5%... - Page 36 STEP 1 STEP 2 Press the cover release and open the printer’s top (a) Pull the colored toner release lever on the cover fully. Note the position of the four cartridges. cartridge to be replaced fully towards the front of the printer. (b) Lift the right hand end of the cartridge and then draw the cartridge to the right to release the left hand end as shown, and withdraw the...
- Page 37 STEP 5 STEP 6 Remove the wrapping material and peel off the Insert the left end of the cartridge into the top of the adhesive tape from the underside of the cartridge. image drum unit first; pushing it against the spring on the drum unit, then lower the right end of the cartridge down onto the image drum unit.
-
Page 38: Image Drum Replacement
Image Drum Replacement The printer contains four image drums: cyan, magenta, yellow and black. CAUTION! Static sensitive devices, handle with care. STEP 1 STEP 2 Press the cover release and open the printer’s top Note the position of the four toner cartridges (a) and cover fully. - Page 39 STEP 4 STEP 5 With the colored toner release lever (1) to the right, Lift the right hand end of the toner cartridge (1) and pull the lever towards you. This will release the toner then draw the cartridge to the right to release the left- cartridge from the drum.
-
Page 40: Replacing The Transfer Belt Unit
Replacing the Transfer Belt Unit The belt unit is located under the four image drums. Switch off the printer and allow the fuser to cool for about 10 minutes before opening the cover. STEP 1 STEP 2 Press the cover release and open the printer’s top Note the positions of the four toner cartridges (a) and cover fully. -
Page 41: Fuser Replacement
STEP 5 STEP 6 Turn the two fasteners (a) 90˚ to the right until they Lower the new belt unit into place, with the lifting bar at the front and the drive gear towards the rear of the lock. This will secure the belt unit into place. Replace printer. - Page 42 STEP 3 STEP 4 Holding the new fuser by its handle, make sure that it is Lower the fuser into the printer, locating the two lugs in the the correct way round. The retaining levers (b) should be slots in the metal partition which separates the fuser from fully upright, and the two locating lugs (c) should be the image drums .Push the two retaining levers (b) towards towards you.
-
Page 43: Printer Specifications
17.12” x 20.75” x 25.98” (W x D x H) (43.4cm x 54.6cm x 64.8cm) WEIGHT 110lbs OPERATING TEMPERATURE 50°F to 90°F OPERATING HUMIDITY 20% to 60% RH non-condensing CERTIFICATIONS FCC Class A, CE For MSDS Sheets please visit: http://www.isys-media.com/view_category.asp?cat=92 June 2011: Revision 002...
Need help?
Do you have a question about the iTerra Elite ll and is the answer not in the manual?
Questions and answers