
Subscribe to Our Youtube Channel
Related Manuals for Ekofires eko 3021


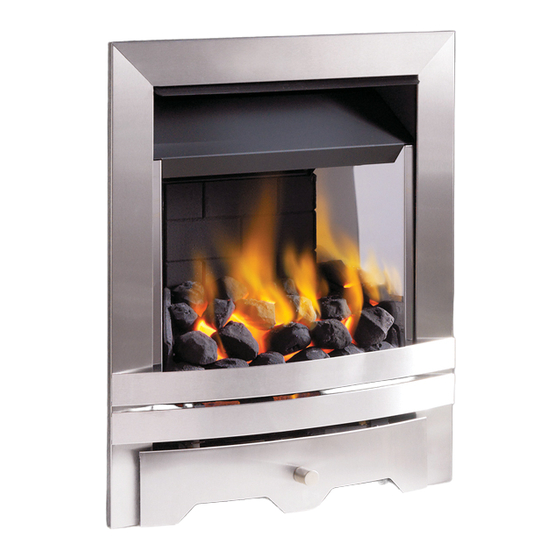
Summary of Contents for Ekofires eko 3021
- Page 1 All instructions must be handed to user for safekeeping Revision A - 06/09 Country(s) of destination - GB/IE eko 3021 eko 3031 fan-flue fuel effect gas fire...
-
Page 2: Installation Instructions
INSTALLATION INSTRUCTIONS Eko 3021 Eko 3031 Preliminary Notes Before Installation This appliance is an Inset Live Fuel Effect appliance which provides radiant warmth utilising the latest type burner technology. The fire is designed to suit various types of fireplaces and installation methods as detailed in this manual. -
Page 3: Table Of Contents
Section Contents Page No. Important Notes Fitting Fan Terminal Appliance Data Fuel Bed Layout (Eko 3021 coal) Installation Requirements Fuel Bed Layout (Eko 3031 coal) Terminal Location Fuel Bed Layout (Eko 3031 pebble) Site Requirements Fitting the frame and front Ventilation 10.0... -
Page 4: Appliance Data
APPLIANCE DATA Eko 3021 models Eko 3031 models Gas Group G20 Natural Gas CAT I2H G20 Natural Gas CAT I2H Inlet Pressure 20 mbar 20 mbar Max Energy Input (gross) 6.2 kW 6.8 kW Min Energy Input (gross) 3.5 kW 3.5 kW... -
Page 5: Terminal Location
INSTALLATION REQUIREMENTS (continued) Avoid locating the terminal in close proximity to combustible materials, such as plastic drainpipes and fences. If these are impossible to avoid, then a suitable metal deflector must be used if the flue gasses begin to heat the object. For minimum standard dimensions of clearance see below. Covered areas such as under car ports should be avoided but if no alternative is available the fol- lowing notes should be adhered to;... -
Page 6: Site Requirements
SITE REQUIREMENTS For aesthetic purposes it is essential that the hearth and infill plinth area are flat and level. The hearth and infill must also be square to the back panel. Failure to comply with this could cause the appliance to lean away from the fireplace resulting in an unsatisfactory installation. The electrical earth to the property and all wiring must be carried out in accordance with IEE Wiring Regulations (including any Local Regulations). -
Page 7: Ventilation
Terminal guard cage Front coal piece (Eko 3031 models) Fan box cover Bag of 11 moulded coals (Eko 3021 coal models) Fan box trim Bag of 16 moulded ceramic coals (Eko 3031 coal versions) Bag of 16 ceramic pebbles (Eko 3031 pebble versions) Set of manufacturers instructions Bag of fixings (10 rawl plugs, 10 No8x1.5 screws, 4 No8x0.5 screws), 3 lengths of sealing strip... -
Page 8: Outer Wall Aperture
Note: The vertical centreline of the pilot hole Proposed location of appliance will either be 475 (Eko 3021 models) or 500mm (Eko 3031 models) from the floor PLUS the 120mm thickness of the hearth you are using. This... -
Page 9: Installation Method
Inner cavity leaf False chimney breast A- Opening width: (Eko 3021 380mm min 450mm max) (Eko 3031 375mm min. 460mm max.) B- Overall width: (Eko 3021 and Eko 3031 480mm) C- Overall height (excluding hearth): (Eko 3021 and Eko 3031 590mm.) D- Opening height: (excluding hearth): (Eko 3021 and Eko 3031 565mm min. -
Page 10: Installation Method
INSTALLATION METHOD 2 This method allows for installation of the appliance with the rear part of it's firebox recessed into the inner leaf of the cavity wall. This will enable a standard fireplace to be flush fitted to the wall and the appliance will then be fitted flush into the fireplace. The structural integrity of the wall must be maintained. - Page 11 B- Overall width: (Eko 3021 and Eko 3031 480mm) C- Overall height (exc hearth): (Eko 3021 and Eko 3031 590mm) D- Opening height: (exc hearth): (Eko 3021 540mm min 580mm max) (Eko 3031 565mm min. 580mm max) E- Recessed depth of fire: (Eko 3021 125mm) (Eko 3031 180mm) F- The hearth must extend 300mm in front of the appliance, with it’s top surface 50mm above the surrounding...
- Page 12 INSTALLATION METHOD 3 (continued) Installation using rebated fire surround or false chimney breast. When using this method of installation the following amendments should be incorpo- rated 25mm clearance must be allowed from the appliance firebox to any insulat- Superlux ed combustibles. 75mm clearance must board be allowed to any unprotected com- bustibles.
-
Page 13: Flue Preparation
FLUE PREPARATION When all the preparation work has been completed for whichever method of installation has been chosen, and with the fire surround fitted, take the appliance and slide the round flue section over the spigot on the rear of the fire. Protect any decorative hearth with a dust sheet or similar, place the appliance in position with the flue section protruding through the wall(s) to the outside. - Page 14 FITTING THE FAN TERMINAL (continued) Fitting the fan terminal by recessing into the outer wall If already fitted, remove the four long M4 screws from the top and bottom of the fan terminal. Fit the terminal into the wall opening previously prepared, ensuring the flue tube seats correctly over the terminal spigot.
-
Page 15: Gas Connection
If the data/control plate is not already fitted, attach with two screws, ensuring the control knob is free to be depressed fully. FUEL BED LAYOUT - Eko 3021 MODELS This fire is supplied with 11 ceramic coals. The coals may vary slightly in size, shape, in order to allow a realistic layout. - Page 16 FUEL BED LAYOUT Eko 3031 MODELS Coal Effect Option 1. Remove the combustion matrix from its pro- tective packaging, and position onto the burn- er tray as shown. The front edge of the matrix should sit snugly behind the back edge of the burner rails.
-
Page 17: Fuel Bed Layout (Eko 3021 Coal)
FUEL BED LAYOUT - continued Eko 3031 MODELS Coal Effect Option 5. Now take another four coals and place behind the second row of coals, in order to complete the third row. The coals may be ori- entated as desired to achieve a realistic effect. Keep the spacing between the coals even and uniform. -
Page 18: Fitting The Frame And Front
FUEL BED LAYOUT - continued Eko 3031 MODELS Pebble Effect Option 3. Take five more ceramic pebbles and position as shown to form the ‘second row’ of the fuel effect. The pebbles may be rotated as desired to fit into the gaps between the supports in order to create a random, realistic effect. -
Page 19: Testing And Commissioning
10.0 TESTING AND COMMISSIONING Turn on and test the gas supply up to the fire for any leaks, in accordance with the current edi- tion of BS6891. WARNING : DO NOT USE AEROSOL TYPE LEAK DETECTOR AS THIS CAN DAMAGE THE ELEC- TRONICS. -
Page 20: Spillage Monitoring System
11.4 SPILLAGE MONITORING SYSTEM This fire is fitted with a flue spillage safety device (ODS). If the fire shuts down during use for no apparent reason then several things may be suspected. If a door or window has been opened cre- ating a draught, then pilot disturbance is the problem, and removal of the draught should resolve this. -
Page 21: Servicing
13.0 SERVICING Isolate the fire from the gas supply. Ensure that the fire is fully cold before attempting service. A suggested procedure for servicing is detailed below. 1. Lay out the dust sheet and tools. 2. Disconnect electrical supply, and isolate gas supply. 3. -
Page 22: Checking The Fan Assembly
13.2 DISMANTLING THE BURNER TRAY - continued The filter element should also be blown clean. This component should not require replacement, however if signs of deterioration are evident then a genuine spare must be used. If a large amount of debris is present in the filter then the pipework and control should be thoroughly cleaned before re-assembly. -
Page 23: Troubleshooting Guide
14.0 TROUBLESHOOTING GUIDE Fan fails to start Check wall switch is turned ON Check the light on the control box illuminates when ON switch is pressed. If no light, check fuse. Turn OFF the wall switch, check all plugs and connectors from fire to fan and fully and correctly fitted. -
Page 24: User Instructions
USER INSTRUCTIONS Contents Page No. Section Important Notes Firefront Clearances to Combustibles Ventilation Operating Instructions Spillage Monitoring System Cleaning List of Spares IMPORTANT NOTES The installation of this fire MUST only be carried out by a competent person in accordance with the Gas Safety (Installation and Use) Regulations 1998, the relevant British Standards, Codes of Practice, the Building Regulations and the manufacturers’... -
Page 25: Clearances To Combustibles
FIREFRONT This fire is supplied with a particular style of firefront. Use of the firefront will ensure an adequate airflow under the firebed for the correct functioning of this appliance. Compliance with safety standards cannot be guaranteed if another style of front is used. CLEARANCES TO COMBUSTIBLES A combustible shelf may be fixed to the wall above the fire, providing that it complies with the dimensions given below. -
Page 26: Flue Spillage Monitoring System
Clean gently in the open air. Replace components with original spares only as necessary. LIST OF SPARES PART NO. ITEM F780059 Pack of 11 coals (Eko 3021 models) F780034 Fuel matrix (Eko 3021 models) F550038 Pack of 16 coals (Eko 3031 models) F550050...
Need help?
Do you have a question about the eko 3021 and is the answer not in the manual?
Questions and answers