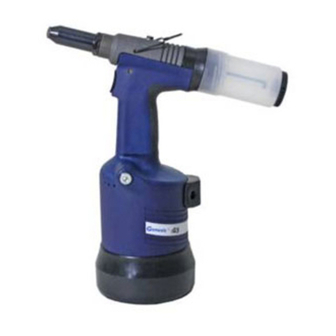
Avdel Genesis G3 Instruction Manual
Hydro-pneumatic power tool
Hide thumbs
Also See for Genesis G3:
- Instruction manual (106 pages) ,
- Fitting instructions manual (8 pages) ,
- Instruction manual (28 pages)
Table of Contents
Advertisement
Available languages
Available languages
Quick Links
Download this manual
See also:
Instruction Manual
Advertisement
Table of Contents

Related Manuals for Avdel Genesis G3


Summary of Contents for Avdel Genesis G3
- Page 1 M a n u a l d e I n s t r u c c i o n e s Tr a d u c c i ó n d e l m a n u a l o r i g i n a l ®...
-
Page 3: Table Of Contents
RELATIVA A LA CALIDAD, IDONEIDAD PARA UN FIN O COMERCIABILIDAD QUEDA, EN VIRTUD DEL PRESENTE, ESPECÍFICAMENTE RECHAZADA Y EXCLUIDA POR PARTE DE AVDEL. La política de Avdel UK Limited es la de desarrollo y mejora continua del producto, reservándose el derecho de cambiar las especificaciones de cualquier producto sin previo aviso. -
Page 4: Normas De Seguridad
La máquina debe funcionar, en todo momento, de acuerdo con la legislación vigente en Seguridad y Salud. Cualquier pregunta referente a la utilización correcta de la herramienta / máquina y a la seguridad del operario, deberá estar dirigida a Avdel UK Limited. -
Page 5: Especificaciones
E s p e c i f i c a c i o n e s E s p e c i f i c a c i o n e s d e l a m á q u i n a Presión de aire Mínimo - Máximo 5,0 - 7,0 bar... -
Page 6: Uso Previsto
TAM AÑO DEL REMACHE ( pulg. neumática diseñada para colocar DENOMINACIÓN 3 3.2 4.0 4.3 4.8 5 5.2 6.4 6.5 7 9 9.5 10 remaches de rotura de vástago Avdel ® DEL REMACHE a alta velocidad, lo que la hace ideal – – –... -
Page 7: Puesta En Servicio
P u e s t a e n s e r v i c i o S u m i n i s t ro d e a i r e Todas las máquinas son accionadas con aire comprimido a una presión óptima de 5,5 bar. Se recomienda el uso de reguladores de presión y de sistemas de filtrado en el suministro principal de aire. -
Page 8: Boquillas
B o q u i l l a s I n s t r u c c i o n e s d e m o n t a j e I M P O R T A N T E Las boquillas NO incluyen las sufrideras. -
Page 9: Sufrideras
Acero 7 1 2 1 0 - 0 5 0 0 2 1 2 . 7 4 . 8 … 0 0 1 AVDEL ® 1 / 8 Cualquiera 7 1 2 1 0 - 1 6 0 7 0 1 2 . - Page 10 B o q u i l l a s S u f r i d e r a s REMACHE SUFRIDERA (mm) S U F R I D E R A S MATERIAL NOMBRE Ø NÚMERO DE PIEZA abajo ® AVEX 1 / 8 Aleación Aluminio...
- Page 11 B o q u i l l a s S u f r i d e r a s R E M A C H E S U F R I D E R A ( m m ) ve r SUFRIDERAS abajo NOMBRE...
-
Page 12: Accesorios
A c c e s o r i o s D e f l e c t o r d e v á s t a g o s El deflector de vástagos es una alternativa muy simple al colector de vástagos estándar, y permite el acceso a zonas restringidas. Para sustituir el colector de vástagos por el deflector de vástagos proceder como se indica a continuación: Preparación de la máquina básica para su uso con el deflector de vástagos. -
Page 13: Cabezales Giratorios
A c c e s o r i o s C a b e z a l e s g i r a t o r i o s En lugar de una boquilla, puede incorporarse a la máquina un cabezal giratorio. Este permite una rotación de la máquina de 360° alrededor de la sufridera y permite el acceso a un gran número de aplicaciones de otro modo restrictivas. -
Page 14: Preparación De La Máquina De Base Para El Cabezal
A c c e s o r i o s Preparación de la Máquina de Base para el Cabezal Giratorio en Ángulo Recto y Línea Recta • Desconectar el suministro de aire. Máquina Básica preparada para recibir una boquilla • Desmontar todos los componentes de la boquilla. -
Page 15: Instrucciones De Montaje Del Cabezal Giratorio
A c c e s o r i o s Los procedimientos para el montaje y servicio de ambos tipos de cabezal son prácticamente idénticos. Las diferencias se encuentran claramente indicadas. I M P O R T A N T E ANTES de montar un cabezal giratorio, debe adaptarse la máquina básica. -
Page 16: Instrucciones De Servicio Del Cabezal Giratorio
A c c e s o r i o s I n s t r u c c i o n e s d e s e r v i c i o d e l c a b e z a l g i r a t o r i o El servicio de mantenimiento de los cabezales giratorios deberá... - Page 17 N o t a s...
-
Page 18: Mantenimiento De La Máquina
M a n t e n i m i e n t o d e l a m á q u i n a I M P O R T A N T E Léanse las instrucciones de seguridad en la página 4. El empresario es responsable de asegurarse de que las instrucciones del mantenimiento de la máquina se den al personal apropiado. -
Page 19: Datos De Seguridad De La Grasa Molykote
M a n t e n i m i e n t o d e l a m á q u i n a ® D a t o s d e s e g u r i d a d d e l a g r a s a M o l y k o t e 5 5 m Primeros auxilios PIEL:... -
Page 20: Kit De Mantenimiento
K i t d e m a n t e n i m i e n t o Para facilitar un servicio totalmente correcto, Avdel ofrece un kit de mantenimiento completo. K I T D E M A N T E N I M I E N T O : 7 1 2 1 0 - 9 9 9 9 0 La indicación correspondiente a las llaves fijas se da en pulgadas y entre caras planas, a menos que se indique lo contrario. -
Page 21: Desmontaje De La Máquina
M a n t e n i m i e n t o d e l a m á q u i n a D e s m o n t a j e d e l a M á q u i n a Antes de desmontar la máquina, debe vaciarse de aceite. -
Page 22: Montaje Del Émbolo Neumático
M a n t e n i m i e n t o d e l a m á q u i n a M o n t a j e d e l é m b o l o n e u m á t i c o •... -
Page 23: Válvula Rotativa
M a n t e n i m i e n t o d e l a m á q u i n a V á l v u l a ro t a t i v a Desmontaje • Utilizando un punzón extractor (07900-00158) de 2 mm, empujar hacia afuera el Pasador del Gatillo 46 y retirar Conjunto de Gatillo 33. -
Page 24: Montaje General De La Máquina Básica 71224-02000
Montaje general de la máquina básica 71224-02000... - Page 25 L i s t a d e c o m p o n e n t e s 7 1 2 2 4 - 0 2 0 0 0...
-
Page 26: Detalles Del Aceite
C e b a d o El cebado es SIEMPRE necesario después de que la máquina ha sido desmontada y antes de hacerla funcionar. También puede ser necesario restablecer la carrera completa después de un uso considerable, cuando la carrera pueda haber quedado reducida y los remaches no queden ya colocados por completo con una sola actuación del gatillo. -
Page 27: Procedimiento De Cebado
C e b a d o P ro c e d i m i e n t o d e c e b a d o I M P O R T A N T E DESCONECTAR LA MÁQUINA DEL SUMINISTRO DE AIRE O DESCONECTAR VÁLVULA 62. RETIRAR LOS COMPONENTES DEL CABEZAL GIRATORIO O DE LA BOQUILLA. - Page 28 Los números de componentes en negrilla se refieren al montaje general y a la lista de componentes de las páginas 24 y 25. Otros síntomas o fallos deberán ser indicados a su distribuidor o centro de reparaciones local autorizado Avdel...
- Page 29 N o t a s...
- Page 30 N o t a s...
- Page 31 D e c l a r a c i ó n d e C o n f o r m i d a d Nosotros, Avdel UK Limited; Watchmead Industrial Estate, Welwyn Garden City, Hertfordshire, AL7 1LY declaramos bajo nuestra única responsabilidad que el producto: Modelo nG3 Nº...
- Page 32 Los datos mostrados están sometidos a cambio sin previo aviso como resultado de la política de desarrollo y mejora continua del producto. Su representante local de Avdel está a su disposición en caso de que necesite confirmar la...
- Page 33 I n s t r u c t i o n M a n u a l O r i g i n a l I n s t r u c t i o n ® Genesis H y d ro - P n e u m a t i c P o w e r To o l...
- Page 35 AND REMEDIES. ANY IMPLIED WARRANTY AS TO QUALITY, FITNESS FOR PURPOSE, OR MERCHANTABILITY ARE HEREBY SPECIFICALLY DISCLAIMED AND EXCLUDED BY AVDEL. Avdel UK Limited policy is one of continuous product development and improvement and we reserve the right to change the specification of any product without prior notice.
- Page 36 Any modification undertaken by the customer to the tool/machine, nose assemblies, accessories or any equipment supplied by Avdel UK Limited or their representatives, shall be the customer’s entire responsibility. Avdel UK Limited will be pleased to advise upon any proposed modification.
- Page 37 S p e c i f i c a t i o n s To o l S p e c i f i c a t i o n Air Pressure Minimum - Maximum 5-7 bar (72.5 - 101.5 psi) Free Air Volume Required @ 5.5 bar 4.3 litres (0.15 cuft)
- Page 38 R a n g e o f F a s t e n e r s nG3 is a hydro-pneumatic tool designed ® to place Avdel breakstem fasteners at high speed making it ideal for batch or FASTENER SIZE ( flow-line assembly in a wide variety of...
- Page 39 P u t t i n g i n t o S e r v i c e A i r S u p p l y All tools are operated with compressed air at an optimum pressure of 5.5 bar. We recommend the use of pressure regulators and filtering systems on the main air supply.
- Page 40 N o s e A s s e m b l i e s F i t t i n g I n s t r u c t i o n s I M P O R T A N T Nose assemblies do NOT include nose tips.
- Page 41 Steel 07498-01401 … 0 8 2 3 / 16 12.7 – Steel 07612-02001 12.7 … 0 2 1 AVDEL 1 / 8 71210-05002 … 0 0 1 ® 12.7 5 / 32 71210-16070 12.7 … 0 0 4 3 / 16 07348-07001 …...
- Page 42 N o s e A s s e m b l i e s N o s e T i p s s e e F A S T E N E R N O S E T I P ( m m ) T Y P E 2 b e l o w MATERIAL...
- Page 43 N o s e A s s e m b l i e s N o s e T i p s F A S T E N E R N O S E T I P ( m m ) T Y P E 4 below NAME...
- Page 44 A c c e s s o r i e s S t e m D e f l e c t o r The stem deflector is a very simple alternative to the standard stem collector and allows access in restricted areas. To replace the stem collector with the stem deflector proceed as follows: Preparing the Base Tool for use with Stem Deflector The airline must be disconnected before any servicing or dismantling.
- Page 45 A c c e s s o r i e s S w i v e l H e a d s Instead of a nose assembly, a swivel head can be fitted to a base tool. It allows 360° rotation of the tool about the nose tip and allows access into many applications otherwise too restrictive.
- Page 46 A c c e s s o r i e s Preparing the Base Tool for Right-Angle and Straight Swivel Head A t t a c h m e n t • Disconnect the air supply. Base tool to receive a nose assembly •...
- Page 47 A c c e s s o r i e s The fitting and servicing procedures for both types of head are almost identical. Differences are clearly indicated. I M P O R T A N T PRIOR to fitting a swivel head, the base tool must be adapted. See Preparing the base tool opposite. The air supply must be disconnected when fitting or removing swivel heads.
- Page 48 A c c e s s o r i e s S w i v e l H e a d S e r v i c i n g I n s t r u c t i o n s Swivel heads should be serviced at weekly intervals.
- Page 49 N o t e s...
- Page 50 S e r v i c i n g t h e To o l I M P O R T A N T Read Safety Instructions on page 4. The employer is responsible for ensuring that tool maintenance instructions are given to the appropriate personnel. The operator should not be involved in maintenance or repair of the tool unless properly trained.
- Page 51 S e r v i c i n g t h e To o l M o l y k o t e ® 5 5 m G r e a s e S a f e t y D a t a First Aid SKIN: Flush with water.
- Page 52 S e r v i c i n g t h e To o l S e r v i c e K i t For an easy complete service, Avdel offers the complete service kit below. SERVICE KIT : 71210-99990 Spanners are specified in inches and across flats unless otherwise stated PART Nº...
- Page 53 S e r v i c i n g t h e To o l D i s m a n t l i n g t h e To o l Before dismantling the tool the oil must be emptied from it. •...
- Page 54 S e r v i c i n g t h e To o l P n e u m a t i c P i s t o n A s s e m b l y • Remove ‘ON/OFF’ Valve Assembly 62. •...
- Page 55 S e r v i c i n g t h e To o l R o t a r y Va l v e Dismantling • Using a 2 mm Pin Punch (07900-00158) drive Trigger Pin 46 out and remove Trigger Assembly 33. •...
- Page 56 G e n e r a l A s s e m b l y o f B a s e To o l 7 1 2 2 4 - 0 2 0 0 0...
- Page 57 P a r t s L i s t f o r 7 1 2 2 4 - 0 2 0 0 0...
- Page 58 P r i m i n g Priming is ALWAYS necessary after the tool has been dismantled and prior to operating. It may also be necessary to restore the full stroke after considerable use, when the stroke may be reduced and fasteners are not fully placed by one operation of the trigger. O i l D e t a i l s ®...
- Page 59 P r i m i n g P r i m i n g P ro c e d u r e I M P O R T A N T DISCONNECT THE TOOL FROM THE AIR SUPPLY OR SWITCH OFF AT VALVE ASSEMBLY 62. REMOVE NOSE ASSEMBLY OR SWIVEL HEAD COMPONENTS.
- Page 60 † Page 16 if a swivel head is used instead of a nose assembly. Item numbers in bold refer to the General Assembly drawing and Parts List on pages 24 and 25. ® Other symptoms or failures should be reported to your local Avdel authorised distributor or repair centre.
- Page 61 N o t e s...
- Page 62 N o t e s...
- Page 63 D e c l a r a t i o n o f C o n f o r m i t y We, Avdel UK Limited, Watchmead Industrial Estate, Welwyn Garden City, Herts, AL7 1LY declare under our sole responsibility that the product: Model nG3 Serial No.
- Page 64 This document is for informational purposes only. Infastech makes no warranties, expressed or implied, in this document. Data shown is subject to change without prior notice as a result of continuous product development and improvement policy. Your local Avdel representative is at your disposal should you need to confirm latest information.
Need help?
Do you have a question about the Genesis G3 and is the answer not in the manual?
Questions and answers