Table of Contents
Advertisement
Advertisement
Table of Contents

Related Manuals for Iteris RZ4 Advanced


Summary of Contents for Iteris RZ4 Advanced
- Page 1 RZ4 Advanced Installation Guide 493470301 Rev B March 2009 ...
-
Page 2: Table Of Contents
4.4.3 Testing Coaxial Cable and BNC Connections ................ 9 5 Camera Installation .......................... 10 5.1 Camera Mounting .......................... 10 5.1.1 Occlusion ............................ 13 5.2 Field Of View ............................. 14 5.2.1 Physical Camera Adjustment ..................... 14 5.2.2 Electronic Camera Adjustment .................... 17 5.2.3 LAM Adapter Kit Components .................... 18 5.2.4 LAM Harness Adapter Cables ..................... 18 5.2.5 Installing the LAM Adapter Module ................... 19 5.2.6 Installing the LAM Harness Adapter .................. 21 5.3 Electronic Camera Adjustment ...................... 24 5.4 Surge Protection .......................... 28 6 Technical Information ......................... 29 6.1 Belden Coaxial Cable ......................... 29 6.2 Sample Power Cable ......................... 30 6.3 Iteris Vantage Camera Bracket ...................... 32 6.4 EDCO Surge Protection ........................ 33 6.5 Vantage RZ‐4 Advanced Camera Specifications ................ 34 7 Maintenance ............................ 34 8 If You Need Assistance ........................ 34 ... -
Page 3: Introduction
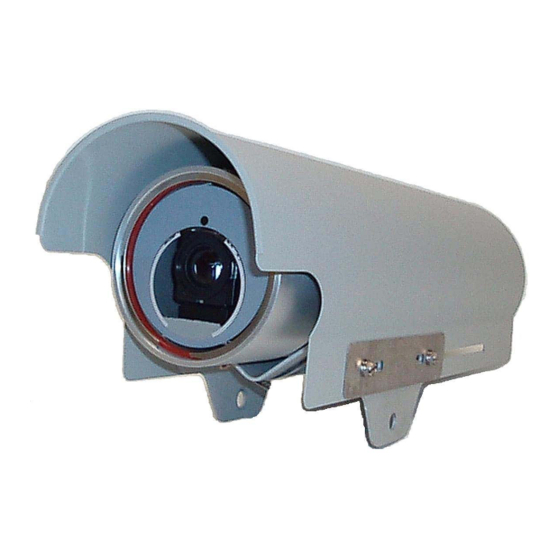
Introduction RZ4‐Advanced our new premium camera offering that provides for streamlined installation by eliminating the Deutsch and BNC connectors; only wire stripping tools and a screw driver are needed to install and terminate the camera cables. A coax cable stripper with a brown insert should be used to simplify the coax cable preparation. The RZ4‐Advanced camera is backward compatible with existing camera installations in the field. Simply cut the existing cables and connectors, strip the power and coax cables, and terminate with a standard screwdriver to the back of the new RZ4‐Advanced camera. The RZ4‐Advanced camera also gives technicians the option to set up the field of view (FOV) from the bucket truck or on the ground at the cabinet. Technicians can use Iteris’ lens adjustment module (LAM or LAMVIEW) with an adapter harness to set up as currently installed at the camera, OR use an adapter box connected to your existing LAM, set up and configure the camera FOV on the ground. Features and Benefits • Specifically designed for vehicle detection applications • Optimized to work with Iteris’ advanced detection algorithms • Quick‐click connectors and adjustable camera mount streamline installation and minimize setup time – no crimping tools required! • Set up and configure at the camera or from the ground • Cable termination located at the rear of the camera simplifies cable connection • Advanced heater enables optimal video detection performance in adverse weather conditions. Tools and Equipment 3.1 Camera Installation Tools 1. Banding tool 2. Ideal Industries 45‐521 coax stripping tool (optional) ... -
Page 4: Camera Installation Supplies
3.2 Camera Installation Supplies 1. ½” or ¾” stainless steel banding material – user supplied 2. Amphenol 31‐321‐1012 BNC connector (one per camera) used in the controller cabinet for the surge protection device – included with camera 3. Belden 8281 coaxial cable (one per camera) – user supplied 4. Three‐conductor, 16 AWG power cable (one per camera) – user supplied 3.3 Processor Installation Supplies A surge suppressor device should be used on the video input line. Iteris provides a surge suppressor from EDCO, part number CX06‐M (in‐line unit) with every Edge processor. System Installation 4.1 Vantage Installation Turn-On Checklist This checklist can be used as a guideline for some of the necessary considerations that must be remembered whenever installing and turning on an intersection using the Vantage video detection system. 1. Correct Coax and Power Cable a. Video coaxial cable = Belden 8281 b. Power cable = 3 conductor, 16 gauge, stranded wire 2. Surge Protection ‐ Installed / properly grounded 3. Camera Installation a. Use 3 stainless steel bands to mount the pedestal bracket on the luminaire arm. ... -
Page 5: Camera Video And Power Cable Installation
7. Programming a. Labels: Camera, Configuration, Zones b. Check using MOD (Mode) menu item Channel Assignment and Zone Type c. Set MOD (Mode) 'Inact/Ch to "NoCall" d. Set Options if needed e. Set Clock (Clk) Time and Date information Make sure the test switches are all in the middle position (normal) 8. Archive snapshots and configurations. using VRAS 9. Observe operation during critical times Morning transition Noon time Evening transition Night time 10. Document count zones (if used) 11. Turn OFF menu / Turn Off Monitor This is by no means intended to be a detailed and all inclusive list. 4.2 Camera Video and Power Cable Installation This procedure describes how to install the coaxial and power cables between the camera mounting location and the traffic control cabinet. If you are installing multiple cameras, perform the procedure for each camera. The procedure is divided into the following parts: 1. Running the cables 2. Preparing the coaxial cable connectors ... -
Page 6: Camera Connections
2. If you are installing multiple cameras at the location, label the camera locations and cables. The following table shows a suggested numbering scheme for a location with four cameras. Cable Camera Phases 1 Camera 1 1, 6 2 Camera 2 2, 5 3 Camera 3 3, 8 4 Camera 4 4, 7 Cable and Camera Numbering 4.3 Camera Connections Remove the cap from the back of the camera by loosening the three screws. Loosen screws to remove backplate. Figure 4.1 Figure 4.2 The system is provided with a simple “Quick‐Click” connection for the power and a terminal block for the video output. Bucket Truck LAM Bucket Truck LAM Video Connection Control Connection Video Out Power Input Connection Connection ... -
Page 7: Power Connection
4.3.1 Power Connection 1. Strip the outer sheath from the power cable back 1” (figure 4.4). 2. Strip the insulation from the three conductors back ¼” (figure 4.4). 3. Loosen the large cord grip (figure 4.5). 4. Thread power cable through large cord grip (figure 4.5). 5. Remove power connector from ship kit. 6. Install the conductors in the connector as per drawing (figure 4.6). Ensure polarity of conductors is correct. NOTE: Failure to install the conductors correctly could result in camera damage and create an electrical shock hazard. 7. Insert the plug into the connector on the back of the camera (figure 4.7). 8. Tighten the large cord grip. Large Cord Grip Figure 4.4 Figure 4.5 ... -
Page 8: Video Connector
4.3.2 Video Connector 1. Loosen the coax cable clamp screws and remove clamp (figure 4.8). 2. Loosen the small cord grip (figure 4.8). 3. Strip Belden Coaxial Cable to length using Ideal Industries 45‐521 coax stripping tool (figure 4.9). Brown Cartridge: A .328 B .109in Note: Strip .250in of inner conductor for insertion into the video connector. 4. Feed cable through small cord grip. 5. Feed cable into video connector (figure 4.10). 6. Tighten video connector (right side of terminal block) (figure 4.10). NOTE: The open connector space to the left of the video connection is not used and is only to provide mechanical rigidity to the terminal block. 7. Replace coax cable clamp and tighten screws (figure 4.11). 8. Tighten small cord grip. 9. Replace the cap on the back of the camera and tighten the three screws to complete the connection process. Video Connector Coax Cable Clamp .250 Figure 4.9 Small Cord Grip ... -
Page 9: Cabinet Connections
4.4 Cabinet Connections 4.4.1 Power Connector In the controller cabinet, AC power will need to be provided to each of the Vantage cameras. It is best to power the cameras from auxiliary breakers, to make sure that any damage to the camera power cables does not affect intersection cabinet power or controller operation. A terminal block attached to an external auxiliary circuit breaker(s) or an auxiliary power strip can be used to make the camera AC power connections in the controller cabinet. To use the power strip, simply terminate each of camera power cables with an AC power plug. All circuit breakers and or fuses should be sized appropriately for the load current. Figure 4.12 Figure 4.13 Camera Power Connections Using AC Power Plug On the End a Surge Protected Power Strip of the Camera Power Cable NOTE: When calculating camera current requirements remember that the Vantage standard RZ‐4 Advanced camera is rated at 25 watts max. 4.4.2 Video (BNC) Connector (for connection to Edge Processor) ... - Page 10 2. When you cut the coaxial cable, it is best to use "cable cutters" to obtain a clean symmetrical cut. Diagonal pliers or straight jaw cutters will deform the coaxial cable and may cause problems crimping on the BNC connector ferrule. The rounded cutting jaws of cable cutter pliers prevent the coaxial cable from being deformed, and provide a round uniform base for the BNC connector ferrule to firmly attach to. Coaxial cable deformation also adversely affects the operation of the coaxial cable stripper, since the cable is grossly out of round. 3. Strip .563" from the outer sleeve of the coaxial cable. 4. Strip .250" from the coaxial shielding and flare the shielding slightly. 5. Strip .125" from the coaxial dielectric. 6. Insert the male contact pin so that it butts up against the dielectric, crimp it in place using an Ideal Industries 30‐483 coax crimping tool. 7. Insert the connector body assembly over the dielectric and shielding and snap it into place. Make sure the center pin is completely seated in the connector body. Make sure none of the coaxial braided shield wires are allowed to make contact with the center conductor. Note: Differences in coaxial stripping tools may result in minor variances from the dimensions shown here. .328 .109 .125 Outer Ferrule Pin must butt against the dielectric Crimp pin on center conductor...
-
Page 11: Testing Coaxial Cable And Bnc Connections
8. Slide the outer ferrule over the braid and against the connector body. Crimp the outer ferrule in place using an Ideal Industries 30‐483 coax crimping tool. Crimp the ferrule in two locations as shown in the diagram "Final Crimping of the BNC Ferrule" in the following section. 9. Apply a five‐pound pull test to verify that the connector is crimped securely. Crimp Here Crimp Here Ferrule BNC Connector Body Figure 4.16 Final Crimping of the BNC Ferrule 4.4.3 Testing Coaxial Cable and BNC Connections 1. Verify that the coaxial cable is not touching the cabinet or signal pole. 2. Check for short circuit on the coax cable assembly using a multimeter. Set your multimeter to the ‘ohms’ (resistance) measurement setting. At the processor end of the cable run put one probe on the center pin and the other probe on the outer BNC connector body. A resistance measurement of less than 15Ω indicates a possible short circuit. A resistance measurement of more than 500kΩ indicates a possible open circuit. If the resistance measurement is outside the range indicated check the BNC and camera connections and the integrity of the coax cable. Be aware that some open connections can be intermittent making them more difficult to diagnose. This picture shows the technique for checking the BNC connector using a multimeter. One meter lead probe is on the BNC center pin, the other meter lead probe is touching the BNC body. The mutimeter should be set to ohms or continuity. ... -
Page 12: Camera Installation
Camera Installation Camera installation involves the following steps: • Camera Mounting • Field Of View • Surge Protection 5.1 Camera Mounting The physical camera mounting is done using a camera bracket that is banded to the luminaire arm or can be mounted on the mast arm using a suitable extension bracket. Figure 5.1 One possible camera mounting location is up on the luminaire arm centered over the field of view, however, it is not always possible to use this mounting. Camera mounting is critical to providing the proper field of view, something that will be discussed in detail in the next section. 10 ... - Page 13 Possible Camera Mounting Location Approximately 12” (30cm) from the luminaire head Camera height should be at least 30’ (10m) above Figure 5.2 Note: If the luminaire arm is too short to center the camera over the field of view, especially on wide roadways, then an extension bracket on the mast arm may be the better choice. Centering the camera is just as important as gaining camera height. The mast arm mounting would end up with a camera height of about 25 feet when using a 6 foot extension bracket. Luminaire Arm Mounting with Pelco Bracket Figure 5.3 11 ...
- Page 14 Figure 5.4 Iteris Universal Camera Mounting Bracket ......CAMBRKT4 Note: See the Vantage Camera Bracket under the Technical Information section for more information. PELCO "Astro Brac" 74 inch Camera Extension Bracket (Mast Arm Mounting) AB‐0175‐5‐96‐ALO Figure 5.5 PELCO has several models depending on band or cable mounting and with or without service outlet. Contact your local PELCO dealer for more information on these brackets. 12 ...
-
Page 15: Occlusion
5.1.1 Occlusion Consequences of Low Camera Mounting Height Occlusion caused by low camera mounting height Figure 5.6 Figure 5.7 13 ... -
Page 16: Field Of View
5.2 Field Of View A proper "Field Of View" (FOV) is crucial for optimal Vantage system operation. The following basic FOV guidelines will help the user to obtain optimal Vantage system performance. There are two parts to obtaining an appropriate FOV: • Physical camera mounting adjustment • Electronic camera lens adjustment 5.2.1 Physical Camera Adjustment The camera should be mounted so that it is centered, as much as possible, in relation to the field of view (vehicle approach). Extreme side shooting can result in reduced performance and vehicle occlusion. See the section in this manual on "Occlusion" for more information. Figure 5.8 Very Poor Mounting ‐ Side Shoot, Camera Not Centered Proper Mounting Height The camera should be mounted at approximately 30 feet for optimal system performance. For lower mountings, like a mast arm mount, a suitable camera extension bracket should be used to increase the camera mounting height to a more workable elevation. A camera mounting height of 25 feet or more can usually be obtained by using an extension bracket. Low mounting heights can result in reduced system performance and vehicle occlusion. See the section in this manual on "Occlusion" for more information. How far can the camera typically see out at a mounting height of 30 feet? The basic formula for LEVEL ground is: For every one foot of height you can see out 10 feet. So, on level ground, at a 30 foot mounting height, you should be able to get accurate detection as far as three hundred feet. This measurement is from the camera mounting location, not from the intersection stop bar area. 14 ... - Page 17 Note: The importance of camera centering versus camera height deserves some further discussion. It must be recognized how important centering the camera is to optimal system performance. In many cases centering the camera is more important than getting an additional five feet of height. For instance, when dealing with a short luminaire arm on a very wide roadway, it might be a better choice to mount the camera on the mast arm with a suitable extension bracket. With the right extension bracket you should be able to achieve a mounting height of about 25 feet. While this is less than the 30 feet you would achieve with a luminaire mounting, the ability to center the camera over the roadway in this example makes the mast arm with a six foot extension bracket the better choice. The luminaire mounting would get the camera up a little higher, but because the luminaire arm is short and the roadway is wide, this would place the camera way off to one side and would adversely impact the field of view. Remember there are two considerations for camera mounting (height and centering) and they both must be carefully evaluated. Maintain a Proper Camera Angle The physical camera adjustments are done by adjusting the camera bracket mounting bolts to set the mechanical camera pan and tilt after the camera bracket has been mounted to the arm or pole. The camera should always be tilted slightly downward and should never be flat or beyond horizontal. When could a camera be in danger of being beyond horizontal? When the camera is aiming uphill on a steep grade. The distance the camera can look out is significantly reduced on approaches with a steep uphill grade. The camera should never be flat or level. It should always be angled downward. This is especially The camera visor important on east and should be pulled...
- Page 18 Figure 5.10 Figure 5.11 Too Much Camera Visor in the FOV Maximum Acceptable Amount of Visor in the FOV Rotate the Camera Body Ideally, for most intersection applications, vehicles should flow from the top of the screen to the bottom of the screen. By loosening the two hose clamp set screws, the camera body can rotate to better square up the FOV image. The car bumpers should also end up being parallel with the bottom of the screen. Figure 5.12 Figure 5.13 The Camera Body Could Be Rotated The above picture shows an acceptable To Help Square Up The Stop Bar Area FOV and stop bar area alignment. 16 ...
-
Page 19: Electronic Camera Adjustment
5.2.2 Electronic Camera Adjustment Lens Adjustment Module (LAM) Hook Up RZ4‐Advanced is Iteris’ new premium camera offering that eliminates the need for a bucket truck to perform Field Of View setup and configuration. The advanced communication features of this camera allow control of zoom, focus and saving of settings of the FOV from the ground through the video coax cable. To enable current LAM/LAMView modules to take advantage of this feature, a LAM Adapter module has been developed. The following diagram shows how the LAM Adapter is used in the case where the lens control is conducted from the controller cabinet (ground level). Camera Video/Comm Lens Control Ground Level LAMView Video Power Figure 5.14 If, however, the RZ4-Advanced camera needs to be adjusted directly at the back of the camera a LAM Harness Adapter is provided. -
Page 20: Lam Adapter Kit Components
5.2.3 LAM Adapter Kit Components Figure 5.16 5.2.4 LAM Harness Adapter Cables Figure 5.17 18 ... -
Page 21: Installing The Lam Adapter Module
5.2.5 Installing the LAM Adapter Module 1. Remove Power Cable (Deutsch Connector) from LAM/LAMView if attached (figure 5.18). 2. Slide Communication Cable/Connector through hole in the bracket on LAM Adapter (figure 5.19). 3. Hook LAM Adapter bracket under the bottom of the existing LAM bracket on the back of the LAM/LAMView (figure 5.19). 4. Hook Top Mounting Bracket over the top left of the bracket on the back of the LAM/LAMView and slide into position (figure 5.20). 5. Screw the two brackets together with the thumbscrews provided (figure 5.21). 6. Connect the LAM Adapter Video BNC connector to the BNC connector on the LAMView or to the Video input on the cabinet monitor (figure 5.22). 7. Connect the LAM/LAMView Communication Cable/Connector to the Power/Comm Connector (Deutsch Connector) on the bottom of the LAM Adapter (figure 5.22). 8. Connect the Power Connector supplied as part of the LAM Adapter kit (Deutsch Connector) to the LAM/LAMView (figure 5.22). 9. Connect the coax video cable from the camera to the BNC connector on the LAM Adapter (figure 5.22). 10. The unit is now ready for use. Hook under ... - Page 22 Hook over and Tighten slide into position Thumbscrews Figure 5.20 Figure 5.21 Connect Power Connector to LAM Connect Video from Camera to BNC Connector Connect LAM Adapter Video to Connect LAM LAM Comm Cable to LAM Adapter Figure 5.22 20 ...
-
Page 23: Installing The Lam Harness Adapter
5.2.6 Installing the LAM Harness Adapter NOTE: Before beginning, power to the Camera should be turned off. 1. Remove Power Cable (Deutsch Connector) from LAM/LAMView (figure 5.24). 2. Attach Power Adapter Cable to LAM/LAMView (figure 5.25). 3. Attach 6ft Video Cable (supplied with LAM/LAMView) to the LAM/LAMView (figure 5.25). 4. Disconnect the power connector from the back of the camera, remove through cord grip (figure 5.26). NOTE: If the power to the camera has not been turned off this connector will be energized. Please handle with extreme caution. Electrical shock hazard exists. 5. Attach Power/Comm/Video Adapter Cable to the back of the camera (figure 5.26). 6. Connect the Comm (Deutsch Connector), Video and Power from the Camera to the LAM/LAMVIEW (figure 5.27). 7. Restore power to the camera. 8. The unit is now ready for use. LAM Control LAM Video Output Connector Power Connector Figure 5.23 Remove Power Cable Figure 5.24 21 ... - Page 24 Attach Video Attach Power Cable Adapter Cable Figure 5.25 LAM Comm LAM Video Connection Connection Remove Camera LAM Power Power Connection Connection Figure 5.26 Connect Comm Connect Video using BNC Barrel Connect Power ...
- Page 25 LAM Harness Block Diagram Remove cable if attached Figure 5.28 23 ...
-
Page 26: Electronic Camera Adjustment
5.3 Electronic Camera Adjustment Lens Adjustment Module (LAM) Hook Up The Camera FOV is adjusted using the Vantage Lens Adjustment Module (LAM). The LAM is hooked up in series with the Vantage camera during camera installation. After attaching the LAM to the camera (see section 5.2.5 or 5.2.6 above) follow the directions below to correctly set the Field Of View. Lens Adjustment Module (LAM) Field of View Adjustments There are two buttons on the LAM which allow you to control the zoom, wide angle (zoom out) or telephoto (Zoom in) and two buttons which allow you to control the focus adjustment. In addition there are two buttons marked ‘Set’ and ‘Auto Focus’ 1. Turn “On” the monitor if your LAM is equipped with one. Camera video should now be visible. If the LAM is not equipped with a monitor, camera video should be visible on the cabinet monitor. 2. Use the LAM “Zoom Buttons” to obtain the proper Field Of View (FOV). Remember: The FOV should be a minimum of four lanes wide and medium sized vehicles at the stop bar area should be about the size of your thumb when using a nine inch monitor. Horizon should never be included as part of the FOV. 3. Once the proper FOV has been obtained, press the LAM “Auto Focus Button”. It is best to wait till traffic is stopped before attempting to Auto Focus. A pink rectangular shape will appear in the lower right corner of the monitor image indicating that the camera is trying to focus. Never press any other buttons while the rectangular focus indicator is still visible. 4. When proper focus has been obtained you must save the camera settings. To do this, press the LAM “Set Button”. The “Save Light” on the LAM module should illuminate indicating the settings ... - Page 27 b. Is the cabinet monitor connected, adjusted correctly, and plugged in to a valid working power source? c. Is power correctly connected to the camera? See the "Power Connector" section of this manual for more information. d. Is the camera power cable correctly terminated at the cabinet? See the "Cabinet Camera Power Connections" section of this manual for more information. Is the power "On"? Check the circuit breaker or fuse. e. If the LAM has a built‐in monitor, is the switch "ON"? If you are unable to obtain a video image, contact your local Vantage Dealer or contact the Vantage Product Support Team for assistance. See the "Vantage Product Support" section of this manual for contact information. Lens Adjustment Module (LAM) Field of View Adjustments There are six push button switches LAMVIEW. The top left most switches allow you to control the zoom, wide angle (zoom out) or telephoto (Zoom in). The top right most switches allow you to control the focus adjustment. The focus adjustment will be discussed in detail after the section on proper FOV. The results of pushing these switches will be evident while viewing the video monitor. The camera can be auto focused using the Autofocus button on the bottom left and final FOV settings are stored using the Set button on the bottom right. Some Basic Considerations Regarding Proper Field of View (FOV) The Stop Bar Four Lane Minimum Rule This rule states that if the region of interest is less than four lanes, for instance a two lane side street, ...
- Page 28 This picture graphically demonstrates the "stop bar four lane rule" and "the rule of thumb" vehicle size relationship Figure 5.29 Other Important Field of View Considerations 1) Make sure that there is no horizon in the FOV. This can result in serious operational problems for East or West approaches. Why? Because of the sun! During sunrise or sunset the sun can completely blind the camera. Proper FOV, visor adjustment, and camera tilt can prevent this potential problem. Poor Setup ‐ Horizon Is Included As Part of The Field of View (FOV) Figure 5.30 2) Make sure the stop bar area is located toward the bottom of the FOV. This will also leave room for advance zone detection. The following example photo shows the stop bar area located in the middle of the FOV, which is not the ideal location. Poor Setup ‐ Stop bar Area Is In The Middle of The Field of View (FOV) Figure 5.31 26 ...
- Page 29 Figure 5.32 Examples of a Good Fields of View Proper Camera Focus Adjustment When you are sure that you can obtain the desired FOV, you will need to focus the camera using the LAM. Proper focus is crucial for optimal Vantage system detection performance. A camera that is out of focus can significantly reduce the Vantage systems ability to perform; so it is important to take the time to adjust the focus properly. Monitor Vertical Hold Adjustment Some monitors do not show the user the true field of view, therefore, it is actually possible to have horizon in the FOV and not realize it. If the monitor has a vertical hold adjustment control, roll the picture up and down to see everything that is actually contained in the frame. When purchasing a monitor for use with the Vantage systems it is recommended that you buy a monitor with a vertical hold adjustment or an underscan switch. Process Completed Disconnect the LAM and reconnect the camera power and video cable. You are ready to move on to setting up the Vantage processor. 27 ...
-
Page 30: Surge Protection
5.4 Surge Protection Surge protection must be correctly installed as a crucial part of every Vantage system installation. The surge protector not only protects your Vantage equipment from voltage spikes, but also bleeds off voltages induced on the video coaxial cable. These standing voltages, if they were not neutralized, have the potential to damage the Vantage processor. Processor Side Camera Side The surge protector device that ships with the Vantage equipment is the EDCO CX06‐M; which is a good general purpose, multi‐strike, in‐line surge protection device. The EDCO CX06‐M is the surge protection device that has been approved for use with the Vantage video detection equipment. The EDCO surge suppressor is provided with each Vantage processor. The EDCO CX06‐M is a readily available, off the shelf, surge protection device. The specification sheet for the surge protection device is available in the "Technical Information" section of this manual. All surge protection must be approved by Iteris for use with the Vantage video detection systems. Failure to install surge protection, or using non‐approved surge protection devices, will void the Vantage equipment warranties. REMEMBER: The surge protection device must be grounded to operate correctly. Failure to correctly ground the surge protection device may result in damage to the Edge2 modules. A 14 gauge or larger wire run the shortest distance to ground, without severe bends, and to a common chassis ground point, is usually best. See the surge protection device manufacturer’s recommendations for more specific information. Also, make sure the surge protector is oriented correctly. The "cable" side should come from the Vantage camera, while the "equipment" side should go to the Vantage processor video input. Reversing these surge device connections can result in significantly reduced surge protection and a greater risk of damage to your Vantage equipment. 28 ... -
Page 31: Technical Information
Technical Information The following section contains detailed technical information on the Vantage Edge2 Processor and its associated components. • Belden Coaxial Cable • Power Cable • Camera Bracket • EDCO Surge Protection 6.1 Belden Coaxial Cable 29 ... -
Page 32: Sample Power Cable
6.2 Sample Power Cable 30 ... - Page 33 31 ...
-
Page 34: Iteris Vantage Camera Bracket
6.3 Iteris Vantage Camera Bracket The Universal Camera Bracket is designed to accommodate both horizontal and vertical structure mounting. The mounting bracket mates perfectly with Iteris's wired and wireless cameras and is constructed using high strength 6061 aluminum. For added protection, the assembly is gray powder coated. FEATURES & BENEFITS • Universal Camera Mounting • Horizontal for luminaire arm mounting • Vertical for standard pole mounting • High strength, light weight aluminum construction • Easy pan/tilt angle adjustment • Three banding slots for stainless steel banding of up to ¾ inch Vertical Mount Horizontal Mount Iteris Universal Camera Bracket Iteris Part: CAMBRKT4 32 ... -
Page 35: Edco Surge Protection
6.4 EDCO Surge Protection 33 ... -
Page 36: Vantage Rz-4 Advanced Camera Specifications
F Operating Humidity 0% to 100% relative humidity, non‐condensing Dimensions Length 14.5”, Diameter 5” (Tube Only) Weight 5.7 lbs Maintenance The Vantage Video Detection System, once correctly installed, requires a minimal amount of maintenance. Camera Cleaning Because Vantage video detection is a machine vision based system, a regular maintenance program should be implemented to ensure the front camera glass is kept free from dirt and debris. The camera housing glass should be cleaned at least once a year, or more frequently if required, especially under severe environmental conditions. Cleaning the glass ensures optimal performance. The use of a soft cotton cloth (non‐abrasive) and water is the recommended method for camera glass cleaning. Avoid leaving streaks on the glass. Avoid anything that might scratch the glass, cloud the glass, or leave an undesirable residue. Connector and Cable Inspection Periodically, it is wise to check camera power and video connections. Look for connector corrosion or moisture damage. Replace any defective connectors. Cabinet power and video cable and connections can also be checked for excessive wear or other defects. Repair or replace the defective cable or connectors as needed. If You Need Assistance The Iteris Vantage Product Support Team consists of a group of highly skilled individuals that are knowledgeable and readily available to answer your questions or assist you with any of our Vantage products. Please do not hesitate to contact us at: (888) 254‐5487 For more information on Iteris and the products and services that we provide, visit our website at www.iteris.com. 34 ...
Need help?
Do you have a question about the RZ4 Advanced and is the answer not in the manual?
Questions and answers