Table of Contents
Advertisement
Quick Links
Manufactured by Bioness Neuromodulation Ltd.
A Bioness Inc Company
19 Ha'Haroshet Street
PO Box 2500
Industrial Zone
Ra'Anana 43654, Israel
Worldwide Corporate Office
Bioness Inc
25103 Rye Canyon Loop
Valencia, CA 91355 USA
Telephone: 800.211.9136
Email: info@bioness.com
Website: www.bioness.com
NESS
, NESS L300
, NESS L300
Plus, Intelli-Gait
, Intelli-Sense Gait Sensor™, Bioness, the Bioness Logo
®
®
®
®
®
and LiveOn
are trademarks of Bioness Inc. | www.bioness.com
®
Rx Only
602-00383-001 Rev. C
Advertisement
Table of Contents
Troubleshooting

Related Manuals for Bioness NESS L300 Plus


Summary of Contents for Bioness NESS L300 Plus
- Page 1 Valencia, CA 91355 USA Telephone: 800.211.9136 Email: info@bioness.com Website: www.bioness.com NESS , NESS L300 , NESS L300 Plus, Intelli-Gait , Intelli-Sense Gait Sensor™, Bioness, the Bioness Logo ® ® ® ® ® and LiveOn are trademarks of Bioness Inc. | www.bioness.com ®...
- Page 2 Clinician’s Guide...
- Page 3 Clinician’s Guide Rx Only...
- Page 4 Disclaimer Bioness Inc and its affiliates shall not be liable for any injury or damage suffered by any person, either directly or indirectly, as a result of the unauthorized use or repair of Bioness Inc products. Bioness Inc and its affiliates do not accept any responsibility for any damage caused to its products, either directly or indirectly, as a result of use and/ or repair by unauthorized personnel.
-
Page 5: Table Of Contents
Radio Frequency (RF) Communication Information ..................9 Travel and Airport Security .........................10 Electromagnetic Emissions ........................11 Warnings .............................. 11 Chapter 4: The NESS L300 Plus System ................13 L300 FS Cuff ..............................14 L300 RF Stim Unit ..........................16 Cradle ..............................18 Locator ..............................18 Strap ..............................19... - Page 6 Locator ..............................29 Intelli-Sense Gait Sensor ..........................30 L300 Plus Control Unit ..........................31 Operating Buttons ..........................31 Turning On/Off the NESS L300 Plus System ..................32 Testing the Position of the FS Cuffs .....................32 L300 FS Cuff ..........................32 Thigh FS Cuff ..........................33 Selecting an Operating Mode ......................33 Gait Mode ............................33...
- Page 7 HP iPAQ Configuration Cradle with Stylus ....................45 HP iPAQ Clinician’s Programmer Charger ....................45 Programming Setup ............................46 Chapter 7: NESS L300 Plus Intelli-Gait Software ..............49 Icons, Menus, Buttons, Tabs, and Data Entry ....................49 Information Icon ...........................49 Advanced Settings and Audio Feedback Icons ..................50 Back Icon .............................50...
- Page 8 Backing Up and Restoring the Database .....................88 Automatic Backup ..........................88 Manual Backup ..........................88 Restore ............................89 Chapter 8: Fitting the NESS L300 Plus System ..............91 Skin Preparation ............................91 L300 FS Cuff ..............................91 Measuring for FS Cuff Strap Size ......................91 Attaching the Personal Strap Cover .....................92 Attaching the Personal Panel .......................93...
- Page 9 Programming Gait Settings ........................117 Placing the Gait Sensor in the Shoe ....................117 Programming Training Settings ........................ 119 Doffing the NESS L300 Plus System ....................... 119 Attaching the Thigh Electrode Marking Ring ................120 Chapter 9: Patient Training and Follow-Up ............... 121 Chapter 10: Maintenance and Cleaning ................
- Page 10 Thigh Cuff Buckles ...........................128 Thigh Clinic Straps ...........................129 Thigh Silicone Panels ..........................129 Thigh Elongation Bar Lock ........................130 Cleaning ..............................131 Disinfecting ...............................131 Chapter 11: Troubleshooting .................... 133 Using the Tester ............................133 Testing the L300 FS Cuff in Training Mode ..................133 Testing the L300 FS Cuff in Gait Mode ....................134 Advanced Testing ..........................134 Testing the Thigh FS Cuff in Training Mode ..................136 Testing the Thigh FS Cuff in Gait Mode .....................136...
-
Page 11: List Of Symbols
List of Symbols Caution Complies with United States and Canadian Product Safety Standards Complies with the European Union Medical Device Directive Double Insulated (Equivalent to Class II of IEC 536) Type BF Applied Part(s) Non-Ionizing Radiation Date of Manufacture Manufacturer This Product Must not be Disposed of with Other Household Waste Consult Instructions for Use Serial Number... - Page 12 Clinician’s Guide...
-
Page 13: Chapter 1: Introduction
Weak thigh muscles can cause considerable difficulties with flexing or extending the knee during ambulation. The NESS L300 Plus System is intended to provide ankle dorsiflexion and knee flexion or extension in individuals with foot drop and thigh muscle weakness following an upper motor neuron injury or disease. - Page 14 Clinician’s Guide...
-
Page 15: Chapter 2: Device Description And Safety Information
Indications for Use The NESS L300 Plus System is intended to provide ankle dorsiflexion and knee flexion or extension in individuals with foot drop and thigh muscle weakness following an upper motor neuron injury or disease. -
Page 16: Contraindications
Patients with a demand-type cardiac pacemaker, defibrillator, or any electrical or metallic implant should not use the NESS L300 Plus System. • The NESS L300 Plus System should not be used on a leg where a cancerous lesion is present or suspected. •... - Page 17 Turn off the NESS L300 Plus System before removing, replacing, and wetting the electrodes. • Turn off the NESS L300 Plus System before putting on the L300 and Thigh FS Cuffs. Do not turn on the NESS L300 Plus System until the L300 and Thigh FS Cuffs are fastened in place.
-
Page 18: Adverse Reactions
See Chapter 3 and the Appendix. • Do not attempt to repair the NESS L300 Plus System. Changes or modifications to the NESS L300 Plus System components not expressly approved by Bioness Inc could void the user's authority to operate the equipment. -
Page 19: Skin Care Guidelines
Ventilate the skin by removing the L300 and Thigh FS Cuffs for at least 15 minutes every 3 to 4 hours. If skin irritation or a skin reaction occurs, advise patients to stop using the NESS L300 Plus System immediately. They should contact their clinician or dermatologist, and the Bioness Clinical Relations Department, Option 3. - Page 20 Clinician’s Guide...
-
Page 21: Chapter 3: Environmental Conditions That Affect Use
Portable and mobile RF communications equipment can affect the NESS L300 Plus System. Conformity Certification The NESS L300 Plus System complies with Part 15 of the FCC rules. Operation is subject to the following two conditions: 1. This device may not cause harmful interference. -
Page 22: Travel And Airport Security
L300 Plus System. The NESS L300 Plus System will likely set off the security alarm. Patients should be prepared to remove the NESS L300 Plus System so that security can scan it, or to ask for the system to be scanned if they do not want to remove it. They may want to carry a copy of their NESS L300 Plus System prescription. -
Page 23: Electromagnetic Emissions
NESS L300 Plus System. • The NESS L300 Plus System may be interfered with by other equipment, even if that other equipment complies with CISPR (International Special Committee on Radio Interference, International Electrotechnical Commission, IEC) emission requirements. - Page 24 Clinician’s Guide...
-
Page 25: Chapter 4: The Ness L300 Plus System
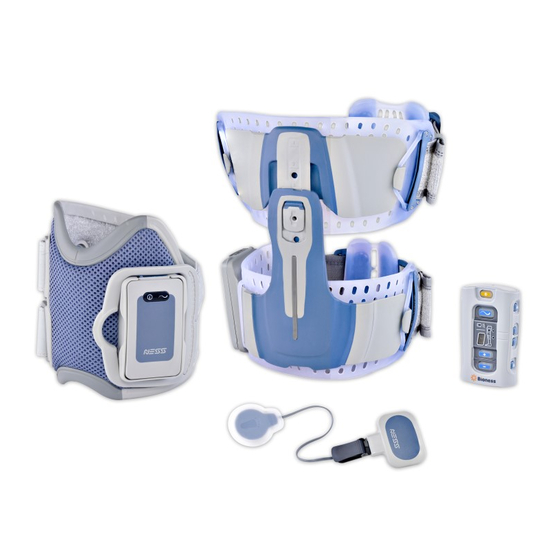
The NESS L300 Plus System The NESS L300 Plus System incorporates the NESS L300 Foot Drop System with a Thigh FS Cuff for stimulation of the quadriceps or hamstrings. The NESS L300 Plus System is designed for individuals with foot drop who require added knee support during gait and who would benefit from therapeutic training of the quadriceps or hamstrings to strengthen knee extension or flexion. -
Page 26: L300 Fs Cuff
L300 FS Cuff The L300 FS Cuff is a lightweight, low-profile neuroprosthesis that straps onto the leg directly under the patella. See Figure 4-2. The L300 FS Cuff can easily be worn under clothing and is available in right and left configurations for lower leg circumferences ranging from 29 cm to 51 cm (11 in. - Page 27 L300 Hydrogel Electrodes and Hydrogel Electrode Bases. • L300 Cloth Electrodes and Cloth Electrode Bases. Electrode and Strap Base Liner Locator Strap Handle L300 RF Stim Unit Cradle Figure 4-3: L300 FS Cuff. Chapter 4: The NESS L300 Plus System...
-
Page 28: L300 Rf Stim Unit
The battery charging port is located at the top of the L300 RF Stim Unit, under the flexible cover. See Figure 4-4. The NESS L300 Plus System Kit includes a system charger set for charging the L300 RF Stim Unit. Remove the L300 FS Cuff from the leg before charging the L300 RF Stim Unit. - Page 29 SOLID GREEN Battery Fully Charged FLASHES RED Radio Communication Failure SOLID RED Malfunction Stimulation FLASHES YELLOW SLOWLY Stimulation is Off Light FLASHES YELLOW RAPIDLY Stimulation is On Table 4-1: L300 RF Stim Unit displays. Chapter 4: The NESS L300 Plus System...
-
Page 30: Cradle
Cradle The cradle for the L300 RF Stim Unit is located on the medial side of the L300 FS Cuff. The L300 RF Stim Unit easily snaps in and out of the cradle. See Figure 4-5. Cradle Figure 4-5: RF Stim Unit cradle. Locator The L300 FS Cuff locator is used to accurately place the L300 FS Cuff on the leg, thus ensuring accurate placement of the L300 electrode(s). -
Page 31: Strap
Figure 4-7: L300 FS Cuff strap. Liner The liner is for attaching the L300 electrode(s) and wire concealers to the L300 FS Cuff. See Figure 4-8. Wire Concealer Liner Electrode and Base Figure 4-8: L300 FS Cuff liner. Chapter 4: The NESS L300 Plus System... -
Page 32: Electrode Options
Electrode Options The L300 electrodes deliver the stimulation generated by the L300 RF Stim Unit to dorsiflex the foot. The following electrodes may be used with the L300 FS Cuff: • Large Cloth Electrode, L300 Systems. See Figure 4-9. • L300 Hydrogel Electrodes and Hydrogel Electrode Bases. -
Page 33: L300 Hydrogel Electrodes And Bases
Figure 4-11: Snapping the L300 hydrogel electrode bases to the L300 FS Cuff plug holes. The L300 hydrogel electrodes adhere to the hydrogel electrode bases. See Figure 4-12. Hydrogel Electrode Figure 4-12: L300 hydrogel electrodes adhered to the bases. Chapter 4: The NESS L300 Plus System... -
Page 34: L300 Cloth Electrodes And Bases
L300 Cloth Electrodes and Bases The L300 FS Cuff uses two cloth electrodes and two cloth electrode bases. The L300 cloth electrode bases snap to the plug holes of the L300 FS Cuff. The L300 cloth electrodes snap to the L300 cloth electrode bases. See Figure 4-13. Cloth Electrode Cloth... -
Page 35: Thigh Fs Cuff
The clinician may also adjust the orientation of the distal cloth electrode. Chapter 4: The NESS L300 Plus System... - Page 36 The Thigh FS Cuff features: • A proximal and distal panel. See Figure 4-15. • An adjustable elongation bar. • A Thigh RF Stim Unit. • A cradle for the Thigh RF Stim Unit. • A locator. • Adjustable straps. •...
-
Page 37: Proximal And Distal Panels
The Thigh elongation bar is used to adjust the distance between the Thigh FS Cuff proximal and distal panels. The elongation bar slides together or apart and has six adjustment holes. See Figure 4-17. Adjustment Holes Figure 4-17: Thigh elongation bar. Chapter 4: The NESS L300 Plus System... -
Page 38: Thigh Rf Stim Unit
The battery charging port is located at the top of the Thigh RF Stim Unit, under the flexible cover. See Figure 4-18. The NESS L300 Plus System Kit includes a system charger set for charging the Thigh RF Stim Unit. Remove the Thigh FS Cuff from the leg before charging the Thigh RF Stim Unit. - Page 39 SOLID GREEN Battery Fully Charged FLASHES RED Radio Communication Failure SOLID RED Malfunction FLASHES YELLOW SLOWLY Stimulation is Off Stimulation Light FLASHES YELLOW RAPIDLY Stimulation is On Table 4-2: Thigh RF Stim Unit displays. Chapter 4: The NESS L300 Plus System...
-
Page 40: Cradle
Cradle The cradle for the Thigh RF Stim Unit is located on the Thigh FS Cuff distal panel. The Thigh RF Stim Unit easily snaps in and out of the cradle. See Figure 4-19. Cradle Figure 4-19: RF Stim Unit cradle. Thigh Clinic Straps The Thigh clinic straps are removable, replaceable, and adjustable. -
Page 41: Thigh Cloth Electrodes
The Thigh FS Cuff uses two cloth electrodes. The electrodes snap to the Thigh proximal and distal panels. See Figure 4-22. Thigh Cloth Electrodes Figure 4-22: Thigh cloth electrodes attached to the Thigh FS Cuff. Chapter 4: The NESS L300 Plus System... -
Page 42: Intelli-Sense Gait Sensor
Intelli-Sense Gait Sensor The Intelli-Sense Gait Sensor detects heel events when the L300 Plus System is used for walking. The Intelli-Sense Gait Sensor wirelessly signals the L300 RF Stim Unit and the Thigh RF Stim Unit to synchronize movement of the foot and knee according to the gait cycle. -
Page 43: L300 Plus Control Unit
RF Stim Unit, and the Intelli-Sense Gait Sensor. It is powered by a single rechargeable AAA NiMH battery that is easily replaced. The NESS L300 Plus System Kit includes a system charger set for charging the L300 Plus Control Unit. It also includes a belt pouch, wrist strap, and neck strap for carrying the L300 Plus Control Unit. -
Page 44: Turning On/Off The Ness L300 Plus System
Turning On/Off the NESS L300 Plus System 1. Press the on/off button on the L300 Plus Control Unit once. The L300 Plus System will start in standby mode. All display indicators will light up for a few seconds while the system performs a self-test. The on/off button will then FLASH GREEN to indicate the system is on. -
Page 45: Thigh Fs Cuff
L300 Plus Control Unit beeps, the mode button starts FLASHING YELLOW SLOWLY, and (“t” for training) alternates with the intensity level in the digital display. When stimulation is on, the mode button will FLASH YELLOW RAPIDLY. Chapter 4: The NESS L300 Plus System... -
Page 46: Standby Mode
Note: The L300 and Thigh FS Cuffs may be worn individually in training mode. When only one FS Cuff is worn, the NESS L300 Plus System will emit a faulty electrode contact alert. The visual and audio alerts can be turned off temporarily by pressing the RF Stim Unit selection button and then holding the mute button for three seconds. -
Page 47: Adjusting Stimulation Intensity
Muting the RF Stim Units To communicate wirelessly, the NESS L300 Plus Control Unit, L300 RF Stim Unit, Thigh RF Stim Unit, and Intelli-Sense Gait Sensor must be within RF communication range of each other. If the components become separated, RF communication will be lost and the system will emit an RF communication failure alert. -
Page 48: Turning On Audio Feedback During Stimulation
To mute the alerts for the L300 RF Stim Unit: 1. Place the L300 Plus Control Unit in standby mode. 2. Press and release the L300 RF Stim Unit selection button. 3. Press and hold the mute button for three seconds. To mute the alerts for the Thigh RF Stim Unit: 1. -
Page 49: Digital Display And Indicator Lights
Indicator Thigh RF Stim Unit Indicator and Selection Arrow L300 RF Stim Unit Indicator and Selection Arrow Digital Display Intelli-Sense Gait Sensor Indicator Figure 4-25: L300 Plus Control Unit digital display and indicators. Chapter 4: The NESS L300 Plus System... - Page 50 Display Description Definition On/Off Button FLASHES System is On GREEN Mode Button FLASHES Stimulation is Off YELLOW SLOWLY Mode Button FLASHES Stimulation is On YELLOW RAPIDLY Displays 0–9 Stimulation Intensity Level Intensity Level and Letter “t” Training Mode is On Alternate GREEN Arrow by Thigh RF Stim Thigh RF Stim Unit Selected...
- Page 51 Table 4-6: L300 Plus Control Unit error displays. Display Description Definition ALTERNATING GREEN Arches Registration is in Process Letter "C" Registration is Complete Letter "E" Registration Error Table 4-7: L300 Plus Control Unit electronic registration displays. Chapter 4: The NESS L300 Plus System...
- Page 52 Display Description Definition Thigh RF Stim Unit Indicator and RF Communication Failure, Thigh RF Communication Indicator RF Stim Unit ALTERNATELY FLASH RED L300 RF Stim Unit Indicator and RF Communication Failure, L300 RF Communication Indicator RF Stim Unit ALTERNATELY FLASH RED Thigh RF Stim Unit, L300 RF Stim RF Communication Failure, L300 Unit, and RF Communication...
-
Page 53: Chapter 5: Clinician's Components And Accessories
Clinician’s Components and Accessories L300 Clinician’s Kit HP iPAQ Clinician’s Programmer Charger PDA Components HP iPAQ Clinician’s Programmer • HP iPAQ Clinician’s Programmer • HP iPAQ Configuration Cradle with Stylus • HP iPAQ Clinician’s Programmer Charger HP iPAQ Configuration Cradle with Stylus Accessories • L300 FS Cuff Straps • Personal Panels... - Page 54 L300 Clinician's Kit L300 FS Cuff Strap Personal Panel Personal Strap Cover L300 Hydrogel L300 Hydrogel Tester, Fitting Cable Electrode Electrode Base L300 Systems L300 Cloth L300 Cloth Replacement Battery, Wire Concealer Gait Sensor Pad Electrode Electrode Base Gait Sensor Shoe Spacer Tape Measure Phillips Screwdriver...
-
Page 55: Chapter 6: Pda Components And Setup
PDA Components and Setup The descriptions in this section are for the L300 HP iPAQ clinician's programming components. The NESS L300 Plus System is also compatible with the L300 Dell clinician's programming components. HP iPAQ Clinician’s Programmer The HP iPAQ Clinician’s Programmer is a portable personal digital assistant (PDA) used to program the NESS L300 Plus System. -
Page 56: On/Off Button
Dispose of used batteries according to local regulation. Touchscreen Display The touchscreen display is used to navigate the NESS L300 Plus Intelli-Gait Software, display system status, and enter data. Use the pointed end of the stylus to make contact with the display screen. -
Page 57: Hp Ipaq Configuration Cradle With Stylus
HP iPAQ Configuration Cradle with Stylus The HP iPAQ Configuration Cradle with Stylus is used to connect the HP iPAQ Clinician’s Programmer to the L300 Plus Control Unit and to the HP iPAQ Clinician’s Programmer Charger. While the Clinician’s Programmer is connected to the L300 Plus Control Unit, it communicates via the L300 Plus Control Unit with the L300 RF Stim Unit and the Thigh RF Stim Unit. -
Page 58: Programming Setup
Programming Setup Orient the Clinician’s Programmer in the Configuration Cradle with the touchscreen facing up and the connector port facing left. See Figure 6-3. 1. Plug the communication connector cable with charger adapter into the connector port. Charge Touchscreen Indicator Light Charger Adapter Clinician's Programmer... - Page 59 To connect the L300 Plus Control Unit: 1. Turn off the L300 Plus Control Unit, or place it in standby mode. 2. Plug the communication connector cable into the connector port of the L300 Plus Control Unit. The white arrow should be facing up. See Figure 6-4. 3.
- Page 60 Clinician’s Guide...
-
Page 61: Chapter 7: Ness L300 Plus Intelli-Gait Software
NESS L300 Plus Intelli-Gait Software The NESS L300 Plus Intelli-Gait Software is used to program the NESS L300 Plus System. Icons, Menus, Buttons, Tabs, and Data Entry Information Icon The information icon indicates system status and, when pressed, opens error messages and troubleshooting screens. -
Page 62: Advanced Settings And Audio Feedback Icons
Advanced Settings and Audio Feedback Icons The advanced settings icon opens the advanced settings screen. The audio feedback icon turns on/off audio feedback during stimulation. See Figure 7-2. Advanced Settings Icon Audio Feedback Icon Figure 7-2: Advanced settings and audio feedback icons. Back Icon The back icon returns to the prior screen. -
Page 63: Menus
History View the patient's gait log, training log, and session history. View the System Information window. Tools For administrators only: manage users and backup and restore the database. Table 7-2: Menu functions. Chapter 7: NESS L300 Plus Intelli-Gait Software... - Page 64 Note: The Settings menu has four tabs: Setup, Stim, Gait, and Training. See Figure 7-5. Tabs Figure 7-5: Settings menu, tabs. Note: The Tools menu has four tabs: Info, Users, Backup, and Restore. Only Administrators have access to the Users, Backup, and Restore tabs. See Figure 7-6. Tabs Figure 7-6: Tools menu, tabs.
-
Page 65: Buttons
Note: Pressing Default will restore the default settings in the open window and Default reduce the intensity level in the stimulation, gait, and training settings windows to zero. Opens a help screen. Table 7-3: Frequently used buttons. Chapter 7: NESS L300 Plus Intelli-Gait Software... -
Page 66: L300 And Thigh Tabs
L300 and Thigh Tabs Press the L300 tab to program settings for the L300 FS Cuff. See Figure 7-8. L300 Tab L300 Tab Figure 7-8: L300 tab. Top: L300 Only configuration. Bottom: L300 and Thigh configuration. Clinician’s Guide... -
Page 67: Scroll Bars
Figure 7-9: Thigh tab. Scroll Bars Press the arrows on a scroll bar to move through the selectable data set. See Figure 7-10. Stimulation Intensity Scroll Bar Scroll Bars Figure 7-10: Scroll bars. Chapter 7: NESS L300 Plus Intelli-Gait Software... -
Page 68: Keyboard
Keyboard Use the on-screen keyboard to enter characters in a field that requires alphanumeric input. The keyboard appears collapsed at the bottom right of most screens. To enlarge or reduce the keyboard, touch the keyboard with the stylus. To enter data, select each character using the stylus. -
Page 69: Programming The Ness L300 Plus System
Programming the NESS L300 Plus System Logging In 1. Turn on the Clinician’s Programmer and launch the NESS L300 Plus Intelli-Gait Software. 2. From the Login Screen, enter a user name and password, and then press Login. See Figure 7-12. -
Page 70: Connecting The L300 Plus Control Unit
Press Yes to add the patient’s data to the Clinician’s Programmer database. • Press No and open an existing patient record. Note: If you press No and open an existing patient record, the opened record will permanently overwrite all existing data on the NESS L300 Plus System. Clinician’s Guide... -
Page 71: Control Unit Unassigned
Plus System components. Non-Supported System Detected Message appears when a Control Unit that is not supported by the NESS L300 Plus Intelli- Gait Software is connected to the Clinician’s Programmer (for example, an L300 Control Unit). Disconnect the Control Unit. -
Page 72: Thigh Rf Stim Unit Not Detected
Press System to overwrite the data in the Clinician’s Programmer database with that on the NESS L300 Plus System. • Press Database to overwrite the data on the NESS L300 Plus System with that in the Clinician’s Programmer database. •... -
Page 73: Opening/Creating A Patient Record
2. For new patients, enter the patient’s first and last name (alpha characters only) in the New Patient window, and assign a patient ID (1–14 characters). All fields must be completed. Then press OK. See Figure 7-18. Figure 7-18: New Patient window. Chapter 7: NESS L300 Plus Intelli-Gait Software... -
Page 74: Selecting A System Configuration
Selecting a System Configuration The L300 Plus System supports three system configurations: • L300 Only. • L300 and Thigh Hamstrings. • L300 and Thigh Quadriceps. To select a system configuration: 1. Press the Setup tab. 2. Select L300 Only, L300 and Thigh Hamstrings, or L300 and Thigh Quadriceps. See Figure 7-19. -
Page 75: Programming The L300
When stimulation is on, the muscle on the L300 tab will animate. 4. Gradually increase stimulation intensity to achieve the desired dorsiflexion. 5. Press Stop to stop stimulation. Note: To restore the default settings in an open window, press Default. Chapter 7: NESS L300 Plus Intelli-Gait Software... -
Page 76: Advanced Stim Settings
Advanced Stim Settings 1. Press the advanced settings icon to open the Advanced Stim Settings window. 2. From the Advanced Stim Settings window, check the box next to Increased Charge. See Figure 7-21. Back Icon Figure 7-21: L300 tab, Advanced Stim Settings window. 3. - Page 77 “Enable specific intensity level” for training mode in the Training Settings window. Table 7-4: L300 stim and gait parameters. Chapter 7: NESS L300 Plus Intelli-Gait Software...
-
Page 78: Gait Settings
Gait Settings The Intelli-Sense Gait Sensor must be in the patient’s shoe to program and test the gait settings. To program gait settings: 1. Press the Gait tab and the L300 tab. See Figure 7-22. Advanced Settings Icon Audio Feedback Icon 5-mA increase 1-mA increase Intensity Bar... -
Page 79: Advanced Gait Settings
Figure 7-23: L300 tab, Advanced Gait Settings window. Maximum Duration of Stimulation To avoid excessive fatigue of the muscles that activate dorsiflexion, the NESS L300 Plus System is designed to automatically stop stimulation after a set number of seconds (the maximum duration of stimulation). -
Page 80: Programming The Thigh
Programming the Thigh Stim Settings 1. Press the Stim tab and the Thigh tab to open the Thigh Stim Settings window. See Figure 7-24. 5-mA increase 1-mA increase Intensity Bar 1-mA decrease 5-mA decrease Figure 7-24: Stim Settings window, Thigh Hamstrings. 2. -
Page 81: Gait Settings, Thigh Hamstrings
The muscle on the Thigh Tab will highlight when stimulation is on. 5. Adjust settings with the patient walking. 6. Press Stop to stop stimulation. Note: Stimulation cannot be tested in the Thigh FS Cuff alone in gait mode. Chapter 7: NESS L300 Plus Intelli-Gait Software... - Page 82 Stim Parameter Definition Intensity Strength of stimulation: 0 mA to 100 mA, in 1-mA steps and 5-mA steps Waveform Type of stimulation: Symmetric or Asymmetric Phase Duration Length of time of the pulse: 100, 200, or 300 μsec Pulse Rate Frequency of stimulation: 20 Hz to 45 Hz, in 5-Hz steps Gait Parameter Definition...
-
Page 83: Advanced Gait Settings, Thigh Hamstrings
5. Adjust settings with the patient walking. 6. Press Stop to stop stimulation. 7. Press the back icon to return to the Gait Settings window. Note: To turn on audio feedback during stimulation, press the audio feedback icon. Chapter 7: NESS L300 Plus Intelli-Gait Software... -
Page 84: Maximum Duration Of Stimulation
Maximum Duration of Stimulation To avoid excessive fatigue of the muscles that activate dorsiflexion, the NESS L300 Plus System is designed to automatically stop stimulation after a set number of seconds (the maximum duration of stimulation). This safety feature is useful when a patient sits or lies down, the leg wearing the NESS L300 Plus System is in the air, and the system is in gait mode. -
Page 85: Gait Settings, Thigh Quadriceps
5. Press Stop to stop stimulation. Note: To turn on audio feedback during stimulation, press the audio feedback icon. Note: Stimulation cannot be tested in the Thigh FS Cuff alone in gait mode. Chapter 7: NESS L300 Plus Intelli-Gait Software... -
Page 86: Advanced Gait Settings, Thigh Quadriceps
Advanced Gait Settings, Thigh Quadriceps 1. Press the advanced settings icon to open the Advanced Gait Settings window. 2. Set the maximum duration of stimulation. See Figure 7-28. Back Icon Audio Feedback Icon Figure 7-28: Advanced Gait Settings window, Thigh Quadriceps. 3. -
Page 87: Programming Training Settings
5. Press Start to turn on stimulation in the selected FS Cuff(s). 6. Adjust stimulation intensity. 7. Press Stop to turn off stimulation. Chapter 7: NESS L300 Plus Intelli-Gait Software... - Page 88 Training Definition Parameter On Time The amount of time that stimulation is applied. Off Time The amount of rest time between stimulations. The time, in seconds, that it takes for the stimulation to increase from zero to the maximum level set. Ramp Up •...
-
Page 89: Viewing A Patient's History
1. Open the patient’s record, and then press History. 2. Press Sessions. The Sessions List window will open, showing the date, time, and programming clinician for each saved session. See Figure 7-20. Figure 7-30: Sessions List window. Chapter 7: NESS L300 Plus Intelli-Gait Software... - Page 90 3. Select a session from the Sessions List and press Open. 4. The Session Details window will open, showing the parameters saved for that session. See Figure 7-31. Figure 7-31: Session Details window. 5. From the View drop-down list, select “All” to view all the session details, or narrow the search by selecting one of the following: •...
-
Page 91: Gait Log
Gait Log The Gait Log is a record of the patient’s NESS L300 Plus System usage history. The Gait Log can be filtered by date and time frame, and displayed as a table or graph. To view a patient’s Gait Log: 1. - Page 92 Cumulative number of steps recorded to date. » Average number of steps recorded to date. » Total time spent using the NESS L300 Plus System for a given date. » Cumulative time spent using the NESS L300 Plus System to date. »...
-
Page 93: Training Log
Training Log The Training Log is a record of the patient’s NESS L300 Plus System training history. The Training Log can be filtered by date and resolution, and displayed as a table or graph. To view a patient’s Training Log: 1. - Page 94 3. From the drop-down list at the bottom right of the screen, select Tabular View or Graph View. • Tabular View displays: » The session date. » Session duration (time in training mode). » Total (cumulative) time in training mode. »...
-
Page 95: Managing Patient Records
1. Select a patient from the Patient List, and then press Modify. 2. The Modify Patient window will open. See Figure 7-36. Figure 7-36: Modify Patient window. 3. Modify the name and press OK. Note: Patient ID cannot be modified. Chapter 7: NESS L300 Plus Intelli-Gait Software... -
Page 96: Removing A Patient Record
Removing a Patient Record 1. Select a patient from the Patient List. 2. Press Remove. 3. The Remove Patient confirmation window will open. See Figure 7-37. 4. Press Yes. Figure 7-37: Remove Patient confirmation window. Clinician’s Guide... -
Page 97: Viewing The System Information
2. Press the Tools Menu and the Info tab. See Figure 7-38. Note: If an L300 Plus Control Unit is not connected, no system information will be displayed. Figure 7-38: System Information window, L300 Plus Control Unit connected. Chapter 7: NESS L300 Plus Intelli-Gait Software... -
Page 98: Managing Users
Managing Users From the Tools menu, administrators can add or remove users, change user passwords, and back up and restore the database. Adding a User 1. Press the Users tab to view the User Administration window. See Figure 7-39. Figure 7-39: User Administration window. 2. -
Page 99: Removing A User
1. From the User Administration window, select a user. 2. Press Change PWD. The Change User’s Password window will open. See Figure 7-42. 3. Enter and confirm the new password. Press OK. Figure 7-42: Change User’s Password window. Chapter 7: NESS L300 Plus Intelli-Gait Software... -
Page 100: Backing Up And Restoring The Database
Backing Up and Restoring the Database Automatic Backup The L300 Intelli-Gait Software will automatically back up the database whenever the application is exited. If a storage card is not in the SD slot, upon exiting the application a warning will appear. Note: Users should exit the L300 Plus Intelli-Gait Software at the end of each day. -
Page 101: Restore
7. Wait until the progress bar shows 100% and a “Restore successful” message appears. Then press ok. 8. Press Patients to return to the Patient List window, and then verify that the database was restored. Chapter 7: NESS L300 Plus Intelli-Gait Software... - Page 102 Clinician’s Guide...
-
Page 103: Chapter 8: Fitting The Ness L300 Plus System
9136, Option 3. If the electrodes are old, replace them. Make sure the component batteries are charged. Also before fitting, the components in a NESS L300 Plus System Upgrade Kit must be electronically registered to the existing L300 components for the L300 Plus System to operate. -
Page 104: Attaching The Personal Strap Cover
2. Remove the existing strap from the L300 FS Cuff, if required. 3. Orient the selected L300 FS Cuff strap with the hook and loop fasteners facing away from the L300 FS Cuff. 4. Insert the selected strap through the strap leads and buckles on the L300 FS Cuff. See Figure 8-1. -
Page 105: Attaching The Personal Panel
To attach the large cloth electrode: 1. Turn off the L300 Plus System. 2. Wet the entire large cloth electrode with water. See Figure 8-4. Figure 8-4: Wetting the large cloth electrode. Chapter 8: Fitting the NESS L300 Plus System... - Page 106 L300 FS Cuff. See Figure 8-6. Figure 8-6: Aligning the large cloth electrode. CAUTION: Only use electrodes provided by Bioness Inc. CAUTION: Do not fold or twist the large cloth electrode. CAUTION: The electrodes are for single patient use.
- Page 107 If the L300 cloth electrodes dry out, the response to the stimulation may change. If stimulation intensity needs to be adjusted more often than usual, try rewetting the cloth electrodes. CAUTION: Change the electrodes every two weeks. Chapter 8: Fitting the NESS L300 Plus System...
-
Page 108: Attaching The L300 Hydrogel Electrodes And Bases
Attaching the L300 Hydrogel Electrodes and Bases The L300 hydrogel electrodes are an alternative to the large cloth electrode. The L300 FS Cuff uses two L300 hydrogel electrodes and two L300 hydrogel electrode bases. The electrode bases snap to the L300 FS Cuff plug holes. The electrodes adhere to the electrode bases. The grid side of the hydrogel electrode faces the hydrogel electrode base. - Page 109 Figure 8-11: Splitting the two-piece covers. 3. Attach the grid side of the electrodes to the electrode bases and then press firmly. 4. Remove the larger covers (with the Bioness logo) from the electrodes and save them. (Always cover the hydrogel electrodes between uses.) 5.
-
Page 110: Connecting The Fitting Cable
Connecting the Fitting Cable The fitting cable is used to connect the L300 hydrogel electrode base snaps to the L300 FS Cuff plug holes, for aid in determining optimal placement of the L300 hydrogel electrodes on the leg. To connect the fitting cable: 1. -
Page 111: Adjusting The Position Of The Electrodes: Patient Seated
After proper dorsiflexion is achieved with the patient seated, if possible, retest with the patient standing and the foot in the air. If necessary, adjust the stimulation or electrode position to achieve proper dorsiflexion in this position. Chapter 8: Fitting the NESS L300 Plus System... -
Page 112: Transferring The Electrodes To The L300 Fs Cuff
Transferring the Electrodes to the L300 FS Cuff 1. Stop stimulation. 2. Using a marking pen, make four small, evenly spaced marks on the patient’s leg around the electrode bases for reference. 3. Disconnect the fitting cable from the electrode bases and the L300 FS Cuff, making sure not to move the electrodes. -
Page 113: Donning The L300 Fs Cuff
Figure 8-17: Tilting the L300 FS Cuff. 2. While holding the locator in place, have the patient lower the L300 FS Cuff until it rests flush against the leg. The L300 FS Cuff should gently grip the leg. Chapter 8: Fitting the NESS L300 Plus System... - Page 114 3. Have the patient grasp the handle of the L300 FS Cuff strap. With the thumb on the L300 RF Stim Unit cradle, have the patient fasten the L300 FS Cuff strap handle around the cradle. See Figure 8-18. Cradle Strap Handle L300...
-
Page 115: Retesting Electrode Placement: Patient Sitting And Standing
If the L300 cloth electrodes dry out, the response to the stimulation may change. If stimulation intensity needs to be adjusted more often than usual, try rewetting the cloth electrodes. CAUTION: The electrodes are for single patient use. Chapter 8: Fitting the NESS L300 Plus System... -
Page 116: L300 Cloth Electrode Bases
L300 Cloth Electrode Bases 1. Turn off the L300 Plus System. 2. Using the marking pen, mark the position of the L300 hydrogel electrode bases on the L300 FS Cuff liner. See Figure 8-21. Figure 8-21: Marking the position of the L300 hydrogel electrode bases on the L300 FS Cuff liner. 3. - Page 117 Figure 8-23: Removing the L300 hydrogel electrode bases. 5. Attach the L300 cloth electrode bases to the L300 FS Cuff where the L300 hydrogel electrode bases were attached. See Figure 8-24. Figure 8-24. Attaching the L300 cloth electrode bases. Chapter 8: Fitting the NESS L300 Plus System...
-
Page 118: L300 Cloth Electrodes
6. Snap the L300 cloth electrode bases to the plug holes of the L300 FS Cuff. See Figure 8-25. Figure 8-25: Snapping the L300 cloth electrode bases to the L300 FS Cuff plug holes. Note: The L300 cloth electrode base is 2 mm smaller in diameter than the L300 hydrogel electrode base. - Page 119 5. Don the L300 FS Cuff and verify that the desired dorsiflexion response is produced. If needed, optimize the stimulation settings and the position of the cloth electrodes. CAUTION: Replace the electrodes every two weeks. Chapter 8: Fitting the NESS L300 Plus System...
-
Page 120: Attaching The Wire Concealers
Attaching the Wire Concealers The wire concealers may be used to cover the wires and snaps of the L300 electrode bases on the L300 FS Cuff. See Figure 8-29. Press on the wire concealers to attach them to the liner of the L300 FS Cuff. Wire Wire Concealer Snap... -
Page 121: Thigh Fs Cuff
≥ 20 in. Table 8-2: Thigh FS Cuff fitting chart. CAUTION: Remove the Thigh FS Cuff from the skin every 3 to 4 hours for 15 minutes to allow the skin to breathe. Chapter 8: Fitting the NESS L300 Plus System... -
Page 122: Adjusting The Elongation Bar
Adjusting the Elongation Bar The Thigh elongation bar is used to adjust the distance between the Thigh FS Cuff proximal and distal panels, to accommodate different leg sizes. The elongation bar has six adjustment holes. The default elongation bar position is the #3 adjustment hole. To adjust the Thigh FS Cuff elongation bar: 1. -
Page 123: Attaching The Thigh Cloth Electrodes
See Figure 8-34, Figure 8-35, and Figure 8-36. Figure 8-34: The distal cloth electrode centered (left) and off-centered (right). CAUTION: Replace the electrodes every two weeks. Chapter 8: Fitting the NESS L300 Plus System... - Page 124 Figure 4-35: Electrode positioning on the quadriceps: centered (left) and off-centered (right) position. Figure 4-36: Electrode positioning on the hamstrings: centered (left) and off-centered (right) position. Note: • Wet the Thigh cloth electrodes before use. After every three to four hours of use, remove and rewet the Thigh cloth electrodes.
- Page 125 2. Press the electrodes together and gently squeeze out excess water. Then, with a soft cloth, gently wipe or blot excess water from snap side. See Figure 8-38. Figure 8-38: Blotting the Thigh cloth electrodes. Chapter 8: Fitting the NESS L300 Plus System...
- Page 126 3. Snap the proximal Thigh cloth electrode to the proximal panel. See Figure 8-39. Figure 8-39: Snapping the proximal Thigh cloth electrode. 4. Snap the distal Thigh cloth electrode to the distal panel. See Figure 8-40. Figure 8-40: Snapping the distal cloth electrode. Clinician’s Guide...
-
Page 127: Donning The Thigh Fs Cuff
See Figure 8-41. Figure 8-41: Donning the Thigh FS Cuff. 3. Fasten and tighten the straps. See Figure 8-42. Figure 8-42: Tightening the straps. Chapter 8: Fitting the NESS L300 Plus System... -
Page 128: Checking The Position Of The Thigh Cloth Electrodes: Patient Seated
Checking the Position of the Thigh Cloth Electrodes: Patient Seated Stimulation can be tested in the Thigh FS Cuff only by way of the stimulation setting screen. Stimulation cannot be tested in the Thigh FS Cuff alone by way of the gait setting screen. To check the position of the Thigh electrodes: 1. -
Page 129: Checking The Position Of The Thigh Cloth Electrodes: Patient Standing
Gait Sensor pad. (Refer to the foot image on the pressure sensor for alignment.) See Figure 8-44. Lifted Insole Pressure Sensor Foot Image Alignment Gait Sensor Intelli-Sense Gait Sensor Pressure Sensor Figure 8-44: Intelli-Sense Gait Sensor in a left shoe. Chapter 8: Fitting the NESS L300 Plus System... - Page 130 Then, place a soft, thin (one layer versus two) generic insole over them. Generic insoles can be purchased from drugstores, shoe stores, or Bioness Inc. CAUTION: The Intelli-Sense Gait Sensor has not been validated for use by individuals weighing more than 300 pounds (136 kilograms).
-
Page 131: Programming Training Settings
5. Note the adjustment hole selected for the Thigh elongation bar. 6. For home users, attach the Thigh electrode marking ring to the appropriate snap. 7. Clean and disinfect the Thigh FS Cuff, if appropriate. Chapter 8: Fitting the NESS L300 Plus System... -
Page 132: Attaching The Thigh Electrode Marking Ring
Attaching the Thigh Electrode Marking Ring 1. Check the orientation of the distal thigh cloth electrode, and attach the Thigh electrode marking ring to the appropriate snap. See Figure 8-47. Figure 8-47: Thigh electrode marking ring on the Thigh distal panel snap. 2. -
Page 133: Chapter 9: Patient Training And Follow-Up
The NESS L300 Plus program should be supervised by a qualified clinician to monitor clinical progress, maximize clinical effectiveness and safety, and provide clinical and technical support. Note: The above topics are described in this manual and in the NESS L300 Plus User’s Guide. Chapter 9: Patient Training and Follow-Up... - Page 134 Review of training topics as necessary: • A review of the general safety information, including the Skin Care Guidelines. • An overview of the NESS L300 Plus System. • Donning and doffing the L300 FS Cuff and the Thigh FS Cuff. •...
-
Page 135: Chapter 10: Maintenance And Cleaning
3. Connect the L300 Plus Control Unit and both RF Stim Units to the L300 Plus system charger set during registration. 4. Make sure all other NESS L300 and NESS L300 Plus System components are at least 30 feet from the components to be registered. -
Page 136: Registration
Registration The registration procedure must be performed twice: once for the L300 Plus Control Unit and once for the Thigh RF Stim Unit. Note: The existing Intelli-Sense Gait Sensor does not need to be registered. Only a new Intelli-Sense Gait Sensor needs to be registered. To register the L300 Plus Control Unit: 1. - Page 137 RF Stim Unit, and on the Thigh FS Cuff. Note: The System ID Number identifies which NESS L300 Plus System a component is registered to. The System ID Number on each component of a NESS L300 Plus System must match.
-
Page 138: Charging
Programmer. Refer to the PDA manufacturer’s instructions for information on battery removal and replacement. Battery Replacement Refer to the NESS L300 Plus User's Guide for battery replacement instructions for the NESS L300 Plus System components. CAUTION: Only use batteries supplied by Bioness Inc. -
Page 139: Electrode Bases
Electrode Bases The L300 electrode bases are reusable. When a patient discontinues use of the NESS L300 Plus System, remove the L300 electrode bases from the personal panel or the L300 FS Cuff, and remove the L300 electrodes from the L300 electrode bases. Clean the L300 electrode bases with cool water to remove any residue. -
Page 140: Thigh Cuff Buckles
*If using L300 hydrogel electrodes and bases: 1. Place the old L300 FS Cuff on the leg. 2. Use a marking pen to mark the position of the L300 FS Cuff locator on the leg. (Mark a few small dots.) 3. -
Page 141: Thigh Clinic Straps
Thigh Clinic Straps The Thigh clinic strap set includes two straps and one handle. The Thigh clinic straps slide in and out of the Thigh FS Cuff distal and proximal panels. To replace the Thigh clinic straps: 1. Note the orientation of the buckle and handle on the old straps. 2. -
Page 142: Thigh Elongation Bar Lock
Thigh Elongation Bar Lock The Thigh elongation bar lock is used to lock the position of the elongation bar on home-use systems. To adjust the elongation bar, the thigh elongation bar lock must be removed. Note: Only clinicians should remove the Thigh elongation bar lock. To remove the Thigh elongation bar lock: 1. -
Page 143: Cleaning
To prevent patient cross-contamination, attach the L300 personal panels and personal strap covers to the L300 FS Cuff. All NESS L300 Plus System components excluding the L300 FS Cuff and the outer surface of the Thigh clinic straps may be disinfected using CaviWipes™ (Metrex, Orange, CA). - Page 144 Clinician’s Guide...
-
Page 145: Chapter 11: Troubleshooting
The Tester is used to troubleshoot if there is a disconnection in one of the FS Cuffs or a faulty RF Stim Unit. The Tester provides audio feedback when connected to the NESS L300 Plus System and stimulation is applied. -
Page 146: Testing The L300 Fs Cuff In Gait Mode
Testing the L300 FS Cuff in Gait Mode 1. Connect the Tester to the L300 FS Cuff. 2. Press the L300 Plus Control Unit on/off button to turn on the system. 3. Press the mode button briefly to enter gait mode. The L300 Plus Control Unit will beep and the mode button will FLASH YELLOW SLOWLY (indicating that stimulation is off). - Page 147 FS Cuff. Retest the L300 FS Cuff. 5. If the Tester does not buzz, the L300 RF Stim Unit may be faulty. Replace the L300 RF Stim Unit or contact the Bioness Client Relations Department at (800) 211-9136, Option 3.
-
Page 148: Testing The Thigh Fs Cuff In Training Mode
Testing the Thigh FS Cuff in Training Mode 1. Connect the Tester to the proximal snap on the Thigh FS Cuff proximal panel and to the proximal snap on the Thigh FS Cuff distal panel. See Figure 11-4. Figure 11-4: Tester connected to the Thigh FS Cuff. 2. -
Page 149: Advanced Testing
Advanced Testing If stimulation is not delivered to the patient’s leg, a “faulty electrode contact” error may appear. Recheck that the Thigh RF Stim Unit is fully snapped into the cradle of the Thigh FS Cuff. Then follow the steps below: Step 1: Test the Thigh FS Cuff: 1. - Page 150 Thigh FS Cuff, and retest the Thigh FS Cuff. 5. If the Tester does not buzz, the Thigh RF Stim Unit may be faulty. Replace the Thigh RF Stim Unit or contact the Bioness Client Relations Department at (800) 211-9136, Option 3.
-
Page 151: Frequently Asked Questions
Frequently Asked Questions If you have any questions or concerns, please contact the Bioness Client Relations Department at (800) 211-9136, Option 3. Our clinic owns multiple NESS L300 Plus Systems. How can we identify which components belong to which system? •... - Page 152 I connected the L300 Plus Control Unit to the Configuration Cradle. A message appeared on the Clinician’s Programmer. The message says that a new patient was found and asks if I would like to add the patient record to the database. •...
- Page 153 An error occurred while charging. Reconnect the system charger set. If the problem persists, contact the Bioness Client Relations Department, Option 3. The L300 Plus Control Unit (or one of the RF Stim Units) does not light up when the system is turned on.
- Page 154 When I turn on the L300 Plus Control Unit, it beeps. One of the RF Stim Unit indicators and the RF communication indicator on the L300 Plus Control Unit is FLASHING RED. The RF Stim Unit indicators are not lit. •...
- Page 155 • The component is malfunctioning. Turn off the L300 Plus Control Unit and turn it back on. If the problem persists, then stop using the NESS L300 Plus System and contact the Bioness Client Relations Department, Option 3. A component indicator is FLASHING YELLOW.
- Page 156 I tried the registration procedure and saw a immediately, but I never saw the ALTERNATING GREEN arches in the digital display. The replacement component is not working. • Clinician mode may have been started instead of the registration process. Clinician mode is started by pressing the minus on/off buttons on the L300 Plus Control Unit.
-
Page 157: Troubleshooting Quick Reference Table
• Replace the Gait Sensor pad, if it appears worn. • Replace the Intelli-Sense Gait Sensor and register it. L300 and Thigh FS Cuffs Solution If you need technical or clinical assistance, please contact the Bioness Client Relations Department at (800) 211-9136, Option 3. Chapter 11: Troubleshooting... - Page 158 • Press the Clinician’s Programmer reset button. • Replace the Clinician’s Programmer. Lost the L300 Plus Intelli-Gait Contact the Bioness Client Relations Department, Option 3. Software application/data. • Reconnect the Configuration Cradle to the Clinician’s Programmer and L300 Plus Control Unit.
-
Page 159: Chapter 12: Technical Specifications
Technical Specifications L300 Plus Control Unit Specifications Classification Internally powered, continuous operation Operation Modes Gait, Training, Clinician, and Standby Battery Type Rechargeable AAA NiMH 1.2 V, 900–1100 mAh • On/Off illuminated button • Mode illuminated button to change operating modes •... - Page 160 L300 RF Stim Unit Specifications Classification Internally powered, continuous operation with type BF applied parts Operating Voltage 3.7 V Battery Type Proprietary rechargeable Li-Ion (Lithium Ion) 3.7 V, 750 mAh • Status (fault, battery, charging) and Stimulation LEDs Indications • "Beeps"...
- Page 161 Approximately 150 grams (4.8 oz.) L300 Electrode and Electrode Base Specifications Two, 45-mm (1.77-in.) diameter hydrogel electrodes Hydrogel Electrodes Note: Use only electrodes provided by Bioness Inc. Hydrogel Electrode Two relocatable polymer electrode bases for individual fitting Bases Two 45-mm (1.77-in.) diameter non-woven fabric/cloth electrodes Cloth Electrodes Note: Use only electrodes provided by Bioness Inc.
- Page 162 Thigh RF Stim Unit Specifications Classification Internally powered, continuous operation with type BF applied parts Operating Voltage 3.7 V Battery Type Proprietary rechargeable Li-Ion (Lithium Ion) 3.7 V, 750 mAh • Status (fault, battery, charging) and Stimulation LEDs Indications • "Beeps"...
- Page 163 Gait Parameters Swing Control Delay (%) 0–100% of phase* time, 5% resolution Swing Control End (%) 0–100% of phase* time, 5% resolution Stance Control Delay (%) 0–100% of phase* time, 5% resolution Stance Control End (%) 0–100% of phase* time, 5% resolution Ramp Up 0–2 seconds, 0.1-second resolution Ramp Down...
- Page 164 Environmental Ranges • Relative humidity: 25% to 85% • Atmospheric pressure: 700 hPa to 1060 hPa System Charger Specifications Use medical Class II safety approved power supply provided/approved by Bioness Inc with the following ratings: Input Voltage 100–240 V AC Current...
-
Page 165: Chapter 13: Appendix - Emi Tables
Guidance and Manufacturer’s Declaration—Electromagnetic Emissions The NESS L300 Plus System is intended for use in the electromagnetic environment specified below. The customer or the user of the NESS L300 Plus System should assure that it is used in such an environment. Emissions Test Compliance Electromagnetic Environment —... - Page 166 Electromagnetic Immunity for All Equipment and Systems The NESS L300 Plus System is intended for use in the electromagnetic environment specified below. The customer or the user of the NESS L300 Plus System should assure that it is used in such an environment. Immunity Test...
- Page 167 Guidance and Manufacturer’s Declaration—Electromagnetic Immunity The NESS L300 Plus System is intended for use in the electromagnetic environment specified below. The customer or the user of the NESS L300 Plus System should assure that it is used in such an environment. Immunity Test...
- Page 168 The NESS L300 Plus System is intended for use in an electromagnetic environment in which radiated RF disturbances are controlled. The customer or the user of the NESS L300 Plus System can help prevent electromagnetic interference by maintaining a minimum distance between portable and mobile RF communications equipment (transmitters) and the NESS L300 Plus System as recommended below, according to the maximum output power of the communications equipment.
Need help?
Do you have a question about the NESS L300 Plus and is the answer not in the manual?
Questions and answers