Bioness NESS L300 User Manual
Foot drop system
Hide thumbs
Also See for NESS L300:
- Clinicians manual (131 pages) ,
- User manual (94 pages) ,
- User reference manual (2 pages)
Table of Contents
Advertisement
Quick Links
Manufactured by Bioness Neuromodulation LTD
a Bioness Inc. Company
19 Ha'Haroshet Street
PO Box 2500
Industrial Zone
Ra'Anana 43654, Israel
European Representative
Ness Europe B.V
Stationsweg 41
3331 LR Zwijndrecht, The Netherlands
Telephone: 0800-6377633
Email: international@nlbioness.com
Website: www.bioness.com
Worldwide Corporate Office
Bioness Inc.
25103 Rye Canyon Loop
Valencia, CA 91355
Telephone: 800-211-9136
Email: info@bioness.com
Website: www.bioness.com
NESS
, NESS L300™, Intelli-Gait™, Intelli-Sense Gait Sensor™, Bioness
, the Bioness Logo
, LiveOn™ and For function. For freedom. For life.™ are trademarks of
®
®
®
Rx Only
Bioness Inc. | Manufactured by Bioness Neuromodulation Ltd., a Bioness Inc. (USA) Company, 25103 Rye Canyon Loop, Valencia, California 91355 USA |
Use of the symbols
and ™ herein refers to the registration status of trademarks in the U.S. only. These trademarks may also be registered in other countries.
®
612-00061-001 Rev. A
Mp612-00061-001_RevA.indd 1
1/29/09 12:38:52 PM
Advertisement
Table of Contents

Related Manuals for Bioness NESS L300


Summary of Contents for Bioness NESS L300
- Page 1 ® Rx Only Bioness Inc. | Manufactured by Bioness Neuromodulation Ltd., a Bioness Inc. (USA) Company, 25103 Rye Canyon Loop, Valencia, California 91355 USA | Use of the symbols and ™ herein refers to the registration status of trademarks in the U.S. only. These trademarks may also be registered in other countries.
- Page 2 NESS L300 ™ User’s Guide Mp612-00061-001_RevA.indd 2 1/29/09 12:38:52 PM...
- Page 3 User’s Guide Caution: Federal law restricts this device to sale by or on the order of a practitioner licensed by the law of the State in which he/she practices to use or order the use of the device. Mp612-00061-001_RevA.indd 1 1/29/09 12:38:52 PM...
- Page 4 Disclaimer Bioness Inc. and its affiliates shall not be liable for any injury or damage suffered by any person, either directly or indirectly, as a result of the unauthorized use or repair of Bioness Inc.’s products. Bioness Inc. does not accept any responsibility for any damage caused to its products, either directly or indirectly, as a result of use and/or repair by unauthorized personnel.
-
Page 5: Table Of Contents
Components of the NESS L300 ............9 ™ NESS L300™ FS Cuff and RF Stim Unit ..........10 Indicator lights on the RF Stim Unit and Audio Indications ....11 The Intelli-Sense Gait Sensor™ .............. 12 The Control Unit ..................13 Control Unit Buttons ................ - Page 6 Charging the Batteries ............... 30 Replacing the Batteries ..............33 Replacing The Electrodes ............... 36 Replacing The Electrode Bases .............. 39 Cleaning your NESS L300™ ..............40 Chapter 6: Replacing and Installing System Components ....41 Removing and Installing the RF Stim Unit ..........41 Placing an Intelli-Sense Gait Sensor™...
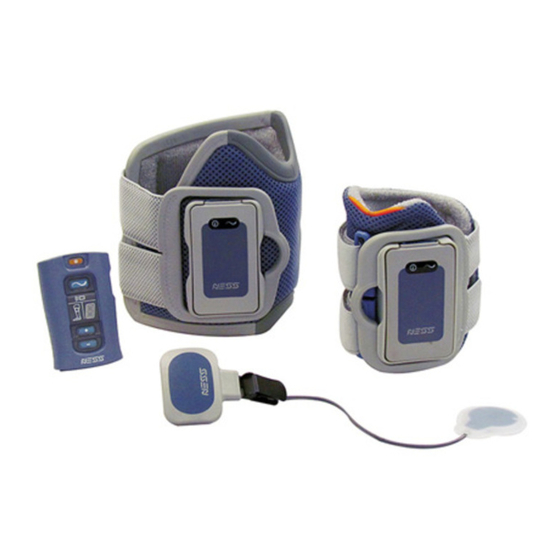
- Page 7 List of Figures Figure 1: NESS L300™ Kit ..............9 Figure 2: NESS L300™ FS Cuff (Right) ..........10 Figure 3: The Intelli-Sense Gait Sensor™ ..........12 Figure 4: The Control Unit ..............13 Figure 5: Recommended Knee Angle for FS Cuff Application ....20 Figure 6: Placing the FS Cuff on the Leg ..........
- Page 8 Figure 22: Intelli-Sense Gait Sensor™ in Place Under Insole ....43 Figure 23: Transmitter in Place (Left Shoe Shown) ........ 44 Figure 24: Shoe Spacer ................44 Figure 25: Optimal Component Arrangement ......... 46 Figure 26: Registration Process .............. 47 Figure 27: Digital Displays while Registering ..........
-
Page 9: Chapter 1: Introduction To Your Ness L30
™ Indications For Use The NESS L300™ is intended to provide ankle dorsiflexion in individuals with foot drop following an upper motor neuron injury or disease (such as a stroke, traumatic brain injury, multiple sclerosis, cerebral palsy or incomplete spinal cord injuries). -
Page 10: For Your Health And Safety
Patients with a demand-type cardiac pacemaker, defibrillator or any electrical or metallic implant should not use the NESS L300™. • The NESS L300™ should not be used on the leg if a cancerous lesion is present or suspected. • The NESS L300™ should not be used over areas of regional disorders, such as a fracture or dislocation, which would be adversely affected by motion from the stimulation. -
Page 11: Mp612-00061-001_Reva.indd
Electrodes and possible damage to the RF Stim Unit of the FS Cuff. • Do not use the NESS L300™ in close proximity (less than three feet) to short wave or microwave therapy equipment as it may produce instability in the RF Stim Unit output. -
Page 12: Mp612-00061-001_Reva.indd
• Do not wear the NESS L300™ System during x-ray examinations. • Turn the NESS L300™ off when refueling; don’t use the NESS L300™ at a refueling point. Don’t use near inflammable fuel, fumes or chemicals. • Electrode placement and stimulation settings should be determined by the treating clinician. - Page 13 • Do not leave the NESS L300™ stored in a car in hot or cold weather where the temperature may exceed the recommended storage temperatures of -20 to 60°C (-4 to 140°F) and could cause damage to the device.
-
Page 14: Mp612-00061-001_Reva.indd
Any other unanticipated reaction. Skin irritations and burns have been reported with the use of powered muscle stimulators. Home users of the NESS L300™ should not don or operate the system prior to being properly fit and trained by a certified clinician. - Page 15 Portable and mobile RF communications equipment can affect medical electrical equipment. Changes or modifications to this equipment not expressly approved by Bioness Inc. could void the user’s authority to operate the equipment. Chapter 1 - Introduction Mp612-00061-001_RevA.indd 7...
- Page 16 User’s Guide Mp612-00061-001_RevA.indd 8 1/29/09 12:38:54 PM...
-
Page 17: Chapter 2: General Overview Of Your Ness L300
™ Components of the NESS L300 ™ The NESS L300™ is available with a right or left Functional Stimulation (FS) Cuff. The kit is supplied with the following components: • Control Unit and optional neck strap, wrist strap, or belt pouch •... -
Page 18: Ness L300™ Fs Cuff And Rf Stim Unit
NESS L300™ FS Cuff and RF Stim Unit Electrode Base Electrode Strap Locator Strap Handle RF Stim Unit Cradle Stimulation Light Status Light Figure 2: NESS L300™ FS Cuff (Right) • The FS Cuff is light weight and has a low profile allowing it to be positioned under clothing. -
Page 19: Indicator Lights On The Rf Stim Unit And Audio Indications
Stimulation Applied RAPIDLY Table 1: RF Stim Unit Indications An audio alert will be emitted from the RF Stim Unit if communication fails or a malfunction occurs. Chapter 2 - General Overview of your NESS L300™ Mp612-00061-001_RevA.indd 11 1/29/09 12:38:59 PM... -
Page 20: The Intelli-Sense Gait Sensor
The Intelli-Sense Gait Sensor™ should be placed under the paretic (weak) foot. A single Intelli-Sense Gait Sensor™ is provided with the NESS L300™ System. Additional Intelli-Sense Gait Sensor™s can be purchased separately to avoid having to transfer the Intelli-Sense Gait Sensor™ from one shoe to another when wearing different pairs of shoes. -
Page 21: The Control Unit
Volume Control Unit Buttons Indicator Gait mode Button Intensity adjustment Buttons RF Stim Unit Intelli-Sense Intensity Indicator Gait Sensor™ Indicator Indicator Figure 4: The Control Unit Chapter 2 - General Overview of your NESS L300™ Mp612-00061-001_RevA.indd 13 1/29/09 12:39:00 PM... -
Page 22: Control Unit Buttons
Control Unit Buttons Control Unit Operating Description Button Turns the Control Unit ON ON/OFF and OFF Selects Gait, Training or Gait mode Standby Mode Adjusts the volume of Volume the audio indications and Adjustment turns the Audio Feedback for stimulation ON/OFF Adjusts the intensity of Intensity stimulation... -
Page 23: Control Unit Display And Audio Indications
Intensity Level One of the Indications Low Battery Flashes Yellow Rotating Circle Control Unit Charging Control Unit Fully Horizontal Line Charged Table 3: Control Unit Display Indications Chapter 2 - General Overview of your NESS L300™ Mp612-00061-001_RevA.indd 15 1/29/09 12:39:04 PM... -
Page 24: Table 4: Error Indications
Audio indications The audio alert beeps to indicate: • The system is turned ON. • A button is pressed. • Low battery. • There is an error which is accompanied by a visual indication. Error indications Display Display Flash Meaning The RF Stim Unit’s Indicator Flashes Faulty Electrode... -
Page 25: Chapter 3: Operating Modes
Operating Modes Standby mode The system is ON, and waiting for commands. Stimulation is not activated in Standby mode. Gait mode Select this mode for walking. In Gait mode the stimulation is synchronized by the Intelli-Sense Gait Sensor™, in order to lift the foot when the heel leaves the ground and relax the foot after heel contact with the ground. - Page 26 Mp612-00061-001_RevA.indd 18 1/29/09 12:39:05 PM...
-
Page 27: Chapter 4: Daily Use Of Your Ness L300
Before using the system in GAIT mode make sure the Intelli-Sense Gait Sensor™ is installed. If not, install it according to the section “Placing the Intelli-Sense Gait Sensor™ in your Shoe”. Chapter 4 - Daily Use of your NESS L300™ Mp612-00061-001_RevA.indd 19 1/29/09 12:39:05 PM... -
Page 28: Positioning The Fs Cuff On Your Leg
Positioning the FS Cuff on your leg 1. Clean the surface of the skin with a wet washcloth. If the skin has any oils or lotions it is best to clean it with soap and water, and rinse well. 2. While seated, slightly straighten your leg as seen in Figure 5. This causes the outline of the Kneecap to be clearly defined. -
Page 29: Figure 6: Placing The Fs Cuff On The Leg
After the Functional Stimulation (FS) Cuff is in position, pivot the FS Cuff until it is flush against the leg. The FS Cuff will gently grip the leg. Chapter 4 - Daily Use of your NESS L300™ Mp612-00061-001_RevA.indd 21 1/29/09 12:39:06 PM... -
Page 30: Figure 7: Fastening The Strap
4. To fasten the Functional Stimulation (FS) Cuff strap, grasp the handle of the elastic strap with the fingers of the opposite hand (see Figure 7), then hook your thumb around the cradle in order to hold the FS Cuff in place while you pull the handle around the cradle. -
Page 31: Taking The Functional Stimulation (Fs) Cuff Off
3. Place the Electrode covers over the Electrodes. 4. Charge the Control Unit and RF Stim Unit’s batteries fully at the end of your daily use (see Charging the Batteries). Chapter 4 - Daily Use of your NESS L300™ Mp612-00061-001_RevA.indd 23 1/29/09 12:39:07 PM... -
Page 32: Operating The Control Unit
Operating the Control Unit Turning ON the system Press the “ON/OFF” button once. The system starts in Standby mode. All display indicators light up for a few seconds while the system performs a self-test, then the “ON/OFF” button flashes green to indicate that the system is activated. -
Page 33: Adjusting The Stimulation Intensity Level
When you turn the system off, the volume level is saved unless the volume is set to “mute”, in which case the volume level is automatically adjusted to the default level. Chapter 4 - Daily Use of your NESS L300™ Mp612-00061-001_RevA.indd 25 1/29/09 12:39:08 PM... -
Page 34: Audio Feedback During Stimulation
Safety Features There are many safety features designed into the NESS L300™. One of the most important safety features occurs in the event of a communication failure (if the RF Stim Unit is separated from the Control Unit, or Intelli-Sense Gait Sensor™), or if a battery is discharged. -
Page 35: Chapter 5: Care And Maintenance
(wear time). Most reported cases of skin irritation occur after approximately 3 months of using the NESS L300™, so it is important to develop a good skin care routine early and then continue to follow these guidelines when using the NESS L300™. - Page 36 NESS L300™ is worn. • If the NESS L300™ is used continuously all day long, then you should ventilate the skin by taking off the FS Cuff for at least 15 minutes approximately every 3-4 hours. • If skin irritation or a skin reaction occurs: •...
-
Page 37: Batteries
Batteries The batteries must be charged daily, before the first use and after extended storage. Only the Control Unit and RF Stim Units’ batteries are rechargeable. Low Battery Warning When one of the component batteries is low, an audio indication will occur and the relevant indicator on the Control Unit will flash yellow (if the RF Stim Unit’s battery is low, its status light also flashes yellow). -
Page 38: Charging The Batteries
Charging the Batteries Both the Control Unit’s and RF Stim Unit’s batteries are rechargeable. Do not wear the Functional Stimulation (FS) Cuff while charging. 1. Open the cover of the charging socket at the bottom of the Control Unit and at the top of the RF Stim Unit as seen in Figure 9. RF Stim Unit charging socket Control Unit... -
Page 39: Figure 10: Connecting The Charger
2. Connect the charger cable to the Control Unit and to the RF Stim Unit as seen in Figure 10 and plug into the wall socket. A rotating circular icon will appear on the Control Unit’s display and the status light on the RF Stim Unit will start flashing alternating between yellow and green Figure 10: Connecting the Charger If the Control Unit’s battery is completely depleted, the letter... -
Page 40: Figure 11: Control Unit Charging Indicators
It is possible to charge the Control Unit or RF Stim Unit separately, but it is not recommended. 3. The charging process continues until the symbol appears on the Control Unit’s display and the RF Stim Unit’s status light turns a constant green , indicating a full charge. -
Page 41: Replacing The Batteries
Replacing the Batteries RF Stim Unit The RF Stim Unit’s rechargable battery should be replaced approximately every 2 years by a Bioness Inc. certified technician. Intelli-Sense Gait Sensor™ When the Intelli-Sense Gait Sensor™’s battery is low, an indication will appear approximately two weeks before it completely loses its charge. -
Page 42: Figure 13: Replacing The Intelli-Sense Gait Sensor™ Battery
Note: If you are Screws Cover unable to replace the battery yourself, your Battery local watchmaker or battery supply store should be able to assist you. Figure 13: Replacing the Intelli-Sense Gait Sensor™ Battery Prior to removing the old battery, note the correct “+” (plus) orientation of the battery Remove the old battery and properly dispose of it according to your local environmental regulations. -
Page 43: Figure 14: Replacing The Control Unit's Battery
the sticker so it can be reapplied). 2. Remove the battery cover. 3. Remove the old battery. 4. Insert a new rechargeable battery AAA NiMH 1.2 V battery according to the polarity marks in the battery socket. 5. Slide the cover back into place and tighten the screw. Use of a non-rechargeable AAA battery can damage the Control Unit. -
Page 44: Replacing The Electrodes
Replacing The Electrodes The Electrodes should be replaced at least every 2 weeks to maintain optimal operation. The NESS L300™ should only be used with Electrodes supplied by Bioness Inc. ® Do not use the NESS L300™ without Electrodes. To replace the Electrodes: 1. -
Page 45: Figure 16A: Tearing Apart The Electrodes
4. Tear apart the two electrodes at the perforated line (see Figure 16a). Figure 16a: Tearing apart the electrodes 5. Peel off the 2-piece split covers and discard (see Figure 16b). Figure 16b: Peeling off the 2-piece split covers 6. Attach the grid side of the electrodes to both electrode bases (see Figure 17). -
Page 46: Figure 18: Removing The Electrode Liners From The Electrodes
8. Remove the electrode liners from the electrodes (see Figure 18) and set aside to cover the electrode between uses. Note: When you cover the electrodes, place the electrode liners over the electrodes so you can read the Bioness logo when the liner is covering the electrodes. ®... -
Page 47: Replacing The Electrode Bases
Replacing The Electrode Bases The Electrode Bases may wear out after 1-2 years of use and may need to be replaced. Contact Bioness Inc. to purchase replacement Electrode Bases. To replace the Electrode Bases: 1. A clinician may have installed Wire Concealers over the Electrode Base’s wire. -
Page 48: Cleaning Your Ness L300
Cleaning your NESS L300™ All parts may be cleaned by carefully wiping with a damp cloth. Electrical components are not waterproof, so do not immerse them in water. The FS Cuff is the only component that can be immersed in water for cleaning. -
Page 49: Chapter 6: Replacing And Installing System Components
Replacing and Installing System Components Removing and Installing the RF Stim Unit The RF Stim Unit should only be removed for the purpose of cleaning the Functional Stimulation (FS) Cuff or if it needs to be replaced. Figure 20 shows how to detach the RF Stim Unit from the FS Cuff cradle. 1. -
Page 50: Placing An Intelli-Sense Gait Sensor™ In Your Shoe
Generic insoles can be purchased in drugstores, shoe stores or from Bioness Inc. The Intelli-Sense Gait Sensor™ should not be used in conjunction with any rigid insoles e.g custom rigid orthotic or... -
Page 51: Figure 22: Intelli-Sense Gait Sensor™ In Place Under Insole
3. Attach the Intelli-Sense Gait Sensor™ to the Adhesive Loop pad in the shoe. Make sure the wire points towards the toes (also see the foot image on the sensor for correct alignment). Pressure Sensor Foot Image Alignment Figure 22: Intelli-Sense Gait Sensor™ in Place Under Insole 4. -
Page 52: Figure 23: Transmitter In Place (Left Shoe Shown)
NESS Logo faces away from the ankle Clamp on Inner Rim of shoe Figure 23: Transmitter in Place (Left Shoe Shown) When using multiple Gait Sensors in multiple pairs of shoes, in order to switch shoes/Gait Sensors, turn the system off, change shoes and turn the system back on. -
Page 53: Replacing And Electronically Registering Components
Replacing and Electronically Registering Components When one or more of the NESS L300™ electronic components are replaced, a procedure must be performed to electronically register the new component to ensure radio communication between the components of the system. New components that require registration include: •... -
Page 54: Figure 25: Optimal Component Arrangement
C. Verify that the “old” Control Unit is turned off and placed in an envelope to be shipped to Bioness Inc. Make certain that it is placed at least 30 feet away from the NESS L300™ System you are registering. -
Page 55: Figure 26: Registration Process
them for three seconds. You should hear a beep indicating the registration process has begun. To initiate registration, press and hold these two buttons for three seconds "New" Unregistered Control Unit Figure 26: Registration Process 3. The Control Unit’s digital display will light up in two alternating arches until the registration is complete (See the left image in Figure 27). -
Page 56: Figure 27: Digital Displays While Registering
Stim Unit” error indication (see the Troubleshooting section). G. Once the registration process is complete, write the identification number found on the NESS L300™ System’s carrying case (e.g. A334) on the small sticker found on the back of the “new” Control Unit. This will help identify to which NESS L300™... -
Page 57: Figure 28: Blank Sticker On The Back Of The Control Unit
Blank Sticker Figure 28: Blank sticker on the back of the Control Unit Warning: Do not turn the system on while the RF Stim Unit is out of the cradle It is recommended that your clinician re-fit the FS Cuff and Electrodes in the event the FS Cuff needs to be replaced. - Page 58 2. Make sure the Control Unit is turned OFF; the ON/OFF button should not flash green. 3. Verify that no other NESS L300™ Systems are in the vicinity of the system (at least 30 feet). 4. Make sure that all the components are on a table and in close proximity to each other, but not closer than a few inches.
-
Page 59: Registering A New Rf Stim Unit
Removing and Installing the RF Stim Unit, page 41). 2. Place the “old” RF Stim Unit in an envelope to be shipped to Bioness Inc. and make certain it is placed at least 30 feet away from the NESS L300™... - Page 60 (See Figure 25 for optimal component arrangement). Make sure that the components aren’t touching. D. Make certain that the registration process is performed at least 30 feet away from any other NESS L300™ system(s). Registration E. Important: Please read the registration steps 1 through 4 below before starting the registration process: 1.
-
Page 61: Figure 30: Registration Process
"New" Unregistered RF Stim Unit To initiate registration, press and hold these two buttons for three seconds Figure 30: Registration Process 3. The Control Unit’s digital display will light up in two alternating arches until the registration is complete (see the left image in Figure 31). This may take several seconds to complete. -
Page 62: Figure 31: Digital Displays While Registering
In the Process of Registration Registration Error Registering Complete Figure 31: Digital Displays while Registering Important Note: If the “old” RF Stim Unit was used 20 minutes previous to the registration process, wait 20 minutes (while the system is turned off) for the RF Stim Unit to enter its energy saving mode. - Page 63 3. Wait 20 minutes (while the system is turned off) for the RF Stim Unit to enter its energy saving mode before commencing the registration process. 4. Verify that no other NESS L300™ Systems are in the vicinity (at least 30 feet).
-
Page 64: Registering A New Intelli-Sense Gait Sensor
L300™ System you are registering is detached from the shoe in order to avoid accidental activation of the Gait Sensor during the registration process. D. If there are other NESS L300™ Systems in the vicinity, make certain that the registration process is performed at least 30 feet away from them. "New"... -
Page 65: Figure 33: Registration Process
Registration E. Important: Please read the registration steps 1 through 5 below before starting the registration process: 1. Make sure the Control Unit is turned OFF. 2. Press the buttons on the Control Unit (see Figure 33) simultaneously and hold them for three seconds. You should hear a beep indicating the registration process has begun. -
Page 66: Figure 34: Digital Displays While Registering
4 seconds. G. Once the registration process is complete, write the system’s identification number found on the NESS L300™ carrying case (e.g. A334) on the small sticker found on the back of the “new” Gait Sensor. This will help identify to which system the “new”... -
Page 67: Figure 35: Blank Sticker On The Back Of The Gait Sensor
Blank Sticker Figure 35: Blank sticker on the back of the Gait Sensor Troubleshooting A Gait Sensor can only be registered once so if the letter appeared on the Control Unit and the Gait Sensor’s indication LED turned green for a few seconds any subsequent attempts to register the Gait Sensor will result in an “Error”... -
Page 68: Un-Registering An Intelli-Sense Gait Sensor
3. Verify that no other NESS L300™ systems are in the vicinity of the system (at least 30 feet). 4. Make sure that all the components are on a table and in close proximity to each other, but not closer than a few inches. -
Page 69: Chapter 7: Accessories
Accessories The NESS L300™ comes with accessories to help you carry your Control Unit. 1. Neck strap: The neck strap enables you to hang the Control Unit around your neck. If you find it more convenient you may insert the Control Unit into your shirt pocket. - Page 70 Mp612-00061-001_RevA.indd 62 1/29/09 12:39:26 PM...
-
Page 71: Chapter 8: Traveling With Your Ness L300™ System
“hand scan”. Be prepared to be asked to remove the NESS L300™ System so it can be run through the X-ray scanner if requested. As an extra precaution, you may want to carry a copy of your physician’s prescription for the NESS L300™... - Page 72 Mp612-00061-001_RevA.indd 64 1/29/09 12:39:27 PM...
-
Page 73: Chapter 9: Troubleshooting
If the problem persists then: 4. Check that the RF Stim Unit is installed properly (see the section “Removing and Installing the RF Stim Unit”). If the problem persists then contact Bioness Inc. Chapter 9 - Troubleshooting Mp612-00061-001_RevA.indd 65 1/29/09 12:39:27 PM... - Page 74 …one of the component indication lights is constantly red and I hear a beep? The corresponding component is malfunctioning. Turn off the system and turn back on. If the problem persists stop using the NESS L300™ and contact Bioness Inc. 66 User’s Guide Mp612-00061-001_RevA.indd 66...
- Page 75 An error occurred while charging. Try to reconnect the charger cable. If the problem persists, then replace the battery or contact Bioness Inc. … the Control Unit’s or RF Stim Unit’s display does not light up when I switch it ON? Make sure that the Control Unit’s battery and/or RF Stim Unit’s battery...
- Page 76 • RESUME use only when the skin is completely healed • Once you resume use of the NESS L300™, follow a CONDITIONING PROTOCOL as per the clinical recommendations from your Clinician, Dermatologist or Bioness Clinical Specialist. For further information see the Skin Care Guidelines Chapter 5 (page 68 User’s Guide...
-
Page 77: Chapter 10: Specifications
Specifications Control Unit Specifications Classification Internally powered, continuous operation Operation modes Gait, Training, Clinician and Standby Battery type Rechargeable AAA NiMH 1.2 V, 900 mAh On/Off illuminated button Gait mode illuminated button for changing operation Controls modes Intensity +/- buttons to fine-tune the intensity Volume +/- buttons control buzzer volume Three status LEDs: Control Unit, RF Stim Unit and Intelli- Sense Gait Sensor™... - Page 78 RF Stim Unit Specifications Internally powered, continuous operation with type BF Classification applied parts Operating 3.7 V voltage Battery type Proprietary rechargeable LiIon (Lithium Ion) 3.7 V, 700 mAh Status (fault, battery, charging) and Stimulation LEDs Indications “Beeps” for audible indications Height: 74 mm (2.9”) Dimensions Width: 43 mm (1.7”)
- Page 79 Symmetric Asymmetric Positive pulse 100 µs 200 µs 300 µs 100 µs 200 µs duration µs Negative pulse 1200 100 µs 200 µs 300 µs 400 µs 800 µs duration µs Inter-phase 50 µs interval Total Pulse 1500 250 µs 450 µs 650 µs 500 µs...
- Page 80 Weight Approximately 150 grams (4.8 oz) Electrode specifications Two, 45 mm hydrogel Electrodes Electrodes Note: Use only Electrodes provided by Bioness Inc. Two relocateable polymer Electrode Bases for individual Electrode Base fitting Intelli-Sense Gait Sensor™ Specifications Internally powered, continuous operation with type BF...
- Page 81 Power Supply specifications Use medical Class II safety approved power supply provided/approved by Bioness Inc. with the following ratings: Input Voltage 100-240V AC Current 200 mA Frequency 50-60 Hz Output Voltage 5V ± 5% Current 1300 mA Note: Do not use the Control Unit or RF Stim Unit while charging.
- Page 82 Mp612-00061-001_RevA.indd 74 1/29/09 12:39:28 PM...
-
Page 83: Chapter 11: List Of Symbols
List of Symbols Caution Complies with United States and Canadian product safety standards 3106069 Complies with the European Union medical device directive Serial Number Double Insulated (equivalent to Class II of IEC 536) Type BF Applied Part(s) Non-Ionizing Radiation Authorized European Representative Date of manufacture Manufacturer This product must not be disposed of... -
Page 84: List Of Components And Accessories
List of Components and Accessories Model Numbers Description LG3-4010 L300 Clinician’s Kit LG3-4A10 Strap Covers LG3-5E10 Electrode Base LG3-5M10 Shoe Spacer LG3-4910 Fitting Cable LG3-5K10 Adhesive Loop Pads LG3-5L10 Wire Concealers LG3-4710 Configuration Cradle LG3-4810 LG3-4310 Charger, Clinician’s Programmer LG3-4510 LG3-4410 Clinician’s programmers charger adapter LG3-4610... - Page 85 LG3-4P10 Permanent Pen LG3-4B10 Tester LG3-4G10 SD Memory Card LG3-4F10 Shoe Insoles LG3-4H10 Shoe Horn LG3-4K10 Clinical Scissors Model Numbers Description LG3-5010 L300 System Kit LG3-5110 LG3-4A10 Strap Covers LG3-5310 RF Stim Unit LG3-5K10 Adhesive Loop Pad LG3-5E10 Electrode Base LG3-5M10 Shoe Spacer LG3-5G10...
Need help?
Do you have a question about the NESS L300 and is the answer not in the manual?
Questions and answers