Table of Contents
Advertisement
Quick Links
Manufactured by Bioness Neuromodulation Ltd.
A Bioness Inc Company
19 Ha'Haroshet Street
PO Box 2500
Industrial Zone
Ra'Anana 43654, Israel
Worldwide Corporate Office
Bioness Inc
25103 Rye Canyon Loop
Valencia, CA 91355 USA
Telephone: 800-211-9136
Email: info@bioness.com
Website: www.bioness.com
European Authorized Representative
NESS Europe B.V.
Stationsweg 41
3331 LR Zwijndrecht, The Netherlands
Telephone: +31.78.625.6088
Email: international@nl.bioness.com
Website: www.bioness.com /Landing.php?reset
NESS
, NESS L300
, NESS L300
Plus, Intelli-Gait
, Intelli-Sense Gait Sensor™, Bioness, the Bioness Logo
and LiveOn
®
®
®
®
®
®
are trademarks of Bioness Inc in the United States or other countries. | www.bioness.com/Landing.php?reset
Rx Only (US Only)
612-00313-001 Rev. B
Mp612-00313-001_RevB.indd 1
7/18/2011 4:13:54 PM
Advertisement
Table of Contents

Related Manuals for Bioness NESS L300 Plus


Summary of Contents for Bioness NESS L300 Plus
- Page 1 , Intelli-Sense Gait Sensor™, Bioness, the Bioness Logo and LiveOn ® ® ® ® ® ® are trademarks of Bioness Inc in the United States or other countries. | www.bioness.com/Landing.php?reset Rx Only (US Only) 612-00313-001 Rev. B Mp612-00313-001_RevB.indd 1 7/18/2011 4:13:54 PM...
- Page 2 User’s Guide Mp612-00313-001_RevB.indd 2 7/18/2011 4:13:54 PM...
- Page 3 User’s Guide Rx Only (US Only) Mp612-00313-001_RevB.indd 1 7/18/2011 4:13:56 PM...
- Page 4 Disclaimer Bioness Inc and its affiliates shall not be liable for any injury or damage suffered by any person, either directly or indirectly, as a result of the unauthorized use or repair of Bioness Inc products. Bioness Inc does not accept any responsibility for any damage caused to its products, either directly or indirectly, as a result of use and/or repair by unauthorized personnel.
-
Page 5: Table Of Contents
Radio Frequency (RF) Communication Information ......... 11 Travel and Airport Security ................12 Electromagnetic Emissions ................13 Warnings ..................... 13 Chapter 4: NESS L300 Plus System Kits ..........15 NESS L300 Plus System Kit ................15 System Components .................. 15 Accessories ....................15 NESS L300 Plus System Upgrade Kit .............. - Page 6 Strap ......................20 L300 Electrodes and Electrode Bases ............20 L300 RF Stim Unit ..................21 Thigh FS Cuff ....................23 Panels ......................24 Elongation Bar .................... 24 Locator ......................24 Cradle ......................24 Thigh Cloth Electrodes ................25 Thigh RF Stim Unit ..................26 Intelli-Sense Gait Sensor ..................
- Page 7 Replacement Battery, Gait Sensor ..............60 Gait Sensor Pads ..................... 61 Shoe Spacers ....................62 Chapter 7: Setting Up the NESS L300 Plus System ......63 Preparing the Skin .................... 63 Checking the Components ................63 Putting on the L300 FS Cuff ................64 Testing the Position of the L300 FS Cuff ............
- Page 8 Adjustment Guidelines ................82 Thigh FS Cuff....................83 Turning on Audio Feedback During Stimulation ..........84 L300 FS Cuff....................84 Thigh FS Cuff....................85 Muting/Un-Muting the L300 Plus Control Unit ..........86 Turning Off Audio/Visual Alerts ................. 87 L300 FS Cuff....................87 Thigh FS Cuff....................
-
Page 9: List Of Symbols
List of Symbols Caution or Warning Double Insulated (Equivalent to Class II of IEC 536) Type BF Applied Part(s) Non-Ionizing Radiation Date of Manufacture Manufacturer This Product Must not be Disposed of with Other Household Waste Consult Instructions for Use Serial Number Re-Order Number Lot Number... - Page 10 User's Guide VIII Mp612-00313-001_RevB.indd 8 7/18/2011 4:14:02 PM...
-
Page 11: Chapter 1: Introduction
Weak thigh muscles can cause considerable difficulties with flexing or extending the knee during ambulation. The NESS L300 Plus System is intended to provide ankle dorsiflexion and knee flexion or extension in individuals with foot drop and thigh muscle weakness following an upper motor neuron injury or disease. - Page 12 User's Guide Mp612-00313-001_RevB.indd 2 7/18/2011 4:14:02 PM...
-
Page 13: Chapter 2: Device Description And Safety Information
Device Description and Safety Information Device Description The NESS L300 Plus System consists of four main components: • L300 Functional Stimulation (FS) Cuff with L300 Radio Frequency (RF) Stim Unit—used to stimulate the nerves that control the muscles of the lower leg. -
Page 14: Indications For Use
The NESS L300 Plus System should not be used on a leg where a cancerous lesion is present or suspected. • The NESS L300 Plus System should not be used on a leg with a regional disorder, such as a fracture or dislocation, which could be adversely affected by motion from the stimulation. -
Page 15: Warnings
L300 and Thigh RF Stim Units. • The NESS L300 Plus System should only be configured by an authorized clinician. Precautions •... - Page 16 Obtain physician clearance before stimulating an area with a structural deformity. • The safe use of the NESS L300 Plus System during pregnancy has not been established. • Keep the NESS L300 Plus System out of the reach of children.
- Page 17 • Turn off the NESS L300 Plus System before putting on the L300 and Thigh FS Cuffs. Do not turn on the NESS L300 Plus System until the FS Cuffs are fastened in place. • Turn off the NESS L300 Plus System before driving, operating machinery, or performing any activity in which involuntary muscle contractions could injure you.
- Page 18 • Do not attempt to repair your NESS L300 Plus System. Changes or modifications to the NESS L300 Plus System components not expressly approved by Bioness Inc could void the user’s authority to operate the equipment. Contact your local distributor if you experience a clinical or technical problem not covered in this guide.
-
Page 19: Adverse Reactions
Skin Care Guidelines In the absence of proper skin care, extended use of electrical stimulation may cause skin irritation or a skin reaction to the NESS L300 Plus System electrodes or the L300 and/or Thigh FS Cuffs. To promote healthy skin with long-term use of the NESS L300 Plus System, it is important to follow a daily skin-care routine: •... - Page 20 Ventilate the skin by removing the L300 and Thigh FS Cuffs for at least 15 minutes every 3 to 4 hours. If skin irritation or a skin reaction occurs, stop using your NESS L300 Plus System immediately. Contact your clinician or dermatologist, and your local distributor.
-
Page 21: Chapter 3: Environmental Conditions That Affect Use
Environmental Conditions that Affect Radio Frequency (RF) Communication Information Several components of the NESS L300 Plus System communicate via radio communication and have been tested and found to comply with the limits for a Class B digital device, pursuant to Part 15 (RF Devices) of the FCC (Federal Communications Commission) Rules. -
Page 22: Travel And Airport Security
You may want to carry a copy of your NESS L300 Plus System prescription. A prescription can be useful when passing through customs as well. -
Page 23: Electromagnetic Emissions
Manufactured by Tamuz Electronics Ltd. Warnings • Do not use the NESS L300 Plus System within three feet of shortwave or microwave therapy equipment. Such equipment may produce instability in the output of the L300 and Thigh RF Stim Units. - Page 24 NESS L300 Plus System. • The NESS L300 Plus System may be interfered with by other equipment, even if that other equipment complies with CISPR (International Special Committee on Radio Interference, International Electrotechnical Commission) emission requirements.
-
Page 25: Chapter 4: Ness L300 Plus System Kits
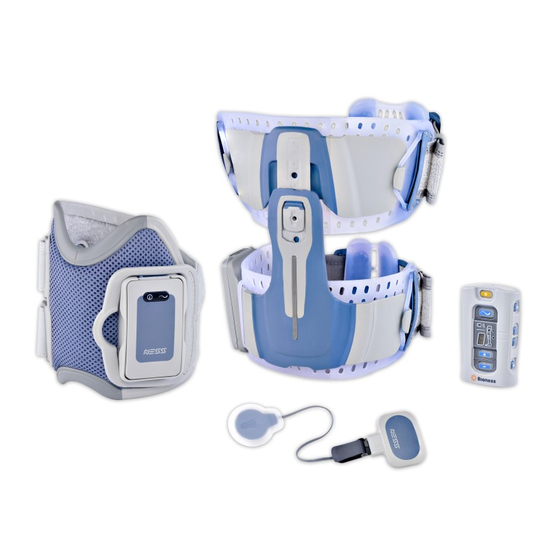
Control Unit Wrist Strap L300 Plus Control Unit • Control Unit Belt Pouch L300 FS Cuff and Thigh FS Cuff and Intelli-Sense Gait Sensor RF Stim Unit RF Stim Unit Chapter 4 - NESS L300 Plus System Kits Mp612-00313-001_RevB.indd 15 7/18/2011 4:14:07 PM... - Page 26 • Replacement Battery, Gait Sensor • Gait Sensor Pads • Shoe Spacers • Thigh Elongation Bar Locks • Thigh Electrode Marking Rings • Large Cloth Electrode* • L300 Hydrogel Electrodes and Bases* • L300 Cloth Electrodes and Bases* • Thigh Cloth Electrodes •...
- Page 27 Cloth Electrode Replacement Battery, Shoe Spacer Gait Sensor Pad Mesh Bag Gait Sensor Control Unit Wrist Strap Control Unit Neck Strap Control Unit Belt Pouch System Charger Set Chapter 4 - NESS L300 Plus System Kits Mp612-00313-001_RevB.indd 17 7/18/2011 4:14:12 PM...
-
Page 28: Ness L300 Plus System Upgrade Kit
NESS L300 Plus System Upgrade Kit The NESS L300 Plus System Upgrade Kit is for individuals who have a NESS L300 Foot Drop System. System Components • L300 Plus Control Unit • Thigh FS Cuff and RF Stim Unit Accessories •... -
Page 29: Chapter 5: Ness L300 Plus System
The L300 FS Cuff features a radio frequency (RF) stimulation unit that communicates wirelessly with the L300 Plus Control Unit and Intelli-Sense Gait Sensor. Locator Strap Strap Handle L300 RF Cradle Stim Unit Figure 5-1: L300 FS Cuff. Chapter 5 - NESS L300 Plus System Mp612-00313-001_RevB.indd 19 7/18/2011 4:14:13 PM... -
Page 30: Locator
Locator The locator fits under the kneecap of the affected leg. The locator is used to accurately place the L300 FS Cuff on the leg, and to ensure repeatable electrode contact. Cradle The cradle holds the L300 RF Stim Unit. The L300 RF Stim Unit snaps in and out of the cradle. -
Page 31: L300 Rf Stim Unit
L300 RF Stim Unit, under the flexible cover. See Figure 5-2. Charging Port under Flexible Cover L300 RF Stim Unit Stimulation Light Status Light Cradle Figure 5-2: L300 RF Stim Unit. Chapter 5 - NESS L300 Plus System Mp612-00313-001_RevB.indd 21 7/18/2011 4:14:13 PM... - Page 32 The L300 RF Stim Unit emits visual and/or audio alerts when: • Stimulation is on. • RF communication with the L300 RF Stim Unit fails. • The L300 RF Stim Unit battery charge level is low. • The L300 RF Stim Unit battery is charging. •...
-
Page 33: Thigh Fs Cuff
The Thigh FS Cuff features an RF stimulation unit that communicates wirelessly with the L300 Plus Control Unit and Intelli-Sense Gait Sensor. Top Panel Cradle Elongation Thigh RF Stim Unit Locator Bottom Panel Figure 5-3: Thigh FS Cuff. Chapter 5 - NESS L300 Plus System Mp612-00313-001_RevB.indd 23 7/18/2011 4:14:16 PM... -
Page 34: Panels
Panels The Thigh FS Cuff features two panels. The top panel fits higher on the thigh. The bottom panel fits lower on the thigh. The bottom panel has a cradle for the Thigh RF Stim Unit. Elongation Bar The elongation bar connects the top and bottom Thigh FS Cuff panels. Your clinician will adjust the elongation bar and lock it. -
Page 35: Thigh Cloth Electrodes
Thigh cloth electrode snaps to the Thigh FS Cuff bottom panel. See Figure 5-4. Figure 5-4: Snapping the small Thigh cloth electrode to the bottom panel. CAUTION: Do not wear the Thigh FS Cuff without the cloth electrodes. Chapter 5 - NESS L300 Plus System Mp612-00313-001_RevB.indd 25 7/18/2011 4:14:18 PM... -
Page 36: Thigh Rf Stim Unit
Thigh RF Stim Unit The Thigh RF Stim Unit generates the electrical stimulation used to flex or extend the knee. It responds to wireless signals from the L300 Plus Control Unit and the Intelli-Sense Gait Sensor to turn stimulation on/off. The Thigh RF Stim Unit includes a status light, a stimulation light, and a rechargeable battery. - Page 37 RF Communication FLASHES RED Failure SOLID RED Malfunction FLASHES YELLOW Stimulation Stimulation is Off Light SLOWLY FLASHES YELLOW Stimulation is On RAPIDLY Table 5-2: Thigh RF Stim Unit displays. Chapter 5 - NESS L300 Plus System Mp612-00313-001_RevB.indd 27 7/18/2011 4:14:19 PM...
-
Page 38: Intelli-Sense Gait Sensor
Intelli-Sense Gait Sensor The Intelli-Sense Gait Sensor features a pressure sensor and a transmitter. See Figure 5-6. Transmitter Pressure Sensor Figure 5-6: Intelli-Sense Gait Sensor. The pressure sensor: • Fits under the insole of the shoe of the affected leg, attached to a gait sensor pad. - Page 39 The battery may need to be replaced after approximately six months of use. CAUTION: The Intelli-Sense Gait Sensor has not been validated for use by individuals weighing more than 136 kilograms. Chapter 5 - NESS L300 Plus System Mp612-00313-001_RevB.indd 29 7/18/2011 4:14:19 PM...
-
Page 40: L300 Plus Control Unit
L300 Plus Control Unit The L300 Plus Control Unit is used to: • Turn on/off the NESS L300 Plus System. • Test stimulation in the FS Cuffs. • Select an operating mode (gait, training, or standby). • Fine-tune stimulation intensity. - Page 41 Selected RF Stim Unit; Turns On/Off Audio Feedback During Stimulation Stimulation Tests Stimulation for the Test Selected RF Stim Unit Table 5-3: L300 Plus Control Unit operating buttons. Chapter 5 - NESS L300 Plus System Mp612-00313-001_RevB.indd 31 7/18/2011 4:14:22 PM...
-
Page 42: Operating Modes
Operating Modes The L300 Plus System has three operating modes: standby, gait, and training. Standby Mode In standby mode, the NESS L300 Plus System is on and waiting for commands. Stimulation is off. Gait Mode Gait mode is used when walking. In gait mode, the Intelli-Sense Gait Sensor signals the L300 and Thigh RF Stim Units when the heel leaves the ground and when the heel contacts the ground. -
Page 43: Digital Display And Indicator Lights
Thigh RF Stim Unit Indicator/Selection Arrow L300 RF Stim Unit Indicator/Selection Arrow Intelli-Sense Gait Sensor Indicator Digital Display Figure 5-9: L300 Plus Control Unit digital display and indicators. Chapter 5 - NESS L300 Plus System Mp612-00313-001_RevB.indd 33 7/18/2011 4:14:22 PM... - Page 44 Display Description Definition On/Off Button FLASHES System is On GREEN Mode Button FLASHES Stimulation is Off YELLOW SLOWLY Mode Button FLASHES Stimulation is On YELLOW RAPIDLY Displays 0–9 Stimulation Intensity Level Intensity Level and Letter “t” Training Mode is On Alternate GREEN Arrow by Thigh RF Stim Thigh RF Stim Unit Selected...
- Page 45 L300 Plus Control Unit Software or SOLID RED Hardware Malfunction Gait Sensor Indicator is SOLID Intelli-Sense Gait Sensor Software or Hardware Malfunction Table 5-5: L300 Plus Control Unit component error displays. Chapter 5 - NESS L300 Plus System Mp612-00313-001_RevB.indd 35 7/18/2011 4:14:25 PM...
- Page 46 Display Description Definition Thigh RF Stim Unit Indicator and RF Communication Failure, Thigh RF Communication Indicator RF Stim Unit ALTERNATELY FLASH RED L300 RF Stim Unit Indicator and RF Communication Failure, L300 RF Communication Indicator RF Stim Unit ALTERNATELY FLASH RED Thigh RF Stim Unit, L300 RF Stim RF Communication Failure, L300 Unit, and RF Communication...
- Page 47 Table 5-7: L300 Plus Control Unit low battery displays. Display Description Definition ALTERNATING GREEN Arches Registration in Process Letter "C" Registration Complete Letter "E" Registration Error Table 5-8: L300 Plus Control Unit electronic registration displays. Chapter 5 - NESS L300 Plus System Mp612-00313-001_RevB.indd 37 7/18/2011 4:14:27 PM...
-
Page 48: Audio Indicators
Charging Error Charging Table 5-9: L300 Plus Control Unit charging displays and definitions. Audio Indicators The L300 Plus Control Unit beeps to indicate: • The NESS L300 Plus System is on. • A button was pressed. • Low battery. •... -
Page 49: Chapter 6: L300 Plus Accessories
L300 Plus Accessories L300 Electrodes and Bases The L300 electrodes deliver the electrical stimulation used to dorsiflex the foot. Three types of electrodes may be used: • L300 Large Cloth Electrode. • L300 Hydrogel Electrodes with Hydrogel Electrode Bases. • L300 Cloth Electrodes with Cloth Electrode Bases. -
Page 50: Large Cloth Electrode
Large Cloth Electrode The L300 FS Cuff uses one large cloth electrode. The large cloth electrode snaps to the L300 FS Cuff plug holes. No electrode base is required. Wet the large cloth electrode before use. After every three to four hours of use, remove and rewet the large cloth electrode. - Page 51 3. Wet the entire large cloth electrode with water. See Figure 6-3. Figure 6-3: Wetting the large cloth electrode. 4. Remove excess water from the large cloth electrode. See Figure 6-4. Figure 6-4: Blotting the large cloth electrode. Chapter 6 - L300 Plus Accessories Mp612-00313-001_RevB.indd 41 7/18/2011 4:14:29 PM...
- Page 52 5. Align the orange and blue snaps on the large cloth electrode with the orange and blue plug holes on the L300 FS Cuff. See Figure 6-5. Figure 6-5: Aligning the large cloth electrode. 6. Press firmly to snap the large cloth electrode into the L300 FS Cuff. See Figure 6-6.
-
Page 53: L300 Hydrogel Electrodes And Bases
L300 Hydrogel Electrodes and Bases The L300 FS Cuff uses two L300 hydrogel electrodes and two L300 hydrogel electrode bases. Your clinician will determine the best position for the L300 hydrogel electrode bases. Do not move the bases. The L300 hydrogel electrodes adhere to the hydrogel electrode bases. The grid side of the hydrogel electrode faces the hydrogel electrode base. - Page 54 To replace the L300 hydrogel electrodes: 1. Turn off the L300 Plus System and remove the L300 FS Cuff. 2. Gently pull the L300 hydrogel electrodes from the bases. Be careful not to detach the bases from the L300 FS Cuff. See Figure 6-8. Hydrogel Electrode Hydrogel...
- Page 55 4. Separate the new L300 hydrogel electrodes along the perforation. See Figure 6-9. Figure 6-9: Separating the new L300 hydrogel electrodes. 5. Split the two-piece covers on each L300 hydrogel electrode and discard them. See Figure 6-10. Figure 6-10: Splitting the two-piece covers on the L300 hydrogel electrodes. Chapter 6 - L300 Plus Accessories Mp612-00313-001_RevB.indd 45 7/18/2011 4:14:30 PM...
- Page 56 6. Adhere the grid side of the L300 hydrogel electrodes to the L300 hydrogel electrode bases, and then press firmly. See Figure 6-11. Figure 6-11: Adhering the L300 hydrogel electrodes to the bases. 7. Remove the covers from the L300 hydrogel electrodes. See Figure 6-12. Figure 6-12: Removing the covers from the L300 hydrogel electrodes.
-
Page 57: L300 Cloth Electrodes And Bases
L300 Cloth Electrodes and Bases The L300 cloth electrodes are for people who opt to use them instead of the L300 hydrogel electrodes. They are also for people who have sensitivities to hydrogel electrodes or other known sensitivities (for example, allergy or skin sensitivity to tape/adhesive). - Page 58 To rewet/replace the L300 cloth electrodes: 1. Turn off the L300 Plus System and remove the L300 FS Cuff. 2. Gently pull the L300 cloth electrodes from the bases. Be careful not to detach the bases from the L300 FS Cuff. See Figure 6-14. Figure 6-14: Removing the L300 cloth electrodes.
- Page 59 4. Wet the L300 cloth electrodes with water until they are saturated. See Figure 6-15. Figure 6-15: Wetting the L300 cloth electrodes. 5. With a soft cloth, gently wipe or blot excess water from the snap side of the cloth electrodes. See Figure 6-16. Figure 6-16: Blotting the snap side of the L300 cloth electrodes.
- Page 60 If you need to adjust stimulation intensity more often than usual, try rewetting the cloth electrodes. CAUTION: Store cloth electrodes where they can air dry. CAUTION: Only use electrodes provided by Bioness Inc. User's Guide Mp612-00313-001_RevB.indd 50 7/18/2011 4:14:32 PM...
-
Page 61: Thigh Cloth Electrodes
Thigh Cloth Electrodes The Thigh cloth electrodes deliver stimulation to the muscles in the upper leg. The Thigh FS Cuff uses two Thigh cloth electrodes. The large Thigh cloth electrode snaps to the Thigh FS Cuff top panel. The small Thigh cloth electrode snaps to the Thigh FS Cuff bottom panel. - Page 62 The small Thigh cloth electrode has a marking around one of the snaps. Align the marking with the electrode marking ring on the Thigh FS Cuff bottom panel. See Figure 6-19. Marking Marking Ring Figure 6-19: Aligning the small Thigh cloth electrode. Wet the Thigh cloth electrodes before use.
- Page 63 To rewet/replace the Thigh cloth electrodes: 1. Turn off the L300 Plus System and remove the Thigh FS Cuff. 2. Gently unsnap the Thigh cloth electrodes. See Figure 6-20. Figure 6-20: Unsnapping the Thigh cloth electrodes. 3. Wet the Thigh cloth electrodes with water until they are saturated. See Figure 6-21.
- Page 64 4. Gently squeeze the Thigh cloth electrodes together. 5. Blot excess water from the snap side of the Thigh cloth electrodes. See Figure 6-22. Figure 6-22: Blotting the snap side of the Thigh cloth electrodes. 6. Snap the Thigh cloth electrodes to the Thigh FS Cuff. See Figure 6-23. Figure 6-23: Snapping the Thigh cloth electrodes to the Thigh FS Cuff.
-
Page 65: Thigh Electrode Marking Ring
Thigh Electrode Marking Ring The Thigh electrode marking ring marks the orientation of the small Thigh cloth electrode on the bottom panel of the Thigh FS Cuff. Align the marking on the small Thigh cloth electrode with the marking ring. See Figure 6-24. Marking Marking Ring Figure 6-24: Aligning the small Thigh cloth electrode. -
Page 66: Cloth Electrode Mesh Bag
Cloth Electrode Mesh Bag The cloth electrode mesh bag is for storing the L300 and Thigh cloth electrodes. See Figure 6-26. Figure 6-26: Cloth electrode mesh bag. User's Guide Mp612-00313-001_RevB.indd 56 7/18/2011 4:14:37 PM... -
Page 67: Thigh Elongation Bar Lock
Thigh Elongation Bar Lock The Thigh elongation bar lock prevents the elongation bar from sliding. See Figure 6-27. Thigh Elongation Bar Lock Figure 6-27: Thigh elongation bar lock. Do not attempt to remove the Thigh elongation bar lock or to adjust the elongation bar. -
Page 68: Control Unit Wrist Strap, Neck Strap, And Belt Pouch
Control Unit Wrist Strap, Neck Strap, and Belt Pouch The L300 Plus control unit wrist strap, neck strap, and belt pouch are for carrying the L300 Plus Control Unit. The wrist and neck straps loop through the top of the L300 Plus Control Unit. See Figure 6-28. Wrist Strap Neck Strap Belt Pouch... -
Page 69: System Charger Set
Figure 6-29: System charger set. WARNING: Use only the charger included in your NESS L300 Plus System Kit or NESS L300 Plus System Upgrade Kit. Use of any other charger could damage the system. Chapter 6 - L300 Plus Accessories Mp612-00313-001_RevB.indd 59... -
Page 70: Replacement Battery, Gait Sensor
Replacement Battery, Gait Sensor The Intelli-Sense Gait Sensor battery may need to be replaced approximately every six months. See Figure 6-30. Battery replacement instructions can be found in the maintenance chapter of this guide. Intelli-Sense Gait Sensor Battery Figure 6-30: The Intelli-Sense Gait Sensor battery. User's Guide Mp612-00313-001_RevB.indd 60 7/18/2011 4:14:38 PM... -
Page 71: Gait Sensor Pads
Gait Sensor Pads The gait sensor pad stabilizes the Intelli-Sense Gait Sensor pressure sensor in the shoe. See Figure 6-31. Pressure Sensor Gait Sensor Figure 6-31: Placement of the gait sensor pad in the heel of a shoe. One gait sensor pad is placed under the insole of the shoe of the affected leg. -
Page 72: Shoe Spacers
Shoe Spacers The shoe spacer is placed on the inner clamp of the Intelli-Sense Gait Sensor. See Figure 6-32. Shoe Spacer Figure 6-32: Attaching the shoe spacer to the Intelli-Sense Gait Sensor. The shoe spacer: • Stabilizes the Intelli-Sense Gait Sensor on the rim of the shoe. •... -
Page 73: Chapter 7: Setting Up The Ness L300 Plus System
Do not use a razor. A razor can irritate the skin. 3. Check the skin for signs of irritation. If any irritation is present, stop using the NESS L300 Plus System. Contact your clinician and your local distributor or visit the Bioness website at www.bioness.com/Landing.php?reset. Wait for complete healing before using the NESS L300 Plus System. -
Page 74: Putting On The L300 Fs Cuff
Putting on the L300 FS Cuff To put on the L300 FS Cuff: 1. Remove and wet the L300 cloth electrode(s), if appropriate. 2. Remove the covers on the hydrogel electrodes, if appropriate. 3. While seated, slightly straighten your leg. The outline of your kneecap should be clearly defined. - Page 75 5. Slide the locator up your leg until it rests snugly and comfortably below your kneecap. See Figure 7-2. Locator Figure 7-2: Aligning the L300 FS Cuff locator below the kneecap. Chapter 7 - Setting Up the NESS L300 Plus System Mp612-00313-001_RevB.indd 65 7/18/2011 4:14:39 PM...
- Page 76 6. While holding the locator in place, lower the L300 FS Cuff until it rests flush against your leg. The L300 FS Cuff should gently grip your leg. 7. Grasp the handle of the L300 FS Cuff strap. 8. With your thumb on the cradle, fasten the L300 FS Cuff strap handle around the cradle.
- Page 77 Locator Below the Kneecap Strap Handle Around the Cradle L300 RF Stim Unit L300 Figure 7-4: The FS Cuff correctly positioned on the right leg. Chapter 7 - Setting Up the NESS L300 Plus System Mp612-00313-001_RevB.indd 67 7/18/2011 4:14:39 PM...
-
Page 78: Testing The Position Of The L300 Fs Cuff
Testing the Position of the L300 FS Cuff To test the position of the L300 FS Cuff: 1. Place the L300 Plus Control Unit in standby mode. 2. Press the L300 RF Stim Unit selection button. The arrow next to the L300 RF Stim Unit indicator will light GREEN to confirm the selection. -
Page 79: Putting On The Thigh Fs Cuff
3. Place the Thigh FS Cuff locator on the midline of the thigh, approximately three finger widths from the knee. See Figure 7-5. Locator Figure 7-5: Thigh FS Cuff locator correctly positioned on the quadriceps. Chapter 7 - Setting Up the NESS L300 Plus System Mp612-00313-001_RevB.indd 69 7/18/2011 4:14:40 PM... - Page 80 4. Center the elongation bar on the midline of the thigh. See Figure 7-6. Elongation Figure 7-6: Thigh FS Cuff correctly positioned on the quadriceps. 5. Fasten the straps. CAUTION: Turn off stimulation before putting on or taking off the Thigh FS Cuff. User's Guide Mp612-00313-001_RevB.indd 70 7/18/2011 4:14:41 PM...
-
Page 81: Testing The Position Of The Thigh Fs Cuff
Thigh cloth electrodes. CAUTION: Remove the Thigh FS Cuff from the skin every 3 to 4 hours for 15 minutes to allow the skin to breathe. Chapter 7 - Setting Up the NESS L300 Plus System Mp612-00313-001_RevB.indd 71 7/18/2011 4:14:41 PM... -
Page 82: Placing The Intelli-Sense Gait Sensor In The Shoe
Placing the Intelli-Sense Gait Sensor in the Shoe The Intelli-Sense Gait Sensor is used when walking in gait mode. Make sure it is placed in your shoe before selecting gait mode. To position the pressure sensor: 1. Lift the insole of the shoe, and attach a gait sensor pad under the insole, at the heel of the shoe. - Page 83 Note: Refer to the foot image on the pressure sensor for correct orientation. CAUTION: The Intelli-Sense Gait Sensor has not been validated for use by individuals weighing more than 136 kilograms. Chapter 7 - Setting Up the NESS L300 Plus System Mp612-00313-001_RevB.indd 73 7/18/2011 4:14:41 PM...
- Page 84 To position the transmitter: 1. Cover the inner clamp of the Intelli-Sense Gait Sensor with the shoe spacer. See Figure 7-9. Shoe Spacer Inner Clamp Figure 7-9: Attaching the shoe spacer. User's Guide Mp612-00313-001_RevB.indd 74 7/18/2011 4:14:41 PM...
- Page 85 Figure 7-10: Clamping the transmitter to the inner rim of the shoe. 3. Lower the insole. Tuck any excess wire under the insole. See Figure 7-11. Left Shoe Figure 7-11: Intelli-Sense Gait Sensor correctly positioned. Chapter 7 - Setting Up the NESS L300 Plus System Mp612-00313-001_RevB.indd 75 7/18/2011 4:14:42 PM...
-
Page 86: Transferring The Intelli-Sense Gait Sensor To Another Shoe
Transferring the Intelli-Sense Gait Sensor to Another Shoe To transfer the Intelli-Sense Gait Sensor to another shoe: 1. Turn off the NESS L300 Plus System. 2. Remove the Intelli-Sense Gait Sensor from the shoe. 3. Select another shoe. 4. Follow the steps for placing the Intelli-Sense Gait Sensor in the shoe. Be sure to place the gait sensor pad in the same location as determined by your clinician. -
Page 87: Chapter 8: Operating The Ness L300 Plus System
Operating the NESS L300 Plus System The NESS L300 Plus System is designed to operate as a complete system. The L300 and Thigh FS Cuffs both must be on and the system components close to each other to communicate wirelessly. -
Page 88: Testing The Position Of The Fs Cuffs
Testing the Position of the FS Cuffs The stimulation test button is used to test the position of the FS Cuffs. Only one FS Cuff can be tested at a time. L300 FS Cuff To test the position of the L300 FS Cuff: 1. -
Page 89: Selecting An Operating Mode
YELLOW SLOWLY, and (“t” for training) will alternate with the intensity level in the digital display. When stimulation is on, the mode button will FLASH YELLOW RAPIDLY . Chapter 8 - Operating the NESS L300 Plus System Mp612-00313-001_RevB.indd 79 7/18/2011 4:14:42 PM... -
Page 90: Returning To Standby Mode
Returning to Standby Mode To return to standby mode from gait or training mode: • Press the flashing mode button briefly. The L300 Plus Control Unit will beep, and the mode button will stop flashing. User's Guide Mp612-00313-001_RevB.indd 80 7/18/2011 4:14:42 PM... -
Page 91: Adjusting Stimulation Intensity
L300 RF Stim Unit indicator will light GREEN to confirm the selection. See Figure 8-1. L300 RF Stim Unit Selection Button Figure 8-1: L300 RF Stim Unit selection. Chapter 8 - Operating the NESS L300 Plus System Mp612-00313-001_RevB.indd 81 7/18/2011 4:14:43 PM... -
Page 92: Adjustment Guidelines
2. Press the plus or minus intensity adjustment button on the L300 Plus Control Unit to change the intensity level. The L300 Plus Control Unit will beep with each change in level. The new level will show in the digital display. Note: An intensity level of “0”... -
Page 93: Thigh Fs Cuff
Note: An intensity level of “0” equals no stimulation. Note: When the system is turned on, the default stimulation intensity level is restored. Chapter 8 - Operating the NESS L300 Plus System Mp612-00313-001_RevB.indd 83 7/18/2011 4:14:43 PM... -
Page 94: Turning On Audio Feedback During Stimulation
Turning on Audio Feedback During Stimulation mute button is used to turn on audio feedback when stimulation is on. Audio feedback can be turned on for one FS Cuff or both. L300 FS Cuff To turn on audio feedback during stimulation: 1. -
Page 95: Thigh Fs Cuff
The L300 Plus Control Unit will emit an audio alert when stimulation is on. To turn off audio feedback during stimulation: • Press the mute button or the FLASHING GREEN on/off button. Chapter 8 - Operating the NESS L300 Plus System Mp612-00313-001_RevB.indd 85 7/18/2011 4:14:43 PM... -
Page 96: Muting/Un-Muting The L300 Plus Control Unit
Muting/Un-Muting the L300 Plus Control Unit To mute/un-mute the L300 Plus Control Unit: • Press the mute button briefly. Note: When the system is turned on, the default volume setting is restored. User's Guide Mp612-00313-001_RevB.indd 86 7/18/2011 4:14:43 PM... -
Page 97: Turning Off Audio/Visual Alerts
L300 FS Cuff and the Thigh FS Cuff can be worn individually. When only one FS Cuff is worn, the NESS L300 Plus System will emit a faulty electrode contact alert for the other FS Cuff. It will also emit an RF communication error alert for the other RF Stim Unit, if it is out of range. - Page 98 User's Guide Mp612-00313-001_RevB.indd 88 7/18/2011 4:14:43 PM...
-
Page 99: Chapter 9: Maintenance And Cleaning
Maintenance and Cleaning Daily Maintenance When the NESS L300 Plus System is not in use: 1. If appropriate, reapply the covers to the hydrogel electrodes. Do not let the hydrogel dry out. 2. Store the cloth electrodes where they can air dry. -
Page 100: Charging The Batteries
Charging the Batteries When a NESS L300 Plus System component has a low battery, the L300 Plus Control Unit will beep and the component indicator light will FLASH YELLOW. See Figure 9-1. Low Battery, RF Stim Unit Low Battery, L300 Plus... - Page 101 Figure 9-2: System charger set. WARNING: Use only the charger included in your NESS L300 Plus System Kit or NESS L300 Plus System Upgrade Kit. Use of any other charger could damage the system. Chapter 9 - Maintenance and Cleaning Mp612-00313-001_RevB.indd 91...
- Page 102 2. Open the flexible covers over the charging ports. See Figure 9-3. Flexible Cover W Cable Flexible Cover Charger Figure 9-3: Charging setup. 3. Connect the W cable to the charging ports. See Figure 9-3 4. Plug the charger into a wall socket. 5.
- Page 103 7. Allow the charging process to continue until: • horizontal GREEN line appears in the L300 Plus Control Unit digital display. See Table 9-1. • status light on both RF Stim Units is solid GREEN. See Table 9-2. The charging process should last approximately three hours, but the L300 Plus Control Unit can take up to six hours to charge.
- Page 104 Note: It is possible to charge the L300 Plus Control Unit and RF Stim Units separately, but Bioness recommends that they be charged at the same time. CAUTION: The batteries must be charged before first use, daily, and after extended storage.
-
Page 105: Battery Replacement
Battery Replacement The battery in the Intelli-Sense Gait Sensor is not rechargeable. It may need to be replaced approximately every six months. When the Intelli-Sense Gait Sensor battery charge level is low, the indicator on the L300 Plus Control Unit will begin to FLASH YELLOW. The alert will begin approximately two weeks before the Intelli-Sense Gait Sensor completely loses its charge. - Page 106 4. Insert the new battery. The “+” should face outward. 5. Slide the cover back into place. 6. Tighten the screws. 7. Press the pressure sensor to activate the sensor. CAUTION: Use only a battery supplied by Bioness. User's Guide Mp612-00313-001_RevB.indd 96 7/18/2011 4:14:47 PM...
- Page 107 The battery in the L300 Plus Control Unit is a rechargeable AAA NiMH battery. It should be replaced approximately every two years. To replace the L300 Plus Control Unit battery (AAA NiMH 1.2 V): 1. Remove the screw from the battery cover on the back of the L300 Plus Control Unit.
- Page 108 6. Tighten the screw. 7. Fully charge the new battery before use. CAUTION: Use of a non-rechargeable AAA battery can damage the L300 Plus Control Unit. CAUTION: Use only a battery supplied by Bioness. User's Guide Mp612-00313-001_RevB.indd 98 7/18/2011 4:14:48 PM...
- Page 109 The RF Stim Units have a rechargeable battery that can only be replaced by a Bioness authorized representative. If the battery needs to be replaced, contact your local distributor. Chapter 9 - Maintenance and Cleaning Mp612-00313-001_RevB.indd 99 7/18/2011 4:14:48 PM...
-
Page 110: Bases
Bases Replace the L300 electrode bases if they appear worn or damaged. To replace the L300 electrode bases: 1. Mark the position of the used L300 electrode bases on the L300 FS Cuff liner. See Figure 9-6. Figure 9-6: Marking the position of the used L300 electrode bases. 2. - Page 111 3. Remove the used L300 electrode bases from the L300 FS Cuff. See Figure 9-8. Figure 9-8: Removing the used L300 electrode bases. 4. Attach the new L300 electrode bases where the previous bases were attached. See Figure 9-9. Figure 9-9. Attaching the new L300 electrode bases. Chapter 9 - Maintenance and Cleaning Mp612-00313-001_RevB.indd 101 7/18/2011 4:14:49 PM...
- Page 112 5. Snap the new L300 electrode bases to the L300 FS Cuff plug holes. See Figure 9-10. Figure 9-10: Snapping the L300 electrode bases to the L300 FS Cuff plug holes. 6. Cover the wires and snaps with wire concealers (not included), if desired. See Figure 9-11.
-
Page 113: L300 Fs Cuff Strap
L300 FS Cuff Strap To replace the L300 FS Cuff strap: 1. Remove the used L300 FS Cuff strap from the L300 FS Cuff buckles and strap leads. See Figure 9-12. Hook and Loop Strap Fasteners Buckles Strap Leads Figure 9-12: L300 FS Cuff strap attached to the L300 FS Cuff. 2. -
Page 114: Thigh Silicone Panels
Thigh Silicone Panels To replace the Thigh silicone panels: 1. Unsnap and remove the Thigh cloth electrodes. 2. Gently detach the loops of the silicone panels from the hooks on the Thigh FS Cuff top and bottom panels. See Figure 9-13. Figure 9-13: Unhooking the top silicone panel. - Page 115 3. Slide the band on the bottom silicone panel over the Thigh RF Stim Unit. See Figure 9-14. Figure 9-14: Sliding the band on the bottom silicone panel. 4. Gently pull the silicone panels away from the cloth electrode snaps. See Figure 9-15.
- Page 116 5. Gently slide the new silicone panels around the electrode snaps. 6. Slide the band on the bottom silicone panel over the Thigh RF Stim Unit. See Figure 9-16. Figure 9-16: Sliding the band on the bottom silicone panel over the RF Stim Unit. 7.
-
Page 117: Removing The L300 And Thigh Rf Stim Units
Removing the L300 and Thigh RF Stim Units The L300 and Thigh RF Stim Units should only be removed for maintenance and to clean the FS Cuffs. To remove the RF Stim Units: 1. Turn off the L300 Plus System. 2. -
Page 118: Cleaning The L300 Plus Components
Cleaning the L300 Plus Components All L300 Plus components may be cleaned by carefully wiping them with a damp cloth. The electrical components are not waterproof. Do not immerse them in water. The L300 FS Cuff is the only component that can be immersed in water to clean. -
Page 119: Disinfecting The L300 Plus Components
Disinfecting the L300 Plus Components All NESS L300 Plus System Kit components excluding the L300 FS Cuff and the Thigh FS Cuff straps may be disinfected using CaviWipes™ (Metrex, Orange, CA) per the manufacturer’s instructions. Metrex products are sold through authorized dealers worldwide. If you have difficulty locating Metrex CaviWipes, please call your local distributor or visit the Bioness website at www.bioness.com/Landing.php?reset. - Page 120 User's Guide Mp612-00313-001_RevB.indd 110 7/18/2011 4:14:53 PM...
-
Page 121: Chapter 10: Electronic Registration
If you have an L300 Plus System Upgrade Kit, bring your upgrade kit and your L300 Foot Drop System to your first fitting session. Your clinician will register your NESS L300 Plus System at your first fitting session. This section describes the steps to register a replacement L300 Plus Control Unit, Thigh RF Stim Unit, L300 RF Stim Unit, or Intelli-Sense Gait Sensor. - Page 122 Setup: 1. Place the components you are registering close together on a table but not touching. See Figure 10-1. Figure 10-1: Registration setup. 2. Make certain no other L300 Plus components are within 30 feet of the components you are registering. 3.
- Page 123 (“E” for error) appears in the digital display, an error has occurred. Repeat steps 2 though 4. 5. After registration is complete, turn on your NESS L300 Plus System. If the replacement component is registered, the L300 and Thigh RF Stim Units will turn on.
- Page 124 6. Locate the System ID Number for the NESS L300 Plus System (for example, A334). The System ID Number can be found on the back label of the existing NESS L300 Plus System components. 7. Write the System ID Number on the blank label on the back of the replacement L300 Plus component.
- Page 125 "E" also can mean that the registration procedure was successful on a prior attempt and not noticed.) 6. After registration is complete, turn on the NESS L300 Plus System and select gait mode. Press and release the Intelli-Sense Gait Sensor pressure sensor.
- Page 126 7. Locate the System ID Number for the NESS L300 Plus System (for example, A334). The System ID Number can be found on the back label of the existing NESS L300 Plus System components. The System ID Number identifies which NESS L300 Plus System the replacement/additional Intelli-Sense Gait Sensor is registered to.
-
Page 127: Chapter 11: Troubleshooting
After the components are fully charged, keep them connected to the system charger set until ready to use. If I charge the NESS L300 Plus System every day, will I harm the batteries? • No. Daily charging will not affect the lifespan or functionality of the batteries. - Page 128 Plus Control Unit, remove the L300 and the Thigh FS Cuffs, and charge the NESS L300 Plus System fully. Then, disconnect the system charger set, put on the L300 and Thigh FS Cuffs, and turn on the NESS L300 Plus System. The L300 Plus Control Unit on/off button and the status light on the RF Stim Unit should FLASH GREEN.
- Page 129 I hear a beep and an RF Stim Unit indicator (L300 or Thigh) on the L300 Plus Control Unit FLASHES RED. • If you feel stimulation but the intensity level seems weaker than usual and movement (ankle and/or knee) is unsatisfactory, electrode contact may be compromised.
- Page 130 • Make sure the L300 and Thigh RF Stim Units are properly snapped into the cradles on the L300 and Thigh FS Cuffs. Press firmly near the upper edges of the L300 and Thigh RF Stim Units until they are flush with the cradles. •...
- Page 131 The respective component is malfunctioning. Turn off the L300 Plus Control Unit and then turn it back on. If the problem persists, stop using the NESS L300 Plus System and contact Bioness. One of the component indicators is FLASHING YELLOW.
- Page 132 Stimulation is inconsistent when I am walking, but the NESS L300 Plus System is not indicating any errors. • Stop walking and shift your weight from side to side. If the problem persists, check for proper placement of the Intelli-Sense Gait Sensor pressure sensor.
- Page 133 I need to repeat the charging process? • If you recently charged your NESS L300 Plus System and the fully charged indications were displayed, your NESS L300 Plus System is still fully charged. You do not have to repeat the charging process.
- Page 134 User's Guide Mp612-00313-001_RevB.indd 124 7/18/2011 4:14:58 PM...
-
Page 135: Chapter 12: Technical Specifications
Technical Specifications L300 Plus Control Unit Specifications Classification Internally powered, continuous operation Operation Modes Gait, Training, Clinician, and Standby Battery Type Rechargeable AAA NiMH 1.2 V, 900–1100 mAh • On/Off illuminated button • Mode illuminated button to change operating modes •... - Page 136 L300 RF Stim Unit Specifications Internally powered, continuous operation with type BF applied Classification parts Operating 3.7 V Voltage Battery Type Proprietary rechargeable Li-Ion (Lithium Ion) 3.7 V, 750 mAh • Status (fault, battery, charging) and Stimulation LEDs Indications • “Beeps”...
- Page 137 Symmetric Asymmetric Positive Pulse Duration (µsec) Negative Pulse 1200 Duration (µsec) Inter-Phase Interval (µsec) Total Pulse 1000 1500 Duration (µsec) Max Load 5000 ohm (Subject to max voltage limitation) Pulse Repetition 20–45 Hz, 5-Hz resolution Rate Gait Parameters Ramp Up 0–2 seconds, 0.1-second resolution Ramp Down 0–2 seconds, 0.1-second resolution...
- Page 138 Thigh RF Stim Unit Specifications Internally powered, continuous operation with type BF applied Classification parts Operating 3.7 V Voltage Battery Type Proprietary rechargeable Li-Ion (Lithium Ion) 3.7 V, 750 mAh • Status (fault, battery, charging) and Stimulation LEDs Indications • “Beeps”...
- Page 139 Symmetric Asymmetric Positive Pulse Duration (µsec) Negative Pulse 1200 Duration (µsec) Inter-Phase Interval (µsec) Total Pulse 1000 1500 Duration (µsec) Max Load 5000 ohm (Subject to max voltage limitation) Pulse Repetition 20–45 Hz, 5-Hz resolution Rate Gait Parameters Swing Control 0–100% of phase* time, 5% resolution Delay (%) Swing Control...
- Page 140 L300 FS Cuff Specifications Material Fabric-Polymer Fits Limb 29–51 cm Circumference • Height: 160 mm Dimensions • Width: 100 mm • Depth: 125 mm Weight Approximately 150 grams Thigh FS Cuff Specifications Material Skeleton–TPU; Panel Assemblies and Buckles–Silicone • Upper thigh circumference: 53 cm–85 cm Fits Limb •...
- Page 141 Intelli-Sense Gait Sensor Specifications Internally powered, continuous operation with type BF applied Classification part(s) Battery Type Lithium coin cell, CR2430, 280 mAh • Length: 80 mm Dimensions of the • Width: 50 mm Transmitter • Height: 10 mm Weight 35 grams •...
- Page 142 Output Voltage 5 V ± 5% Current 2400 mA Note: Do not use the NESS L300 Plus System while charging. Do not wear the L300 or Thigh FS Cuffs while charging. Wireless Link Specifications Frequency Band 2.4 GHz, ISM band Transmission Power Complies with FCC 15.247 (for U.S.) regulations...
- Page 143 L300 Electrode and L300 Electrode Base Specifications Hydrogel Two 45-mm diameter hydrogel electrodes Note: Use only electrodes provided by Bioness Inc. Electrodes Hydrogel Two relocatable polymer electrode bases Electrode Bases Two 45-mm diameter non-woven fabric/cloth electrodes Cloth Electrodes Note: Use only electrodes provided by Bioness Inc.
- Page 144 User's Guide Mp612-00313-001_RevB.indd 134 7/18/2011 4:14:59 PM...
-
Page 145: Chapter 13: Appendix - Emi Tables
Appendix - EMI Tables System Characteristics Transmitters Operating Frequency Band 2401–2482 MHz Type of Modulation Type of Modulating Signal Binary data message Data Rate [=Frequency of Modulating 250 Kbps Signal] Effective Radiated Power <10 dBm Receivers Operating Frequency Band 2401–2482 MHz Receiver Bandwidth 812 kHz around a selected frequency Chapter 13 - Appendix - EMI Tables... - Page 146 Guidance and Manufacturer’s Declaration—Electromagnetic Emissions The NESS L300 Plus System is intended for use in the electromagnetic environment specified below. The customer or the user of the NESS L300 Plus System should assure that it is used in such an environment.
- Page 147 Electromagnetic Immunity for All Equipment and Systems The NESS L300 Plus System is intended for use in the electromagnetic environment specified below. The customer or the user of the NESS L300 Plus System should assure that it is used in such an environment.
- Page 148 Immunity Test IEC 60601 Test Compliance Level Electromagnetic Level Environment— Guidance Voltage dips, short <5% U (>95% dip <5% U (>95% dip Mains power interruptions and in U ) for 0.5 cycle in U ) for 0.5 cycle quality should be voltage variations that of a typical on power supply...
- Page 149 Guidance and Manufacturer’s Declaration—Electromagnetic Immunity The NESS L300 Plus System is intended for use in the electromagnetic environment specified below. The customer or the user of the NESS L300 Plus System should assure that it is used in such an environment.
- Page 150 If the measured field strength in the location in which the NESS L300 Plus System is used exceeds the applicable RF compliance level above, the NESS L300 Plus System should be observed to verify normal operation.
- Page 151 Recommended Separation Distances Between Portable and Mobile RF Communications Equipment and the NESS L300 Plus System The NESS L300 Plus System is intended for use in an electromagnetic environment in which radiated RF disturbances are controlled. The customer or the user of the NESS...
- Page 152 NOTE 1: At 80 MHz and 800 MHz, the higher frequency range applies. NOTE 2: These guidelines may not apply in all situations. Electromagnetic propagation is affected by absorption and reflection from structures, objects, and people. For transmitters rated at a maximum output power not listed above, the recommended separation distance d in meters (m) can be determined using the equation applicable to the frequency of the transmitter, where P is the maximum output power rating of the transmitter in watts (W) according to the transmitter manufacturer.
Need help?
Do you have a question about the NESS L300 Plus and is the answer not in the manual?
Questions and answers