Bioness NESS L300 Clinicians Manual
Foot drop system
Hide thumbs
Also See for NESS L300:
- User manual (94 pages) ,
- User reference manual (2 pages) ,
- User manual (85 pages)
Table of Contents
Advertisement
Quick Links
Manufactured by Bioness Neuromodulation Ltd.
A Bioness Inc Company
19 Ha'Haroshet Street
PO Box 2500
Industrial Zone
Ra'Anana 43654, Israel
Worldwide Corporate Office
Bioness Inc
25103 Rye Canyon Loop
Valencia, CA 91355 USA
Telephone: 800.211.9136
Email: info@bioness.com
Website: www.bioness.com
NESS
, NESS L300
, Intelli-Gait
, Intelli-Sense Gait Sensor
, Bioness, the Bioness Logo
and LiveOn
are
®
®
®
™
®
®
trademarks of Bioness Inc. | www.bioness.com
Rx Only
602-00156-001 Rev. G
01/2013
Advertisement
Table of Contents
Troubleshooting

Related Manuals for Bioness NESS L300


Summary of Contents for Bioness NESS L300
- Page 1 Telephone: 800.211.9136 Email: info@bioness.com Website: www.bioness.com NESS , NESS L300 , Intelli-Gait , Intelli-Sense Gait Sensor , Bioness, the Bioness Logo and LiveOn ® ® ® ™ ® ® trademarks of Bioness Inc. | www.bioness.com Rx Only 602-00156-001 Rev. G 01/2013...
- Page 2 Clinician’s Guide...
- Page 3 Clinician’s Guide Rx Only...
- Page 4 Disclaimer Bioness Inc and its affiliates shall not be liable for any injury or damage suffered by any person, either directly or indirectly, as a result of the unauthorized use or repair of Bioness Inc products. Bioness Inc and its affiliates do not accept any responsibility for any damage caused to its products, either directly or indirectly, as a result of use and/ or repair by unauthorized personnel.
-
Page 5: Table Of Contents
Chapter 3: Environmental Conditions that Affect Use ............7 Radio Communication Information .......................7 Travel .................................7 Chapter 4: The NESS L300 Foot Drop System ..............9 Functional Stimulation (FS) Cuff .........................10 Radio Frequency (RF) Stim Unit ........................ 11 Intelli-Sense Gait Sensor ..........................12 Control Unit ..............................13... - Page 6 SD (Secure Digital) Slot ........................26 Battery ..............................26 Touchscreen Display ..........................26 Connector Port .............................26 Configuration Cradle ...........................26 Storage Card ..............................27 Clinician’s Programmer Charger ........................27 Intelli-Gait Software ............................27 Information Icon ...........................27 Navigation Menus ..........................29 Navigation Buttons ..........................30 Keyboard ..............................31 Drop-Down Lists ..........................31 Chapter 7: Fitting and Testing Accessories ...............
- Page 7 Patients Menu .............................48 Creating a New Patient Record ......................48 Modifying a Patient Name ........................49 Removing a Patient Record .........................49 Settings Menu .............................50 Programming Stimulation Settings .......................50 Programming Advanced Stimulation Settings ..................51 Programming Gait Settings ........................52 Programming Advanced Gait Settings ....................54 Programming Training Settings ......................55 Programming Advanced Training Settings ...................57 History Menu ..............................58...
- Page 8 Acute/Subacute Patients ..........................85 Gait Mode ............................85 Training Mode ............................85 Home Program Training ..........................85 Standard Conditioning Protocol for NESS L300 Home Use ...............86 Chapter 12: Patient Training and Follow-Up ............... 87 Patient Training ............................87 Patient Follow-Up ............................88 Chapter 13: Care and Maintenance ..................89 Replacing the Intelli-Sense Gait Sensor Battery ..................89...
-
Page 9: List Of Symbols
List of Symbols Caution Complies with United States and Canadian Product Safety Standards Complies with the European Union Medical Device Directive Serial Number Double Insulated (Equivalent to Class II of IEC 536) Type BF Applied Part(s) Non-Ionizing Radiation European Authorized Representative Date of Manufacture Manufacturer This Product Must not be Disposed of with Other Household Waste... - Page 10 VIII...
-
Page 11: Chapter 1: Introduction
Introduction The NESS L300 Foot Drop System is an advanced neuroprosthesis designed to improve gait in people suffering from foot drop―the dragging of the forefoot while walking—as a result of a central nervous system injury or disease. The NESS L300 Foot Drop System communicates wirelessly to deliver electrical pulses over the common peroneal nerve and to the motor point of the tibialis anterior muscle, causing ankle dorsiflexion in the swing phase of gait to prevent foot drop. - Page 12 In addition, the NESS L300 features a gait mode for use when walking and a therapeutic training mode for therapeutic muscle training when not walking. The NESS L300 Clinician’s Kit contains the components and accessories for fitting and programming the NESS L300 Foot Drop System. This Clinician’s Guide describes the Clinician’s Kit contents and instructions for use.
-
Page 13: Chapter 2: General Warnings And Precautions
The NESS L300 should not be used where a cancerous lesion is present or suspected. • The NESS L300 should not be used on a leg where a regional disorder, such as a fracture or dislocation, would be adversely affected by motion from the stimulation. -
Page 14: Precautions
Precautions • Inflammation in the region of the FS Cuff may be aggravated by motion, muscle activity, or pressure from the FS Cuff. Advise patients to stop using the NESS L300 until any inflammation is gone. • Use caution when treating patients with suspected or diagnosed heart problems. -
Page 15: Adverse Reactions
• Turn off the NESS L300 before putting on the FS Cuff. Do not turn on the NESS L300 until the FS Cuff is fastened in place. -
Page 16: Skin Care Guidelines
Ventilate the skin by removing the FS Cuff for at least 15 minutes every three to four hours. If skin irritation or a skin reaction occurs, patients should stop using the NESS L300 immediately and contact their clinician, dermatologist, or Bioness Clinical Specialist. They should resume use only when the skin is completely healed, and then follow a skin-conditioning protocol per the recommendation of a health-care specialist. -
Page 17: Chapter 3: Environmental Conditions That Affect Use
European and U.S. voltage: 110/220 V, 50/60 Hz. Turn off your L300 system before going through airport security. Wear loose clothing so that you can easily show the security person your NESS L300. The NESS L300 will likely set off Chapter 3: Environmental Conditions that Affect Use... - Page 18 Either ask for a “hand scan” or be prepared to remove your NESS L300 so that security can scan it. You may want to carry a copy of your NESS L300 prescription. A prescription can be useful when passing through customs as well.
-
Page 19: Chapter 4: The Ness L300 Foot Drop System
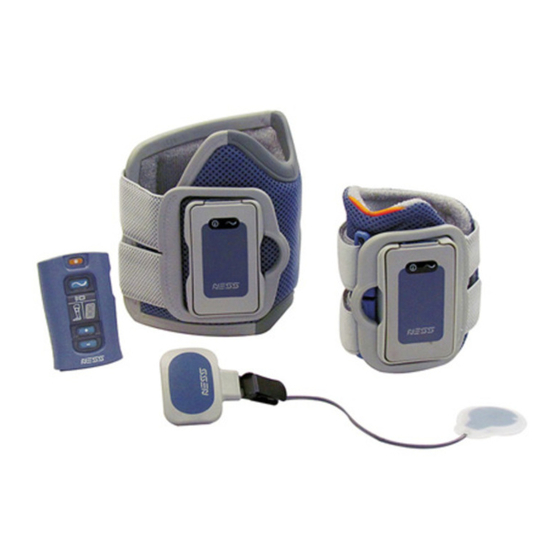
The NESS L300 Foot Drop System The NESS L300 Foot Drop System consists of an FS Cuff with RF Stim Unit, a Control Unit, and an Intelli-Sense Gait Sensor. See Figure 4-1. These components communicate wirelessly to stimulate the common peroneal nerve (normally found posterior and slightly distal to the head of the fibula) to contract the tibialis anterior and peroneal muscles, thus causing balanced dorsiflexion (without excessive inversion or eversion). -
Page 20: Functional Stimulation (Fs) Cuff
Functional Stimulation (FS) Cuff The L300 FS Cuff is a lightweight, low-profile neuroprosthesis that straps onto the leg directly under the patella. The L300 FS Cuff features an ergonomically designed locator for accurate placement, a cradle for the RF Stim Unit, and an adjustable elastic strap. See Figure 4-2. The Regular L300 FS Cuff strap is available in three sizes: small (S), medium (M), and large (L). -
Page 21: Radio Frequency (Rf) Stim Unit
See Table 4-1. The RF Stim Unit emits visual and audio alerts when radio communication fails or the component malfunctions. The NESS L300 System Kit includes a system charger set for charging the RF Stim Unit and Control Unit. -
Page 22: Intelli-Sense Gait Sensor
Intelli-Sense Gait Sensor The Intelli-Sense Gait Sensor detects when the foot is in the air and on the ground, and wirelessly signals the RF Stim Unit and Control Unit to synchronize movement of the foot accordingly during the gait cycle. The Intelli-Sense Gait Sensor features a pressure sensor and a transmitter. -
Page 23: Control Unit
Control Unit The Control Unit is used to turn on/off the NESS L300 system, select an operating mode (gait, training, standby, or clinician), fine-tune stimulation intensity, adjust audio alert volume, and monitor system performance. See Figure 4-4 and tables 4-2, 4-3, and 4-4. - Page 24 Operating Control Unit Description Function Button On/Off Turns On/Off the System Mode Selects Gait, Training, Standby, and Clinician Mode Adjusts Volume of Audio Alerts and Turns On/Off Volume Audio Feedback for Stimulation Intensity Adjustment Adjusts Stimulation Intensity Level (Plus/Minus) Table 4-2: Control Unit operating buttons and functions. Control Unit Display Description...
-
Page 25: Turning On/Off The Control Unit
The on/off button will then flash GREEN to indicate the system is on. To turn off the Control Unit: • Press the flashing GREEN on/off button once. Chapter 4: The NESS L300 Foot Drop System... -
Page 26: Selecting Gait Mode
Selecting Gait Mode Gait mode is used for walking. In gait mode, the stimulation is synchronized by the Intelli- Sense Gait Sensor to achieve dorsiflexion in the swing phase of gait when the heel or forefoot leaves the ground and relaxation after heel or forefoot contact during the stance phase of gait. -
Page 27: Returning To Standby Mode
Selecting Clinician Mode Clinician mode is used to start and pause stimulation while programming the NESS L300, or to enhance clinical training. Select clinician mode to enhance clinical training to include, for example, balance training in acute and sub-acute patients. Clinician mode uses the stimulation parameters set for gait mode. -
Page 28: Fine-Tuning Stimulation Intensity
Fine-Tuning Stimulation Intensity When patients first turn on the Control Unit the stimulation intensity level will be “5”, which is the level set by the clinician. Normally patients will not need to adjust stimulation intensity other than when walking on different surfaces or in different shoes. To fine-tune stimulation intensity: •... -
Page 29: Turning On Audio Feedback During Stimulation
The Control Unit and RF Stim Unit indicators will flash RED and “E” will flash in the digital display. • The Control Unit will emit an audio alert. • The NESS L300 will deliver a warning default stimulation to lift the foot for six seconds before shutting down. Chapter 4: The NESS L300 Foot Drop System... - Page 30 20 Clinician’s Guide...
-
Page 31: Chapter 5: The Ness L300 Clinician's Kit
The NESS L300 Clinician’s Kit The NESS L300 Clinician’s Kit is a portable clinical workshop used to fit, program, test, and perform routine maintenance on the NESS L300 Foot Drop System. The Regular L300 Clinician’s Kit includes the following: •... - Page 32 The Small L300 Clinician’s Kit includes the following: • Clinician’s Programmer with Intelli-Gait Software • Storage Card • Configuration Cradle • Clinician’s Programmer Charger • Gait Sensor Pads • Gait Sensor Replacement Battery • Fitting Cable • Small L300 Personal Panels, Right •...
- Page 33 Small L300 Quick Fit Electrode - B • Clinician’s Reference Card Clinician’s Programmer Charger Storage Card (Installed) Clinician’s Programmer with Inteli-Gait Software Gait Sensor Replacement Battery Configuration Cradle Gait Sensor Pads Regular L300 Personal Panel Small L300 Personal Panel Chapter 5: The NESS L300 Clinician’s Kit...
- Page 34 Personal Strap Cover Fitting Cable Shoe Spacer Small L300 Quick Fit Small L300 Quick Fit Electrode - A Electrode - B Small L300 Small L300 Small L300 Electrode Bases Cloth Electrodes Hydrogel Electrodes Regular L300 Hydrogel Electrode Bases Regular L300 Quick Fit Electrode Tester (right - A shown)
-
Page 35: Chapter 6: Programming Components And Software
Figure 6-1: Programming components (and Control Unit). Clinician’s Programmer The Clinician’s Programmer is used to program the NESS L300 Foot Drop System. The Clinician’s Programmer is a portable personal digital assistant (PDA) that comes with the NESS L300 Intelli-Gait Software and a storage card installed. When connected to the Configuration Cradle and the Control Unit, the Clinician’s Programmer can wirelessly communicate with... -
Page 36: Sd (Secure Digital) Slot
Touchscreen Display The touchscreen display is used to navigate the NESS L300 Intelli-Gait Software, read statuses, and enter data. Use the pointed end of the stylus on the Configuration Cradle to make contact with the display screen. Use only the stylus. -
Page 37: Storage Card
The Clinician’s Programmer Charger is used to recharge the Clinician’s Programmer battery. Intelli-Gait Software The NESS L300 Intelli-Gait Software is used to program the NESS L300 Foot Drop System. The software features an information icon, six navigation menus, and numerous navigation buttons to aid in navigating the software. - Page 38 The information icon is GREEN when the Clinician’s Programmer is connected to a Control Unit. The information icon is GRAY when the Clinician’s Programmer is not connected to a Control Unit. When the information icon is RED or YELLOW: • Press the information icon with the stylus to open a message window.
-
Page 39: Navigation Menus
Navigation Menus The Intelli-Gait Software has six navigation menus: Exit, Patients, Settings, History, Admin (accessible to administrators only), and (i), which opens the Intelli-Gait Software information screen. Press on the navigation menu with the stylus to open the navigation menu. See Figure 6-3 and Table 6-2. -
Page 40: Navigation Buttons
Navigation Buttons The Intelli-Gait Software has numerous navigation buttons that, when pressed, open a new screen or execute a command. Buttons common to the Stim, Gait, Training, and Advanced Settings windows are shown in Figure 6-4 and Table 6-3. Navigation Buttons Figure 6-4: Navigation buttons, Training Settings window. -
Page 41: Keyboard
Keyboard Use the on-screen keyboard to enter characters in a field that requires alphanumeric input. The keyboard appears collapsed at the bottom right of most screens. To enlarge or reduce the keyboard, touch the keyboard with the stylus. To enter data, select each character using the stylus. - Page 42 32 Clinician’s Guide...
-
Page 43: Chapter 7: Fitting And Testing Accessories
Fitting and Testing Accessories FS Cuff Straps The L300 FS Cuff strap is used to hold the L300 FS Cuff in place on the leg. The L300 FS Cuff strap is elastic, and fastens around the leg and the FS Cuff cradle. See Figure 7-1. The Regular L300 FS Cuff strap comes in three sizes: small (S), medium (M), and large (L). -
Page 44: Personal Strap Cover
To attach the L300 FS Cuff strap to the L300 FS Cuff: • Slide the strap through the strap leads and buckles on the L300 FS Cuff. Make sure the hook and loop fasteners face away from the L300 FS Cuff. Press on the hook and loop fasteners to secure the strap. -
Page 45: Personal Panels
Personal Panels The personal panel is a removable inner lining for the L300 FS Cuff for use in the clinic when the L300 FS Cuff is used by multiple patients. The personal panel is available in small and regular sizes, as well as in right and left configurations. The regular personal panel is used with the Regular L300 FS Cuff and features two buttonholes that snap into the L300 FS Cuff plug holes. - Page 46 To attach the personal panel to the L300 FS Cuff for follow-up sessions: • When the patient returns to the clinic for a follow-up visit, attach the personal panel (with the electrode bases and electrodes attached) onto the L300 FS Cuff inner liner. See Figure 7-6.
-
Page 47: Electrode Bases
Electrode Bases Figure 7-7: Small L300 FS Cuff electrode base option. Note: When the patient discontinues use of the NESS L300, remove the electrode bases from the personal panel or the L300 FS Cuff and remove the electrodes from the electrode bases. -
Page 48: Electrodes
The electrodes transmit the electrical signal from the RF Stim Unit to the target nerve and there are three types of electrodes that can be used with the NESS L300 FS Cuff. With the Regular L300 FS Cuff the following electrodes can be used: (See Figure 7-8) •... - Page 49 With the Small L300 FS Cuff the following electrodes can be used: (See Figure 7-9) • Small L300 Quick Fit Electrode - A • Small L300 Quick Fit Electrode - B • Small L300 Cloth Electrodes • Small L300 Hydrogel Electrodes (only used for the fitting process) Side against skin Attaches to the L300 FS Cuff Small L300 Quick Fit Electrode - A...
-
Page 50: Wire Concealers
Wire Concealers The wire concealers are used to cover the wires and snaps of the electrode bases when attached to the L300 FS Cuff. See Figure 7-10. Wire Snap Electrode Base Wire Concealer Figure 7-10: L300 FS Cuff without wire concealers (left) and with wire concealers (right). -
Page 51: Gait Sensor Pads
Gait Sensor Pads The Gait Sensor pad is used to secure the Intelli-Sense Gait Sensor pressure sensor to the inside of the shoe. The Gait Sensor pad is placed under the insole, and the Gait Sensor pressure sensor is placed on top of the Gait Sensor pad. See Figure 7-12. Shoe Insole Gait Sensor Pad Gait Sensor Pressure Sensor... -
Page 52: L300 Tester
L300 Tester The L300 Tester provides audio feedback when connected to the NESS L300 and stimulation is applied. The L300 Tester is used to diagnose if there is a disconnection in the L300 FS Cuff or a faulty RF Stim Unit. See figures 7-14 and 7-15, and the Troubleshooting section of this guide. -
Page 53: Chapter 8: Set-Up: Clinician's Programmer
Set-Up: Clinician’s Programmer Connecting the Clinician’s Programmer and Configuration Cradle To connect the Clinician’s Programmer and Configuration Cradle: 1. Orient the Clinician’s Programmer in the Configuration Cradle with the touchscreen facing up and the connector port facing left. See Figure 8-1. 2. -
Page 54: Connecting The Control Unit And Clinician's Programmer
2. Plug the charger into a power socket. 3. Allow the Clinician’s Programmer to charge. While charging, the charge indicator light will be AMBER. The Clinician’s Programmer can take two to four hours to charge. When the Clinician’s Programmer is fully charged, the charge indicator light will be GREEN. Connecting the Control Unit and Clinician’s Programmer Caution: Turn off the Control Unit or place it in standby mode before connecting it to the Configuration Cradle. -
Page 55: Chapter 9: Intelli-Gait Software Navigation
User Login To log into the NESS L300 Intelli-Gait Software: 1. Turn on the Clinician’s Programmer, and launch the NESS L300 Intelli-Gait Software. 2. When the Login Screen window opens, enter a user name and password, and then press Login. See Figure 9-1. -
Page 56: Start-Up Message Screens
Start-Up Message Screens New Patient Message This message appears when a Control Unit with patient data on it is connected to a Clinician’s Programmer with no record of the data in the database. Do one of the following: • Press Yes to add the patient’s data to the Clinician’s Programmer database. Press No if you do not want to add the patient’s data to the Clinician’s Programmer •... -
Page 57: Inconsistency Message
Inconsistency Message This message appears when the data stored in the Clinician’s Programmer database and on the Control Unit differ. See Figure 9-4. A data inconsistency can occur when two different Clinician’s Programmers are used to program the Control Unit. Do one of the following: •... -
Page 58: Patients Menu
Patients Menu Creating a New Patient Record To create a new patient record: 1. From the Patients List window, press New. See Figure 9-5. Figure 9-5: Patients List window. 2. When the New Patient window opens, enter the patient’s first and last name (alpha characters only) and assign a patient ID number (numeric characters only). -
Page 59: Modifying A Patient Name
Modifying a Patient Name To modify a patient’s first or last name (patient ID cannot be modified): 1. Select a patient from the Patients List, and then press Modify. See Figure 9-5. 2. The Modify Patient window will open. Modify the name and press OK. See Figure 9-7. Figure 9-7: Modify Patient window. -
Page 60: Settings Menu
Settings Menu Note: If the Control Unit is disconnected while programming, changes automatically will be saved. Programming Stimulation Settings To program stimulation settings: 1. From the Patients List, select a patient and press Open. The Stim Settings window will open. See Figure 9-8. 2. -
Page 61: Programming Advanced Stimulation Settings
Stim Parameter Definition Intensity Strength of Stimulation: 0 mA to 80 mA, in 1mA Steps Waveform Type of Stimulation: Symmetric or Asymmetric Phase Duration Length of Time of the Pulse: 100, 200, or 300 μsec Pulse Rate Frequency of Stimulation: 20 Hz to 45 Hz, in 5Hz Steps Table 9-1: Stimulation parameters and definitions. -
Page 62: Programming Gait Settings
Programming Gait Settings To program gait settings: 1. Press Gait to open the Gait Settings window. See Figure 9-10. Note: The Gait Settings window displays an audio feedback icon. Press the icon to turn on audio feedback during stimulation. The icon is GREEN when audio feedback is on and GRAY when audio feedback is off. - Page 63 Gait Parameter Definition The time, in seconds, that it takes for the stimulation to increase from zero to the maximum level set. A gradual buildup of the current makes the stimulation Ramp Up more comfortable, helps avoid stretch reflexes, and delays the start of muscle contraction.
-
Page 64: Programming Advanced Gait Settings
This safety feature is useful when a patient sits or lies down, and the leg wearing the NESS L300 is in the air and the system is in gait mode. It limits the duration of stimulation. To adjust the maximum duration of stimulation, use the stylus to move the slider. -
Page 65: Programming Training Settings
Programming Training Settings To program training settings: 1. Press Training to open the Training Settings window. See Figure 9-12. 2. Adjust On Time, Off Time, Ramp Up, Ramp Down, Total Time, and Intensity. See Table 9-3. 3. Press Start to turn on stimulation. Press Stop to turn off stimulation. 5-mA increase 1-mA increase Intensity Bar... - Page 66 Training Definition Parameter On Time The amount of time that stimulation is applied. Off Time The amount of rest time between stimulations. The time, in seconds, that it takes for the stimulation to increase from zero to the maximum level set. A gradual buildup of the current makes the stimulation Ramp Up more comfortable, helps avoid stretch reflexes, and delays the start of muscle contraction.
-
Page 67: Programming Advanced Training Settings
Programming Advanced Training Settings Press Advanced to open the Advanced Training Settings window. See Figure 9-13. Enable Specific Intensity Level for Training Mode Some patients may require a lower or higher intensity level in training mode than in gait mode. Press ? for more information. To adjust the intensity level in training mode independently of the intensity level set for stimulation and gait settings: •... -
Page 68: History Menu
History Menu Viewing a Session History A patient session begins when a Control Unit is connected to the Clinician’s Programmer and the patient’s record is opened. A patient session ends when session data are saved and the Control Unit is disconnected from the Clinician’s Programmer. If the Control Unit is disconnected and then reconnected within one hour, the most recent session reopens. - Page 69 Figure 9-14: Sessions List window. Figure 9-15: Session Details window. Chapter 9: Intelli-Gait Software Navigation...
-
Page 70: Viewing The Gait Log
Viewing the Gait Log The Gait Log is a record of the patient’s NESS L300 usage history. See figures 9-16 and 9-17 and Table 9-4. The Gait Log can be filtered by date and time frame, and displayed as a table or graphically. - Page 71 Cumulative Number of Steps Recorded to Date Average (# of Steps) Average Number of Steps Recorded to Date Gait Duration Total Time Spent Using the NESS L300 for a Given Date Total (Gait Duration) Cumulative Time Spent Using the NESS L300 to Date Average (Gait Duration) Average Time Spent Using the NESS L300 to Date Table 9-4: Gait Log data fields and definitions.
-
Page 72: Viewing The Training Log
Viewing the Training Log The Training Log is a record of the patient’s NESS L300 training history. See figures 9-18 and 9-19 and Table 9-5. The Training Log can be filtered by date and time frame, and displayed as a table or graphically. - Page 73 Training Log Field Definition Session Duration Total Time in Training Mode Total Cumulative Time in Training Mode Average (Session Duration) Average Time in Training Mode Table 9-5: Training Log data fields and definitions. Figure 9-19: Training Log, Graph View. Chapter 9: Intelli-Gait Software Navigation...
-
Page 74: Admin Menu
Admin Menu System administrators have access to the Admin menu. From the Admin menu, administrators can add or remove users, change user passwords, and back up and restore the database. See Figure 9-20. Figure 9-20: Admin menu, User Administration window. 64 Clinician’s Guide... -
Page 75: Adding And Removing Users
Adding and Removing Users To add a new user: 1. From the User Administration window, press Users and then New User. The Add new user window will open. See Figure 9-21. 2. Enter a user name and password, and confirm the password. 3. -
Page 76: Changing User Passwords
Changing User Passwords To change a user’s password: 1. From the User Administration window, select a user, and then press Change PWD. See Figure 9-22. The Change Password window will open. 2. Enter and confirm the new password, and then press OK. Figure 9-22: Admin menu, User Administration window. -
Page 77: Backing Up The Database
Backing Up the Database Administrators can back up the Clinician’s Programmer database to the storage (SD) card automatically or manually at any time. When a storage card is installed and automatic backup is enabled, the Clinician’s Programmer will automatically back up the database periodically and whenever the Intelli-Gait application is exited. -
Page 78: Restoring The Database
Restoring the Database Administrators can restore the database when the Clinician’s Programmer is replaced or the database is corrupted. Do not enter new patient information before restoring the database. To restore the database: 1. If a new storage card is in the Clinician’s Programmer, remove it. 2. -
Page 79: Chapter 10: Fitting Guidelines
Fitting Guidelines Inspect the Components To inspect the NESS L300 components: 1. Examine the L300 FS Cuff for signs of wear. 2. Test the Control Unit. Turn on the system, and check that no error indications appear. 3. Test the Intelli-Sense Gait Sensor. Press on it with your thumb while the system is in gait mode, and verify that the RF Stim Unit’s... -
Page 80: Attach The Hydrogel Electrodes And Electrode Bases
5. Attach the grid side of the electrodes to the Regular L300 Hydrogel Electrode Bases and then press firmly. 6. Remove the larger covers (with the Bioness logo) from the electrodes and save them. (Always cover the hydrogel electrodes between uses. Make sure the Bioness logo on the cover faces up.) - Page 81 6. Have the patient sit and extend the leg to between 15 and 20 degrees of flexion. (The patient should maintain this position throughout the fitting process.) The heel should be elevated, if possible. 7. Position one electrode (the nerve electrode) over the common peroneal nerve, distal and slightly posterior to the fibular head.
-
Page 82: Connect The Fitting Cable
Connect the Fitting Cable To connect the fitting cable: 1. Make sure the RF Stim Unit is connected to the cradle on the L300 FS Cuff. 2. Connect the fitting cable to the electrode bases and to the L300 FS Cuff plug holes. •... -
Page 83: Test The Effect Of A Positional Change
5. When applying stimulation, observe the patient’s foot for proper dorsiflexion. 6. Gradually increase stimulation intensity to achieve dorsiflexion with a small amount of eversion. If inversion is excessive: • Move the nerve electrode posterolaterally to increase eversion. If eversion is excessive: •... - Page 84 3. Disconnect the fitting cable from the electrode bases and L300 FS Cuff, making sure not to move the electrodes. 4. For in-patient use, attach an FS Cuff personal strap cover and personal panel to the L300 FS Cuff. 5. Grasp the L300 FS Cuff on each side to flare the Orthosis slightly open. Then tilt the bottom of the L300 FS Cuff away from the leg about 30 degrees.
- Page 85 8. Gently remove the L300 FS Cuff from the leg. See Figure 10-7. Figure 10-7: Removing the L300 FS Cuff with the captured electrode bases. 9. Press firmly on the electrode bases to secure them to the L300 FS Cuff. Plug the electrode base snaps into the L300 FS Cuff plug holes.
-
Page 86: Don The Fs Cuff
Don the L300 FS Cuff To don the L300 FS Cuff: 1. Wipe the leg with lukewarm water. 2. Have the patient sit and extend the knee so that the patella is clearly defined. Use a footrest if needed. 3. Tilt the top of the L300 FS Cuff toward the leg. Gently slide the locator up to the base of the patella. -
Page 87: Fitting The Small L300 Cloth Electrodes
Fitting the Small L300 Cloth Electrodes Note: The Small L300 Hydrogel Electrodes are used for the initial fitting process only. After the position of the electrodes have been determined, the small hydrogel electrodes will need to be removed and replaced with the Small L300 Cloth Electrodes. To fit the Small L300 Cloth Electrodes: (See Figure 10-9) 1. -
Page 88: Fitting The Regular L300 Cloth Electrodes
Fitting the Regular L300 Cloth Electrodes To fit the Regular L300 Cloth Electrode Bases: (See Figure 10-10) 1. Remove the Regular L300 FS Cuff from patient's leg. 2. Mark the position of the Regular L300 Hydrogel Electrode Bases on the FS Cuff liner. 3. -
Page 89: Fitting The L300 Quick Fit Electrodes
To fit the Regular L300 Cloth Electrodes: (See Figure 10-11) 1. Wet the new Regular L300 Cloth Electrodes with water until saturated. 2. With a soft cloth, gently wipe or blot excess water from the back (side with the snap) of the cloth electrodes. - Page 90 To fit the L300 Quick Fit Electrode: (See Figure 10-12) 1. Wet the entire new L300 Quick Fit Electrode with water. 2. Remove excess water from the L300 Quick Fit Electrode with a cloth. 3. Align the orange and blue snaps on the L300 Quick Fit Electrode with the orange and blue plug holes on the L300 FS Cuff.
-
Page 91: Place The Intelli-Sense Gait Sensor In The Shoe
Sensor pad and pressure sensor on top of the insole. Then, place a soft, thin (one layer versus two) generic insole over them. Generic insoles can be purchased from drugstores, shoe stores, or Bioness Inc. To place the Intelli-Sense Gait Sensor in the shoe: 1. -
Page 92: Program Gait, Training, And Advanced Settings
4. Clamp the Intelli-Sense Gait Sensor transmitter to the inner rim of the shoe. Face the NESS logo on the transmitter away from the ankle. See Figure 10-14. Transmitter NESS Logo Faces away from Ankle Clamp to Inner Rim of Shoe Pressure Sensor Figure 10-14: Clamping the transmitter to the inner rim of the shoe. -
Page 93: Doff The Fs Cuff
Figure 10-16: Regular L300 FS Cuff without (left) and with (right) wire concealers. Note: Make sure to instruct patients who will be using the NESS L300 at home to remove the L300 FS Cuff several times daily to allow the skin below the FS Cuff to breathe. - Page 94 84 Clinician’s Guide...
-
Page 95: Chapter 11: General Conditioning And Training Guidelines
Home Program Training When the NESS L300 is introduced in the out-patient setting for home program training for patients who are more than three months post stroke, muscle strength and endurance should be built up gradually to avoid over-fatigue. Separate gait and training sessions with rest periods of up to four hours during Week 1 and Week 2 to allow for recovery. -
Page 96: Standard Conditioning Protocol For Ness L300 Home Use
* Always use your recommended assistive device unless otherwise directed by your therapist. You should wear the NESS L300 for the time listed and put the L300 in gait mode whenever you are standing. Your prescribed AFO or other recommended brace should be worn when the NESS L300 is not in use. -
Page 97: Chapter 12: Patient Training And Follow-Up
Patient Training Clinicians and patients should know the limitations, warnings, and precautions associated with the NESS L300 Foot Drop System. Clinicians should review the safety information with patients, and train patients on component set-up, operation, and maintenance. Patients should understand the system displays and indicators, troubleshooting solutions, and whom to contact for technical support. -
Page 98: Patient Follow-Up
Patient Follow-Up The NESS L300 program should be followed and supervised by a qualified clinician to monitor clinical progress, maximize clinical effectiveness and safety, and provide clinical and technical support. A suggested follow-up agenda would include: • Component check-out: wear and function. -
Page 99: Chapter 13: Care And Maintenance
Care and Maintenance Replacing the Intelli-Sense Gait Sensor Battery The Clinician’s Kit includes a replacement battery for the Intelli-Sense Gait Sensor. The Gait Sensor battery is not rechargeable. A Gait Sensor battery will need to be replaced approximately every six months. The Gait Sensor indicator on the Control Unit will flash YELLOW when the battery has about two weeks of charge left. -
Page 100: Replacing The Rf Stim Unit Battery
Replacing the Control Unit Battery The Control Unit rechargeable battery should be replaced approximately every two years. Refer to the NESS L300 User’s Guide for battery replacement instructions. Replacing the L300 Quick Fit Electrode The L300 Quick Fit Electrode will need to be replaced at least every two weeks. - Page 101 Figure 14-2: Replacing the L300 Quick Fit Electrode. (Regular L300 Quick Fit Electrode and Regular L300 FS Cuff shown.) Chapter 13: Care and Maintenance...
-
Page 102: Replacing The L300 Cloth Electrodes
Replacing the L300 Cloth Electrodes Cloth electrodes will need to be replaced at least every two weeks. Caution: Use only NESS L300 Cloth Electrodes supplied by Bioness. Caution: Do not use the NESS L300 without electrodes. To replace the L300 Cloth Electrodes: (See Figure 14-3) 1. - Page 103 Figure 14-3: Replacing the L300 Cloth Electrodes. (Regular L300 Cloth Electrodes and Regular L300 FS Cuff shown.) Chapter 13: Care and Maintenance...
-
Page 104: Replacing The Regular L300 Hydrogel Electrodes
The Regular L300 Hydrogel Electrodes will need to replaced every two weeks for optimal stimulation. Caution: Use only NESS L300 Hydrogel Electrodes supplied by Bioness. Caution: Do not use the NESS L300 without electrodes. To replace the Regular L300 Hydrogel Electrodes: (See Figure 14-4) 1. - Page 105 Figure 14-4: Replacing the Regular L300 Hydrogel Electrodes. Chapter 13: Care and Maintenance...
-
Page 106: Replacing The Electrode Bases
Replacing the Electrode Bases If the electrode bases become worn, they many need to be replaced. To replace the electrode bases: (See Figure 14-5) 1. Remove any electrode base wire concealers. 2. Mark the position of the used electrode bases on the L300 FS Cuff liner with a permanent marker. -
Page 107: Replacing The L300 Fs Cuff
System Kit carrying case. Electronically Registering New Components When a NESS L300 Control Unit, RF Stim Unit, or Intelli-Sense Gait Sensor is replaced, the new component must be electronically registered to the other NESS L300 components for the system to communicate wirelessly. - Page 108 98 Clinician’s Guide...
-
Page 109: Chapter 14: Troubleshooting
Troubleshooting Frequently Asked Questions If you have any questions or concerns, please contact the NESS L300 Technical and Clinical Support Department at (800) 211-9136, Option 3. Our clinic owns multiple NESS L300 systems. How can we identify which components belong to which system? •... - Page 110 I connected the Control Unit to the Configuration Cradle, and a message appeared on the Clinician’s Programmer. The message says that a new patient was found and asks if I would like to add this record to the database. • Select Yes, if you want to review or make changes to the patient’s settings.
- Page 111 "E" appears in the digital display. • An error occurred while charging. Reconnect the system charger set. If the problem persists, contact Bioness. The Control Unit (or RF Stim Unit) does not light up when turned on. • The battery needs to be charged. Charge the battery. If the problem persists, contact Bioness.
- Page 112 I hear a beep, the RF Stim Unit indicator on the Control Unit flashes RED, and the stimulation intensity level flashes in the Control Unit digital display. If the patient feels stimulation but the intensity level seems weaker than usual and ankle movement is unsatisfactory, electrode contact may be compromised.
- Page 113 • Stop using the NESS L300 immediately and contact Bioness. Resume use only when the skin is completely healed. Give patients the NESS L300 Skin Care Guidelines and a skin conditioning protocol. I received a replacement component and was told I need to “register” it. Why is registration important, and how do I register a component? •...
- Page 114 I tried the registration procedure and saw a “C” immediately, but I never saw the alternating GREEN arches in the digital display. The replacement component is not working. • Clinician mode (for use by clinicians only) may have been started instead of the registration process.
-
Page 115: Using The L300 Tester
Using the L300 Tester The L300 Tester provides audio feedback when connected to the NESS L300 and stimulation is applied. Testing in Training Mode 1. Connect the L300 Tester to the FS Cuff. See Figure 15-1. 2. Press the Control Unit on/off button to turn on the system. -
Page 116: Advanced Testing
If either of the above steps elicits an error indication, test using the advanced testing procedures. Advanced Testing Note: If stimulation is not delivered to the patient’s leg, a “faulty electrode contact” error may appear. After you have rechecked that the electrode base snaps are secured to the plug holes of the FS Cuff and that the RF Stim Unit is fully snapped into the FS Cuff cradle, use the L300 Tester to differentiate among problems in the RF Stim Unit, FS Cuff, and electrode bases using a process of elimination. - Page 117 “Step 1: Test the FS Cuff”. 6. If the L300 Tester does not buzz, the RF Stim Unit may be faulty. Replace the RF Stim Unit or contact Bioness Inc. Figure 15-4: L300 Tester connected to the RF Stim Unit.
-
Page 118: Troubleshooting Quick Reference Table
Replace the Control Unit and register it RF Stim Unit Solution Charge the RF Stim Unit Charge the RF Stim Unit or contact Bioness Inc to replace Will not turn on the battery Replace the RF Stim Unit and register it... - Page 119 Will not turn on Press the Clinician’s Programmer reset button Replace the Clinician’s Programmer Lost the Intelli-Gait application/ Contact Bioness Inc data Reconnect the communication connector cable of the Configuration Cradle to the Clinician’s Programmer and Will not communicate with the...
- Page 120 110 Clinician’s Guide...
-
Page 121: Chapter 15: Technical Specifications
Technical Specifications Control Unit Specifications Classification Internally powered, continuous operation Operation Modes Gait, Training, Clinician, and Standby Battery Type Rechargeable AAA NiMH 1.2 V, 900–1100 mAh On/Off illuminated button Mode illuminated button for changing operation modes Controls Intensity +/- buttons to fine-tune intensity level Volume adjustment buttons for audio alerts Three status LEDs: Control Unit, RF Stim Unit, and Intelli-Sense Gait Sensor Digital display designates relative stimulation intensity... - Page 122 RF Stim Unit Specifications Classification Internally powered, continuous operation with type BF applied parts Operating Voltage 3.7 V Battery Type Proprietary rechargeable Li-Ion (Lithium Ion) 3.7 V, 700 mAh Status (fault, battery, charging) and Stimulation LEDs Indications "Beeps" for audio alerts Length: 74 mm (2.9 in.) Dimensions Width: 43 mm (1.7 in.)
- Page 123 Two, 45 mm (1.77 in.) diameter, surface area 15.8 cm hydrogel electrodes Regular L300 Hydrogel Electrodes Note: Use only electrodes provided by Bioness Inc Regular L300 Hydrogel Two relocatable polymer electrode bases for individual fitting Electrode Bases Two, 45 mm (1.77 in.) diameter, surface area 15.8 cm...
- Page 124 Two, 36 mm (1.41 in.) diameter, surface area 10.1 cm² hydrogel electrodes Small L300 Hydrogel Use only for fitting process Electrodes Note: Use only electrodes provided by Bioness Inc Small L300 Electrode Two, 36 mm (1.41 in.) diameter, relocatable Thermoplastic elastomer (TPE) Bases electrode bases Two, 36 mm (1.41 in.) diameter, surface area 10.1cm...
- Page 125 Power Supply Specifications Use medical Class II safety approved power supply provided/approved by Bioness Inc with the following ratings: Input Voltage 100–240 V AC Current 400 mA Frequency 50–60 Hz Output Voltage 5 V ± 5% Current 2400 mA Note: Do not use the Control Unit or RF Stim Unit while charging.
- Page 126 116 Clinician’s Guide...
-
Page 127: Chapter 16: Appendix - Emi Tables
Guidance and Manufacturer’s Declaration—Electromagnetic Emissions The NESS L300 System is intended for use in the electromagnetic environment specified below. The customer or the user of the NESS L300 System should assure that it is used in such an environment. Emissions Test Compliance Electromagnetic Environment –Guidance... - Page 128 Electromagnetic Immunity for All Equipment and Systems The NESS L300 System is intended for use in the electromagnetic environment specified below. The customer or the user of the NESS L300 System should assure that it is used in such an environment. IEC 60601 Test Electromagnetic Environment –...
- Page 129 Guidance and Manufacturer’s Declaration—Electromagnetic Immunity The NESS L300 System is intended for use in the electromagnetic environment specified below. The customer or the user of the NESS L300 System should assure that it is used in such an environment. Immunity...
- Page 130 Recommended Separation Distances Between Portable and Mobile RF Communications Equipment and the NESS L300 System The NESS L300 System is intended for use in an electromagnetic environment in which radiated RF disturbances are controlled. The customer or the user of the NESS L300 System can help prevent...
- Page 131 Chapter 16: Appendix - EMI Tables...
Need help?
Do you have a question about the NESS L300 and is the answer not in the manual?
Questions and answers