Bioness NESS H200 Wireless Clinicians Manual
Hide thumbs
Also See for NESS H200 Wireless:
- User manual (128 pages) ,
- Troubleshooting manual (16 pages) ,
- User reference manual (2 pages)
Table of Contents
Advertisement
Quick Links
Manufactured by Bioness Neuromodulation Ltd.
A Bioness Inc Company
19 Ha'Haroshet Street
PO Box 2500
Industrial Zone
Ra'Anana 43654, Israel
Worldwide Corporate Office
Bioness Inc
25103 Rye Canyon Loop
Valencia, CA 91355 USA
Telephone: 800.211.9136
Email: info@bioness.com
Website: www.bioness.com
NESS
, NESS H200
, NESS H200
Wireless, Bioness, the Bioness Logo
, and LiveOn
are trademarks of Bioness Inc. | www.bioness.com
®
®
®
®
®
Rx Only
©2011 Bioness Inc.
602-00503-001 Rev. C
Advertisement
Table of Contents
Troubleshooting

Related Manuals for Bioness NESS H200 Wireless


Summary of Contents for Bioness NESS H200 Wireless
- Page 1 Telephone: 800.211.9136 Email: info@bioness.com Website: www.bioness.com NESS , NESS H200 , NESS H200 Wireless, Bioness, the Bioness Logo , and LiveOn are trademarks of Bioness Inc. | www.bioness.com ® ® ® ® ® Rx Only ©2011 Bioness Inc. 602-00503-001 Rev. C...
- Page 2 Clinician’s Guide...
- Page 3 Clinician’s Guide Rx Only...
- Page 4 Disclaimer Bioness Inc and its affiliates shall not be liable for any injury or damage suffered by any person, either directly or indirectly, as a result of the unauthorized use or repair of Bioness Inc products. Bioness Inc and its affiliates do not accept any responsibility for any damage caused to its products, either directly or indirectly, as a result of use and/ or repair by unauthorized personnel.
-
Page 5: List Of Symbols
List of Symbols Caution or Warning Type BF Applied Part(s) Complies with the European Union Medical Device Directive Double Insulated (Equivalent to Class II of IEC 536) Non-Ionizing Radiation This Product Must Not be Disposed of with Other Household Waste Complies with United States and Canadian Product Safety Standards European Authorized Representative Manufacturer... - Page 6 Fits Large Orthosis Fits Small and Medium Orthoses Thick Wrist Insert Large Thenar FPL Panel Clinician's Guide...
-
Page 7: Table Of Contents
Radio Frequency (RF) Communication ......................9 Travel and Airport Security .........................10 Electromagnetic Compatibility ........................10 Warnings and Cautions ........................11 Chapter 4: The NESS H200 Wireless System ..............13 H200 Wireless Orthosis ..........................13 Stimulating Electrodes .........................14 Orthosis Flexor Support ........................15 Orthosis Extensor Wing ........................15 Spiral End of the Orthosis ........................16... - Page 8 H200 Wireless Clinician’s Kit (large) ......................34 H200 Wireless Clinician’s Upgrade Kit (small/medium) ................34 H200 Wireless Clinician’s Upgrade Kit (large) ....................35 PDA Components ............................37 HP iPAQ Clinician’s Programmer with NESS H200 Wireless Software ..........37 On/Off Button ..........................38 Charge Indicator Light ......................38 Clinician's Guide...
- Page 9 Wetting/Attaching the H200 Wireless Cloth Electrodes ................61 Chapter 7: PDA Setup ......................63 Connecting the Clinician’s Programmer to the Cradle ................63 Charging the Clinician’s Programmer ......................63 Connecting the H200 Wireless Control Unit ....................64 Chapter 8: NESS H200 Wireless Software ................65...
- Page 10 Drop-Down Lists ..........................69 Scroll Bars ............................70 Stimulation Intensity Bar ........................70 Program Countdown Clock ........................71 Program Active Phase Color Display ....................71 Programming the NESS H200 Wireless System ..................72 Logging In ............................72 Start-Up Messages ..........................73 New Patient Detected ......................73 Control Unit Unassigned ......................74 H200 Wireless Control Unit Not Registered ................74...
- Page 11 Patient Training ............................101 Donning/Doffing the H200 Wireless Orthosis ..................102 Operating the NESS H200 Wireless System ..................103 Maintaining and Cleaning the NESS H200 Wireless System ............103 Troubleshooting ..........................103 Practicing with the NESS H200 Wireless System ................103 Patient Follow-Up and Clinical Support ....................104 Suggested Follow-up Agenda ......................104...
- Page 12 Cleaning the H200 Wireless Components ....................108 Disinfecting the H200 Wireless Components ...................108 Electronic Components ........................108 Wrist Insert ............................109 Chapter 11: Troubleshooting ....................111 Frequently Asked Questions ........................112 Chapter 12: Technical Specifications ................115 Chapter 13: Appendix - EMI Tables ................... 119 Clinician's Guide...
-
Page 13: Chapter 1: Introduction
The NESS H200 Wireless Hand Rehabilitation System delivers electrical stimulation to the nerves of the flexor and extensor muscles that control the hand, to improve hand function and treat upper limb impairments resulting from injury to the central nervous system. - Page 14 Clinician's Guide...
-
Page 15: Chapter 2: Device Description And Safety Information
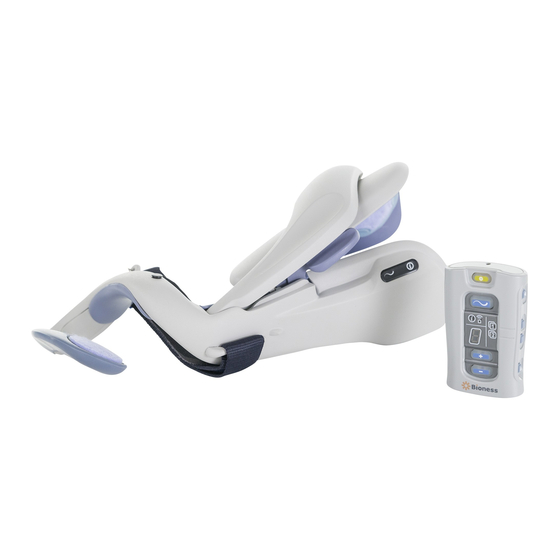
Chapter Device Description and Safety Information Device Description The NESS H200 Wireless System consists of a radio-frequency controlled Orthosis and a wireless handheld Control Unit. See Figure 2-1. H200 Wireless Control Unit H200 Wireless Orthosis Figure 2-1: H200 Wireless Orthosis and Control Unit. -
Page 16: Indications For Use
Re-education of muscles. Contraindications • Do not use the NESS H200 Wireless System on an arm where a cancerous lesion is present or suspected. • Do not use the NESS H200 Wireless System on patients who have a cardiac pacemaker, implanted defibrillator, or other implanted metallic or electronic device. -
Page 17: Adverse Reactions
• The NESS H200 Wireless System should only be configured by an authorized clinician. • Only trained clinicians should determine electrode placement and stimulation settings. • The H200 Wireless Clinician’s Programmer should only contain the Windows Mobile for Pocket PC operating system and Bioness Inc proprietary software. Third-party software packages are not supported and may interfere with proper operation of the NESS H200 Wireless System, thus voiding the warranty. - Page 18 The safe use of the NESS H200 Wireless System during pregnancy has not been established. • Keep the NESS H200 Wireless System out of the reach of children. Advise patients to use the H200 Wireless Orthosis with caution: • If the patient has a tendency to hemorrhage following acute trauma or fracture.
- Page 19 -25°C (-13°F) to +70°C (+158°F). Temperature extremes can damage the components. If skin irritation or a skin reaction occurs, advise patients to stop using the NESS H200 Wireless System immediately, and to contact their clinician or dermatologist and the Bioness Client Relations Department: (800) 211-9136, Option 3.
- Page 20 Clinician's Guide...
-
Page 21: Chapter 3: Environmental Conditions That Affect Use
Portable and mobile RF communications equipment can affect the NESS H200 Wireless System. Conformity Certification The NESS H200 Wireless System complies with Part 15 of the FCC rules. Operation is subject to the following two conditions: 1. This device may not cause harmful interference. -
Page 22: Travel And Airport Security
Patients may want to carry a copy of their NESS H200 Wireless System prescription. A prescription can be useful when passing through customs as well. -
Page 23: Warnings And Cautions
CISPR (International Special Committee on Radio Interference, International Electrotechnical Commission) emission requirements. • Do not use the NESS H200 Wireless System within three feet of short wave or microwave therapy equipment. Such equipment may produce instability in the stimulation output by the Orthosis. - Page 24 Clinician's Guide...
-
Page 25: Chapter 4: The Ness H200 Wireless System
Extensor Wing Wrist Insert EPB #2 Thenar #3 Electrode Electrode FPL #5 Charging Electrode Port FDS #4 Electrode Spiral End Flexor Support Stimulation Status Light Light Figure 4-1: The H200 Wireless Orthosis. Chapter 4 - The NESS H200 Wireless System... -
Page 26: Stimulating Electrodes
Stimulating Electrodes The Orthosis transmits electrical stimulation through five surface electrodes custom placed by the clinician to provide optimal wrist and hand movements. See Table 4-1. • Two electrodes are placed on the ventral aspect of the forearm, to stimulate the flexor muscles. -
Page 27: Orthosis Flexor Support
The extensor wing includes a release handle for opening the wing and a wing arm for closing the wing. See Figure 4-3. It is primarily designed to stimulate the extensor muscles. Extensor Wing Wing Arm Wing Release Handle Figure 4-3: H200 Wireless Orthosis extensor wing. Chapter 4 - The NESS H200 Wireless System... -
Page 28: Spiral End Of The Orthosis
Spiral End of the Orthosis The spiral end of the Orthosis is designed to support the hand while delivering stimulation to the thenar muscle group. The spiral end features: See Figure 4-4. • A removable thenar—supports the thenar eminence. • A wrist bridge—used to stabilize the hand in a functional position while in the Orthosis. -
Page 29: Indicator Lights
SOLID GREEN Charged; Registration Successful Faulty Electrode FLASHES RED Contact Hardware/Software SOLID RED Error; Charging Error Stimulation Light SOLID YELLOW Stimulation Paused FLASHES YELLOW Stimulation On RAPIDLY Table 4-2: H200 Wireless Orthosis displays. Chapter 4 - The NESS H200 Wireless System... -
Page 30: Audio Alerts
Electrode contact is faulty. • A charging error has occurred. • The battery charge level is low. • Stimulation is turned on/off or paused. • The NESS H200 Wireless System is turned on/off. • The H200 Wireless Orthosis stimulation unit malfunctions. Clinician's Guide... -
Page 31: Rechargeable Battery And Charging Port
The charging port is located on the distal end of the Orthosis. The Orthosis battery must be charged before initial use and daily thereafter. The NESS H200 Wireless System Kit includes a system charger set for charging the Orthosis and the H200 Wireless Control Unit simultaneously. -
Page 32: H200 Wireless Control Unit
H200 Wireless Control Unit The Control Unit communicates wirelessly with the Orthosis to turn on/off and pause stimulation, adjust stimulation intensity, and monitor system status. The H200 Wireless Control Unit features: • Operating buttons. • On/off lights. • Operating modes. •... - Page 33 Bottom: Selects User Program 2. In clinical Buttons mode, scrolls back though Clinical Programs A–G. Stimulation Test Tests Stimulation in the H200 Wireless Orthosis: Button Alternately tests extensors and flexors. Table 4-3: H200 Wireless Control Unit operating buttons. Chapter 4 - The NESS H200 Wireless System...
-
Page 34: On/Off Lights
The H200 Wireless System has three operating modes: standby, user, and clinical. Standby Mode The NESS H200 Wireless System is on and waiting for commands; stimulation is off. User Mode User mode is automatically entered when the Control Unit is turned on. User Programs 1 and 2 can be selected. -
Page 35: Indicators And Digital Display
The Control Unit indicators and digital display are illustrated in Figure 4-7. Control Unit RF Communication Status Indicator Indicator Program 1 Indicator Program 2 Indicator Digital Display Figure 4-7: H200 Wireless Control Unit digital display and indicators. Chapter 4 - The NESS H200 Wireless System... - Page 36 The Control Unit indicators communicate: • System status. • User program selected. • RF communication status. See Table 4-5. Indicator Description Definition Control Unit Status Indicator Low Battery, H200 Wireless FLASHES YELLOW Control Unit Control Unit Charging Error; Control Unit Status Indicator is Electronic Registration Error;...
- Page 37 Letter "U" H200 Wireless Control Unit Unregistered Rotating GREEN Circle H200 Wireless Control Unit Charging Horizontal GREEN Line H200 Wireless Control Unit Fully Charged Table 4-6: H200 Wireless Control Unit digital displays. Chapter 4 - The NESS H200 Wireless System...
-
Page 38: Audio Alerts
The audio alerts were muted/un-muted. • A charger was connected or disconnected. • The NESS H200 Wireless System was turned on/off. • The H200 Wireless Control Unit battery charge level is low. • An H200 Wireless Control Unit hardware/software error occurred. -
Page 39: Rechargeable Battery And Charging Port
CAUTION: Next to the charging port is a signal input/output port for the configuration cradle communication connector cable. See Figure 4-8. The signal input/output port on the Control Unit is only to be used by the clinician. Chapter 4 - The NESS H200 Wireless System... -
Page 40: H200 Wireless Clinical Programs
H200 Wireless Clinical Programs The H200 Wireless System supports: • Functional Training Programs. • Neuroprosthesis Programs. • Motor Neuromodulation Program. • Personal Preset Programs. • Custom Personal Programming Functional Training Programs There are three functional Training Programs A, B, and C that are designed to exercise the hand. -
Page 41: Neuroprosthesis Programs
The program is started and paused by pressing the trigger button on the Control Unit or Orthosis. Program time can range from 5 to 30 minutes. Chapter 4 - The NESS H200 Wireless System... -
Page 42: Personal Preset Programs
Personal Preset Programs The Personal Preset Programs address patient variances in: • Voluntary movement of the wrist and fingers. • Finger response to motor neuromodulation. • Tone. The three Personal Preset Program consists of a series of Functional Training and Motor Neuromodulation Program segments that cycle for a total programmed time. -
Page 43: Operating The Ness H200 Wireless System
Selecting a Clinical Program While in clinical mode, press the top or bottom program selection button on the H200 Wireless Control Unit until the desired program letter appears in the digital display. Chapter 4 - The NESS H200 Wireless System... -
Page 44: Turning On Stimulation
Turning On Stimulation Press the trigger button on the H200 Wireless Control Unit or the trigger button on the Orthosis. Pausing Stimulation Press the trigger button on the H200 Wireless Control Unit or the trigger button on the Orthosis. Note: Neuroprosthesis Programs cannot be paused. Pressing the trigger button when stimulation is on starts the second phase of a Neuroprosthesis Program. -
Page 45: Chapter 5: Ness H200 Wireless Clinician's Kit
Chapter NESS H200 Wireless Clinician’s Kit The NESS H200 Wireless Clinician’s Kit is used to fit and program the NESS H200 Wireless System. The small/medium Clinician’s Kit is for fitting small/medium Orthoses. The large Clinician’s Kit is for fitting the large Orthosis. -
Page 46: H200 Wireless Clinician's Kit (Large)
H200 Wireless Clinician’s Reference Card • HP iPAQ Manufacturer’s Instructions The NESS H200 Wireless Clinician’s Upgrade Kit is to be used with the NESS H200 Clinician's Kit to fit and program the NESS H200 Wireless System. H200 Wireless Clinician’s Upgrade Kit PDA Components •... -
Page 47: H200 Wireless Clinician's Upgrade Kit (Large)
HP iPAQ Manufacturer’s Instructions CAUTION: Inspect all components for damage prior to use. HP iPAQ Clinician’s Programmer Charger HP iPAQ Clinician’s Programmer with H200 Wireless Software ® HP iPAQ Configuration Cradle with Stylus Chapter 5 - NESS H200 Wireless Clinician's Kit... - Page 48 Thenar Wrist Insert Cover Wrist Insert Wrist Insert Screw Wrist Insert Screw H200 Wireless FPL H200 Wireless FPL Thenar Screw (small/medium) (large) Panel Screw Panel Screw 2.5 x 4 mm 3 x 6 mm 3 x 8 mm (small/medium) (large) 3 x 12 mm 3 x 14 mm Extensor A, B, C, D...
-
Page 49: Pda Components
HP iPAQ Clinician’s Programmer with NESS H200 Wireless Software The HP iPAQ Clinician’s Programmer is a portable personal digital assistant (PDA) used to program the NESS H200 Wireless System. When connected to the HP iPAQ Configuration Cradle and H200 Wireless Control Unit, the Clinician’s Programmer can wirelessly communicate with the H200 Wireless Orthosis. -
Page 50: On/Off Button
On/Off Button Used to turn on/off the Clinician’s Programmer. Charge Indicator Light The charge indicator light is YELLOW when the Clinician’s Programmer is charging and GREEN when the Clinician’s Programmer battery charge is complete. SD (Secure Digital) Slot The SD slot is for the SD card, used to back up and restore the Clinician's Programmer database. -
Page 51: Accessories
Figure 5-2: Thenar. Thenar Screws One thenar screw is needed to attach the thenar to the spiral end of the H200 Wireless Orthosis. See Figure 5-3. Thenar Screw Figure 5-3: Thenar screw. Chapter 5 - NESS H200 Wireless Clinician's Kit... -
Page 52: Wrist Insert
Wrist Insert The wrist insert is a removable unit that attaches to the underside of the wrist bridge of the Orthosis. See Figure 5-4. It is used to cushion the back of the hand, maintain contact pressure between the Orthosis and the hand in order to stabilize the hand, and optimize hand posture during stimulation. -
Page 53: H200 Wireless Fpl Panel
Figure 5-6: FPL panel and FPL panel screw. H200 Wireless FPL Panel Screws One H200 Wireless FPL panel screw is needed to attach the H200 Wireless FPL panel to the Orthosis. See Figure 5-6. Chapter 5 - NESS H200 Wireless Clinician's Kit... -
Page 54: Fitting Panels
Fitting Panels The fitting panels feature an array of electrode base configurations used to stimulate opening and closing of the hand and fingers. The extensor fitting panels attach to the Orthosis extensor wing. The flexor fitting panels attach to the Orthosis flexor support. The fitting panels are used in the clinic setting and to customize the electrode bases to the Orthosis for home users. -
Page 55: Flexor Fitting Panels
The flexor fitting panels have one electrode base (Flexor Digitorum Superficialis (FDS) #4) and one conducting spring each. The conducting spring is on the back of the fitting panel and makes contact with the #4 electrode base socket on the Orthosis. Chapter 5 - NESS H200 Wireless Clinician's Kit... -
Page 56: Electrode Base Set
The thenar cloth electrode is available in regular and large sizes. CAUTION: Do not use the NESS H200 Wireless System without the cloth electrodes. CAUTION: The H200 Wireless cloth electrodes must be wet before use and wet again after every four hours of use. -
Page 57: Chapter 6: Fitting The H200 Wireless Orthosis
Chapter Fitting the H200 Wireless Orthosis Before fitting the H200 Wireless Orthosis: • Wash the patient's hand and forearm with soap and water and remove any lotions or oils. • Have the patient remove any jewelry from the hand, wrist, and forearm. Measuring for Orthosis Size The Orthosis is available in three sizes: small, medium, and large. -
Page 58: Fitting The Thenar
Fitting the Thenar The thenar #3 electrode should rest on the thenar eminence. See Figure 6-1. Thenar #3 Cloth Electrode Figure 6-1: Placement of the thenar on the thenar eminence. To fit the thenar: 1. Choose a thenar of appropriate size and configuration. 2. - Page 59 2. Slide the thenar away from the Orthosis. Note: Using an incorrect screw can damage the H200 Wireless Orthosis. CAUTION: Do not use the NESS H200 Wireless System without wetting and attaching the thenar cloth electrode. Chapter 6 - Fitting the H200 Wireless Orthosis...
-
Page 60: Fitting The Wrist Insert
Fitting the Wrist Insert The wrist insert fits under the wrist bridge of the Orthosis. See Figure 6-4. Wrist Bridge Figure 6-4: Wrist bridge, with wrist insert underneath. To fit the wrist insert: 1. Select a wrist insert of appropriate size, side, and thickness. When choosing a thickness, follow these guidelines: Hand/Arm Posture: The patient’s hand/arm will determine which wrist insert to use. - Page 61 Thenar Screw Hole Prong(s) Wrist Wrist Insert Bridge Figure 6-5: Aligning the wrist insert. Prong(s) Wrist Bridge Figure 6-6: Inserting the wrist insert into the wrist bridge. Figure 6-7: Tightening the wrist insert screw. Chapter 6 - Fitting the H200 Wireless Orthosis...
- Page 62 To remove the wrist insert: 1. Carefully lift the corner padding overlying the wrist insert screw. Do not tear the padding. 2. Remove the screw. 3. Lift the wrist insert (screw hole end first) away from the wrist bridge. Do not damage the electronic circuitry in the wrist bridge.
-
Page 63: Fitting The Wrist Strap And Fpl Panel
Fitting the Wrist Strap and FPL Panel 1. With the extensor wing open, position the spiral end of the Orthosis proximally on the hand. 2. Bring the Orthosis around the forearm, and position the flexor support on the forearm. See Figure 6-9. Figure 6-9: Positioning the flexor support. - Page 64 5. If the Orthosis is positioned correctly, close the extensor wing. Place your hand on top of the wing arm and grasp under the Orthosis extensor wing with your fingers. Pull the extensor wing out while pushing down on the wing arm. Push until no more clicking can be heard.
-
Page 65: Attaching The Wrist Strap
Attaching the Wrist Strap 1. Attach the hook on the wrist strap to the attachment ring on the Orthosis wrist bridge. See Figure 6-11. Wrist Strap Wrist Strap Attachment Hook Attachment Ring Figure 6-11: Attaching the wrist strap. 2. Bring the wrist strap under the wrist and up through the wrist strap attachment bar. See Figure 6-12. - Page 66 3. Pull up on the wrist strap. 4. Bring the wrist strap down onto itself to fasten. 5. Check to see if the FPL #5 electrode is in contact with the radial side of the wrist. If there is a gap, tighten the wrist strap. If there is still a gap, attach the FPL panel. Note: If the patient is feeling excessive pressure under the wrist strap or over the radial side of the wrist, loosen the wrist strap.
-
Page 67: Attaching The Fpl Panel
Attaching the FPL Panel The FPL panel fits over the FPL #5 electrode base. See Figure 6-13. Note: The FPL panel is for patients who have small wrists, to improve limb contact with the FPL electrode. FPL Panel Figure 6-13: The FPL panel placed over the #5 electrode base. To attach the FPL panel: 1. - Page 68 5. Insert the FPL panel screw through the FPL panel electrode base and into the Orthosis FPL #5 electrode base and socket. 6. Tighten the screw. CAUTION: Do not use the NESS H200 Wireless System without wetting and attaching the FPL #5 cloth electrode. Clinician's Guide...
-
Page 69: Determining The Optimal Electrode Configuration
Determining the Optimal Electrode Configuration The fitting panels are used to determine the optimal electrode configuration for the extensors and flexors. The fitting panels easily snap in and out of the Orthosis and can be changed to elicit the desired hand movement. Extensor Fitting Panels 1. - Page 70 2. With the Orthosis wing opened, align the narrow end of the extensor fitting panel with the narrow end of the extensor wing. See Figure 6-17. Make sure the lip of the fitting panel rests outside of the wing. Extensor Wing Extensor Fitting Panel Figure 6-17: Placement of the extensor fitting panel.
-
Page 71: Flexor Fitting Panels
Flexor Fitting Panels 1. Select a flexor fitting panel that will elicit the desired hand movement. See Figure 6-18. Figure 6-18: Flexor fitting panels. • Always start with fitting panel A. • Use the B or C flexor fitting panel for additional radial stimulation and for better index finger and/or thumb flexion. - Page 72 2. With the Orthosis wing open, fit the flexor fitting panel to the Orthosis flexor support. See Figure 6-20. Extensor Wing Fitting Panel Orthosis Figure 6-20: Placement of the flexor fitting panel. 3. Make sure the lip of the fitting panel rests beyond the edge of the Orthosis. 4.
-
Page 73: Wetting/Attaching The H200 Wireless Cloth Electrodes
Wetting/Attaching the H200 Wireless Cloth Electrodes To wet the cloth electrodes: 1. Remove the cloth electrodes from the H200 Wireless Orthosis. 2. Wet the cloth electrodes thoroughly and uniformly. See Figure 6-21. Figure 6-21: Wetting the cloth electrodes. 3. Blot excess water from the cloth electrodes. See Figure 6-22. Figure 6-22: Blotting the cloth electrodes. - Page 74 4. Snap cloth electrode #3 to the thenar. 5. For cloth electrodes #1, 2, 4, and 5, face the white dot on the cloth electrode toward the electrode base. Insert the corners of the cloth electrode into the electrode base. See Figure 6-23.
-
Page 75: Chapter 7: Pda Setup
Chapter PDA Setup Connecting the Clinician’s Programmer to the Cradle 1. Orient the Clinician’s Programmer in the Configuration Cradle with the touchscreen facing up and the connector port facing left. See Figure 7-1. HP iPAQ Clinician’s Programmer with Software Charger Adapter Charger Connector Port Communication Connector Cable... -
Page 76: Connecting The H200 Wireless Control Unit
Connecting the H200 Wireless Control Unit 1. Turn off the Control Unit, or make sure it is in standby mode. Stimulation should not be on or paused. 2. Plug the communication connector cable of the Configuration Cradle into the signal input/ output port of the Control Unit. -
Page 77: Chapter 8: Ness H200 Wireless Software
Chapter NESS H200 Wireless Software The H200 Wireless Software is used to program the NESS H200 Wireless System. Navigation Tools Information Icon The information icon is positioned in the top right corner of the software screens. The information icon indicates system status and, when pressed, opens error messages and troubleshooting screens. -
Page 78: Menus
Menus The H200 Wireless Software has five menus at the bottom of each screen: Exit, Patients, Programs, Logs, and Tools. See Figure 8-2 and Table 8-2. Menus Figure 8-2: Menus. Menu Function Exit Exit or log off the H200 Wireless Software. Patients Open the Patient List window to open, create, modify, or remove a patient record. -
Page 79: Tabs
Figure 8-3: Tabs, Logs menu. The Tools menu has four tabs: Info, Users, Backup, and Restore. Only Administrators have access to the Users, Backup, and Restore tabs. See Figure 8-4. Tabs Figure 8-4: Tabs, Tools menu. Chapter 8 - NESS H200 Wireless Software... -
Page 80: Buttons
Buttons The buttons, when pressed, open a new screen or execute a command. See Figure 8-5. Frequently used buttons are described in Table 8-3. Button Button Figure 8-5: Buttons. Button Function Start Starts stimulation. Stop Stops stimulation. Trigger Starts a stimulation phase in a trigger-controlled exercise. Modify Opens a window to change various data. -
Page 81: Keyboard
Drop-Down List Keyboard Figure 8-7: On-screen keyboard and drop-down lists. Drop-Down Lists Press the down arrow to display the values in a drop-down list. Use the stylus to select a value. See Figure 8-7. Chapter 8 - NESS H200 Wireless Software... -
Page 82: Scroll Bars
Scroll Bars Press an arrow on a scroll bar to move through the selectable data set. See Figure 8-8. Scroll Bars Figure 8-8: Scroll bars. Stimulation Intensity Bar Press on the stimulation intensity bar to open or collapse the bar. See Figure 8-9. Press on the arrows to increase/decrease stimulation intensity. -
Page 83: Program Countdown Clock
Figure 8-10: Countdown clock. Program Active Phase Color Display During a multi-phase program, the active phase will display in ORANGE. See Figure 8-11. Active Phase in ORANGE Figure 8-11: Program active phase color display. Chapter 8 - NESS H200 Wireless Software... -
Page 84: Programming The Ness H200 Wireless System
Programming the NESS H200 Wireless System Before programming the H200 Wireless System: • Make sure the cloth electrodes are wet and attached to the Orthosis electrode bases. • Make sure there is good contact between the cloth electrodes and the forearm. -
Page 85: Start-Up Messages
Press No and open an existing patient record. Note: If you press No and open an existing patient record, the opened record will permanently overwrite all existing data on the NESS H200 Wireless System. Figure 8-14: New patient message. Chapter 8 - NESS H200 Wireless Software... -
Page 86: Control Unit Unassigned
Control Unit Unassigned Message appears when a new, unassigned Control Unit (one with no patient data on it) is connected to the Clinician’s Programmer. See Figure 8-15. Do one of the following: • Press OK and then NEW to create a new patient record. •... -
Page 87: Data Inconsistency
Press System to overwrite the data in the Clinician’s Programmer database with that on • the NESS H200 Wireless System. Press Database to overwrite the data on the NESS H200 Wireless System with that in • the Clinician’s Programmer database. -
Page 88: Opening/Creating A Patient Record
Opening/Creating a Patient Record 1. Select a patient record from the patient list and press Open, or press New to create a new patient record. See Figure 8-18. Figure 8-18: Patient List window. 2. For new patients, enter the patient’s first and last name (alpha characters only) in the New Patient window, and assign a patient ID (1–14 characters). -
Page 89: Configuring Stimulation Parameters
• Press Start to turn on stimulation. • Press Stop to turn off stimulation. 5. Deactivate/activate the remote trigger button on the Orthosis, if desired, by checking/ unchecking the "Deactivate Remote Trigger" box. Chapter 8 - NESS H200 Wireless Software... -
Page 90: Configuring Clinical Programs A-G
6. Press Done to return to the Programs window. Note: “0” intensity equals no stimulation. Note: Adjustments to stimulation intensity affect all programs except Program F—Key Open. Configuring Clinical Programs A–G 1. From the Programs menu, press Program Settings to open the Program Settings window. -
Page 91: Program A-Grasp & Release
5. Allow the program to continue for the total time or press Stop. 6. Press Done to return to the Program Settings window. Note: The active program phase will be highlighted in ORANGE. Note: Adjustments to stimulation intensity affect all programs except Key Open. Chapter 8 - NESS H200 Wireless Software... -
Page 92: Program B-Open Hand
Program B—Open Hand Program B activates the extensor muscles only. Pressing Start starts the program. Cyclical hand extension is followed by a period of relaxation, and then hand extension repeats. The program shuts down automatically after the total time has elapsed (range: 5–120 minutes). Stimulation intensity, the duration of extension and relaxation, and total time are adjustable. -
Page 93: Program C-Grasp
5. Allow the program to continue for the total time or press Stop. 6. Press Done to return to the Program Settings window. Note: The active program phase will be highlighted in ORANGE. Note: Adjustments to stimulation intensity affect all programs except Key Open. Chapter 8 - NESS H200 Wireless Software... -
Page 94: Program D-Grasp & Release
Program D—Grasp & Release Program D is used to grasp and hold objects using a palmar grasp. Pressing Trigger starts the program. A half-second pause is followed by several seconds of the hand opening. The hand then closes and remains closed until the trigger button is pressed again to release the grasp. -
Page 95: Program E-Open Hand
Note: Adjustments to stimulation intensity affect all programs except Key Open. Note: Extended use (more that 30 seconds of uninterrupted use) of this mode is not recommended due to potential fatigue in the extensor muscles. Chapter 8 - NESS H200 Wireless Software... -
Page 96: Program F-Key Grip
Program F—Key Grip Program F is used to grasp and hold small items in a lateral grasp (or key grip) between the thumb and the lateral side of the index finger. Pressing Trigger starts the program. A half-second pause is followed by several seconds of thumb opening. The thumb then closes against the lateral side of the index finger and remains closed until Trigger is pressed again to release the grip. -
Page 97: Program G-Motor Neuromodulation
4. Allow the program to continue for the total time, or press Stop. 5. Press Done to return to the Program Settings window. Note: The active program phase will be highlighted in ORANGE. Note: Adjustments to stimulation intensity affect all programs except Key Open. Chapter 8 - NESS H200 Wireless Software... -
Page 98: Extensors
Extensors 1. Adjust extensors on time, stimulation off time, and total time. See Figure 8-30. Figure 8-30: Program G, extensors window. 2. Press Start. The program countdown clock will appear at the bottom of the screen. 3. If needed, adjust stimulation intensity. 4. -
Page 99: Flexors
4. Allow the program to continue for the total time, or press Stop. 5. Press Done to return to the Program Settings window. Note: The active program phase will be highlighted in ORANGE. Note: Adjustments to stimulation intensity affect all programs except Key Open. Chapter 8 - NESS H200 Wireless Software... -
Page 100: Configuring A Personal Custom Program
Configuring a Personal Custom Program 1. From the Assign to Button 1 or Assign to Button 2 window, select Personal Custom and press Edit. See Figure 8-32. Figure 8-32: Assign to Button 1 window. 2. The Personal Custom window will open, displaying the program segment list. See Figure 8-33. - Page 101 9. Press Done to return to the Assign to Button window. Note: The maximum number of program segments is eight. The maximum number of rest periods is 15. Note: Adjustments to stimulation intensity affect all programs except Key Grip. Chapter 8 - NESS H200 Wireless Software...
-
Page 102: Assigning User Program Buttons 1 And 2
Assigning User Program Buttons 1 and 2 The clinician may assign up to two programs to the H200 Wireless Control Unit for patient use at home. The assigned User Programs are patient accessible by pressing the Program 1 and Program 2 buttons on the H200 Wireless Control Unit. To assign User Program Button 1. - Page 103 Figure 8-37: Assign to Button 2 window. 3. Select a program or press "Same as Button 1." 4. Press Done to return to the Programs menu, or press Edit to open the program and change the program settings. Chapter 8 - NESS H200 Wireless Software...
-
Page 104: Viewing A Patient's Session Log
Viewing a Patient’s Session Log A patient session begins when an H200 Wireless Control Unit is connected to the Clinician’s Programmer and the patient’s record is opened. A patient session ends when session data are saved and the H200 Wireless Control Unit is disconnected from the Clinician’s Programmer. If the H200 Wireless Control Unit is disconnected and then reconnected within one hour, the most recent session reopens. - Page 105 5. From the View drop-down list, select "All" to view all the session details, or narrow the search by selecting one of the following: • Demographic Details • Program Buttons Assignment • Stimulation Parameters • Stimulation Programs 6. Press Back to return to the Sessions List window. Chapter 8 - NESS H200 Wireless Software...
-
Page 106: Viewing A Patient's Use Log
Viewing a Patient's Use Log The Use Log is a record of the patient’s NESS H200 Wireless System usage history. The Use Log can be filtered by date and interval. To view a patient’s Use Log: 1. Open the patient’s record, and then press the Logs menu. -
Page 107: Viewing The System Information
Viewing the System Information 1. Connect an H200 Wireless Control Unit to the Clinician’s Programmer. 2. From the Tools menu, press the Info tab. See Figure 8-41. Figure 8-41: System Information window. Chapter 8 - NESS H200 Wireless Software... -
Page 108: Managing Patient Records
Managing Patient Records Modifying a Patient Name 1. Select a patient from the Patient List, and then press Modify. 2. The Modify Patient window will open. See Figure 8-42. 3. Modify the name, and press OK. Note: Patient ID cannot be modified. Figure 8-42: Modify Patient window. -
Page 109: Managing Users
2. Press New User. The Add New User window will open. See Figure 8-45. Figure 8-45: Add New User window. 3. Enter a user name and password, and confirm the password. 4. From the "Group" drop-down list, select "Administrators" or "Users," and then press Add. Chapter 8 - NESS H200 Wireless Software... -
Page 110: Removing A User
Removing a User 1. From the User Administration window, select a user. 2. Press Remove User. 3. A confirmation message will appear. See Figure 8-46. Press Yes. Note: The last remaining administrator cannot be removed. Figure 8-46: Remove User confirmation window. Changing a User’s Password 1. -
Page 111: Backing Up And Restoring The Database
3. Press Start Backup. A file will be created on the storage card. The file name will be the date and time the file was created. 4. Monitor the progress bar until the backup is successful, and then press ok. Chapter 8 - NESS H200 Wireless Software... -
Page 112: Restore
Restore Administrators can restore the database when the Clinician’s Programmer is replaced or the database is corrupted. Do not enter new patient information before restoring the database. To restore the database: 1. If a new storage card is in the Clinician’s Programmer, remove it. 2. -
Page 113: Chapter 9: Patient Training And Follow-Up
Patient training should include the following topics: Review of the H200 Wireless User Reference Card and User’s Guide. • • How to don and doff the Orthosis. • How to operate the NESS H200 Wireless System. • System maintenance and cleaning Instructions. • Basic troubleshooting. •... -
Page 114: Donning/Doffing The H200 Wireless Orthosis
Donning/Doffing the H200 Wireless Orthosis Remind patients to: • Remove any lotions or oils from their hand and forearm with soap and water. • Make sure the cloth electrodes are wet and have no dry patches. Dry patches reduce the stimulation current reaching the arm/hand. -
Page 115: Operating The Ness H200 Wireless System
• Clean the electrode bases. Troubleshooting Instruct patients to contact you or the Bioness Client Relations Department if they have any questions or problems. Bioness Client Relations Department: (800) 211-9136, Option 3. Practicing with the NESS H200 Wireless System Have patients set up and operate the NESS H200 Wireless System, following their training program. -
Page 116: Patient Follow-Up And Clinical Support
Patient Follow-Up and Clinical Support A patient follow-up and clinical support program should: • Evaluate the benefits of continuing with the chosen selected programs. • Monitor clinical progress. • Maximize clinical effectiveness. • Provide clinical and technical support. Suggested Follow-up Agenda 1. -
Page 117: Chapter 10: Maintenance And Cleaning
H200 Wireless Orthosis The Orthosis rechargeable batteries may need to be replaced approximately every two years. The batteries should only be replaced by a Bioness Inc certified technician. Contact the Bioness Client Relations Department at (800) 211-9136, Option 3, for assistance. -
Page 118: H200 Wireless Cloth Electrodes
H200 Wireless Cloth Electrodes The H200 Wireless Cloth Electrodes should be replaced every two weeks, or sooner if they become damaged. The H200 Wireless Cloth Electrodes should be wet before use and after three to four hours of use. Remove the cloth electrodes from the Orthosis before wetting them. Electrode Bases To replace the electrode bases, unscrew and remove them from the Orthosis. -
Page 119: Maintenance Summary
Monitor the Clinician's Programmer battery charge status. • Charge the Clinician's Programmer. • Identify and report to Bioness any component fault or damage. • Replace removable components and electrode bases as required. • Check for mechanical faults in the H200 Wireless Orthosis and Control Unit. -
Page 120: Cleaning The H200 Wireless Components
3. As needed, use additional saturated disinfectant wipes or cloths to keep the component surface wet for 3 minutes. Note: Be sure to follow the Bioness instructions for the specified contact time to ensure an effective bacteria kill. The H200 Wireless Orthosis (except for the wrist insert) may be cleaned and low-level... -
Page 121: Wrist Insert
4. Use additional new cloths or wipes saturated with 70% IPA as needed to keep the entire surface of the carrying case wet for 10 minutes. Note: Be sure to follow the Bioness instructions for the specified contact time to ensure an effective bacteria kill. - Page 122 Clinician's Guide...
-
Page 123: Chapter 11: Troubleshooting
Chapter Troubleshooting This section provides troubleshooting tips for clinicians. Refer patients to the H200 Wireless User’s Guide troubleshooting section and to the Bioness Client Relations Department: (800) 211-9136, Option 3. Problem Solution The cloth electrodes are damaged or Replace the cloth electrodes. -
Page 124: Frequently Asked Questions
If you have any questions or concerns, please contact the Bioness Client Relations Department at (800) 211-9136, Option 3. Our clinic owns multiple NESS H200 Wireless Systems. How can we identify which electronic components belong to which H200 Wireless system? •... - Page 125 H200 Wireless Control Unit. Note: If you open another patient record while the H200 Wireless Control Unit is connected, the data on the NESS H200 Wireless System will be permanently overwritten by the record that is opened.
- Page 126 After I fully charged the H200 Wireless Control Unit and Orthosis, I disconnected the system charger and then immediately reconnected it. The charging icons displayed again on the H200 Wireless Control Unit and Orthosis. Do I need to repeat the charging process? •...
-
Page 127: Chapter 12: Technical Specifications
Chapter Technical Specifications H200 Wireless Control Unit Specifications Classification Internally powered, continuous operation Operation Modes User, Standby, Clinical Battery Type Rechargeable AAA NiMH 1.2 V, 900–1100 mAh • On/Off illuminated button • Trigger illuminated button to turn on and pause stimulation •... - Page 128 H200 Wireless Orthosis Specifications Classification Internally powered, continuous operation with type BF applied parts Operating Voltage 3.7 V Battery Type Proprietary rechargeable Li-Ion (Lithium Ion) 3.7 V, 280–350 mAh • H200 Wireless Orthosis status (fault, battery, charging) and Stimulation LEDs Indications •...
- Page 129 0–3.1 seconds Max. Duration of Stimulation 4 hours, 5-minute resolution Program H200 Wireless Cloth Electrode Specifications Non-woven cloth Material Note: Use only cloth electrodes provided by Bioness Inc. Cloth Electrode # 3 Regular 3 Large Area (mm 1784 1185 1284...
- Page 130 Power Supply Specifications Use medical Class II safety approved power supply provided/approved by Bioness with the following ratings: Input Voltage 100–240 V AC Current 400 mA Frequency 50–60 Hz Output Voltage 5 V ± 5% Current 2400 mA Note: The H200 Wireless Control Unit and Orthosis can be used while charging if the Control Unit is not connected to the Clinician Programmer.
-
Page 131: Chapter 13: Appendix - Emi Tables
Guidance and Manufacturer’s Declaration Electromagnetic Emissions The NESS H200 Wireless System is intended for use in the electromagnetic environment specified below. The customer or the user of the NESS H200 Wireless System should assure that it is used in such an environment. Emissions Test Compliance Electromagnetic Environment —... - Page 132 All Equipment and Systems The NESS H200 Wireless System is intended for use in the electromagnetic environment specified below. The customer or the user of the NESS H200 Wireless System should assure that it is used in such an environment. Immunity Test...
- Page 133 Guidance and Manufacturer’s Declaration—Electromagnetic Immunity The NESS H200 Wireless System is intended for use in the electromagnetic environment specified below. The customer or the user of the NESS H200 Wireless System should assure that it is used in such an environment. Immunity Test...
- Page 134 The NESS H200 Wireless System is intended for use in an electromagnetic environment in which radiated RF disturbances are controlled. The customer or the user of the NESS H200 Wireless System can help prevent electromagnetic interference by maintaining a minimum distance between portable and mobile RF communications equipment (transmitters) and the NESS H200 Wireless System as recommended below, according to the maximum output power of the communications equipment.
Need help?
Do you have a question about the NESS H200 Wireless and is the answer not in the manual?
Questions and answers