Table of Contents
Advertisement
Quick Links
Download this manual
See also:
User Manual
Advertisement
Table of Contents

Subscribe to Our Youtube Channel
Related Manuals for Siemens OpenStage 60 SIP


Summary of Contents for Siemens OpenStage 60 SIP
- Page 1 Documentation OpenScape Voice OpenStage 60 SIP, OpenStage 60 G SIP OpenStage 80 SIP, OpenStage 80 G SIP OpenStage Key Module Operating Manual Communication for the open minded V1 R3.x V1 R4.x Siemens Enterprise Communications www.siemens.com/open...
-
Page 2: Important Information
Never open the telephone or a key module. Should you en- counter any problems, contact the responsible service per- sonnel. Use only original Siemens accessories. The use of other accessories may be hazardous and will render the warran- ty, extended manufacturer’s liability and the CE marking in- valid. -
Page 3: Location Of The Telephone
Product support on the internet Information and support for our products can be found on the Internet at: http://www.siemens-enterprise.com/. Technical notes, current information about firmware updates, frequently asked questions and lots more can be found on the Internet at:... -
Page 4: Table Of Contents
Contents Contents Important information ......2 Trademarks ..........2 Location of the telephone . - Page 5 Contents Applications available on your OpenStage phone 36 Application navigation ........36 Telephony interface .
- Page 6 Contents Making calls..........61 Off-hook dialing .
- Page 7 Contents Enhanced phone functions ....88 Incoming calls ..........88 Rejecting a call .
- Page 8 Contents "Executive-secretary" with Executive/Assistant Cockpit ... 128 Sample scenarios........128 Function overview .
- Page 9 Contents Mobility function ......159 Mobility scenarios ........159 Logging on and off at the same phone .
- Page 10 Contents Individual phone configuration ....180 Display ..........180 Adjusting the display to a comfortable reading angle .
- Page 11 Contents Bluetooth ........217 Discoverability ......... . . 217 Pairing .
-
Page 12: General Information
• Your communications platform does not feature this function. Please contact your Siemens sales partner for information on how to upgrade. This user guide is intended to help you familiarize yourself with OpenStage and all of its functions. It contains important information on the safe and proper operation of your OpenStage phone. -
Page 13: Service
General information Service The Siemens service department can only help you if you experi- ence problems or defects with the phone. Should you have any questions regarding operation, your specialist retailer or network administrator will gladly help you. For queries regarding connection of the telephone, please contact your network provider. -
Page 14: Single-Line Telephone/Multi-Line Telephone
General information Single-line telephone/multi-line telephone Your OpenStage is a "multi-line telephone“ . This means that multiple lines can be configured, which is not the case with single-line phones. Each line is assigned an individual phone number which you can use to make and receive calls. -
Page 15: Getting To Know Your Openstage Phone
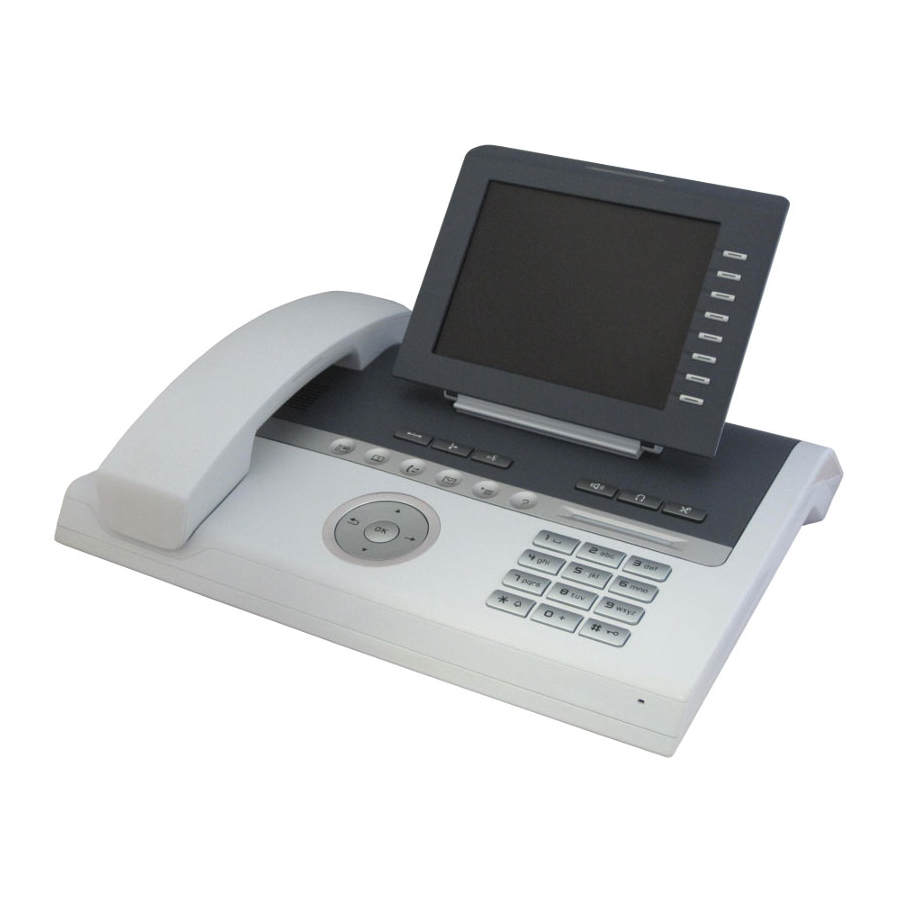
Getting to know your OpenStage phone Getting to know your OpenStage phone The following sections describe the most frequently used operating ele- ments and the displays on your OpenStage phone. The user interface of your OpenStage The diagram shows an OpenStage 60/60 G, the description applies to both product variants. -
Page 16: Ports On The Underside Of The Phone
Getting to know your OpenStage phone Ports on the underside of the phone USB Memory stick Power supply unit (e.g. OpenStage Manager) (if necessary) Network switch Country specific Headset cable Key Module Handset OpenStage operating features OpenStage 80 G 60 G Color Color Color... -
Page 17: Using Network Ports More Efficiently
Getting to know your OpenStage phone Using network ports more efficiently OpenStage 60/80 has a built-in 10/100 Mbps Ethernet switch. OpenStage 60 G/80 G has a 1000 Mbps Ethernet switch. This means that you can directly connect one additional network device in each case (e.g. a PC) via the telephone with the LAN. -
Page 18: Openstage Key Module
Getting to know your OpenStage phone OpenStage Key Module The OpenStage Key Module is a key module attached to the side of the phone that provides 12 additional illuminated, programmed keys. Like keys on the phone, these keys can be programmed and used accord- ing to your needs page 24. -
Page 19: Openstage Manager
Getting to know your OpenStage phone OpenStage Manager This program offers an additional option for tailoring your OpenStage to your personal needs. OpenStage Manager is suitable for the following models: • OpenStage 60 (SIP/HFA) • OpenStage 60 T • OpenStage 80 (SIP/HFA) •... -
Page 20: Keys And Controls
Getting to know your OpenStage phone Keys and controls Function keys Function when key is pressed End (disconnect) call page 58. Activating/deactivating call forwarding page 70. Key currently has no function Audio controls Audio keys Function when key is pressed Activate/deactivate the loudspeaker page 52. -
Page 21: Mode Keys
Getting to know your OpenStage phone Mode keys These sensor keys allow you to switch to the required application with the simple stroke of a key. To select a tab within an application press the rele- vant key repeatedly until the required tab is displayed. Function when key is pressed LED display Display telephony interface... -
Page 22: Touchguide
Getting to know your OpenStage phone TouchGuide Before using the telephone, remove the protective covering from the TouchGuide ring surface. With this control, you can manipulate most of your phone’s functions as well as its displays. Operation Functions when key is pressed In idle mode: Press the key. - Page 23 Getting to know your OpenStage phone Browsing in the call list and phonebook tabs If you are in the phonebook, you normally navigate between the "Personal" and "Corporate" tabs using the u key or if you are in the call lists you navi- gate between the "Missed", "Received", "Dialed"...
-
Page 24: Programmable Sensor Keys
Getting to know your OpenStage phone Programmable sensor keys Your OpenStage 80 has nine (OpenStage 60: eight) illuminated sensor keys. You can assign functions or numbers to them. To open the programming menu, press and hold down the relevant sensor page 81. -
Page 25: Trunk Keys (On Multi-Line Phones Only)
Getting to know your OpenStage phone Trunk keys (on multi-line phones only) The programmable sensor keys on multi-line phones function as trunk keys. Each key programmed with the "Line" function is handled as a line. This means up to 9 line keys can be configured on OpenStage 80 and up to 8 on OpenStage 60. -
Page 26: Line Utilization
Getting to know your OpenStage phone Line utilization Private line: A line that is used by a single telephone. This line cannot • be used as a secondary line by another telephone. Shared line: A line that is configured on multiple telephones. The line •... -
Page 27: Keypad
Getting to know your OpenStage phone Keypad Text input In cases where text input is possible, you can use the keypad to input text, punctuation and special characters in addition to the digits 0 to 9 and the hash and asterisk symbols. To do this, press the numerical keys repeatedly. Example: To enter the letter "h", press the number 4 key on the keypad twice. - Page 28 Getting to know your OpenStage phone Multi-function keys Function during text input Function when held down Deactivate the ring tone Write special characters page 152 Switch between upper and low- Activate the telephone lock er case page 157 You can also input text using the display keypad page 30.
-
Page 29: Graphic Display
Getting to know your OpenStage phone Graphic display Your OpenStage 60/80 is equipped with a tilt-and-swivel color display page 16. Appearance You can customize your display to suit your personal requirements: • Angle the display as required page 13 • Set the contrast (OpenStage 80 only) page 180 •... -
Page 30: Display Keyboard
Getting to know your OpenStage phone Display keyboard Simple text and characters can also be entered at any time using the keypad page 27. Depending on the context, the display keyboard is displayed with different elements. Element in focus Letters, digits, punctuation or special characters Function bar Use the TouchGuide to operate the display keyboard... -
Page 31: Context-Dependent Displays
Getting to know your OpenStage phone Context-dependent displays Depending on the situation at hand, the graphic display on your OpenStage phone displays different content, to which you can respond intuitively. Idle mode In addition to the status bar and the programmable sensor key list, the graphic display offers a wide range of context-dependent displays. -
Page 32: Telephony Dialogs
Getting to know your OpenStage phone Telephony dialogs The dialogs in the lower area of the display prompt you to input data or pro- vide you with information about the call states. Example: In idle state, enter a phone number using the dialpad. 08912345 Dial Once you have entered the first digit, several options corresponding to the... -
Page 33: Context Menus
Getting to know your OpenStage phone Context menus If the arrow icon appears next to a selected entry, additional menu lev- els or selection options are available in the form of a context menu. Navi- gate through these options using the TouchGuide page 22. -
Page 34: Pop-Up Window
Getting to know your OpenStage phone Pop-up window In certain situations, a pop-up window opens automatically in the lower third of the display. Pop-up menu You will be prompted to use a pop-up menu to select situation-dependant functions and to confirm them or to make entries. You can use the TouchGuide to navigate within the pop-up menu page 22. -
Page 35: Application Tab
Getting to know your OpenStage phone Application tab In many cases you can select further content within an application using tabs. Missed Received Arrow icon: Additional tabs Icon Active tab Additional tab Example: Press the mode key to open the call lists page 21. -
Page 36: Applications Available On Your Openstage Phone
Applications available on your OpenStage phone Applications available on your OpenStage phone The following descriptions provide an overview of the various applications available on your OpenStage phone. Application navigation Activating an application You can switch to the relevant application using the mode keys page 21. -
Page 37: Telephony Interface
Applications available on your OpenStage phone Telephony interface Single-line view Additional information is displayed in the telephony interface when your phone rings, when you dial a number or during a call, for instance. The same information is available on multi-line telephones for the selected line in the line overview. -
Page 38: Multi-Line View
Applications available on your OpenStage phone Multi-line view Two tabs are displayed on the telephony interface: • "[My phone]" tab - represents the primary line or the line view of a se- lected line page 37 • "Overview" tab - configurable overview of the secondary lines page 25 Press to open this interface. - Page 39 Applications available on your OpenStage phone Context in the line overview In the context menu of a selected line you have the following options with: • Own free line – Select – View • Own line with active call – Hold –...
-
Page 40: Phonebooks
Applications available on your OpenStage phone Phonebooks In addition to the local phonebook, this application contains entries from other directory services, such as an LDAP corporate directory. To activate a specific tab, press repeatedly until the required tab is dis- played. -
Page 41: Personal Phonebook
Applications available on your OpenStage phone Personal phonebook The "Personal" tab contains your local phonebook. You can store up to 1000 personal contacts in this phonebook. The entries are sorted in alphabetical order in the phonebook list and displayed with the icon for the specified default phone number. -
Page 42: Ldap Directory
Applications available on your OpenStage phone LDAP directory If you have access to an LDAP directory (contact the responsible adminis- trator), you can search contacts in a company-wide directory. A user-friendly, advanced search function is available for this. You can trans- fer any entries found to your local phonebook. -
Page 43: Call Lists
Applications available on your OpenStage phone Call lists All calls and numbers dialed on your phone are logged in chronological or- der in call lists. Callers with suppressed numbers cannot be saved in the call lists. The following call lists are displayed individually on separate tabs: •... -
Page 44: Entry Details
Applications available on your OpenStage phone Example: "Dialed" tab Additional tabs Missed Dialed Selected entry with Options context menu Coco, Chanel 12.07. Date of call 220870 Number of call attempts The following functions are available via the context menu of a selected en- try: •... -
Page 45: Managing Call Lists
Applications available on your OpenStage phone Managing call lists Each call list may contain up to 30 entries. Once this limit is reached, the oldest entry in the log is deleted. Multiple calls from the same number are only listed once. The number of call attempts is logged in the "Details"... -
Page 46: Voicemail
Applications available on your OpenStage phone Voicemail Depending on the type and configuration of your communications platform (contact the relevant administrator), messages from services, such as HiPath Xpressions, can be displayed in this application. Voicemail Only voicemails for the primary line are received on a multi-line phone ( page 14). -
Page 47: Program/Service Menu/Applications Menu
Applications available on your OpenStage phone Program/Service menu/Applications menu This menu includes a configuration area for users and administrators, as well as an area for any available applications (contact administrator). Press repeatedly until the "Settings" tab is active. Select and confirm the "User" entry using the TouchGuide page 22. - Page 48 Applications available on your OpenStage phone Configuration Call forwarding Set up call forwarding for your telephone. Adjust the settings on your telephone page 70. Enhanced phone functions Use the enhanced phone functions on your telephone. Adjust the settings on your telephone page 88.
-
Page 49: Administration
Applications available on your OpenStage phone Network information Information about the IP address of the phone and HTML address of the Web interface. View information on the phone page 215 Reset phone Personal settings made via the telephone menu or the web interface can be reset to factory settings. -
Page 50: Control And Monitoring Function
Applications available on your OpenStage phone Control and monitoring function A control or monitoring function can be activated on your phone for service purposes by remote maintenance. Control function Service personnel have the option to activate and deactivate features of the phone via remote maintenance. -
Page 51: Basic Functions
Basic functions Step by Step Basic functions Please read the introductory chapters "Getting to know your OpenStage phone" page 15 and "Applications available on your OpenStage phone" page 36 carefully before performing any of the steps described here on your phone. Secure voice transmission Prerequisite: The secure voice communication option must be activated by your administrator. -
Page 52: Answering A Call Via The Handset
Basic functions Step by Step Answering a call via the handset The phone rings. The caller is displayed. Lift the handset. if nec. Set the call volume. Answering a call via the loudspeaker (speakerphone mode) The phone rings. The caller is displayed. The pop-up menu opens: Select and confirm the option shown. -
Page 53: Answering A Call With A Headset
Basic functions Step by Step Answering a call with a headset Prerequisite: A headset is connected. Make sure your headset port is set up properly page 196. Answering calls via the headset The phone rings. The o key flashes. Press the key shown. if nec. -
Page 54: Directed Pickup
Basic functions Step by Step Directed pickup You can pick up a call signaled at an absent coworker’s phone. If a colleague has placed a call on hold on their multi-line phone you can also pick up this call. Picking up call Prerequisite: You know the coworker’s internal phone number and the function is configured for you in OpenScape Voice. -
Page 55: Picking Up A Held Call
Basic functions Step by Step Picking up a held call Prerequisite: Your colleague has placed a call on hold on their multi-line phone page 117. You know the co- worker’s internal phone number and the function is con- figured for you in OpenScape Voice. Directed pickup Select and confirm the option shown in the idle phone’s context menu. -
Page 56: Switching To Speakerphone Mode
Basic functions Step by Step Switching to speakerphone mode Make note of the two different processes and ac- tivate, if necessary, your preferred setting page 196. Prerequisite: You are conducting a call via the handset and the microphone and loudspeaker functions have been activated by administrator. -
Page 57: Switching From Headset To Speakerphone Mode
Basic functions Step by Step Switching from headset to speaker- phone mode In standard mode Press and hold the key (open listening ist activated), Press the key. Speakerphone mode is activated. In U.S. mode Press the key Press the key. Speakerphone mode is activated. Open listening People present in the room can silently monitor your call. -
Page 58: Ending A Call
Basic functions Step by Step Ending a call Press the key shown. Press the lit key. Disconnect Select and confirm the option shown in the connec- tions’s context menu. -
Page 59: Group Call
Basic functions Step by Step Group call Your administrator can incorporate multiple telephones in a call pickup group. If your telephone belongs to a pickup group, you can also accept calls intended for oth- er members of the group. A group call is displayed on the phone. Service person- nel may have made the following settings for signaling: Telephone status Ring on group call... - Page 60 Basic functions Step by Step Further service personnel settings for group calls: • The group call can be picked up both by lifting the handset and via the "Pickup call" menu option.. • The group call be picked up via the "Pickup call" menu option but not by just lifting the handset.
-
Page 61: Making Calls
Basic functions Step by Step Making calls If you selected the option "Busy When Dialing" page 106, you will not be interrupted by an in- coming call. In this case, the caller hears the busy signal. Off-hook dialing Lift the handset. Enter the station number. -
Page 62: On-Hook Dialing
Basic functions Step by Step On-hook dialing The connection is set up with on-hook dialing via the loudspeaker (speakerphone mode) or via a connected headset. The line is seized before dialing. Press the key shown. Press the key if a headset is connected. Enter the station number. -
Page 63: Immediate Dialing
Basic functions Step by Step Immediate dialing Immediate dialing should only be activated if service personnel has configured and approved a dial plan. Immediate dialing is deactivated by default. For this rea- son after entering the number you must either confirm the "Dial"... -
Page 64: Redial
Basic functions Step by Step Redial Redialing from the call list Only calls to the primary line are received on multi-line phones ( page 14). Press the key repeatedly until the application’s "Dialled" tab appears. Niels, Bohr18.10. 07:06am Select and confirm the entry you want. The phone num- ber associated with the list entry is dialed. -
Page 65: Activating/Deactivating The Microphone
Basic functions Step by Step Activating/deactivating the microphone You can temporarily switch off the handset microphone to prevent the other party from listening in while you consult with someone in your office. Prerequisite: You are conducting a call. Deactivating the microphone Press the key shown. -
Page 66: Consulting A Second Party
Basic functions Step by Step Consulting a second party You can call a second party while a call is in progress. The connection to the first party is placed on hold. Prerequisite: You are conducting a call. Consultation Select and confirm the option shown in the connec- tions’s context menu. -
Page 67: Canceling A Consultation Call
Basic functions Step by Step Canceling a consultation call If the called party does not answer In the pop-up menu: Disconnect & return Select and confirm the option shown. The call with the first party is resumed. If the called party does answer Disconnect &... -
Page 68: Putting On Hold And Retreiving Successively Or Simultaneously
Basic functions Step by Step Putting on hold and retreiving successively or simultaneously Putting an active call on hold Prerequisite: You are conducting a consultation call page 66 or have accepted a second call page 95. The "Hold" sensor key must be configured page 80. -
Page 69: Connecting Parties
Basic functions Step by Step Connecting parties You can join the first party with the party you consulted, clearing down your connection to both parties in the process. Prerequisite: You are conducting a consultation call page 66 and call joining must be allowed page 69. -
Page 70: Call Forwarding
Basic functions Step by Step Call forwarding You can forward calls for your phone to another phone. On multi-line telephones ( page 14), you can only configure call forwarding for the primary line. Prerequisite: The call forwarding function is pro- grammed page 73. -
Page 71: Programming Call Forwarding
Basic functions Step by Step Programming call forwarding z You can also configure this setting via the Web interface page 230. Saving destination phone numbers for call forwarding You can save up to five destination phone numbers for call forwarding. These destination phone numbers can then be assigned different forwarding conditions. - Page 72 Basic functions Step by Step Destination Select and confirm the option shown for the call for- warding condition you want. 08972228596 Select and confirm the destination phone number you want. Save & exit Select and confirm the option shown. Defining the ring duration before call forwarding on no reply You can define how long the phone should ring before the "No reply"...
-
Page 73: Activating/Deactivating Call Forwarding
Basic functions Step by Step Activating/deactivating call forwarding Prerequisite: At least one destination phone number is programmed page 71. z You can also configure this setting via the Web interface page 230. Press the key shown. The pop-up menu opens: Edit call forwarding Select and confirm the option shown. -
Page 74: Activating Call Forwarding For All Calls
Basic functions Step by Step Activating call forwarding for all calls Use the r function key to activate or deactivate call forwarding directly for all calls. z You can also configure this setting via the Web interface page 230. Prerequisite: At least one destination phone number is programmed page 71. -
Page 75: Call Forwarding Chain
Basic functions Step by Step Call forwarding chain Sometimes calls to a station are forwarded to another station which also has call forwarding or DND activated. This can create a call forwarding chain consisting of se- veral telephones where the last member of the chain is your phone. -
Page 76: Callback
Basic functions Step by Step Callback You can request a callback if the station called is busy or if nobody answers. You receive a callback when the other party’s line be- comes free. This option must be activated by your administra- tor. -
Page 77: Responding To A Callback
Basic functions Step by Step Responding to a callback Prerequisite: A callback was requested. Your phone rings and station information appears on the graphic dis- play. The pop-up menu opens: Accepting a callback Accept Select and confirm the option shown. Rejecting a callback Reject Select and confirm the option shown. -
Page 78: Permitting A Callback
Basic functions Step by Step Permitting a callback Permitting callback on busy/no reply z You can also configure this setting via the Web interface page 230. Press the key shown until the "Settings" tab is active. User Confirm the option shown. if nec. -
Page 79: Calling Back Missed Calls
Basic functions Step by Step Calling back missed calls Calls received while you are absent are indicated by a message ( page 32) on the idle display. In addition, the mode key lights up white. Missed calls are logged in the missed calls list. This list provides information on the missed call and lets you call back the number directly. -
Page 80: Programmable Sensor Keys
Programmable sensor keys Step by Step Programmable sensor keys The phone features a range of functions that can, if re- quired, be programmed on programmable sensor keys. The phone comes with nine (OpenStage 80) or eight (OpenStage 60) sensor keys, all of which can be programmed on two separate levels. -
Page 81: Programming Sensor Keys
Programmable sensor keys Step by Step Programming sensor keys Initiating programming Directly via a sensor key Hold down the sensor key to which a function should be assigned until the programming prompt is displayed.. If the prompt is not displayed or a programmed function is not executed, then you can only launch key programming via the user menu (ask your service personnel about the current set-... -
Page 82: Beginning Programming
Programmable sensor keys Step by Step Beginning programming Normal Select and confirm the option shown to program the first level. Shifted Select and confirm the option shown to program the se- cond level. Do not disturb In the context menu select and confirm the required function (e. -
Page 83: Programming Enhanced Functions
Programmable sensor keys Step by Step Programming enhanced functions Repertory dial Hold down the sensor key to which a function should be assigned until the programming prompt is displayed. If the prompt is not displayed or a programmed function is not executed, then you can only launch key programming via the user menu (ask your service personnel about the current set- ting). -
Page 84: Feature Toggle
Programmable sensor keys Step by Step Save & exit Select and confirm the option shown. The repertory dial can be up to 40 characters long. Feature toggle Only available for Hunt group functions ( page 171). Hold down the sensor key to which a function should be assigned until the programming prompt is displayed. -
Page 85: Forwarding
Programmable sensor keys Step by Step Forwarding Hold down the sensor key to which a function should be assigned until the programming prompt is displayed. If the prompt is not displayed or a programmed function is not executed, then you can only launch key programming via the user menu (ask your service personnel about the current set- ting). -
Page 86: Using Sensor Keys
Programmable sensor keys Step by Step Using sensor keys The use of programmed functions depends on the pho- ne’s status. The relevant display appears once you have pressed a sensor key. Example 1: Calling saved number Prerequisite: The idle menu is displayed on the display. Press the sensor key for a saved number . -
Page 87: Resetting Sensor Keys
Programmable sensor keys Step by Step Resetting sensor keys You can reset sensor keys you configured to factory set- tings (see also page 216). Press the key shown until the "Settings" tab is active. User Confirm the option shown. if nec. Enter and confirm the user password. -
Page 88: Enhanced Phone Functions
Enhanced phone functions Step by Step Enhanced phone functions Incoming calls Rejecting a call You can reject an incoming call. In the pop-up menu: Reject Select and confirm the option shown. The caller hears a busy signal. If the rejected caller’s phone number is transmit- ted, it is saved in the call list. - Page 89 Enhanced phone functions Step by Step Permitting call deflection z You can also configure this setting via the Web interface page 230. Press the key shown until the "Settings" tab is active. User Confirm the option shown. if nec. Enter and confirm the user password. Configuration Select and confirm the option shown.
-
Page 90: Configuring Call Forwarding
Enhanced phone functions Step by Step Configuring call forwarding You can also enter the call forwarding settings via the Forwarding key ( page 71). Press the key shown until "Settings" is active. User Confirm the option shown. if nec. Enter and confirm the user password. Configuration Select and confirm the option shown. -
Page 91: Placing A Call On Hold
Enhanced phone functions Step by Step Forwarding station... Select the option shown. Select and confirm Display last/Display first Display last Save & exit Select and confirm the option shown. Placing a call on hold You can use this function to place an ongoing call on hold, for instance, to prevent the other party overhear- ing a conversation with a colleague in the same room. - Page 92 Enhanced phone functions Step by Step The LED display page 26 or status display on the "Overview" tab page 38 indicates that the call is on hold to other multi-line telephones where this line is also configured. These phones can then pick up the call. Held call wait status After placing a call on hold, you can replace the handset and then decide if the call should be retrieved or discon-...
- Page 93 Enhanced phone functions Step by Step Setting the hold reminder time Use "Hold reminder" to specify when you want to re- ceive an automatic reminder about a held call. The min- imum time value is 1, that is, the reminder is output af- ter one minute.
- Page 94 Enhanced phone functions Step by Step Music on hold Music on hold is played back when you are placed on hold by another party, providing this option is active. z You can also configure this setting via the Web interface page 230.
-
Page 95: Call Waiting (Second Call)
Enhanced phone functions Step by Step Call waiting (second call) You can accept a second incoming call in the course of an ongoing call. The caller hears the on-hook signal while you hear a call-waiting signal tone. You can reject or accept the second call. Before you ac- cept the second call, you can end the first call or place it on hold for subsequent retrieval. - Page 96 Enhanced phone functions Step by Step Ignoring second call Prerequisite: You are conducting a call and call waiting is allowed ( page 97). In the pop-up menu: Ignore Select and confirm the option shown. The caller still hears the on-hook signal. You can subse- quently Accept, Reject or Deflect the second call.
- Page 97 Enhanced phone functions Step by Step Connecting parties Complete Xfer Select and confirm the option shown in the active con- nections context menu. The other two parties are now connected to one another. You can now hang up or dial another number for instance.
- Page 98 Enhanced phone functions Step by Step When Allow call waiting is activated,you can toggle the configured sensor key to switch call waiting on/off page 86). Toggling associate Set the "Toggle associate" function to Yes if you want to connect to a second or pickup call by hanging up. z You can also configure this setting via the web interface page 230.
-
Page 99: Transferring A Call
Enhanced phone functions Step by Step Transferring a call You can transfer your current call to another party with or without consultation. Blind transfer Prerequisite: You are conducting a call. The options "Al- low call transfer" and "Transfer on ring" were selected page 100). - Page 100 Enhanced phone functions Step by Step Allowing call transfer z You can also configure this setting via the Web interface page 230. Press the key shown until the "Settings" tab is active. User Confirm the option shown. if nec. Enter and confirm the user password. Configuration Select and confirm the option shown.
-
Page 101: Cti Calls
Enhanced phone functions Step by Step CTI calls Beep on auto-answer Speakerphone mode activates automatically on your phone if you use a CTI application (such as Outlook) to dial a number when Auto Answer is active. If Auto An- swer is not active, the phone rings first and you have to press the loudspeaker key or lift the handset to set up the call. - Page 102 Enhanced phone functions Step by Step Beep on auto-reconnect You can reconnect a held call both via the CTI applica- tion and via the phone. A beep sounds when you toggle between an active call and a held call when the function is active.
-
Page 103: Making Calls
Enhanced phone functions Step by Step Making calls Dialing with the DDS key You can program frequently used phone numbers on programmable keys ( page 80). If you press a direct destination selection key for around three seconds, the associated contact or phone number appears and dial- ing is initiated. -
Page 104: Dialing A Phone Number From A List
Enhanced phone functions Step by Step Dialing a phone number from a list Press the key until the application table for the relevant call list is active. Niels, Bohr18.10. 07:06am Select and confirm the entry you want. The phone num- ber associated with the list entry is dialed. -
Page 105: Using Autodial Delay
Enhanced phone functions Step by Step Using autodial delay A number is automatically dialed after a set delay start- ing from the entry of the number’s last digit. The auto- dial delay can be used: • when dialing in idle mode •... - Page 106 Enhanced phone functions Step by Step Outgoing calls Select and confirm the option shown. Autodial delay Select and confirm the option shown. Specify a value and confirm your entry. Save & exit Select and confirm the option shown. Automatic dial delay does not work if you are using a dial plan and Immediate dialing is confi- gured (see page 63).
-
Page 107: Conference
Enhanced phone functions Step by Step Conference Local conference This type of conference is also referred to as a three- party conference. It involves up to three participants. Prerequisite: You are conducting a consultation call page 66 or have accepted a second call page 95, and the conference function is active page 108. - Page 108 Enhanced phone functions Step by Step Ending a local conference Allowing call partners to continue a conference af- ter you exit Prerequisite: The function "Allow join in conference" page 109) was activated. Exit Conf Select and confirm the option shown in the "Confer- ence"...
- Page 109 Enhanced phone functions Step by Step Allowing joining in a local conference You can use this option to decide whether or not your call partners are allowed to join calls after you exit the conference call. z You can also configure this setting via the Web interface page 230.
-
Page 110: System-Supported Conference
Enhanced phone functions Step by Step System-supported conference This type of conference is also referred to as a large con- ference. It can include up to ten parties. Prerequisite: You are conducting a consultation call page 66 or you have accepted a second call page 95, and the "Centralized conference"... - Page 111 Enhanced phone functions Step by Step Leaving a conference Exit Conf Select and confirm the option shown in the "Confer- ence" context menu. You are disconnected from the conference call and can dial another number, for in- stance. The other call partners remain connected. If using the "Centralized conference"...
-
Page 112: Making Calls With Multiple Lines
Making calls with multiple lines Step by Step Making calls with multiple lines You can use your OpenStage 60/80 as a multi-line phone. If you have any questions regarding how to con- figure your OpenStage phone as a multi-line phone, please contact your administrator. -
Page 113: Making Calls
Making calls with multiple lines Step by Step Using the line keys Press the flashing trunk key. Speakerphone mode. Accept Confirm the option shown. Speakerphone mode. Making calls You must seize a line before you can make calls on a multi-line telephone. -
Page 114: Automatic Trunk Seizure
Making calls with multiple lines Step by Step Automatic trunk seizure Prerequisite: Your administrator has configured auto- matic trunk seizure. Lift the handset or press the speakerphone mode or headset key. The line defined during configuration is seized. Enter and confirm the phone number. The connection is set up. -
Page 115: During Calls
Making calls with multiple lines Step by Step During calls Making and receiving calls on a single line If you only use one line on your multi-line telephone to make calls, and you receive calls on the same line, the phone operates in the same way as a single-line tele- phone: •... -
Page 116: Making And Receiving Calls With Multiple Lines
Making calls with multiple lines Step by Step Making and receiving calls with multiple lines Accepting a waiting call Depending on the settings for "Rollover", you will be notified of incoming calls page 140. Prerequisite: You are conducting a call. At the same time, a call is incoming on another line. -
Page 117: Putting A Line On Hold
Making calls with multiple lines Step by Step Putting a line on hold On a multi-line telephone you can use the line keys to place calls on hold. Prerequisite: You are conducting a call. Press the call-line sensor key. • The LED line key flashes. - Page 118 Making calls with multiple lines Step by Step Entering a number for the hot and warm line function Specify which number should be dialed when the hot or warm line function is activated. z You can also configure this setting via the web interface page 230.
-
Page 119: Busy Override
Making calls with multiple lines Step by Step Busy override A station of a line trunk group is on a call. It’s primary line is configured as a secondary line on your phone. This line now has the status "busy." You can join in the call by pressing the illuminated key of this line (see also page 25). -
Page 120: Direct Station Selection Keys
Making calls with multiple lines Step by Step Direct station selection keys Apart from line keys, administrator can also configure direct station selection (DSS) keys. You can use a DSS key to call an internal station directly, pick up calls for this station or forward calls directly to it. -
Page 121: Call Pickup
Making calls with multiple lines Step by Step Call pickup You can pick up calls for another DSS station. The LED flashes if a call incoming for this station’s line. Indirect pickup Prerequisite: The auto-answer function must be deac- tivated page 101. -
Page 122: Deflecting A Call To A Dss Station
Making calls with multiple lines Step by Step Deflecting a call to a DSS station Prerequisite: The deflect function is enabled for DSS keys. For information on the current setting, see page 89. If you receive a call on one of your lines, you can imme- diately deflect it to the DSS station. -
Page 123: Making Calls In An Executive-Secretary Team
Making calls with multiple lines Making calls in an executive-secretary team An executive-secretary team is configured by the relevant service person- nel and may include up to four executive and up to two secretary telepho- nes. Sample scenarios This example assumes that two executive and two secretary phones are configured. -
Page 124: Accepting A Call
Making calls with multiple lines Step by Step Accepting a call Incoming calls for the executives should be forwarded immediately to the assigned secretary and answered there. The line overview ( page 127) shows whether the executive has activated call forwarding. Accepting calls at the secretary phone An incoming call for "Executive 1"... -
Page 125: Connecting A Call
Making calls with multiple lines Step by Step If "Sekretary 1" is busy, the call is forwarded im- mediately to "Sekretary 2" if: • a consultation call is being made or • "Allow call waiting" is deactivated. Second call Prerequisite: "Allow call waiting" is activated. If "Sekretary 1"... - Page 126 Making calls with multiple lines Step by Step If "Executive 1" does not answer the call, so erfolgt ein Wiederanruf ( see also page 99) nach einer einge- stellten Zeit. The "Executive 1" direct station selection key on the "Sekretary 1" phone illuminates. Consultation without connecting Press the DSS "Executive 1"...
-
Page 127: Dss Keys
Making calls with multiple lines Step by Step DSS keys These keys are configured in such a way that every pho- ne can be reached by every phone in the group. The DSS keys are also used for consultation calls. Press a team member’s DSS key. -
Page 128: Executive-Secretary" With Executive/Assistant Cockpit
Making calls with multiple lines "Executive-secretary" with Executive/Assistant Cockpit An "Executive/secretary" team is configured by the service personnel using the "Executive/Assistant Cockpit" – referred to in this manual as E/A Cock- pit. A team can for example consist of four executive and two secretary phones. -
Page 129: Function Overview
Making calls with multiple lines Step by Step Prerequisites: The E/A Cockpit application is installed on the phone and the connection to a E/A Cockpit server entered. "Allow call waiting" should be activated on the secreta- ries’ phones ( page 97). Line and DSS keys have been set up and configured by service personnel and Transfer on hangup, uaCSTA and server features are activated. -
Page 130: Launching The E/A Cockpit From The Secretary
Making calls with multiple lines Step by Step Launching the E/A Cockpit from the secretary For completeness sake it is assumed that no other tele- phone in the team has launched the application at this point. Press the key as often as required until the Applications tab is active. -
Page 131: Managing Call Forwarding
Making calls with multiple lines Step by Step Managing call forwarding Every executive can configure their displayed call for- warding themselves or can have the secretary configu- re them The result is displayed in the E/A Cockpit tab of Sekretary 1 and Sekretary 2. In the overview menu E/A Cockpit of Sekretary 1, call forwarding for Executive 1 should for example be modi- fied. - Page 132 Making calls with multiple lines Step by Step • Regular to number (if At Desk, otherwise to a num- ber). The view in the E/A Cockpit overview menu is then: "To Assistant (Regular to number)" • Strict (To Assistant in any case - Desk, Box or Mobi- le).
-
Page 133: Managing Secretary Statuses
Making calls with multiple lines Step by Step Managing secretary statuses The "My status" option on the secretary phone is used to set the presence status und if required to configure call forwarding. Configuring status and call forwarding My status At Desk Confirm the option shown. - Page 134 Making calls with multiple lines Step by Step Changing the call forwarding destination My status At Desk Open the context menu. You have the following opti- ons: • Call mobile • Forward Nr. • Deputy Nr. • Deputy on or Deputy off The "Forward Nr."...
-
Page 135: Making Calls In The E/A Cockpit Team
Making calls with multiple lines Step by Step Making calls in the E/A Cockpit team Using DSS keys These keys are configured in such a way that every pho- ne can be reached by every phone in the group. The only exception is when both secretaries have the "Off Desk"... -
Page 136: Settings For Multi-Line Phones (Keyset)
Making calls with multiple lines Step by Step Settings for multi-line phones (keyset) The details for each keyset line contain supplementary information for the user. The following uneditable fields are displayed: • Address – Displays the phone number for the line •... -
Page 137: Setting The Time For A Delayed Ringer
Making calls with multiple lines Step by Step Setting the time for a delayed ringer Specify the length of time before a held call should be signaled on a line. z You can also configure this setting via the Web interface page 230. -
Page 138: Configuring The "Overview" Tab Display
Making calls with multiple lines Step by Step Configuring the "Overview" tab display Specify here the sequence in which the individual lines in the "Overview" tab should appear on the display. z You can also configure this setting via the Web interface page 230. -
Page 139: Line Preview
Making calls with multiple lines Step by Step Line preview Activating via the line keys Prerequisite: You are already on a call on one line and a further call rings on the secondary line. Service person- nel have activated line preview. Press the flashing trunk key. -
Page 140: Rollover For A Line
Making calls with multiple lines Step by Step Rollover for a line Your administrator can determine how rollover calls are to be signaled. Only the relevant line key blinks. You hear a special advisory tone and the correspond- ing line key flashes. The ringer melody set sounds briefly (approx. -
Page 141: Phonebooks And Call Lists
Phonebooks and call lists Step by Step Phonebooks and call lists Personal phonebook Your personal phonebook should not contain more than 1000 entries. Creating a new contact Press the key shown. Options Select and confirm the option shown. New contact Select and confirm the option shown in the context menu. -
Page 142: Selecting A Preferred Phone Number
Phonebooks and call lists Step by Step Selecting a preferred phone number If multiple phone numbers were assigned to a contact, you can select the preferred phone number here that you want to use for calls via the phonebook. Press the key shown. Niels, Bohr Select a phonebook entry. -
Page 143: Managing Contact Groups
Phonebooks and call lists Step by Step Managing contact groups Creating a new group Press the key shown. Options Select and confirm the option shown. Groups Select and confirm the option shown in the context menu. Options Select and confirm the option shown. New group Select and confirm the option shown in the context menu. -
Page 144: Deleting A Group
Phonebooks and call lists Step by Step Adding a contact to a group Press the key shown. Niels, Bohr Select a phonebook entry. Details Select and confirm the option shown in the context menu. Groups Select and confirm the option shown. @Home Select and confirm a group. -
Page 145: Quick Search In The Phonebook
Phonebooks and call lists Step by Step View Select and confirm the option shown in the context menu. Niels, Bohr Select group member. Details Select and confirm the option shown in the context menu. The form for entering contact data opens. Picture Select and confirm the option shown. -
Page 146: Changing The Display Format For Contacts
Phonebooks and call lists Step by Step Changing the display format for contacts Press the key shown. Options Select and confirm the option shown. Display Select and confirm the option shown in the context menu. Lastname, Firstname Select and confirm the display format. Press the key to return to the phonebook. -
Page 147: Ldap Database
Phonebooks and call lists Step by Step LDAP database You can search an LDAP database (corporate phone- book) for contact entries if you can reach this database over your network and your access was correctly con- figured by your administrator. You can perform searches using the name (simple search) or different information on an entry (advanced search), for example, job title or department name. - Page 148 Phonebooks and call lists Step by Step Viewing an LDAP entry Prerequisite: You found and selected an LDAP entry (see above). Details Select and confirm the option shown in the context menu for the entry. New search To conduct a new search, you must first clear all the search fields.
-
Page 149: Quick Search
Phonebooks and call lists Step by Step Quick search Press the key as often as required until the "Corporate" (LDAP) tab is active. Enter the initial letter of the surname you need, e. g. "K". A single-line search window appears at the lower edge of the display. -
Page 150: Call Lists
Phonebooks and call lists Step by Step Call lists For a detailed description of the different call lists, see page 43. Viewing details Prerequisite: You selected an entry. Details Select and confirm the option shown in the context menu. For display and information shown page 44. -
Page 151: Copying Entries From The Call Lists Into The Personal Phonebook
Phonebooks and call lists Step by Step Copying entries from the call lists into the personal phonebook Press the key until the call list you want is active. Niels, Bohr18.10. 07:06am Select the entry you want. page 40Niels, Bohr18.10. 07:06am Copy as contact Select and confirm the option shown in the context me- You have the following options for "Create contact":... -
Page 152: Privacy/Security
Privacy/security Step by Step Privacy/security Deactivating the ring tone You can deactivate your ring tone if you do not want to be disturbed by your phone ringing. Deactivating the ring tone using the keypad Hold down the key until the "Ringer off" icon appears on the status bar on the display ( page 29). -
Page 153: Do Not Disturb
Privacy/security Step by Step Do not disturb If "Do not disturb" is activated, your telephone will not ring. The caller hears the busy signal. On multi-line telephones ( page 14) you can only activate the "Do not disturb" function for your primary line. -
Page 154: Allowing "Do Not Disturb
Privacy/security Step by Step Allowing "Do not disturb" z You can also configure this setting via the Web interface page 230. Press the key shown until the "Settings" tab is active. User Confirm the option shown. if nec. Enter and confirm the user password. Configuration Select and confirm the option shown. -
Page 155: Security
Privacy/security Step by Step Security User password Your user password protects your individual configura- tions, including your language settings. You can also use the user password to lock your telephone page 157. The preset password "000000" corresponds to a blank password. In other words, the phone can- not be locked and the user menu is not pass- word protected (see also page 156). - Page 156 Privacy/security Step by Step Deactivating the user password You can deactivate the phone’s password prompt if a password has already been configured. The deactivation of the password prompt does not affect the Web interface page 230, OpenStage Manager or CTI applications that use a password prompt.
-
Page 157: Locking The Phone
Privacy/security Step by Step Locking the phone You can lock your phone to protect it against unautho- rized access. In this way, no one can make calls or change your user settings unless they know your user password. Predefined numbers from the dial plan can still be dialed when the phone is locked. - Page 158 Privacy/security Step by Step Unlocking the phone Unlock phone Confirm the option shown. or If the display is empty, Hold down the key shown until "Enter Password" ap- pears. Enter and confirm the User password. The phone is un- locked if the password is correct. Emergency numbers and predefined numbers from the dial plan can be dialed from a locked phone.
-
Page 159: Mobility Function
Mobility function Step by Step Mobility function Prerequisite: Your phone is configured to support mo- bility by administrator. A DLS server is available in the LAN and its address is entered in the phone. Mobility scenarios When you log on to your phone, or any other mobility- enabled phone, the following scenarios are possible: Logging on and off at the same phone •... -
Page 160: Logging On And Off At The Same Phone
Mobility function Step by Step Logging on and off at the same phone Logging on to the phone No other mobility user is logged on. Logon via a key If a program key is configured for Mobility. Press the "Mobility" program key. Logon via the context menu Mobile logon Select and confirm the option shown in the idle display... -
Page 161: Logging Off From The Phone
Mobility function Step by Step Logging off from the phone Prerequisite: You are logged on as a mobility user. Logoff via key If a program key is configured for Mobility. Press the "Mobility" program key. Logon via the context menu Mobile logoff Select and confirm the option shown in the idle display context menu... -
Page 162: Logging On At Different Telephones
Mobility function Step by Step Logging on at different telephones An attempted login is rejected if the user is already logged on to another phone and "Logon with forced logoff" is disabled for the mobility user. Logging on with forced logoff at a remote phone If the user is already logged on at another phone and the remote phone is busy, the logon is rejected. -
Page 163: Logging On With Forced, Delayed Logoff At A Remote Phone
Mobility function Step by Step Logging on with forced, delayed logoff at a remote phone If the remote phone is busy and your service personnel enabled "Forced logoff during call" with a set timeout, forced logoff does not occur until this timeout expires. Logon via a key If a program key is configured for Mobility. -
Page 164: Openscape Voice Functions
OpenScape Voice functions Step by Step OpenScape Voice functions The OpenScape Voice supports a number of functions that you can activate and deactivate from your phone. The OpenScape Voice functions are only avail- able if the "Server features" function was activat- ed on the phone by the administrator. -
Page 165: Making Anonymous Calls
OpenScape Voice functions Step by Step Making anonymous calls Your administrator decides whether or not your caller ID (name and phone number) is displayed on a called par- ty’s station. Anonymous calling is when your data is not transmitted. The settings configured can be deacti- vated, however, for specific calls. -
Page 166: Temporarily Activate Anonymous Calling For The Next Call
OpenScape Voice functions Step by Step Temporarily activate anonymous calling for the next call If your administrator activated caller ID transmission for your phone, you can deactivate this setting for the next call as follows: Lift the handset. Enter the code (see the table of codes page 179). -
Page 167: Creating A List For Selective Calls
OpenScape Voice functions Step by Step Creating a list for selective calls For call acceptance You can create a list of the phone numbers from which you are willing to accept calls (also known as a selection list). Your service personnel know how long this list may be in the OpenScape Voice used on site in your facility. -
Page 168: For Call Rejection
OpenScape Voice functions Step by Step For call rejection As for selective call acceptance, you can create a selec- tion list with the phone numbers of parties from whom you are not willing to accept calls. Your administrator know how long this list may be in the OpenScape Voice used on site in your facility. -
Page 169: Anonymous Calls
OpenScape Voice functions Step by Step Anonymous calls Rejecting You can reject all calls from parties that activated a data protection feature (for example, caller ID suppression) to prevent their phone number from being transmitted. In this case, you are not informed that a call was reject- Lift the handset. -
Page 170: Using Abbreviated Dialing
OpenScape Voice functions Step by Step Using abbreviated dialing Abbreviated dialing gives you access to a central list of frequently dialed phone numbers. You can dial a specific phone number by simply entering a digit string. As these are three-digit numbers, you can store up to 1000 phone numbers. -
Page 171: Hunt Group Functions
OpenScape Voice functions Step by Step Hunt group functions To ensure optimum handling of specific calls, your tele- phone can be assigned to a pickup group page 59 and/or a hunt group. Your administrator can incorporate multiple telephones in a hunt group. If your telephone is assigned to a hunt group, OpenScape Voice forwards calls for the mem- bers of your group in accordance with specific rules de- fined by your administrator. -
Page 172: Marking The Last Line In The Hunt Group Chain
OpenScape Voice functions Step by Step Marking the last line in the hunt group chain Sets the "stop hunt" line in the hunt group chain. The system will stop looking for a free line in the hunt group chain after it reaches this line. Activating Lift the handset. -
Page 173: Reachability
OpenScape Voice functions Step by Step Reachability You can make either serial calls or simultaneous calls on several sites. The features for this are • serial call • parallel call Prerequisite: The service personnel has configured the respective feature for your main number in OpenScape Voice. -
Page 174: Parallel Call
OpenScape Voice functions Step by Step The caller is informed that the call is being routed to another station. The connection is established with the first phone that accepts the call. If the call is not answered by any phone, it is forwarded to the configured forwarding destination (on no reply) or to a "rejection announcement". - Page 175 OpenScape Voice functions Step by Step Activating/deactivating parallel call via code You can activate/deactivate the parallel call without ha- ving to change to edit mode. Prerequisite: You have already entered numbers in the parallel call list. Lift the handset. Enter the code to activate or deactivate the parallel call (see code table page 179).
-
Page 176: Parking A Call
OpenScape Voice functions Step by Step Parking a call If you have answered a call for a colleague and cannot forward it to him, you can park the call. Park a call You are conducting the call. Let the other party know, e.g. -
Page 177: Silent Monitoring
OpenScape Voice functions Step by Step Silent Monitoring If this function has been configured by service person- nel and enabled for the destination phone, you can join an active call of an internal station and listen in un- noticed (muted) or with the knowledge of the target station (active). -
Page 178: Muted Silent Monitoring
OpenScape Voice functions Step by Step Muted silent monitoring Station A and B are on a call. You want to monitor a call but so that neither station notices. internal station A Your phone internal or external station B • You can hear station A but cannot talk to him becau- se he cannot hear you •... -
Page 179: Table Of Codes For Openscape Voice Functions
OpenScape Voice functions Table of codes for OpenScape Voice functions Ask your administrator to enter the latest codes in the following table. Print this page as an overview. Function Code Description Making anonymous calls off page 165 Making anonymous calls on page 165 Making anonymous calls temporarily on page 166... -
Page 180: Individual Phone Configuration
Individual phone configuration Step by Step Individual phone configuration Display Adjusting the display to a comfortable read- ing angle You can swivel the display unit. Adjust the display unit so that you can clearly read the screen. Setting contrast You can adjust the display contrast on your OpenStage 80/OpenStage 80 G to suit the lighting con- ditions in your work environment. -
Page 181: Appearance
Individual phone configuration Step by Step Appearance Select your preferred appearance for the menu display here. For sample display themes, see page 29. z You can also configure this setting via the Web interface page 230. Press the key shown until the "Settings" tab is active. User Confirm the option shown. -
Page 182: Lamp Brightness For Touchslider
Individual phone configuration Step by Step Lamp brightness for TouchSlider Adjust the brightness of the TouchSlider page 20 by choosing one of the six settings available. z You can also configure this setting via the Web interface page 230. Press the key shown until the "Settings" tab is active. User Select and confirm the option shown. -
Page 183: Set The Sensitivity Of The Touchguide
Individual phone configuration Step by Step Set the sensitivity of the TouchGuide Adjust the sensitivity of the TouchGuide page 22 by choosing one of the four settings available. z You can also configure this setting via the Web interface page 230. Press the key shown until the "Settings"... -
Page 184: Contrast For The Openstage Key Module
Individual phone configuration Step by Step Contrast for the OpenStage Key Module If you have connected an OpenStage Key Module, you can adjust the key label contrast to suit your ambient lighting. z You can also configure this setting via the Web interface page 230. -
Page 185: Screensaver
Individual phone configuration Step by Step Screensaver Activate a screensaver for the telephone idle state. Your administrator can set a time of between two and eight hours defining how long the phone should be idle before display backlighting deacti- vates completely. z You can also configure this setting via the Web interface page 230. -
Page 186: Automatic Screensaver Activation
Individual phone configuration Step by Step Automatic screensaver activation Set how long OpenStage should be idle before the screensaver automatically activates. z You can also configure this setting via the Web interface page 230. Press the key shown until the "Settings" tab is active. User Confirm the option shown. -
Page 187: Setting The Fade Time For The Screensaver
Individual phone configuration Step by Step Setting the fade time for the screensaver Set the intervals at which the screensaver images change here. The following fade times are possible: • 5 seconds • 10 seconds • 20 seconds • 30 seconds •... -
Page 188: Date And Time
Individual phone configuration Step by Step Date and time You can choose the date and time display here. z You can also configure this setting via the Web interface page 230. Setting the time Press the key shown until the "Settings" tab is active. User Confirm the option shown. -
Page 189: Time Display Format
Individual phone configuration Step by Step Time display format z You can also configure this setting via the Web interface page 230. Press the key shown until the "Settings" tab is active. User Confirm the option shown. if nec. Enter and confirm the user password. Locality Select and confirm the option shown. -
Page 190: Setting Daylight Saving Time
Individual phone configuration Step by Step Setting daylight saving time z You can also configure this setting via the Web interface page 230. Prerequisite: Auto DST is deactivated page 191. Press the key shown until the "Settings" tab is active. User Confirm the option shown. -
Page 191: Automatic Daylight Saving Time
Individual phone configuration Step by Step Automatic daylight saving time The Auto DST setting is provided for information pur- poses and can only be changed by your administrator. z You can also access this information via the Web inter- face page 230. -
Page 192: Audio
Individual phone configuration Step by Step Audio Optimize the audio settings on your OpenStage for your environment and according to your personal require- ments. Volumes Set the volume here, for instance, for the loudspeaker, handset or headset. Use the TouchSlider to adjust the current volume settings page 20. -
Page 193: Settings
Individual phone configuration Step by Step Confirm the option shown. Save & exit Select and confirm the option shown. Settings Room character To ensure that the other party can hear you properly in speakerphone mode, you can adjust the phone to the room acoustics by choosing one of the following room character conditions: •... - Page 194 Individual phone configuration Step by Step Ringtone Select your preferred ringtone from the available audio files. If no individual audio files are available the "pattern" ringtone is preset. To upload your own files in ".mp3" or ".wav" format, please contact your service personnel. z You can also configure this setting via the Web interface page 230.
- Page 195 Individual phone configuration Step by Step Pattern melody z You can also configure this setting via the web interface page 230. Prerequisite: You have chosen the "pattern" ringtone, page 194. Press the key shown until the "Settings" tab is active. User Confirm the option shown.
- Page 196 Individual phone configuration Step by Step Select the required Ringer tone sequence between 1 and 3 (e. g. 2) in the context menu. You will immediately hear the set Ringer melody with the selected Ringer tone sequence. Confirm the selected setting. Country setting for speakerphone mode Enter the country setting you prefer for speakerphone mode here...
-
Page 197: Activating/Deactivating The Ringer
Individual phone configuration Step by Step Settings Select and confirm the option shown. Headset port Select the option shown. Wired headset From the following setting select and confirm the op- tion shown in the context menu. • Wired headset • Wireless headset •... -
Page 198: Nonsecure Voice Communication Tone And Message
Individual phone configuration Step by Step Nonsecure voice communication tone and message Use this option to activate an alert tone that you hear when a secure voice connection with the party you are currently talking to ceases to be secure. The message "Nonsecure connection"... -
Page 199: Setting The Language And Country
Individual phone configuration Step by Step Setting the language and country Display language z You can also configure this setting via the Web interface page 230. Press the key shown until the "Settings" tab is active. User Confirm the option shown. if nec. - Page 200 Individual phone configuration Step by Step You may choose from the following languages: 1. Bahasa Indonesia 2. Bahasa Malaysia 3. Brasileiro 4. Català Ceština 6. Dansk 7 . Deutsch 8. English 9. English(US) 10. Español 11. Français 12. Hrvatski 13. Italiano 14.
-
Page 201: Country-Specific Setting
Individual phone configuration Step by Step Country-specific setting Adapt your phone settings to suit the country-specific conditions (for example, transmission parameters). z You can also configure this setting via the Web interface page 230. Press the key shown until the "Settings" tab is active. User Confirm the option shown. -
Page 202: Context Menu
Individual phone configuration Step by Step Context menu After a connection is set up, a context menu appears with dependent functions. You can activate/deactivate the automatic display and can also set how long the context menu should be displayed. z You can also configure this setting via the Web interface page 230. -
Page 203: Bluetooth
Individual phone configuration Step by Step Bluetooth Activating and deactivating Bluetooth z You can also configure this setting via the Web interface page 230. Press the key shown until the "Settings" tab is active. User Confirm the option shown. if nec. Enter and confirm the user password. -
Page 204: Open Bluetooth Discoverability
Individual phone configuration Step by Step Open Bluetooth discoverability You can use this function to set whether or not your OpenStage should be transparent to other Bluetooth devices when operating in Bluetooth mode. z You can also configure this setting via the Web interface page 230. -
Page 205: Bluetooth Name For Your Openstage
Individual phone configuration Step by Step Bluetooth name for your OpenStage Here you can determine which name your OpenStage should use to register at other Bluetooth devices. z You can also configure this setting via the Web interface page 230. By factory default, the Bluetooth name is: OpenStage [MAC address of your telephone]. -
Page 206: Configuring Pairing Settings
Individual phone configuration Step by Step Configuring pairing settings Pairing is used for checking the access authorization of a Bluetooth device in a Bluetooth network. During the pairing process, a 128-bit connection key is created. This is used for subsequent identification. You can spec- ify whether pairing should be Automatic, occur after a Prompt or not at all. -
Page 207: Entering The Pairing Pin
Individual phone configuration Step by Step Entering the pairing PIN The personal identification number (PIN) contains at least four alphanumeric characters. This PIN is used for se- curely pairing Bluetooth devices with your OpenStage. z You can also configure this setting via the Web interface page 230. -
Page 208: Managing Bluetooth Devices
Individual phone configuration Step by Step Managing Bluetooth devices The following functions are available in the Bluetooth pairing manager: • Add a Bluetooth device • Delete Bluetooth device list • Connect or disconnect paired Bluetooth devices • Remove single Bluetooth devices from the list •... - Page 209 Individual phone configuration Step by Step Deleting all Bluetooth devices from the list You can delete the whole list if, for example, the devices are no longer in the area. Press the key shown until the application’s "Settings" tab is active. User Select and confirm the option shown.
- Page 210 Individual phone configuration Step by Step Connecting/disconnecting a Bluetooth device Prerequisite: At least one Bluetooth device is listed. Press the key shown until the application’s "Settings" tab is active. User Select and confirm the option shown. if nec. Enter and confirm the user password. Configuration Select and confirm the option shown.
- Page 211 Individual phone configuration Step by Step Deleting a Bluetooth device from the list You can delete a single Bluetooth device from the list if, for example, it will be away from the area for an indefi- nite period. Press the key shown until the application’s "Settings" tab is active.
- Page 212 Individual phone configuration Step by Step Renaming a Bluetooth device in the list A Bluetooth device is entered in the list with the name set in the device. This is often the device type. You can change this logon name. Press the key shown until the application’s "Settings"...
-
Page 213: Blacklist For Bluetooth Devices
Individual phone configuration Step by Step Blacklist for Bluetooth devices The blacklist contains Bluetooth devices to which your OpenStage should not connect. Adding a Bluetooth device Press the key shown until the application’s "Settings" tab is active. User Select and confirm the option shown. if nec. - Page 214 Individual phone configuration Step by Step Removing a Bluetooth device from the blacklist Press the key shown until the application’s "Settings" tab is active. User Select and confirm the option shown. if nec. Enter and confirm the user password. Configuration Select and confirm the option shown.
-
Page 215: Network Information
Individual phone configuration Step by Step Network information This information overview in the user area of the service menu provides you with information about the IP ad- dress or name of the phone and the HTML address of the web-interface. It also provides real-time data about the network activity of the phone. -
Page 216: Resetting User Data
Individual phone configuration Step by Step Resetting user data The following user-specific settings changed via the phone menu or the Web interface can be reset to facto- ry settings. • Display settings • Language setting • Screensaver Personal images for the screensaver are delete and deleted default images are restored (admi- nistration e.g. -
Page 217: Bluetooth
Bluetooth Step by Step Bluetooth Bluetooth is an open standard for high-performance technology and allows wireless communication be- tween PCs, PDAs, and mobile telephones. In contrast to infrared connections, Bluetooth does not require a visual contact for communication purposes and can be used over distances of up to 10 meters. To exchange data between Bluetooth-enabled devices, the devices need to undergo a once-off discovery pro- cedure. -
Page 218: Transferring Contacts
Bluetooth Step by Step Transferring contacts The Bluetooth function on your OpenStage allows you to transfer contacts in vCard format (file extension: .vcf) from other Bluetooth devices to your OpenStage and save them in the phonebook. You can also send phone- book entries as vCards to other Bluetooth-enabled devic- Due to the diverse range of PCs, mobile tele- phones and PDA devices currently available, we... -
Page 219: Sending A Vcard
Bluetooth Step by Step Sending a vCard Prerequisite: The Bluetooth connection is configured between your OpenStage and one other device page 203. A vCard file is saved on the OpenStage. Search the phonebook for the entry you wish to send. Press the key shown. -
Page 220: Using A Bluetooth Headset
Bluetooth Step by Step Using a Bluetooth headset You can connect a Bluetooth headset to your OpenStage 60/80 which is approved for use with the OpenStage 60/80. Ask for service personnel about ap- proved headset types. It is not recommended to activate the open listen page 57ing feature in connection with a Bluetooth headset because this can lead to re-... -
Page 221: Testing A Bluetooth Headset
Bluetooth Step by Step Connecting a Bluetooth headset to OpenStage The Bluetooth headset must now be connected to the OpenStage 60/80. Jabra BT500 Select the Bluetooth headset in the list. Connect Select and confirm the option shown in the context menu. -
Page 222: Using A Bluetooth Conference Phone
Bluetooth Step by Step Using a Bluetooth Conference Phone You can connect a Bluetooth conference phone to your OpenStage 60/80 which is approved for use with the OpenStage 60/80. Ask your service personnel about ap- proved conference phone types. Connecting a "Konftel 60W" Bluetooth conference phone Below is an example of connecting and operating a "Konftel 60W"... - Page 223 Bluetooth Step by Step The message "Pairing in progress" is displayed. Follow- ing successful pairing, the device is added to the list of paired devices. You hear a short confirmation tone from the Konftel 60W before the device switches itself off again.
-
Page 224: Testing The "Konftel 60W" Bluetooth Conference Phone
Bluetooth Step by Step Testing the "Konftel 60W" Bluetooth confer- ence phone Answering a call Prerequisite: The "Konftel 60W" conference phone is ready for use but turned off (see user guide „Konftel 60W“). The OpenStage is in idle mode. Both the phone and the "Konftel 60W" ring. The caller is displayed. -
Page 225: Backup/Restore
Backup/restore Step by Step Backup/restore Backups are usually made to a USB mass storage de- vice and contain user-specific data. A backup includes the following components: • All user settings for configuration • Call forwarding instructions with default destina- tions •... -
Page 226: Saving User Data
Backup/restore Step by Step Saving user data Press the key shown until the "Settings" tab is active. User Confirm the option shown. if nec. Enter and confirm the user password. Phone Select and confirm the option shown. Backup/Restore Select and confirm the option shown. Creating a new backup Options Select and confirm the option shown. -
Page 227: Restoring User Data
Backup/restore Step by Step Restoring user data Press the key shown until the "Settings" tab is active. User Confirm the option shown. if nec. Enter and confirm the user password. Phone Select and confirm the option shown. Backup/Restore Select and confirm the option shown. 17.08.07 14:42 August 3770 Select and confirm the backup you want. -
Page 228: Deleting A User Backup On A Storage Medium
Backup/restore Step by Step Deleting a user backup on a storage medium You can delete invalid or older backups on your USB me- dium. Press the key shown until the "Settings" tab is active. User Confirm the option shown. if nec. Enter and confirm the user password. -
Page 229: Displaying And Checking Backups On Usb Media
Backup/restore Step by Step Displaying and checking backups on USB media Check which backups are stored on the medium. Press the key shown until the "Settings" tab is active. User Confirm the option shown. if nec. Enter and confirm the user password. Phone Select and confirm the option shown. -
Page 230: Web Interface (Wbm)
Web interface (WBM) Web interface (WBM) You can configure a number of settings for your phone via the Web inter- face. Communication is via a secure HTTPS connection. Calling up the Web interface For more information on the IP address, the Web interface address, and how to connect the telephone to the network, refer to the sec- tion entitled "Network information"... -
Page 231: User Pages
Web interface (WBM) User pages The Web interface homepage opens once you have entered and confirmed the phone’s IP address: User menu Phone information User selection User login Highlighted entry (current page) Menu heading Menu entry 1. Click a menu heading to display the individual menu entries. Click the menu heading again to close the menu. -
Page 232: User Menu
Web interface (WBM) User menu All settings that you can make via the Web interface’s user menu can also be made via the phone’s user menu page 47. User Pages User login User login V page 155 Date and Time –... - Page 233 Web interface (WBM) – Alerts – Visual alerts V page 90 – Audible alerts V page 90 – Forwarding party V page 90 – Handling – Allow call waiting V page 97 – Allow DND V page 154 – Allow busy when dialling V page 106 –...
- Page 234 Web interface (WBM) – Bluetooth – Bluetooth device address – Phone name V page 205 – Status – Active V page 203 – Discoverable V page 204 – Pairing mode V page 206 – PIN for pairing V page 207 –...
-
Page 235: Fixing Problems
Fixing problems Fixing problems Caring for your telephone • Never allow the telephone to come into contact with coloring, oily or aggressive agents. • Always use a damp or antistatic cloth to clean the telephone. Never use a dry cloth. •... -
Page 236: Local User Menu
Local user menu Local user menu Opening the user menu on the phone Press the key to open the user menu. On the Settings tab, select the User menu option. You are prompted to page 155. Confirm this with OK. The options enter the User password of the user menu are available. - Page 237 Local user menu – Pattern – Ringer1.mp3 – Ringer2.mp3 – Ringer3.mp3 – Ringer4.mp3 – Ringer5.mp3 – Ringer6.mp3 – Ringer melody page 195 – 1 – 2 – 3 – 4 – 5 – 6 – 7 – 8 – Ringer tone sequence page 195 –...
- Page 238 Local user menu – No – Callback: no reply page 78 – Yes – No – Busy when dialing page 106 – Yes – No – Transfer on ring page 100 – Yes – No – Immediate dialing page 63 –...
- Page 239 Local user menu – Destination 2 – Destination 3 – Destination 4 – Destination 5 – No reply page 73 – On – Off – Destination Destination 1 to Destination 5 – Edit favorites? – Options Save & exit – Exit (no save) –...
- Page 240 Local user menu – AutoAnswer beep page 101 – Yes – No – AutoReconnect beep page 102 – Yes – No – Connected calls? – Options Save & exit – Exit (no save) – Allow call transfer page 100 – Yes –...
- Page 241 Local user menu – Context menu – Automatic menu... page 202 – Yes – No – Display time page 202 – 5 – 10 – 20 – 30 – 60 – 120 – Unlimited display – Keyset – Lines? – Line (one of eight possible) –...
- Page 242 Local user menu – No – Telephone name OpenStage 80 page 205 – Pairing Prompt page 206 – No – Prompt – Automatic – Pairing PIN **** page 207 – Paired devices page 208 – Options – Exit – Add device –...
- Page 243 Local user menu – Menu data Ignore – Ignore – Restore – Screensaver images Ignore – Ignore – Restore – All clip images Ignore – Ignore – Restore – All ringer tones Ignore – Ignore – Restore – All midlet data Ignore –...
- Page 244 Local user menu – Options Save & exit – Exit (no save) – Display theme Crystal sea page 180 – Crystal sea – Warm grey – Key mod. contrast page 184 – Slider brightness page 182 – Program keys Press the key to be programmed –...
- Page 245 Local user menu – Confirm password Network information? – Options Exit – Phone address page 215 – Web address – IP address – LAN RX – LAN TX – PC RX – PC TX – LAN autonegotiated – LAN information 10 Mbps full duplex –...
-
Page 246: Key Functions
Local user menu Key functions Normal You can program the following functions on the Normal of the function keys: • Selected dialing • Repeat dialing • Forward all calls • Forward no reply • Forward busy • Ringer off • Hold •... - Page 247 Local user menu Shifted You can program the following functions on the Shifted of the function keys: • Selected dialing • Repeat dialing • Alternate • Blind transfer call • Transfer call • Deflecting • Conference • Repertory dial • Release •...
-
Page 248: Index
Index Index ..........107 Conference ........16 Connection options ..........66 Consultation ..95 Consultation call from second call Accepting calls ..........112 Contact multi-line ........146 ..........49 display format Administration ............63 ............90 Context Alerts ........... 31 ........ - Page 249 Index ......... 123 Executive/secretary ........125 ..........18 connecting a call Key modules ..........125 ............27 second call Keypad ..........163 ........199 Forced logoff Language setting ......114 ........201 Forwarding primary line country setting ..........20 ....199 Function keys language for user prompts ........
- Page 250 Index ..........59 Pickup group ..........63 ....... 194 Normal dialing Play ringtone melody ........32, 34, 37 Pop-up menu ..........25 Primary line ..........57 ............152 Open listening Privacy ........164 ........... 26 OpenScape Voice Private line ......47 abbreviated dialing Program/Service menu ....
- Page 251 Index ......52, 56 Speakerphone mode ..........29 Status icons Symbols ......... 35 application tab ..........38 multi-line ..........29 status bar ......... 110 System conference ......235 Telephone maintenance ........19 Telephone models Telephony interface ..........38 multi-line ..........37 single line ..
-
Page 252: Display Icons
Display icons Display icons Application tab Telephony interface page 37 Phonebooks page 40 Call lists page 43 Voicemail page 46 Program/Service menu/Applications menu page 47 Help function page 49 Status bar The ring tone is deactivated page 152 Operating data is sent to the server page 50 The "Do not disturb"... - Page 253 Display icons Phonebook entries Primary business number Secondary business number Mobile phone number Private phone number E/A Cockpit Not available Available Call forward to assistant (if there) Call forward to assistant (if there) Ring immediately (call forwarding cleared) Call forwarding to mobile phone. Call forwarding to answering machine.
- Page 254 Hofmannstr. 51 80200 München Deutschland Siemens Enterprise Communications GmbH & Co. KG is a Trademark Licensee of Siemens AG Reference No: A31003-O1010-U102-40-7619 The information provided in this document contains merely general descriptions or char- acteristics of performance which in case of...
Need help?
Do you have a question about the OpenStage 60 SIP and is the answer not in the manual?
Questions and answers