Advertisement
Table of Contents
- 1 Table of Contents
- 2 Important Notes for E100/E200/E400 Series Controllers
- 3 System Overview
- 4 E100 Series Function and Wiring
- 5 Power Supply and Grounding
- 6 Description of the Connectors / Interfaces
- 7 Power Supply Requirement
- 8 Ordering Information
- 9 Declaration of Conformity Ce-Marking
- 10 Error Codes
- 11 Contact Addresses
- Download this manual
Controller Series E100/200/400
Installation Guide
Controller Series E100/E200/E400
Products
E100-AT / -MT /-DN /-CO
E200-AT / -MT /-DN/-CO
E400-AT / -MT /-DN/-CO
Content
IMPORTANT NOTES FOR E100/E200/E400 SERIES CONTROLLERS ..................... 2
SYSTEM OVERVIEW............................................................................................................. 3
E100 SERIES FUNCTION AND WIRING ........................................................................... 4
POWER SUPPLY AND GROUNDING ................................................................................ 5
DESCRIPTION OF THE CONNECTORS / INTERFACES .............................................. 6
POWER SUPPLY REQUIREMENT ................................................................................... 10
ORDERING INFORMATION ............................................................................................... 10
DECLARATION OF CONFORMITY CE-MARKING ....................................................... 11
ERROR CODES .................................................................................................................... 12
CONTACT ADDRESSES .................................................................................................... 12
NTI AG
Installation: E100/E200/E400 series / 28.07.2010
Page 1/12
Advertisement
Table of Contents

Related Manuals for LinMot E100 Series


Summary of Contents for LinMot E100 Series
-
Page 1: Table Of Contents
E400-AT / -MT /-DN/-CO Content IMPORTANT NOTES FOR E100/E200/E400 SERIES CONTROLLERS ..... 2 SYSTEM OVERVIEW......................3 E100 SERIES FUNCTION AND WIRING ................4 POWER SUPPLY AND GROUNDING ................5 DESCRIPTION OF THE CONNECTORS / INTERFACES ..........6 POWER SUPPLY REQUIREMENT ................... 10 ORDERING INFORMATION .................... -
Page 2: Important Notes For E100/E200/E400 Series Controllers
All connectors must not be connected or disconnected while DC voltage is present. Do not disconnect system components until all LinMot controller LED’s have turned off. (Capacitors in the power supply may not fully discharge for several minutes after input voltage been disconnected). -
Page 3: System Overview
Controller Series E100/200/400 System Overview Power Supply Signal Fault Ready Stat A Stat B Interfaces Power Supply Mot A to PLC or Signal --> 24 ... 48 V Sys 1 -->--> Interfaces to PLC or Power Supply Motor Mot B From AC Mains -->... -
Page 4: E100 Series Function And Wiring
Controller Series E100/200/400 E100 series Function and Wiring Motor Internal Linear Motor Hall Sensors Mot A ( addtional Motors B,C,D) Power Supply motor Emergency Stop Breaker PWR motor AC-Mains 2-Phase Powerstage - Circuit Breaker 10 AT 24...48VDC - Fuse Power Supply signal Ground Bus 24...48V DC... -
Page 5: Power Supply And Grounding
In order to assure a safe and error free operation, and to avoid severe damage to system components, all system components must be well grounded to either a single earth or utility ground. This includes both LinMot and all other control system components to the same ground bus. -
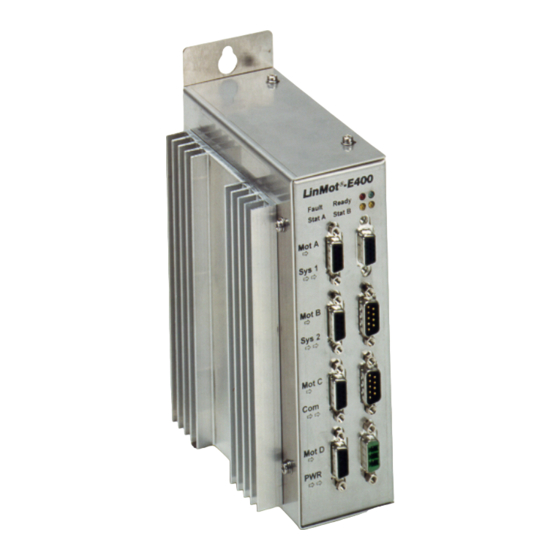
Page 6: Description Of The Connectors / Interfaces
Controller Series E100/200/400 Description of the connectors / Interfaces Power Supply Power Connector 24...48VDC 24...48VDC Internal Internal Fuse 500mAT Fuse 10AT GND internally connected to controller housing 1 PWR Signal+ 1 2 3 2 GND 3 PWR Motor+ 24...48VDC 24...48VDC Supply GND must be externally connected to earth (Ground Bus) - Page 7 Do not connect or disconnect the motors from controllers with voltage present. Wait to connect or dis- connect motors until all LinMot controller LED’s have turned off. (Capacitors may not fully discharge for several minutes after power has been turned off).Failure to observe these precautions may result in se- vere damage to electronic components in LinMot motors and/or controllers.
- Page 8 Controller Series E100/200/400 Sys 1 System Connector 1 Sys 1 DSUB-15 (female) Emergency Stop (active low) / Freeze input (active high) Optical isolated inputs Input voltage: 0 …. 24V for logical zero < 2V for logical one > 3.5V Input current: < 20 mA (internally limited to 20 mA) Update rate: 1.6 ms Dig In 5 / Dig In 6 max.
- Page 9 Controller Series E100/200/400 Mechanical Dimension Dimensions Fixings for 2 x M5 screws Centers Dimensions in mm Recommended mounting for multiple controller installation Fixings for 2 x M5 screws Dimensions in mm NTI AG Installation: E100/E200/E400 series / 28.07.2010 Page 9/12...
-
Page 10: Power Supply Requirement
The calculation of the needed power for the Motor supply is depending on the application and the used motor(s). The following table shows a recommendation for general applications. Controller Voltage/ Power LinMot Switched- Power Supply Part-Nr. E100 1 motor 48 V / 150 W... -
Page 11: Declaration Of Conformity Ce-Marking
Controller Series E100/200/400 Declaration of Conformity CE-Marking Manufacturer: NTI AG ® LinMot Technoparkstrasse 1 8005 Zurich Switzerland Tel.: +41 (0) 1 445 22 82 Fax: +41 (0) 1 445 22 81 ® Products: LinMot Controllers Type Art.-No. Type Art-No. Type Art.-No. -
Page 12: Error Codes
LED blinks longer (ca. 1½s) Contact Addresses NTI AG LinMot Tel.: +41 (0)56-419 91 91 Haerdlistrasse 15 Fax: +41 (0)56-419 91 92 CH-8957 Spreitenbach E-Mail: office@linmot.com Schweiz Web: www.linmot.com LinMot Inc. Sales: 877-546-3270 5750 Townline Road 262-743-2555 Elkhorn Tech. Service: 877-804-0718...
Need help?
Do you have a question about the E100 Series and is the answer not in the manual?
Questions and answers