Keithley 2002 Getting Started Manual
Hide thumbs
Also See for 2002:
- User manual (366 pages) ,
- Repair manual (148 pages) ,
- Calibration manual (114 pages)

Subscribe to Our Youtube Channel
Related Manuals for Keithley 2002


Summary of Contents for Keithley 2002
- Page 1 Model 2002 Multimeter Getting Started Manual A G R E A T E R M E A S U R E O F C O N F I D E N C E...
- Page 2 WARRANTY Keithley Instruments, Inc. warrants this product to be free from defects in material and workmanship for a period of 3 years from date of shipment. Keithley Instruments, Inc. warrants the following items for 90 days from the date of shipment: probes, cables, rechargeable batteries, diskettes, and documentation.
- Page 3 Model 2002 Multimeter Getting Started Manual ©1994, Keithley Instruments, Inc. All rights reserved. Cleveland, Ohio, U.S.A. First Printing May 1994 Document Number: 2002-903-01 Rev. A...
- Page 4 Revision A (Document Number 2002-903-01) ..............May 1994 All Keithley product names are trademarks or registered trademarks of Keithley Instruments, Inc. Other brand names are trademarks or registered trademarks of their respective holders.
-
Page 5: Safety Precautions
Safety Precautions The following safety precautions should be observed before using this product and any asso- ciated instrumentation. Although some instruments and accessories would normally be used with non-hazardous voltages, there are situations where hazardous conditions may be present. This product is intended for use by qualified personnel who recognize shock hazards and are familiar with the safety precautions required to avoid possible injury. - Page 6 If a screw is present, connect it to safety earth ground using #18 AWG or larger wire. symbol on an instrument or accessory indicates that 1000V or more may be present on the terminals. Refer to the product manual for detailed operating information. Instrumentation and accessories should not be connected to humans.
-
Page 7: Table Of Contents
Table of Contents Front Panel Operation Product overview................. 1-2 Display ....................1-8 Power-up....................1-8 Bench defaults ..................1-9 Voltage measurements............... 1-10 Current measurements............... 1-11 Two and four-wire resistance measurements ........1-12 Frequency measurements ..............1-14 Temperature measurements............... 1-16 Measurement Options Multiple displays ................. -
Page 8: Front Panel Operation
Front Panel Operation... -
Page 9: Product Overview
Front Panel Operation Product overview If you have any questions after reviewing this information, please contact your local Keithley representative, or call one of our Applications Engineers at 1-800-348-3735 (U.S. and Canada only). Worldwide phone numbers are listed on the back cover. - Page 10 • Digital ltering • Remote operation using the IEEE-488 bus By installing the appropriate option card, the capabilities of the Model 2002 are extended as follows: • Scan internal channels (Model 2001-SCAN Scanner Card or Model 2001-TCSCAN Thermocouple Scanner Card) •...
-
Page 11: Range Keys
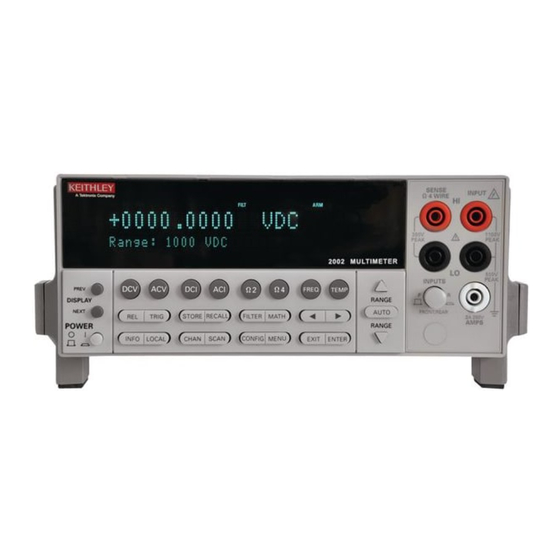
Front Panel Operation Figure 2 Primary Display Line Model 2002 front panel Secondary Display Line overview SENSE INPUT Ω 4 WIRE ERR REM TALK LSTN SRQ REAR REL FILT MATH AUTO ARM TRIG SMPL 350V 1100V PEAK PEAK Range : 200mVDC... -
Page 12: Operation Keys
Front Panel Operation 4 HANDLE (not shown) Pull out and rotate to desired position 5 DISPLAY KEYS PREV/NEXT Scroll through multiple displays of a function 6 OPERATION KEYS Enables/disables relative reading TRIG Triggers unit STORE Enables data storage RECALL Displays reading data (reading, number, time). Use PREV/NEXT DISPLAY for maximum, minimum average, standard deviation FILTER Displays digital filter status for present function and toggles filter on/off... -
Page 13: External Trigger Input
Front Panel Operation Figure 3 Model 2002 rear panel overview WARNING: WARNING: NO INTERNAL OPERATOR SERVICABLE PARTS,SERVICE BY QUALIFIED PERSONNEL ONLY. NO INTERNAL OPERATOR SERVICABLE PARTS,SERVICE BY QUALIFIED PERSONNEL ONLY. INPUT MADE IN U.S.A. EXTERNAL METER TRIGGER COMPLETE INPUT OUTPUT... -
Page 14: Power Line Input
Front Panel Operation 1 INPUT CONNECTIONS INPUT HI and LO Used for DC volts, AC volts, and 2-wire resistance measure- ments AMPS Used with INPUT LO to make DC current and AC current measurements SENSE Ω4 WIRE HI and LO Used with INPUT HI and LO to make 4-wire resistance measurements 2 FAN Keep filter clean to ensure proper instrument cooling 3 POWER LINE INPUT... -
Page 15: Display
Front Panel Operation Display As shown in the Model 2002 front panel overview (Figure 2), the front panel has three lines of display information: the primary display line, the secondary display line, and annunciators. • Primary Display Line: The top line displays readings along with units. It can also display measurement type (e.g., RMS), “hold”, math operating type, channel number, menu... -
Page 16: Bench Defaults
Front Panel Operation Bench defaults The Model 2002 can save one, v e, or ten user setups in non-volatile memory, depending on the installed memory option. You can select one of the user setups as the power-on default, or have the instrument power up to either of the two factory defaults (optimized for “BENCH” or “GPIB”... -
Page 17: Voltage Measurements
Observe the display. If the “Over o w” message is displayed, select a higher range until a normal reading is displayed. Use the lowest possible range for the best resolution. Take a reading from the display. Figure 4 Model 2002 DC and AC voltage measurements EDIT... -
Page 18: Current Measurements
Observe the display. If the “Over o w” message is displayed, select a higher range until a normal reading is displayed. Use the lowest possible range for the best resolution. Take the reading from the display. Figure 5 Model 2002 DC and AC current measurements EDIT... -
Page 19: Two And Four-Wire Resistance Measurements
A. For 2-wire, connect the test leads to INPUT HI and LO. B. For 4-wire, connect the test leads to INPUT HI and LO, and SENSE Ω 4 WIRE HI and LO. Recommended Kelvin test probes include the Keithley Models 5805 and 5806. - Page 20 Front Panel Operation 1-13 Figure 6 Optional shield Shielded Model 2002 Two and four- Cable wire resistance EDIT TALK LSTN SRQ REAR FILT MATH AUTO TRIG SMPL measurements 2001 MULTIMETER Resistance Under Test Note: Source current flows from the INPUT HI to INPUT LO terminals.
-
Page 21: Frequency Measurements
Assuming “BENCH” reset conditions, the basic procedure is as follows: Connect test leads to the INPUT HI and LO terminals of the Model 2002. Either the front or rear inputs can be used; place the INPUTS button in the appropriate position. -
Page 22: Trigger Level
Front Panel Operation 1-15 Figure 7 Model 2002 Frequency measurements EDIT TALK LSTN SRQ REAR FILT MATH AUTO TRIG SMPL AC Voltage Source 2001 MULTIMETER AC voltage input Caution: Maximum Input = 1100V peak, 2 x 10 V•Hz Model 2002... -
Page 23: Temperature Measurements
Model 2001-TCSCAN or an external card (Model 7057A or 7402). The thermocouple cards use channel 1 as the reference junction and must be con gured on the Model 2002 for TC type, voltage reference and offset. See Section 2 in the User’s Manual for con guration details. - Page 24 Front Panel Operation 1-17 Sense Ω4-wire HI Figure 8 Four-wire RTD temperature Model 2002 measurements Input HI EDIT TALK LSTN SRQ REAR FILT MATH AUTO TRIG SMPL Platinum 2001 MULTIMETER Connections to banana jacks Input LO Sense Ω4-wire LO Model 8680 RTD Sense Ω4-wire HI...
- Page 25 1-18 Front Panel Operation...
-
Page 26: Measurement Options
Measurement Options... -
Page 27: Multiple Displays
This section describes the details of making measurements. Configuration options, triggers, reading storage, and scanning are just a few of the topics discussed. You will find this informa- tion useful whether operating the Model 2002 from the front panel or IEEE-488 bus. Multiple displays Each measurement function and some operations provide “multiple displays”... - Page 28 Measurement Options Table 1 Multiple displays by function Function Next display Bar graph Zero-centered bar graph Maximum and minimum values Relative and actual values Calculated and actual values (see Note 1) Limts bar graph (see Note 1) Adjacent channel readings (see Note 2) DC voltage DC volts, AC ripple voltage and frequency Positive peak spikes and highest value...
- Page 29 Each full segment of the bar represents approximately 4% of the range limit. 2002 MULTIMETER Zero-centered Bar Graph — The zero-centered bar FILT graph is a graphical representation of the reading using plus minus limits with zero in the center.
- Page 30 While the top line provides the re- sult of the math calculation, the bottom line provides the raw reading. 2002 MULTIMETER Buffer — These bottom line displays are used when FILT recalling readings from the data store buffer. They pro- vide the maximum, minimum, average and standard deviation for the readings stored in the buffer.
-
Page 31: Menus
Measurement Options Menus There are two basic menu structures used by the Model 2002: the main menu and the CON- FIGure menus. The main menu accesses items for which there are no dedicated keys; the CON- FIGure menus configure measurement functions and other instrument operations. - Page 32 • • • The 2002 allows each measurement function to be configured independently, letting you set each function as desired. For example, if DCV is set for 7 digits using 10 power line cycles, ACV can be set to 5 digits at 0.1 power line cycle.
- Page 33 Measurement Options Navigating menus Use the following rules to navigate through the menu structures. Table 5 summarizes the front panel keys used for navigation. From the instrument’s normal state of displaying readings, you can: • View a configuration menu by pressing CONFIG and then the desired function or op- eration key (DCV, TRIG, etc.).
- Page 34 Measurement Options Table 5 Menu summary Action Description CONFIG-(function) Press the CONFIG key, then a function key (e.g., DCV) to view the top level of a function configuration menu. MENU Press the MENU key to view the top level of the main menu.
-
Page 35: Relative
2-10 Measurement Options Relative Rel subtracts a reference value from actual readings. When rel is enabled, the instrument uses the present reading as a relative value. Subsequent readings will be the difference between the actual input value and the rel value. Actual Input –... -
Page 36: Trigger
ARM indicator is off when in idle. When the Model 2002 is taken out of idle by pressing TRIG (or sending :INIT or :INIT:CONT ON over the bus), the ARM indicator turns on and operation proceeds into the Arm... -
Page 37: Control Source
488 bus operation, these layers are known as Arm Layer 1, Arm Layer 2 and the Trigger Layer. Once the Model 2002 is taken out of idle, operation proceeds through the layers of the trigger model down to the device action where a measurement occurs. -
Page 38: Device Action
After each measurement (device action), an output trigger pulse occurs and is available at the rear panel of the Model 2002. When used with an external scanner (such as a Model 7001 or 7002 Switch System), each output trigger would be used to select the next channel in a scan (see EXTERNAL SCANNING in the MEASUREMENT OPTIONS section of this manual). -
Page 39: Speed
2-14 Measurement Options Speed SPEED sets the integration time of the A/D converter, the period of time the input signal is measured. The SPEED can be set for each measurement function except FREQ. The integration time is specified in parameters based on a number of power line cycles (NPLC), where one PLC for 60Hz is 16.67msec and one PLC for 50Hz and 400Hz is 20msec. -
Page 40: Resolution
Measurement Options 2-15 Resolution Except for FREQ, TEMP and some special cases for ACV, all functions can operate from 3.5 to 8.5 digits of resolution. Each function can have its own unique resolution setting. Configure resolution Perform the following steps to set resolution for a measurement function: Press the CONFIG key and then the desired function key (DCV, ACV, etc.). -
Page 41: Filter
filter. Filter types The Model 2002 has two types of digital filters; averaging and advanced. Both types are a simple average of 1 to 100 reading conversions. The difference is a user-programmed noise “window” for the advanced filter. The noise window (expressed as a percentage of range) allows a faster response time to large signal step changes. - Page 42 Measurement Options 2-17 Configuring filters Each measurement function, except FREQ, has its own filter configuration. The procedure to configure a filter is summarized as follows: Select the measurement function. Press CONFIG and then FILTER to display the following filter menu options: AUTO: Selects auto filtering.
-
Page 43: Buffer (Data Store)
Measurement Options Buffer (Data Store) The Model 2002 has a buffer to store readings at two different rates: normal and burst modes. The maximum number of readings that can be stored depends on the installed memory option (standard, MEM1 or MEM2) and the user-programmable data group (full or compact). Storage capacity is summarized in Table 6. -
Page 44: Burst Mode
Burst mode The burst data acquisition mode maximizes the reading rate of the Model 2002. With burst mode, new raw readings (A/D counts) are acquired and then post-processed by applying calibra- tion constants. If filter or math operations are enabled, the post-processing time is longer. -
Page 45: Math
2-20 Measurement Options Math The MATH key lets you perform math operations on single readings and display the result. The three math calculations that are configured from the CONFIGURE MATH menu structure are: Polynomial: where: X is the normal display reading a2, a1, and a0 are user entered constants Y is the displayed result Percent:... - Page 46 Display = % DEV (reading) Math is disabled by pressing MATH a second time. Additional math operations In addition to the math performed on single readings described above, the Model 2002 has these math operations: • Math performed on buffered readings (maximum and minimum values, average, and standard deviation).
-
Page 47: Internal Scanning
Measurement Options Internal scanning The Model 2002 can be used with a scanner card (such as the Model 2001-SCAN or 2001- TCSCAN) installed in the option slot of the instrument. This section provides basic information for scanning internal channels. If the scanner card is not already installed, refer to the scanner card instruction manual. - Page 48 With the desired function assignments displayed, use the EXIT key to back out of the menu structure. Configure scan Perform the following steps to configure the Model 2002 for an internal scan: Press CONFIG and the SCAN to display the SCAN OPERATION menu options. Use the cursor keys ( ) to select INTERNAL and press ENTER.
- Page 49 2-24 Measurement Options Close/Open channels The CHAN key is used to close an internal channel or channel pair (for 4-wire functions), or open any internal closed channel or channel pair. Perform the following steps to close or open channels: Press CHAN to display the following CHANNEL SELECTION options: CLOSE-CHANNEL: Use to close a channel or channel pair on the internal scanner card.
- Page 50 2-25 Ratio and delta calculations With RATIO or DELTA selected from the SCAN OPERATION menu, the Model 2002 can measure two specified internal scanner channels (reference channel and measure channel) and then compute the ratio or difference (delta) between them. Valid measurement functions for ratio and delta include DCV, Ω...
-
Page 51: External Scanning
RESET default conditions. Trigger connections If using Trigger Link, connect the Model 2002 to the switch system as shown in Figure 13. If using conventional external triggering, connect the instruments as shown in Figure 14. Detailed information on triggers is provided in Section 2 of the User’s Manual. - Page 52 Measurement Options 2-27 Figure 14 External Trigger Trigger con- 7001 or 7002 Switch System 2002 Multimeter nections using WARNING: WARNING: NO INTERNAL OPERATOR SERVICABLE PARTS,SERVICE BY QUALIFIED PERSONNEL ONLY. WARNING: WARNING: conventional NO INTERNAL OPERATOR SERVICABLE PARTS,SERVICE BY QUALIFIED PERSONNEL ONLY.
- Page 53 INFINITE Note: Do not exit from the menu structure after selecting an infinite channel count. Model 2002 – Select the appropriate trigger source. If using the Trigger Link, select TRIGLINK. If you are instead using conventional external triggering, select EXTER- NAL.
- Page 54 ). Press ENTER to continue. Model 2002 – You will then be asked if you wish to use the scan timer. The timer is used to provide a time interval between each scan. If you select YES, enter the interval (in sec- onds).
-
Page 55: Ieee-488 Bus Operation
IEEE-488 Bus Operation... -
Page 56: Software Support
National Instruments NI-488.2 for PCII/IIA or AT-GPIB, rev. 1.5 IOtech Driver 488, at least v2.6 MET/CAL™ 1 routines Routines to calibrate (adjust and/or verify) the Model 2002 on a MET/CAL system are avail- able free. Semi-automatic calibration program For users with a PC who want to speed calibration, a program is available that prompts the operator through setup and calibration of the 2002. -
Page 57: Ieee-488 Bus Standards
SCPI commands. IEEE-488 bus connections The Model 2002 is connected to the IEEE-488 bus using a cable terminated with standard IEEE-488 connectors. Figure 15 shows a typical connection scheme for a multi-unit test system. -
Page 58: Primary Address Selection
IEEE-488 Bus Operation Primary address selection The Model 2002 is shipped from the factory with a programmed primary address of 16. The address is displayed on power-up. Programming examples in this manual assume a primary ad- dress of 16. Perform the following steps to check and/or change the primary address: Press MENU to display the MAIN MENU. -
Page 59: Common Commands
IEEE-488 Bus Operation Common commands Common commands are common to all IEEE-488 devices on the bus. The following infor- mation summarizes the Common commands that are used most often. For complete details, refer to Section 3 in the User’s Manual. *CLS (clear status) Clears all event registers and Error Queue. -
Page 60: Scpi Commands
IEEE-488 Bus Operation SCPI commands In the Model 2002 Multimeter, you are given access to control settings that are hidden on oth- er instruments. The increased capability does, however, produce increased complexity. To ac- commodate this, the multimeter incorporates the Standard Commands for Programmable Instruments (SCPI) command set. -
Page 61: Scpi Command Syntax
IEEE-488 Bus Operation SCPI command syntax Tree structure SCPI commands are organized in a tree structure, similar to disk directories in computer op- erating systems. Each subdirectory is called a subsystem. For example, part of the sub- SENSe1 system is listed below and shown in Figure 16. [SENSe[1]] :DATA? :FUNCtion "<name>"... - Page 62 - you must send the exact short or long form. However, you do not have to use the mixed capitalization - the Model 2002 accepts commands in any combination of upper and lower case. For example, all of the following are valid forms of the...
-
Page 63: Query Commands
Figure 16. What is within square brackets is not necessary to send to the instrument, but the instrument will accept it if you send it. Consider the command, which sets the mea- :UPPer surement range. To set the Mode 2002 to measure 15VDC, any of the following commands works: SENSe1:VOLTage:DC:RANGe:UPPer 15 SENSe:VOLTage:DC:RANGe:UPPer 15... -
Page 64: Command Syntax
A leading colon instructs the Model 2002 to interpret the command starting at the root (highest level) of the command tree. Since the Model 2002 also starts at the root each time you send it a new command, the leading colon is not needed (although the instrument will accept it if you send it). -
Page 65: Scpi Signal Oriented Commands
This query command is used to request the latest post-processed reading. After sending this command and addressing the Model 2002 to talk, the reading will be sent to the computer. This command does not trigger a measurement, it simply requests the last available reading. -
Page 66: Scpi Subsystem Commands
Defaults SYSTem Subsystem :SYSTem Set the 2002 to the system present defaults. :PREset Some of the selected defaults include: DCV, continu- ous triggers, normal speed (1.0 PLC), auto range and auto filter. - Page 67 IEEE-488 Bus Operation 3-13 Path to configure DCV: :VOLTage:DC Set speed: 0.01 to 10 PLC. :NPLC <n> Enable or disable auto NPLC. :AUTO <b> Path to configure measurement range: :RANGe Specify expected reading to select range. [:UPPer] <n> Enable or disable auto range. :AUTO <n>...
- Page 68 3-14 IEEE-488 Bus Operation Path to configure FREQ: :FREQuency Specify input coupling: :COUPling <name> Specify reference (rel): 0 to 15e6. :REFerence <n> Enable or disable reference (rel). :STATe <b> Use input signal as reference (rel). :ACQuire Specify measurement resolution: 4 or 5. :DIGits <n>...
-
Page 69: Data Store (Buffer)
IEEE-488 Bus Operation 3-15 Measurement units (ACV and TEMP) Subsystem :UNIT UNIT Select units for TEMP: , or :TEMPerature <name> Path to configure units for ACV: :VOLTage Select units for ACV: , or :AC <name> Path to set dB reference voltage: Specify reference (volts): 0.001 to 750. -
Page 70: Trigger Model
3-16 IEEE-488 Bus Operation Trigger model Performing a system preset (:SYSTem:PRESet) configures the trigger model for typical in- strument operation. After a system preset, many advanced operations can be accomplished using the initiate commands, :ABORt, and the trigger (measure) layer commands. All of the following commands are part of the Trigger Subsystem. -
Page 71: Status Register
3-17 Status register The status register structure of the Model 2002 lets you monitor and act upon numerous events that occur. Many programming decisions can be made by monitoring the Measurement Event Register and the Operation Event Register. See the User’s Manual for details of the status registers. -
Page 72: Program Examples
IEEE-488 Bus Operation Program examples All examples presume QuickBASIC version 4.5 or higher and a CEC IEEE-488 interface card with CEC driver version 2.11 or higher, with the Model 2002 at address 16 on the IEEE- 488 bus. Changing function and range The Model 2002 has independent controls for each of its measurement functions. - Page 73 IEEE-488 Bus Operation 3-19 'Example program to demonstrate changing function and range, 'taking readings on various functions 'For QuickBASIC 4.5 and CEC PC488 interface card 'Edit the following line to where the QuickBASIC 'libraries are on your computer '$INCLUDE: 'c:\qb45\ieeeqb.bi' 'Initialize the CEC interface as address 21 CALL initialize(21, 0) 'Reset the SENSe1 subsystem settings, along with the trigger...
- Page 74 Model TRIGger 2002 for triggers. The following program sets up the Model 2002 to take one reading each time it receives an external trigger pulse. 'Example program to demonstrate one-shot external triggering 'For QuickBASIC 4.5 and CEC PC488 interface card...
- Page 75 3-21 Continuous triggering #1 The following example program sets up the Model 2002 to take readings as fast as it can once it receives an external trigger. The actual reading rate will depend upon other factors, such as A/D integration time, autozero mode, autorange on/off, etc.
- Page 76 IEEE-488 Bus Operation Continuous triggering #2 The following example program sets up the Model 2002 to take readings continuously after an external trigger is received. The trigger rate is set to one reading every 50ms. 'Example program to demonstrate continuous triggering 'at a specified rate 'For QuickBASIC 4.5 and CEC PC488 interface card...
-
Page 77: Generating Srq On Buffer Full
When your program must wait until the Model 2002 has completed an operation, it is more efficient to program the 2002 to assert the IEEE-488 SRQ line when it is finished, rather than repeatedly serial polling the instrument. An IEEE-488 controller will typically address the in- strument to talk, then unaddress it, each time it performs a serial poll. -
Page 78: Storing Readings In Buffer
TRACe:FEED:CONTrol PRETrigger The following example program sets up the Model 2002 to take 20 readings as fast as it can into the buffer, then reads the data back after the buffer has filled. The readings will be stored... - Page 79 CALL SEND(16, "trac:poin 20;egr full", status%) CALL SEND(16, "trac:feed sens1;feed:cont next", status%) 'Start everything CALL SEND(16, "init", status%) 'Initialize reading$ while the 2002 is busy taking readings reading$ = SPACE$(4000) WaitSRQ: IF (NOT(srq%) THEN GOTO WaitSRQ CALL SPOLL(16, poll%, status%) IF (poll% AND 64)=0 THEN GOTO WaitSRQ CALL SEND(16, "form:elem read,time", status%)
-
Page 80: Taking Readings With The Scanner Card
IEEE-488 Bus Operation Taking readings with the scanner card The Model 2001-SCAN is an optional 10-channel scanner card for the Model 2002 Multim- eter. Only one channel can be closed at a time. If you close a channel while another is already closed, the first one opens with break-before-make operation. - Page 81 IEEE-488 Bus Operation 3-27 'Example program to demonstrate taking readings on different 'scanner channels 'For QuickBASIC 4.5 and CEC PC488 interface card 'Edit the following line to where the QuickBASIC 'libraries are on your computer '$INCLUDE: 'c:\qb45\ieeeqb.bi' 'Initialize the CEC interface as address 21 CALL initialize(21, 0) 'Reset controls in INIT, ARM;LAY1, ARM:LAY2, and TRIG subsystems 'and put trigger model in IDLE state, set function to DCV...
- Page 82 3-28 IEEE-488 Bus Operation The following example program sets up the Model 2002 using a scan list to measure DC volt- age on channel 1, AC voltage on channel 2, and 2-wire resistance on channel 3. The meter takes ten sets of readings, with each set spaced 15 seconds apart, and each of the three readings in each group taken as fast as possible.
- Page 83 CALL SEND(16, "rout:scan:func (@2), 'volt:ac'", status%) CALL SEND(16, "rout:scan:func (@3), 'res'", status%) CALL SEND(16, "rout:lsel int", status%) 'Start everything CALL SEND(16, "init", status%) 'Initialize reading$ while the 2002 is busy taking readings reading$ = SPACE$(2500) WaitSRQ: IF (NOT(srq%()) THEN GOTO WaitSRQ CALL SPOLL(16, poll%, status%) IF (poll% AND 64)=0 THEN GOTO WaitSRQ CALL SEND(16, "form:elem read,time,chan", status%)
-
Page 84: Specs And Accessories
Specs and Accessories... - Page 85 90-day, 1-year, and 2-year intervals. This allows the operator to utilize 90-day, 1-year, or 2-year recommended calibration intervals, depending upon the level of accuracy de- sired. As a general rule, the 2002’s 2-year performance exceeds a 6 -digit DMM’s 90-day, 180- day, or 1-year specifications.
- Page 86 DC VOLTAGE UNCERTAINTY = ± [ (ppm of reading) × (measured value) + (ppm of range) × (range used) ] / 1,000,000. % ACCURACY = (ppm accuracy) /10,000. 1PPM OF RANGE = 20 counts for ranges up to 200V and 10 counts on 1000V range at 7 digits. KEITHLEY FACTORY CALIBRATION UNCERTAINTY RANGE ppm of reading 200 mV Factory calibration uncertainty represents traceability to NIST.
- Page 87 RESISTANCE UNCERTAINTY = ± [ (ppm of reading) × (measured value) + (ppm of range) × (range used) ] / 1,000,000. % ACCURACY = (ppm accuracy) / 10,000. 1PPM OF RANGE = 20 counts for ranges up to 200M Ω and 10 counts on 1G Ω range at 7 digits. KEITHLEY FACTORY CALIBRATION UNCERTAINTY RANGE ppm of reading Ω...
-
Page 88: Frequency Counter
The DC in-circuit current measurement function allows a user to measure the current through a wire or a circuit board trace without breaking the circuit. When the In-Circuit Current Measurement function is selected, the 2002 will first perform a 4-wire resistance measurement, then a voltage mea- surement, and will display the calculated current. -
Page 89: Digital I/O
Specs and Accessories TEMPERATURE (RTD) RESO- 4-WIRE ACCURACY RANGE LUTION 24 Hours 90 Days 1 Year 2 Years –100° to +100°C 0.001°C ±0.016°C ±0.020°C ±0.021°C ±0.022°C –200° to +630°C 0.001°C ±0.061°C ±0.066°C ±0.068°C ±0.070°C –148° to +212°F 0.001°F ±0.029°F ±0.036°F ±0.038°F ±0.040°F –328°... - Page 90 Specs and Accessories GENERAL SPECIFICATIONS AND STANDARDS COMPLIANCE POWER Voltage: 90–134V and 180–250V, universal self-selecting. Frequency: 50Hz, 60Hz, or 400Hz, self-identifying at power-up. Consumption: <55VA. ENVIRONMENTAL Operating Temperature: 0°C to 50°C. Storage Temperature: –40°C to 70°C. Humidity: 80% R.H., 0°C to 35°C, per MIL-T-28800E Para 4.5.5.1.2.
-
Page 91: Accessories Available
Side-by-Side Rack Mount Kit: For mounting a Model 2001 or 2002 and Model 199. 4288-4 Side-by-Side Rack Mount Kit: For mounting a Model 2001 or 2002 and 5 -in instruments (195A, 196, 220, 224, 230, 263, 595, 614, 617, 705, 750, 775, etc.) in a standard 19-in rack. - Page 92 BNC Trigger Interconnect Cable, 1.5m (5 ft) 7051-10 BNC Trigger Interconnect Cable, 3m (10 ft) Service parts kits 2002-SPARES KIT Single Unit Spares Kit: An inexpensive kit of high mortality parts. 2002-MOD KIT Single Unit Module Kit: A set of boards including digital boards, analog board cables and fuses.
- Page 93 Index Accessories 4-8 Line fuse 1-7 Accuracy 4-2 Long form 3-8 Amps fuse 1-7 Annunciators 1-4 Main menu 2-6 Auto filter 2-16 Manuals 4-9 Math 2-20 Bench default 1-9, 2-13 Measurement ranges 1-2 Buffer 3-23, 3-24 Menus 2-6, 2-8 Buffer (Data Store) 2-18 Model 1801 Nanovolt Preamp 1-3 Burst mode 2-19 Model 2001-SCAN 1-16, 2-22, 3-26...
- Page 94 SCPI signal oriented commands 3-11 SCPI subsystem commands 3-12 SENSe1 3-7 Shielding 1-12 Short form 3-8 Software support 3-2 Specifications 4-2 Speed 2-14 SRQ 3-23 Status register 3-17 Temperature measurements 1-16 Thermocouples 1-16 Trigger 2-11 Trigger level 1-15 Trigger link 1-7, 4-8 Trigger model 2-11, 3-16 Triggering 3-20, 3-21, 3-22 Voltage measurements 1-10...
- Page 95 Specifications are subject to change without notice. All Keithley trademarks and trade names are the property of Keithley Instruments, Inc. All other trademarks and trade names are the property of their respective companies. Keithley Instruments, Inc. 28775 Aurora Road • Cleveland, Ohio 44139 • 440-248-0400 • Fax: 440-248-6168 1-888-KEITHLEY (534-8453) •...
Need help?
Do you have a question about the 2002 and is the answer not in the manual?
Questions and answers