Table of Contents
Advertisement
Quick Links
Advertisement
Table of Contents

Related Manuals for Extron electronics HDMI DA Series


Summary of Contents for Extron electronics HDMI DA Series
- Page 1 User Guide HDMI ® HDMI DA Series Distribution Amplifiers 68-1844-02 Rev. B 09 14...
-
Page 2: Safety Instructions
Safety Instructions Safety Instructions • English Инструкция по технике безопасности • Русский WARNING: This symbol, , when used on the product, is intended ПРЕДУПРЕЖДЕНИЕ: Данный символ, , если указан to alert the user of the presence of uninsulated dangerous voltage на... - Page 3 Extron Safety and Regulatory Compliance Guide on the Extron website. Copyright © 2014 Extron Electronics. All rights reserved. Trademarks All trademarks mentioned in this guide are the properties of their respective owners. ® The following registered trademarks(...
-
Page 4: Conventions Used In This Guide
Conventions Used in this Guide Notifications In this user guide, the following are used: WARNING: Potential risk of severe injury or death. AVERTISSEMENT : Risque potentiel de blessure grave ou de mort. ATTENTION: • Risk of property damage. • Risque de dommages matériels. NOTE: A note draws attention to important information. -
Page 5: Table Of Contents
..........21 Front Panel Features ......... 11 Downloading and Installing Firmware Loader ..21 Power Status LED ........11 Downloading HDMI DA Series Firmware ... 22 USB Config Port ........... 12 Loading the Firmware to the Signal Status LEDs ........12 Distribution Amplifier ........ - Page 6 HDMI DA Series • Contents...
-
Page 7: Introduction
Automatic input cable equalization — up to 50 feet at 1080p/60 with 8-bit color when used with Extron HDMI Pro Series cable. Actively conditions incoming HDMI signals to compensate for signal loss when using long cables, low quality cables, or source devices with poor signal output. HDMI DA Series • Introduction... -
Page 8: Application Diagram
Control LAPT System DISP Distribution SCRE SCRE Ampli er RS-232 TCP/IP - 2 3 ® RELA LINK INPU HDMI Cables 0 .3 0 -2 /6 0 Blu-ray Player Flat Panel Displays Figure 1. Application Diagram HDMI DA Series • Introduction... -
Page 9: Installation
(see page 17), connect a control PC rear panel captive screw connector front panel USB port to the (see page 8) or the (see page 9). Connect and power on the input device (see page 7). HDMI DA Series • Installation... -
Page 10: Rear Panel Features
, above), using the provided female IEC cable. Connect the HDMI DA2 to the provided 12 VDC, 1 A power supply as described in Connecting the Power Supply (HDMI DA2 Only) on the next page. HDMI DA Series • Installation... -
Page 11: Connecting The Power Supply (Hdmi Da2 Only)
Cette installation doit toujours être en accord avec les mesures qui s’applique au National Electrical Code ANSI/NFPA 70, article 725, et au Canadian Electrical Code, partie 1, section 16. La source d’alimentation ne devra pas être fixée de façon permanente à une structure de bâtiment ou à une structure similaire. HDMI DA Series • Installation... - Page 12 Insert the captive screw connector into the rear panel receptacle (Figure , on page 4). 3/16" Connect the power supply to a convenient 100-240 VAC (5 mm) Max. (50 or 60 Hz) power source. Ridges Smooth SECTION A–A HDMI DA Series • Installation...
-
Page 13: Connecting The Input Source
(12-bit > 10-bit > 8-bit). The signal can be forced to always truncate to 8-bit via SIS commands, disabling deep color. All outputs carry +5 VDC and up to 250 mA on pin 18, regulated by a current limiting circuit. HDMI DA Series • Installation... -
Page 14: Wiring For Rs-232 Control (Optional)
Transmit Pin 3 = Tx Transmit Receive Pin 5 = G Ground Ground Tx Rx G DB9 Pin Locations Female Computer HDMI DA2 Figure 3. Wiring the HDMI DA4 and HDMI DA6 for RS-232 Control HDMI DA Series • Installation... -
Page 15: Connecting To The Usb Port
Figure 4. Connecting a PC to the HDMI DA6 Front Panel USB Port If this is the first time a HDMI DA series device has been connected to the PC, the Found opens. Connect to Windows Update to search the web for the New Hardware Wizard driver needed for the USB port to communicate with the distribution amplifier. - Page 16 USB port. The wizard reappears if you connect the unit to a different USB port or if you connect a different piece of equipment, requiring a different driver, to the same USB port. Operation Configure the distribution amplifier as required (see on the next page). HDMI DA Series • Installation...
-
Page 17: Operation
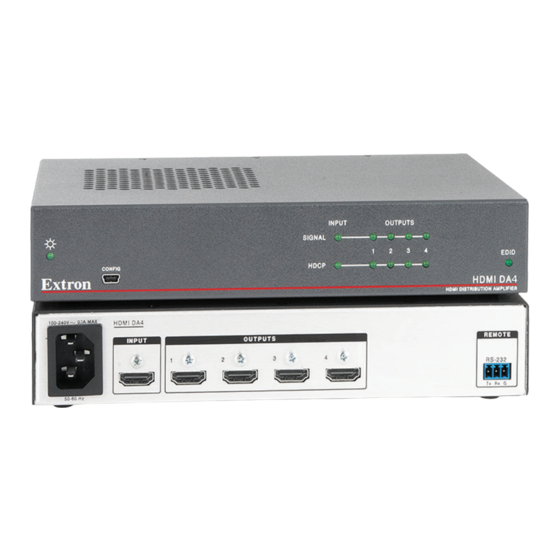
USB Config Port (see page 12) Signal LEDs (see page 12) HDCP LEDs (see page 12) EDID LED (see page 12) Power Status LED The power status LED lights green when power is applied to the unit. HDMI DA Series • Operation... -
Page 18: Usb Config Port
This only occurs when an output EDID slot has been assigned. The LED lights amber if the internal, factory-installed EDID is used or if the EDID was not successfully stored. For information about using the EDID Minder, see EDID Minder on the next page. HDMI DA Series • Operation... -
Page 19: Edid Minder
Four user-loaded slots are available to save the EDID of any connected display. EDIDs saved to these slots are retained after a power cycle. Upon a factory reset, these EDIDs revert to the factory default (720p @ 60 Hz, 2-Ch audio). HDMI DA Series • Operation... -
Page 20: Hdmi Da2, Hdmi Da4, And Hdmi Da6 Edid Lookup Table
HDMI DA Series • Operation... - Page 21 Multi-Ch: These are HDMI formatted EDID files with support for multiple audio formats, up to 8 channels. • LPCM (2-Ch) • LPCM (8-Ch) • Dolby Digital (6-Ch) • DTS (7 Ch) • Dolby Digital Plus (8-Ch) • DTS-HD (8-Ch) • Dolby TrueHD (8-Ch) HDMI DA Series • Operation...
-
Page 22: Mounting
Pay particular attention to supply connections other than direct connections to the branch circuit (such as the use of power strips). Rack Mounting Procedure See the HDMI DA Series product page at www.extron.com for a list of suitable rack mounting kits and shelf accessories. -
Page 23: Sis Commands
No response is required from the host. When the distribution amplifier is first switched on, it sends the message: (c) Copyright 20yy, Extron Electronics HDMI DA Series, V x.xx, where is the year the currently installed version of the firmware was 60‑99x‑01]... -
Page 24: Symbols Used In This Guide
— Unit name: Up to 24 alphanumeric characters (including the hyphen [-]) No spaces are allowed There is no distinction between upper and lower case letters The first character must be a letter The last character cannot be a hyphen (-) HDMI DA Series • SIS Commands... -
Page 25: Error Messages
0 (signal undetected) 1 (signal detected) Request all HDCP status X#] X# HDCP Hdcp • 0 (HDCP on) or 1 (HDCP off) HDCP status of input * output 1 • output 2 • output n HDMI DA Series • SIS Commands... - Page 26 Set unit name to factory Ipn•HDMA‑DA‑ •CN default SERIES View unit name Other Request part number HDMI DA2 60‑997‑01 HDMI DA4 60‑998‑01 60‑999‑01 HDMI DA6 Query firmware version = Firmware build (2 decimal places) Reset ZXXX HDMI DA Series • SIS Commands...
-
Page 27: Updating Firmware
Updating Firmware Updates to the HDMI DA Series firmware are released periodically on the Extron website. You can find which version is currently loaded on your distribution amplifier using SIS commands. Compare this with the latest release on the Extron website and decide whether to update your firmware. -
Page 28: Downloading Hdmi Da Series Firmware
Follow the instructions on the Installation Wizard screens to install the new firmware on your computer. A Release Notes file and a set of instructions for updating the firmware are also loaded. HDMI DA Series • Updating Firmware... -
Page 29: Loading The Firmware To The Distribution Amplifier
• Les fichiers firmware valides doivent contenir l’extension fichier S19. Un fichier avec n’importe quelle autre extension n’est pas une mise à jour de firmware pour cet appareil et l’appareil pourrait arrêter de fonctionner. HDMI DA Series • Updating Firmware... - Page 30 The upload is complete when the Remaining Time field shows 00.00.00 , the column shows , and is displayed above the progress bar and Progress 100% Completed in the field. Close the Firmware Loader dialog. Status HDMI DA Series • Updating Firmware...
-
Page 31: Extron Warranty
Extron Electronics makes no further warranties either expressed or implied with respect to the product and its quality, performance, merchantability, or fitness for any particular use. In no event will Extron Electronics be liable for direct, indirect, or consequential damages resulting from any defect in this product even if Extron Electronics has been advised of such damage.
Need help?
Do you have a question about the HDMI DA Series and is the answer not in the manual?
Questions and answers