Extron electronics HDMI DA2 User Manual
Hide thumbs
Also See for HDMI DA2:
- Setup manual (2 pages) ,
- User manual (32 pages) ,
- User manual (31 pages)
Table of Contents
Advertisement
Quick Links
Download this manual
See also:
Setup Manual
Advertisement
Table of Contents

Related Manuals for Extron electronics HDMI DA2


Summary of Contents for Extron electronics HDMI DA2
- Page 1 User Guide DVI and HDMI ® HDMI DA2 Distribution Amplifier 68-1844-01 Rev. A 05 12...
- Page 2 Safety Instructions • English Warning Power sources • This equipment should be operated only from the power source indicated on the product. This This symbol is intended to alert the user of important operating and equipment is intended to be used with a main power system with a grounded (neutral) conductor. The third maintenance (servicing) instructions in the literature provided with the (grounding) pin is a safety feature, do not attempt to bypass or disable it.
- Page 3 For more information on safety guidelines, regulatory compliances, EMI/EMF compatibility, accessibility, and related topics, see the “Extron Safety and Regulatory Compliance Guide” on the Extron website. Copyright © 2012 Extron Electronics. All rights reserved. Trademarks All trademarks mentioned in this guide are the properties of their respective owners.
-
Page 4: Conventions Used In This Guide
Conventions Used in this Guide Notifications the following are used: DANGER: Danger indicates a situation that will result in death or severe injury. WARNING: A warning indicates a situation that has the potential to result in death or severe injury. CAUTION: A caution indicates a situation that may result in minor injury. -
Page 5: Table Of Contents
Downloading and Installing Firmware Loader . 21 HDMI DA2 Front Panel Features ....... 9 Downloading HDMI DA2 Firmware ....22 Power Status LED ......... 9 Loading the Firmware to the HDMI DA2 ..23 USB Config Port ........... 9 Signal Status LEDs ........10 Mounting .......... - Page 6 HDMI DA2 • Contents...
-
Page 7: Introduction
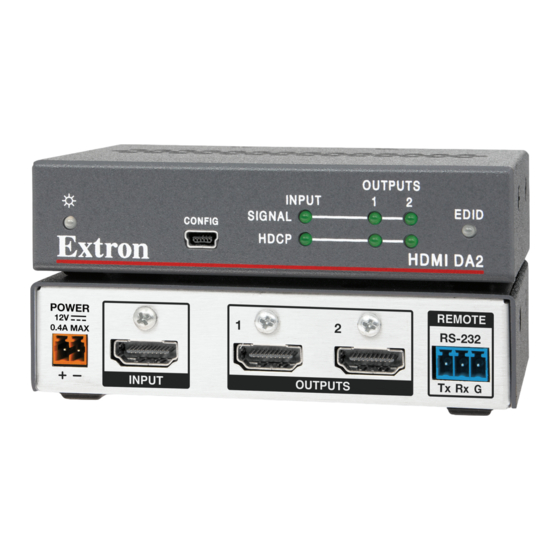
The Extron HDMI DA2 distribution amplifier distributes one HDMI input signal to two outputs simultaneously. It is fully High-bandwidth Digital Content Protection (HDCP) compliant. The HDMI DA2 supports data rates up to 6.75 Gbps (2.25 Gbps per color) with up to 12-bit deep color and uses the EDID Minder feature for EDID management. -
Page 8: Hdmi Da2 Application Diagram
Easy mounting options — The HDMI DA2 is a quarter rack wide, 1 inch high, and 3 inches deep, which allows the unit to be conveniently mounted in a rack or under furniture. -
Page 9: Installation
(see page 27). Connect the provided 12 VDC power supply to the power connector. Be sure to read all attention points, notes, and warnings in this section before powering up the HDMI DA2 (see page 4). Connect the display devices to the HDMI DA2 and power them on (see page 5). -
Page 10: Connecting The Power Supply
Connecting the Power Supply Connect the provided 12 VDC, 1 A power supply to the HDMI DA2 by following these instructions: ATTENTION: • This product is intended to be supplied by a Listed Power Unit marked “Class 2” or “LPS,” rated 12 VDC, maximum 1.0 A. Always use a power supply supplied or specified by Extron. -
Page 11: Connecting The Input Source
SIS commands (see page 17). The HDMI DA2 monitors the EDID of each connected display to ensure it is compatible with the current input signal. The following adjustments are made for each output independently: Interface format: If the connected display is DVI and the input signal is HDMI, the signal is reformatted to DVI. -
Page 12: Wiring For Rs-232 Control (Optional)
Wiring for RS-232 Control (Optional) RS-232 communication between the HDMI DA2 and a host PC can be used to update firmware or configure the distribution amplifier using SIS commands (see “Command and Response Table for SIS Commands“ on page 19). -
Page 13: Connecting To The Usb Port
Connecting a PC to the HDMI DA2 Front Panel USB Port If this is the first time an HDMI DA2 has been connected to the PC, the Found New Hardware Wizard opens. The first screen offers to connect to Windows Update to search the web for the appropriate driver needed for the USB port to communicate with the distribution amplifier. - Page 14 The wizard appears only on the first occasion you connect the HDMI DA2 to that USB port. The wizard reappears if you connect the HDMI DA2 to a different USB port or if you connect a different piece of equipment, requiring a different driver, to the same USB port.
-
Page 15: Operation
Extron recommends that the USB port is used for temporary connections. If a permanent connection is required, the RS-232 port should be used. When the USB Config Port is connected to the HDMI DA2 for the first time, the Found New Hardware Wizard opens to install the correct device driver (see "Connecting to the USB... -
Page 16: Signal Status Leds
(output 1 by default). The LED lights amber if the internal, factory-installed EDID is used or if the EDID was not successfully stored. Minder” on page 11. For information about using the EDID Minder, see “EDID HDMI DA2 • Operation... -
Page 17: Edid Minder
EDID files. This EDID is stored on an EEPROM located at the HDMI input. By default, the HDMI DA2 is configured to store EDID from the display connected to output 1 automatically. The unit reverts to this configuration after a factory reset. -
Page 18: Hdmi Da2 Memory Locations
HDMI DA2 • Operation... - Page 19 Multi-Ch: These are HDMI formatted EDID files with support for multiple audio formats, up to 8 channels. LPCM (2-Ch) LPCM (8-Ch Dolby Digital (6-Ch) DTS (7 Ch) Dolby Digital Plus (8-Ch) DTS-HD (8-Ch) Dolby TrueHD (8-Ch) HDMI DA2 • Operation...
-
Page 20: Reference Information
Serial pin configuration ....1 = Tx, 2 = Rx, 3 = GND USB control port ......(1) front panel female mini USB B USB standards ......USB 2.0, low speed Program control ......Extron Simple Instruction Set (SIS) HDMI DA2 • Reference Information... -
Page 21: Accessories And Part Numbers
IEC cord (4) Rubber feet (1) 3.5 mm, 3-pole captive screw connector, with tail (1) 3.5 mm, 3-pole captive screw connector, with tail (2) 3/16" zip tie (3) HDMI LockIt kits HDMI DA2 Setup Guide HDMI DA2 • Reference Information... -
Page 22: Optional Parts
UC 50' (50 feet / 15.2 m) 26-518-01 UC 100' (100 feet / 30.5 m) 26-518-02 9DM-9DM232 12' (12 feet / 3.6 m) 26-434-06 USB CFG Cable (6 feet / 1.8 m) 26-654-06 MBU 125 under-desk mounting kit 70-077-01 HDMI DA2 • Reference Information... -
Page 23: Sis Commands
The protocol is 9600 baud, 8 data bit, 1 stop bit, and no parity. NOTES: • The wiring in the RS-232 cables crosses over so that the HDMI DA2 transmit (Tx) wire connects with the control device receive (Rx) and vice versa. -
Page 24: Symbols Used In This Guide
1 = force 8-bit 2 = pass-through — EDID memory location (see “HDMI DA2 Memory Locations" Table on page 12) — EDID data as 256 bytes of Hex data (text representation) — Native resolution and refresh rate (translated from Hex) for example: 1600x1200 @60Hz X&... -
Page 25: Command And Response Table For Sis Commands
EDID memory location View/Read EDID in Hex Read out EDID in Hex from currently R*EDID selected EDID View EDID native resolution Resolution and refresh rate of N*EDID currently selected EDID Example: 1600x1200@60Hz HDMI DA2 • SIS Commands... - Page 26 Command ASCII Command Response Additional Description (host to unit) (unit to host) Other Request part number 60‑997‑01 X&] X& Query firmware version = Firmware build (2 decimal places) Reset ZXXX HDMI DA2 • SIS Commands...
-
Page 27: Updating Firmware
Updating Firmware Updates to the HDMI DA2 firmware are released periodically on the Extron website. You can find which version is currently loaded on your DA using SIS commands. Compare this with the latest release on the Extron website and decide whether to update your firmware. -
Page 28: Downloading Hdmi Da2 Firmware
Figure 9. Firmware Link on the Download Tab On the Download Center screen, locate the section for the HDMI DA2 firmware (Optional) click Release Notes. These notes show the issues that have been addressed by the latest update. If these issues do not affect you, you may decide not to upgrade the firmware. -
Page 29: Loading The Firmware To The Hdmi Da2
(see the previous page). If necessary, download the latest version of HDMI DA2 firmware and install it on your computer (see “Downloading the HDMI DA2 Firmware” on the previous page). Open the Firmware Loader via your desktop Start menu by making the following selections: Start >... - Page 30 HDMI DA2 to stop functioning. NOTES: • The original factory-installed firmware is permanently available on the HDMI DA2. If the attempted firmware upload fails for any reason, the unit reverts to the factory version. •...
- Page 31 Path to the New Firmware File on the Add Device Window If this is the only device to which you are uploading firmware, click Add. The HDMI DA2 information is added to the Devices section of the Firmware Loader window and the Add Device window closes.
- Page 32 Figure 13. Firmware Loader Screen with a HDMI DA2 Added If you want to remove a device from the Devices section, do the following: Click on the names of the devices to be deleted, to highlight them. Select Remove Selected Device(s) from the Edit menu.
-
Page 33: Mounting
Mounting Desktop Placement Attach the four provided rubber feet to the bottom of the HDMI DA2 and place it in any convenient location. Rack Mounting UL Guidelines for Rack Mounting The following Underwriters Laboratories (UL) guidelines are relevant to the safe installation of these products in a rack: Elevated operating ambient temperature —... -
Page 34: Extron Warranty
Extron Electronics makes no further warranties either expressed or implied with respect to the product and its quality, performance, merchantability, or fitness for any particular use. In no event will Extron Electronics be liable for direct, indirect, or consequential damages resulting from any defect in this product even if Extron Electronics has been advised of such damage.
Need help?
Do you have a question about the HDMI DA2 and is the answer not in the manual?
Questions and answers