
Related Manuals for Life Gear 97630


Summary of Contents for Life Gear 97630
- Page 1 DYNA TRACK PROGRAMMABLE MOTORIZED TREADMILL OWNER’S MANUAL MODEL# 97630 2008, April...
- Page 2 TABLE OF CONTENTS WARRANTY SAFETY INSTRUCTIONS OVERVIEW DRAWING PARTS LIST HARDWARE PACKING LIST ASSEMBLY INSTRUCTIONS FOLDINGUP& FOLDING DOWNTHE TREADMILL 9 COMPUTER OPERATION TROUBLE SHOOTING GUIDE RUNNING BELT ADJUSTMENT AND LUBRICATION WARM UP AND COOL DOWN ROUTINE ONE YEAR LIMTED WARRANTY LifeGear Inc.
- Page 3 Basic precautions should always be followed, including the following safety instructions when using this treadmill: Read all instructions before using this treadmill. DANGER: To reduce the risk of electric shock, please read the following: Always unplug the treadmill from the electrical outlet immediately after using and befor cleaning, assembling, or servicing. NOTE: Failure to follow these instructions may lead to personal injury and cause damage to the treadmill.
- Page 4 Always make sure the storage latch is in place when folding and moving the treadmill. Do not leave children who are under 12 year-old unsupervised near or on the treadmill. This appliance is not intended for use by persons (including children) with reduced physical, sensory or mental capabilities, or lack of experience and knowledge, unless they have been given supervision or instruction concerning use of the appliance by a person responsible for their safety.
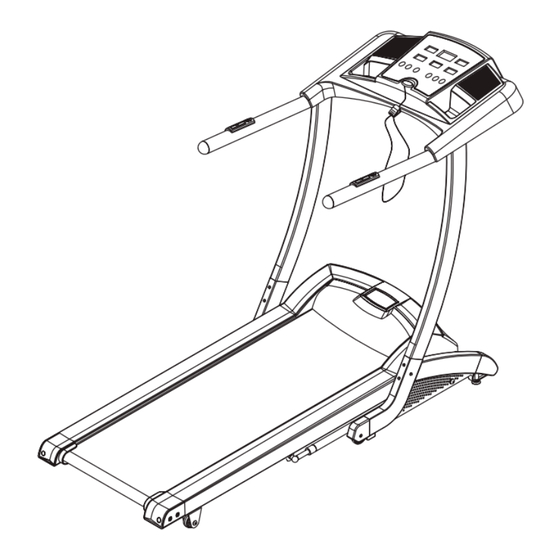
- Page 5 73 68 12 61...
- Page 6 Part # Description Quantity Part # Description Quantity Main Frame Incline Bracket Stabilizer Incline Button Wire with Hand End Cap for Stabilizer Pulse Sensor Adjustable Leveler (M8) Spacer (Ø 14xØ 10.5x5.5mm) Transportation Wheel Deck Bumper Running Belt End Cap Running Deck Side Rail Front Roller 034R...
- Page 7 Part # Description Quantity Part # Description Quantity Spacer (Ø 12xØ 8.5x12mm) Bolt (M8x35mm) Spring Washer (M8) Bolt (M10x35mm) Hex Socket Head Cap Bolt Nylon Nut (M10) (M8x48mm) Screw (M4x50mm) Nylon Nut (M6) Bolt (M8x12mm) Tapping Screw (M4x16mm) Bolt (M10x100mm) Bolt (M6x33mm) Bolt (M4x12) Bolt (M8x60mm)
- Page 8 Part # Description Quantity Computer Knob (M5)-------------------------------------------------------------------------------4 Spring Washer (M8)----------------------------------------------------------------------------------------12 Bolt (M8x16mm) ------------------------------------------------------------------------------------12 Washer (Ø 8.5xØ 16x1.5)--------------------------------------------------------------------------6 Allen Wrench/Screwdriver Allen Wrench 1 PC...
- Page 9 Step 1 Connect the Sensor Cable III (24) from the Stabilizer (2) to the Sensor Cable II (23) from the 70 52 Right Handlebar Support (37R). Then attach the Right and Left Handlebar Supports (37R, 37L) to the Stabilizer (2) with six M8x16mm Bolts (70) and M8 Spring Washers (52). Step 2 Connect the Sensor Cable II (23) from the Right Handlebar Support (37R) to the Sensor Cable I (22) from the Handlebar (38).
-
Page 10: Folding Up The Treadmill
Folding Up the Treadmill: Lift the deck up from the rear of treadmill until the Spring Knob "pops" down into the locked position. Check the Spring Knob is "pop" down into the locked position before moving the treadmill. (See diagrams A and B.) Setting Down the Treadmill: Place one hand on the rear end of deck and the other hand to pull the Spring Knob, then lower the deck down from the rear of treadmill until the Spring Knob "pops"... -
Page 11: Quick Start
Quick Start: Press Master Power Switch that is located at the front of the treadmill to ON position. Before beginning a workout session ensure that the Safety Tether Key is properly installed onto the Computer Console and the Safety Clip is securely attached to an article of your clothing. -
Page 12: Computer Functions
Button Functions: START/STOP: To start or stop training. PAUSE/ENTER: To pause the treadmill running. To confirm the clock setting. To confirm the setting for user’s gender, age, height, and weight in body fat program mode. MODE: To select each function (time, distance, or calories) for target presetting. To select the body fat program mode. PROGRAM: To select training program from P1, P2, P3, P4, P5, to Manual. - Page 13 SPEED: Display the current running speed from the minimum 0.8km/h to the maximum 16km/h. You may also press FAST or SLOW button on the computer console or handlebar to speed up or down your running speed during exercise. DISTANCE: Displays the accumulative distance traveled during workout. Press START/STOP button, the running belt starts moving with the speed at 0.8km/h.
- Page 14 PULSE: The computer will display your current heart rate figures in 4-5 seconds after you hold both two hands on handlebar grip sensors during exercise. To ensure the pulse readout is more precise, please always hold on to the handlebar grip sensors with two hands instead of just with one hand only when you try to test your heart rate figures.
-
Page 15: Troubleshooting Guide
WARNING: To prevent electrical shock, please turn off and unplugged the treadmill before cleaning or routine maintenance. CLEANING The treadmill can be cleaned with a soft cloth and mild detergent. Do not use abrasives or solvents. Be careful not get excessive moisture on the display panel as this might cause an electrical hazard or electronics to fail. -
Page 16: Running Belt Adjustment
Running Belt Adjustment: The running belt is adjusted at the factory; it may come loose during transportation and from use. After prolong use of running, the belt will stretch out. If the running belt is shifting to the left, turn on the main power switch of treadmill and let the running belt run at the speed of 2~3 km/h. - Page 17 A good exercise program consists of a warm-up, aerobic exercise, and a cool down. Do the entire program at least two to three times a week, resting for a day between workouts. After several months you can increase your workouts to four or five times per week.
- Page 18 SIDE STRETCHES Open your arms to the side and lift them until they are over your head. Reach your right arm as far toward the ceiling as you can for one count. Repeat this action with your left arm. QUADRICEPS STRETCH With one hand against a wall for balance, reach behind you and pull your right foot up.
- Page 19 TOE TOUCHES Slowly bend forward from your waist, letting your back and shoulders relax as you stretch toward your toes. Reach as far as you can and hold for 15 counts. HAMSTRING STRETCHES Extend your right leg. Rest the sole of your left foot against your right inner thigh.
- Page 20 http://www.lifegear.com.tw e-mail:lifegear@lifegear.com.tw...
Need help?
Do you have a question about the 97630 and is the answer not in the manual?
Questions and answers
97628M اريد كاتالوج لهذا المنتج