Aastra S850i Administrator's Manual
Wireless conference phone system
Hide thumbs
Also See for S850i:
- User manual (22 pages) ,
- Installation and quick start manual (14 pages)
Table of Contents
Advertisement
Quick Links
Download this manual
See also:
User Manual
Advertisement
Table of Contents

Related Manuals for Aastra S850i


Summary of Contents for Aastra S850i
- Page 1 Aastra S850i Wireless Conference Phone System Administrator Guide 41-001516-00 REV00 – 06.2013...
-
Page 2: Software License Agreement
Software in object form solely with the Equipment for which the Software was intended. This Product may integrate programs, licensed to Aastra by third party Suppliers, for distri- bution under the terms of this agreement. These programs are confidential and proprietary, and are protected as such by copyright law as unpublished works and by international treaties to the fullest extent under the applicable law of the jurisdiction of the Customer. -
Page 3: Table Of Contents
....................12 Installing S850i Components . - Page 4 ..................64 Connecting to the S850i Web Interface .
- Page 5 Content Battery Exchange ................... . 84 Microphones .
-
Page 6: Introduction
PC, mobile device, and video conferencing system. The S850i Wireless Conference Phone System allows enhanced freedom for VoIP calls and video conferences by allowing independent locations of the Microphones and the Speaker used during the call. -
Page 7: Safety Warnings
Only use the power adapter provided to connect the Charger Tray to the power outlet. Warning! Do not open or try to modify any of the batteries delivered with the S850i Wireless Conference Phone System components. Replace batteries only with Aastra approved batteries. -
Page 8: General Information
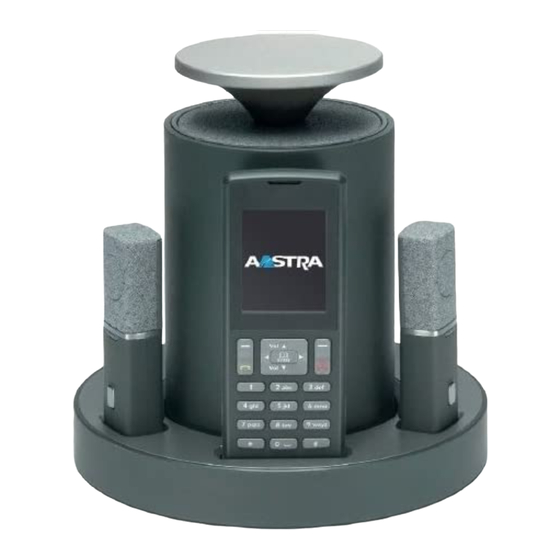
General Information The S850i Wireless Conference Phone System includes several components which, in the sum, make up the conferencing phone. The components are the Charger Tray, Speaker, Microphones and Handset/Dialer. In addition, the Wireless Base Unit receives the wireless signals from those components and connects to your VoIP net- work for conference calls with your video conferencing unit to provide outstanding audio for your video calls, or to your Bluetooth-enabled device such as a cell phone or computer. -
Page 9: Quick Setup For Voip Conference Calls
Quick Setup for VoIP Conference Calls While all components delivered with the S850i Wireless Conference Phone System are partially charged, we recommend charging the Speaker, the Microphones, and the Handset/Dialer for at least eight hours or overnight before starting to use the system. -
Page 10: Phone Configuration
Depending on your switch, different settings will be required for your S850i to work in your environment. First of all, the S850i will require an IP address. The IP address can either be obtained from a DHCP server in your network, or be stati- cally set on the phone. -
Page 11: Making A Call
Restart the phone once you are finished with your changes. Once the S850i is registered with the SIP Call Server, it will display the ID in the screen and is ready to make and receive phone calls. -
Page 12: Description
Description The S850i Wireless Conference Phone System is a unique marriage of innovative technology and ergonomic design, allowing for an unparalleled experience when making telephone calls, video conference calls, or using it with your Blue- tooth enabled cell phone or computer to make conference calls. -
Page 13: Installing S850I Components
The Wireless Base Unit is designed to optimize audio and video conferencing by providing consistent audio input from all participants. The S850i VoIP Wireless Base Unit is shown in rear panel view below. It is equipped with an Ethernet/power connection, two mini-USB ports for firmware updates, and analog audio input/output connections for video conferencing collabora- tion or for recording. -
Page 14: S850I Charger Tray
The S850i Charger Tray is not required while in a conference call, however it can maintain the charge of the S850i Speaker and S850i Handset/Dialer while a call is in progress. The Charger Tray is equipped with a DC power connection and a mini-USB connection for firmware updates to the Handset/Dialer. -
Page 15: S850I Handset/Dialer
The S850i Speaker, shown below, is a wireless active omnidirectional Speaker that has been designed and optimized spe- cifically for use with the S850i System. The Speaker is equipped with a pairing button on the bottom and 4 LED indicators on the top to display the activity of the Speaker and the mute status of the system. -
Page 16: S850I Microphones
Wireless Base Unit. Two omnidirectional Microphones are included with the S850i. An optional lapel wearable Microphone may be pur- chased separately. Any combination of two S850i Microphones can be used with a S850i System as they are mix and match. -
Page 17: Initial Setup
S850i System and need to be purchased separately. Before using the S850i to make a call, you will need to select the system language to be used for the screens. The six options are English, Español (Spanish), Français (French), Deutsch (German), Italiano (Italian), and Português (Portuguese). -
Page 18: Voip Configuration
VoIP Configuration For the S850i to work within a VoIP environment the phone has to be set up to communicate to the SIP Call Server. You will also have to enable the extension (user) you want to use with the S850i on your SIP Call Server. Please review your SIP Call Server documentation on information on how to do that. -
Page 19: Managing A Call
Handset Mode allows a telephone call to take place through the Handset/Dialer speaker and microphone located in the S850i Handset/Dialer. This allows a single user to make and receive a private call. It also provides the ability for the S850i System to act as a personal desk phone. -
Page 20: S850I Home Screen
Video Conference Call The S850i System can be connected to a video or PC conferencing system via the Analog I/O ports located on the S850i Wireless Base Unit with additional cables. This allows the Microphones and Speaker to be used as the audio interface for the video conference call. - Page 21 Managing A Call In addition, the first line will show if a Bluetooth link is currently active with a blue symbol. If the Handset/Dialer failed to connect to the Wireless Base Unit, a red, crossed out Bluetooth symbol is shown. In the top text line of the screen the ID or the user name with which this telephone registered to the SIP Call Server is shown.
-
Page 22: Placing A Voip Call
If any Microphones are out of the Charger Tray and active, the call will default to “Speaker Mode” and will be identified by the ring tone being played out of the Speaker. If no Microphones are outside the Charger Tray the call will default to “Handset Mode” and the call will take place on the S850i Handset/Dialer. -
Page 23: Answering An Incoming Call
Managing A Call Answering an Incoming Call When the S850i System identifies an incoming call, it will play the ring tone through the S850i Speaker. If the Handset/Dialer is not in the Charger Tray it will play a ring tone, too. -
Page 24: Declining An Incoming Voip Call
Managing A Call Declining an Incoming VoIP Call When the S850i System identifies an incoming call, it will play the ring tone through the S850i Speaker. The S850i Handset/Dialer will display the caller ID information for the incoming call. A call can be ignored in one of two ways: •... -
Page 25: Calling A Directory Contact
"Call" key. Active Call Management The S850i System has many call features that can be used when receiving or making phone calls. These features can be controlled via the S850i Handset/Dialer during the call. Caller ID If the incoming caller is in the Contact List, Caller ID will display both name and number of the incoming contact. - Page 26 Master Mute can only be deactivated via the S850i Handset/Dialer. Once deactivated, the Microphones will return to their previous mute state. If "All Mic Mute" is ON, the Mute/UnMute button on the S850i Handset/Dialer and the mute buttons on the S850i Microphones work together. Pressing either of these buttons will mute/unmute all Microphones out of the Charger Tray, or in the Charger Tray if no Microphone is outside.
- Page 27 Managing A Call Active Call Menu During a call, pressing the "Enter" key will open the "Active Call Menu". This menu allows you to place a caller on hold or start a conference call based on a dialed number, a contact, or a recent call.
- Page 28 Managing A Call Conference Call There are two ways to start a conference call: Press the "Enter" key to access the Active Call Menu and select "Conference". Create the second call by selecting Dialer, Contacts, or Recent. Initiate the second call. After the second call has been established, merge the two calls by pressing the left arrow key, which switches the Handset/Dialer screen back to Active Call (1), and then press the "Join"...
- Page 29 Managing A Call Call Waiting While a call is active and the S850i System receives a second call, the Speaker or Handset/Dialer will play the call waiting indication tone. If available, the S850i Handset/Dialer displays the incoming caller number and name.
-
Page 30: Component Behavior In And Out Of The Charger Tray
Managing A Call Component Behavior In and Out of the Charger Tray Each system component will respond differently when placed in or out of the Charger Tray during an active telephone call. The following is a description of what can be expected. Handset/Dialer When the Handset/Dialer is placed into the Charger Tray during a call in "Speaker Mode", the call will not be affected and the Handset/Dialer will enter its charging mode. -
Page 31: Bluetooth
Bluetooth The S850i System is equipped with a Bluetooth interface allowing a call to be placed through a cell phone, computer, or third-party Bluetooth device. The S850i Microphones and Speaker then act as the Microphone and Speaker for that call. -
Page 32: Managing The Device Registry
S850i for Bluetooth calls. S850i can hold information for up to four Bluetooth connections. Device List To see the list of Bluetooth devices the S850i has been connected to, go to Menu > Bluetooth and select "Device List". 41-001516-00 REV00 – 06.2013... - Page 33 The discovery mode screen will read “System in Discoverable Mode, Start Scan From BT Device. System Name: <System Name>”. Scan for devices from the Bluetooth device you want to connect to the S850i System. When the S850i System’s name shows up on the Bluetooth device, select the S850i System, and connect to it. 41-001516-00 REV00 – 06.2013...
- Page 34 Bluetooth If prompted for confirmation, select "Yes". If prompted for pin, type "0000" (default). Press the "Stop" key in order to abort the pairing processes. Viewing Device Details Go to Menu > Bluetooth. Select "Device List". Select desired device and press the "Enter" key or the "Select" key to view device details. Device Information screen is shown with device name, address, BT version, and date/time the device was first connected.
- Page 35 Select "Unpair" in the Device Options menu, and press "Select". Accepting Device Connection Request If the trust setting for a previously paired Bluetooth device is set to "Ask" and that device comes into range with the S850i System, a message will appear on the S850i Handset/Dialer.
-
Page 36: Making A Call Via Bluetooth
If you answer the call using your Bluetooth device, settings on that device will determine whether the call will be answered as a Speaker Call using the S850i Conference Phone, or as a call using other audio devices. If you want to have a private call not using the S850i as the Speaker of the call, ensure that you select the correct audio output device in your Bluetooth-enabled device. -
Page 37: Video Conference Collaboration
In the Advanced Audio setting (see "Advanced Audio" on page 55), change the Aux Audio setting for Aux Out to MIC. Then connect one of the AUX OUT on the S850i Wireless Base Unit via an appropriate mono balanced or unbalanced cable with 3.5mm plugs to the "Mic Input"... -
Page 38: Mixing The Audio Signals
Video Conference Collaboration Mixing the Audio Signals As discussed earlier, Audio and Video, or Bluetooth and video calls can be made simultaneously from a S850i System, requiring S850i to mix the audio of the different inputs to go to the different outputs. -
Page 39: S850I System Configuration
S850i System Configuration There are many features to the S850i System that can be modified and configured using the S850i Handset/Dialer. The fol- lowing is a list of those features and their options. Menu Hierarchy Audio Device System Recent Bluetooth... -
Page 40: Menu Navigation
S850i System Configuration Menu Navigation Enter the menu by pressing the "Menu" softkey in the home screen. The Left, Right, Up and Down navigation keys are used to highlight an icon and the Enter key is used to make a selection. -
Page 41: Recent Calls
S850i System Configuration Recent Calls The Recent Calls call log stores the contact information from calls placed or received, allowing the user to review recent calls, redial a recent call, or store a recent call in the system directory. Recent Call Log Access the recent call log by browsing: Menu >... - Page 42 S850i System Configuration Call Recent Caller Access the recent call log by browsing: Menu > Recent Calls or pressing the green "Call" button while no call is in progress. You can call an entry in the recent caller list in one of three ways: •...
- Page 43 S850i System Configuration Save Recent Caller as Contact Access the recent call log by browsing: Menu > Recent Calls or pressing the green "Call" button while no call is in progress. In the recent call list, select the entry you want to add to the contacts, and press "View". This displays more information for the recent call you selected.
- Page 44 S850i System Configuration Delete Call History Access the recent call log by browsing: Menu > Recent Calls or pressing the green "Call" button while no call is in progress. In the Recent Call menu, press "Enter" to open the Options Menu.
-
Page 45: Contacts
S850i System Configuration Contacts The S850i Handset/Dialer can store 100 entries in a contact directory (phone book). The following is a list of features and menus that allow managing the contact directory. View Contact List The contact list can be viewed in one of two ways: •... - Page 46 S850i System Configuration Edit a Contact Browse to the Contacts menu: Menu > Contacts, scroll to the desired contact, and select "View" to access the contact. The contact screen shows the current name and number. Pressing the "Edit" key will open the Edit Contact menu.
- Page 47 S850i System Configuration Search for Contact Browse to the Contacts menu: Menu > Contacts. Use the alphanumeric keys to apply a filter: • Once a key is pressed the title line will read "Contact()" and display the characters being typed.
- Page 48 To call a speed dial number, from the dial menu or from the home screen, press and hold the number key of the speed dial contact you want to call until the screen changes, showing that S850i is dialing the number.
-
Page 49: Audio Control
S850i System Configuration Audio Control The following is a list of S850i Handset/Dialer menus that adjust the system attributes related to Speaker audio, Analog audio inputs/outputs, telephony audio configurations, and muting Microphones. Speaker Volume Browse to the Speaker Volume menu: Menu > Audio Controls > Speaker Volume. - Page 50 S850i System Configuration Ringer Browse to the Ringer menu: Menu > Audio Controls > Ringer. Choose "Ringer Volume" in the Ringer Settings menu to adjust the Ringer Volume. Press the up and down buttons to increase and decrease the volume.
-
Page 51: Device Status
S850i System Configuration Mute/UnMute During a phone call or Bluetooth call one of the softkeys allows to master-Mute or UnMute all Microphones. In an environ- ment where only the AUX OUT/AUX IN connections are used for audio this option does not exist on the home screen. -
Page 52: System Information
S850i System Configuration System Information The following is a list of S850i Handset/Dialer menus that allow the user to retrieve system information. System Info Browse to System Info: Menu > System Info. About System shows the IP Address, firmware (FW) bundle version, the System Name, phone type information, and the extension number (logon) to the telephone switch. - Page 53 S850i System Configuration Display Browse to the Display menu: Menu > Setup > Display. The Display menu offers five options: Contrast, Brightness, Backlight time, whether the backlight is on or off while the Handset/Dialer is in the Charger Tray, and to switch Network Alerts “Registration Failed” on or off.
- Page 54 "Cancel" will discard any changes you entered. To change the use of the network time, select the “Netwrk Time ON/OFF” option. You change the setting by pressing the “Select” key. If you select “Netwrk Time ON” the S850i will attempt to derive the date and time from the IP network.
- Page 55 To forward incoming calls when the call is not answered on the S850i System in a specific time, switch "No Answer" to "ON", and enter the number to which to forward the calls.
- Page 56 S850i System Configuration Mic Audio The "Mic Audio" allows controlling the Microphones. If "All Mic Mute" is ON, all active Microphones are affected when a mute button is pressed. If one or more active Microphones are outside the Charger Tray, pressing the mute button will change the mute status on all Microphones outside of the Charger Tray.
- Page 57 "Aux Audio" is to control the AUX In and AUX Out connectors on the Wireless Base Unit. Aux In ON/OFF and Aux Out ON/OFF allow enabling/disabling the Aux connectors of the S850i. Aux In Level allows changing the level of the Aux In signal.
- Page 58 S850i System Configuration RF Power The RF Power level setting allows changing the signal strength of the Wireless Base unit and Microphones. Factory default is HIGH. Low or medium can be selected to reduce the signal strength. Lower signal strength reduces the maxi- mum distance between Wireless Base Unit and any of the wireless devices.
- Page 59 S850i System Configuration Setting System Name Go to Menu > Setup > Advanced Setup > Admin Settings > Set System Name. Change the current System Name to the new name, and press Enter. Reset Defaults Go to Menu > Setup > Advanced Setup > Admin Settings > Reset Defaults.
- Page 60 Web Access ON/OFF Web Access OFF allows you to disable the Web Interface into the S850i. If Web Access is set to off, any attempt to open the Web Interface will be declined. Please be aware that if the Web Interface is switched off, it can only be restarted from the phone.
- Page 61 Press and hold the button on the bottom of the Speaker until the LED turns solid red. The Speaker is now in pairing mode. After a short time an overlay will appear on the S850i Handset/Dialer saying "Pairing Successful", after which the screen should read "SPK 1 Linked".
- Page 62 "Display Name" is the string that is shown at the far side when you make outbound calls. If you do not provide a Display Name, the Username will be used. Please note that your SIP Call Server might override the Display name sent by the S850i and replace it with names configured in the SIP Call Server.
- Page 63 Region setting, you need to pair all of them again to your system. Note: We recommend changing the Region setting only after previous consultation with Aastra support. 41-001516-00 REV00 – 06.2013...
-
Page 64: Web Interface
Connecting to the S850i Web Interface To use the Web Interface, open a web browser and navigate to the IP address of the S850i. If you do not know the IP address of your S850i System, on the Handset/Dialer open the menu, System Info, About System. The IP address is listed here. -
Page 65: Home Page
The Home page shows general information about the system as shown below. The Product field is a brief description of the S850i to which you are connected. The System IP Address shows the IP address of the device, whether it was configured by DHCP or with a static IP address. The Physical Address is the MAC address of the phone. - Page 66 Audio The Audio page can be used to configure audio settings and audio mixer settings of your S850i. These settings are also available on the Handset. The figure below shows the Audio page, followed by a description of each setting. After chang- ing any of the settings, click Save to save the settings.
- Page 67 Web Interface Call Forwarding The Call Forwarding settings are used to forward incoming calls to another phone. There are three conditions that can be set to determine when to forward calls, as shown in the figure below. Call Forwarding Always Forward The Always Forward option will forward all incoming calls to the specified number.
- Page 68 Logging Out of the Web Session When you login to the S850i Web Interface, the web session will remain active for fifteen minutes. Once the session times out, the user will need to login again. This is a security measure to protect against unwanted access if the web client is left unattended.
-
Page 69: Administrator Settings
Web Interface Administrator Settings In the upper right corner click the Administrator link to access the Administrator settings. The Administrator Menu will appear on the left side of the page showing these options: • Network • SIP Registration • SIP Configuration •... - Page 70 Web Interface The illustration shows the Network Settings page. Note that after changing any settings, the changes must be saved and the phone must be restarted for the changes to take effect. Network Settings Connection Type Select the network connection type, either DHCP or Static IP. If you choose Static IP, specify the Static IP Address, Subnet Mask, and Default Gateway in the fields below.
- Page 71 The minimum number of information required to register your phone is the Registrar, the Username and Pass- word. If ID and Display Name are not set, S850i will use the user name for both of these parameters. Some SIP Call Servers require an ID different from the user name to be set.
- Page 72 Web Interface The table below describes the SIP Registration settings. Different SIP Call Server providers might use different names in their setup. The descriptions below will help you in mapping the S850i fields to your SIP Call Server fields. SIP Registration Registrar This is the IP address or DNS name of the SIP registrar server.
- Page 73 NAT S850i will keep track of the public IP address from the response of the REGISTER request. If it detects that the address has changed, it will unregister the current Contact, update the Contact with the transport address obtained from the Via header, and register a new Contact to the SIP registrar.
- Page 74 Web Interface SIP Settings Allow strict routing By default, proxies specified on the SIP Registration page will be configured as loose-routing proxies. The loose-routing designation (“;lr”) will be automatically appended to each proxy address when the proxy is added to the SIP Route header.
- Page 75 Web Interface Transport Use the Web Interface’s Transport page to manage transport and Network Address Translation (NAT) settings, and to ena- ble or disable Quality of Service (QoS). The illustration below shows the Transport page. After changing any of these set- tings, the phone must be restarted for the changes to take effect.
- Page 76 When using ICE, select the preferred ICE Nomination Method. To validate candidate pairs (IP addresses and ports for the local and remote nodes), S850i sends STUN binding requests as part of the media connectivity tests. When a candidate is nominated for use, a STUN binding request is sent with a flag indicating that the candidate pair is nominated. There are two nomination methods that can be used: •...
- Page 77 Disabling VAD is sometimes useful to work around NAT problems. This option is unchecked by default. Jitter buffer maximum delay Specify the jitter buffer maximum delay in milliseconds. Leave the field empty or specify -1 to use the default. The S850i default is 500 ms. 41-001516-00 REV00 – 06.2013...
- Page 78 An empty field indicates no maximum. Enable message waiting indi- Select this option to display the message waiting indicator (MWI) on the S850i Handset/Dialer and to enable message cation waiting notifications from the SIP Call Server. The SIP Call Server must be configures to support voice mail for the reg- istered user in order for this feature to work properly.
- Page 79 The “Start Unmute” option specifies that Microphones will be unmuted when taken out of the Charger. The default value is On. Aux In, Aux Out The “Aux In” and “Aux Out” settings are used to enable and disable Aux audio connections on the S850i Wireless Base Unit. Aux In Level, The “Aux In”...
- Page 80 Use the Web Access Enabled option to enable or disable the S850i Web Interface. If access is enabled, users can browse to the S850i using a web browser. Even if enabled, the Web Interface is password protected for all pages. It is restricted to Administrator use.
- Page 81 Your web browser should indicate the download progress. When the download is complete, you will be prompted to save the compressed configuration file. The file name will include the IP address of the S850i and a date and time stamp, for example, log-10.134.123.101-120131-210112.tar.gz.
- Page 82 However, the addi- tional logging can degrade performance. Note: Use this setting only when instructed by Aastra support staff, and uncheck this option after you have retrieved the sys- tem log package. Call Status The Call Status page displays summary call statistics while in an active call.
-
Page 83: Power On/Off The System Components
Power On/Off the System Components During normal use and operation of the S850i Wireless Conference Phon System, there is no need to turn off any part of the system. However, if the system is going to be stored without the Charger Tray powered on, then each component should be powered off until further use. -
Page 84: Battery Exchange
Battery Exchange The rechargeable batteries in the different S850i components can all be exchanged. Please note that only Aastra approved batteries should be used for the replacement. The following sections explain how to change the batteries in the different components. -
Page 85: Handset/Dialer
Handset/Dialer. Speaker To change the rechargeable battery in the S850i Speaker you will need to use a screwdriver to loosen the screw on the bot- tom of the Speaker. -
Page 86: Connecting Using Aux In/Aux Out
Contact your reseller to purchase the appropriate Aastra audio cables for connectivity with BluStar for Conference Room. Line OUT on the BluStar for Conference Room box connects to the AUX IN on the S850i Wireless Base Unit. Line IN on the BluStar for Conference Room box connects to the AUX OUT1 on the S850i Wireless Base Unit. -
Page 87: Troubleshooting
Speaker/Microphone Low Battery If a S850i Microphone or S850i Speaker begins to experience a low battery, the LED indicator will begin to flash a green - yellow (unmuted) or red - yellow (muted) sequence. It will also start to emit an audio signal. When this LED and sound sequence begins, the battery has roughly 5% battery power remaining and should be returned to the Charger Tray. -
Page 88: Microphone, Speaker, Or Handset/Dialer Not Connecting To Wireless Base Unit
The fault message in the Wireless Base Unit will continue (every fifth double flash is skipped) – this just shows that a fault has happened in the past and can be ignored. If the components still do not connect to the Wireless Base Unit please contact Aastra Support. -
Page 89: Led Indicators
Troubleshooting LED Indicators Microphone in Charger Tray Device LED Indicator Status Steady red Charging Steady green Fully charged Single red flash Active phone call, both Microphones in Charger Tray, Microphones muted via Master Mute or All Mic Mute is ON Double red flash Active phone call, Microphone(s) in Charger Tray, Microphone is muted Green flash... - Page 90 Troubleshooting Device LED Indicator Status Red flash every second • Connected, battery fully charged, phone call in progress, Master Mute or “All Mic Mute” is ON, all Microphones are muted • Connected, battery fully charged, no phone call in progress, Microphones outside of Charger Tray, “All Mic Mute” is ON, all Microphones are muted Flashing yellow* –...
-
Page 91: Reset To Factory Defaults
Updating non-volatile memory as part of software update No power Reset to Factory Defaults See "Reset Defaults" on page 59 for a description on how to reset the S850i Wireless Conference Phone System back to its factory defaults. 41-001516-00 REV00 – 06.2013... -
Page 92: Technical Specification
Technical Specification Item Specification Details Wireless Technology DECT DECT 6.0 for US, ETSI ETS 300 175 for other countries Bluetooth BT 2.1 + EDR Wireless Range DECT 65 feet, 20 meters Bluetooth Class II, 33 feet, 10 meters Security (DECT/Bluetooth) DECT: 128-bit encryption Noise Cancelation Noise cancellation on the Microphone... - Page 93 Technical Specification Item Specification Details Indicators (LED) 1 indicating system status Charger Tray Power 15V 1A Dimensions 170mm x 22mm diameter Weight 252g Handset/Dialer Dimensions 125 x 48 x 11mm Weight 67.5g Microphone and Speaker band- 300 – 3300Hz width Battery life 8 hours Charge time...
-
Page 94: Gpl Licensed Software
GPL Licensed Software The following GPL licensed software is used in this product and is subject to the GNU General Public License version 2 (GPLv2) License Agreements included as part of this documentation: • uClinux 2.6.26 • BusyBox 1.2.2 Source code for this software can be obtained by contacting Revolabs at support@revolabs.com. GNU General Public License Version 2, June 1991 Copyright (C) 1989, 1991 Free Software Foundation, Inc. - Page 95 GPL Licensed Software Terms and Conditions for Copying, Distribution and Modification 0. This License applies to any program or other work which contains a notice placed by the copyright holder saying it may be distributed under the terms of this General Public License. The "Program", below, refers to any such program or work, and a "work based on the Program"...
- Page 96 GPL Licensed Software c) Accompany it with the information you received as to the offer to distribute corresponding source code. (This alter- native is allowed only for noncommercial distribution and only if you received the program in object code or exe- cutable form with such an offer, in accord with Subsection b above).
- Page 97 GPL Licensed Software 10. If you wish to incorporate parts of the Program into other free programs whose distribution conditions are different, write to the author to ask for permission. For software which is copyrighted by the Free Software Foundation, write to the Free Software Foundation;...
-
Page 98: Limited Warranty
(1) year period from the date of original purchase (“Warranty Period”). If there is a defect or malfunction, Aastra shall, at its option, and as the exclusive remedy, either repair or replace the product at no charge, if returned within the Warranty Period. -
Page 99: Limited Warranty (Australia Only)
Part 5-4 of Schedule 2 to the Competition and Consumer Act 2010 (the ACL), the exercise of a right conferred by such a provision or any liability of Aastra in relation to a failure to com- ply with a guarantee that applies under Division 1 of Part 3-2 of the ACL to a supply of goods or services. -
Page 100: Warranty Repair Services
Aastra in relation to a failure to comply with a guarantee that applies under Division 1 of Part 3-2 of the ACL to a supply of goods or services. - Page 101 Disclaimer Aastra Telecom Inc. will not accept liability for any damages and/or long distance charges, which result from unauthorized and/or unlawful use. While every effort has been made to ensure accuracy, Aastra Telecom Inc. will not be liable for technical or editorial errors or omissions contained within this documentation.
Need help?
Do you have a question about the S850i and is the answer not in the manual?
Questions and answers