Table of Contents
Advertisement
Quick Links
Advertisement
Table of Contents
Troubleshooting

Related Manuals for LifeSize Passport


Summary of Contents for LifeSize Passport
- Page 1 ® LifeSize Passport User Guide...
-
Page 2: Copyright Notice
© 2009 LifeSize Communications Inc, and its licensors. All rights reserved. LifeSize Communications has made every effort to ensure that the information contained in this document is accurate and reliable, but assumes no responsibility for errors or omissions. Information in this document is subject to change without notice. Companies, names, and data used in examples herein are fictitious unless noted. -
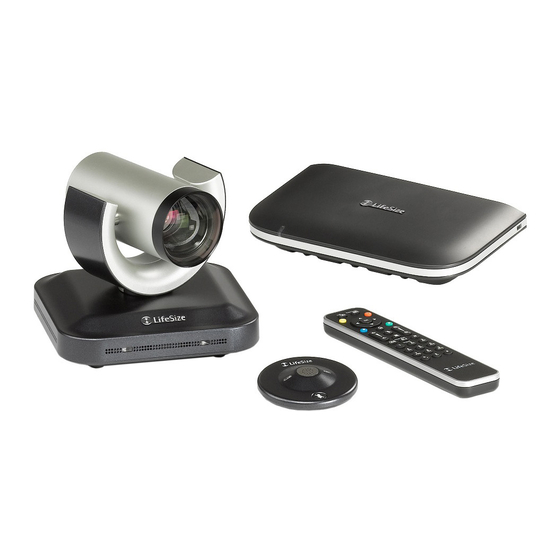
Page 3: System Components
Using LifeSize Passport This guide explains how to use LifeSize Passport to place and manage calls. It also describes configuration options available to users, and advanced configuration options available only to system administrators. Related documentation is available from the documentation CD included with the product and from the Support page of www.lifesize.com. - Page 4 LifeSize Camera Codec The LifeSize Passport codec compresses outgoing video and audio, transmits this information to the far end of a call, and decompresses incoming information. You should not need to interact with the codec once it has been properly installed in your environment.
- Page 5 Remote Control The LifeSize remote control provides wireless control of all LifeSize Passport functions and enables you to navigate the user interface, place and receive calls, and control cameras connected to the system. The remote control is shown in the following illustration:...
-
Page 6: Navigating The User Interface
Administrators can set LifeSize Passport to telepresence mode in which a conference administrator controls calls from a control panel. If telepresence is enabled on your LifeSize Passport, only an administrator can access the user interface when the system is idle. During a call, you can perform only the following tasks in the user interface: •... - Page 7 Warning: Temperatures that require the codec to reboot can permanently damage codec components. Ensure the room that houses the codec is properly ventilated and temperature controlled. Skype log in Indicates the Skype log in failed (red indicator). status LifeSize Passport User Guide...
-
Page 8: Logging In To Skype
Logging in to Skype To place or accept Skype calls with LifeSize Passport, you must first log in to Skype from your LifeSize Passport system. 1. From the main screen, press the button on the remote control. -
Page 9: The System Menu
Administrator Preferences is password protected and contains preferences for administrators only. Refer to “Accessing Administrative Features” on page 31. • Activate the system Do Not Disturb feature. For more information, refer to “Answering or Rejecting a Call” on page 15. LifeSize Passport User Guide... - Page 10 “Using LifeSize Camera Presets During a Call” on page 22. You can save nine presets. When presets are available for use, icons for the numeric keys (0 through 9) followed by the word Presets appear in the navigation bar. LifeSize Passport User Guide...
-
Page 11: Placing A Call
LifeSize systems in the network using system IP addresses. If you enter # as the first character when placing a call, the system attempts to dial the call first as an ISDN number only if LifeSize Networker is configured for use with LifeSize Passport. LifeSize Passport User Guide... - Page 12 Skype:+ before the country code and number you want to call. For more information refer to “Manually Dialing a Voice Number” on page 14. Note: Calling your own LifeSize Passport system is not supported or recommended and results in a busy signal. Placing a Call from the REDIAL List The REDIAL list on the main screen stores up to 15 recently dialed numbers.
-
Page 13: Placing A Call From The Directory
“Managing the Directory” on page 26. Manually Dialing a Number from the Main Screen Use the Video Call and Voice Call selections on the main screen to dial a video or voice number manually, including Skype calls, using the remote control. LifeSize Passport User Guide... - Page 14 (indicated at the bottom of the screen). button behaves as backspace. button displays the keyboard from which you can enter alphanumeric characters. Use the arrow keys to navigate to the character you wish to enter and press OK. LifeSize Passport User Guide...
-
Page 15: Answering Or Rejecting A Call
2. Use the down arrow key to select Do Not Disturb. 3. Click OK. A dialog box appears indicating that the system Do Not Disturb feature is enabled. Press OK to return the system to normal operation. LifeSize Passport User Guide... -
Page 16: Managing A Call
Note: The icon appears in the Call Status, Call Manager list, and Call Statistics list. A video call that is encrypted. Note: The icon appears in the Call Status, Call Manager list, and Call Statistics list. LifeSize Passport User Guide... -
Page 17: Hiding Or Showing User Interface Elements
• Typical levels during a call peak around –28 to –22 dB DFS. The AEC (Acoustic Echo Canceller) and AGC (Automatic Gain Control) In LifeSize Passport attempt to keep the RMS transmit level below –20 dB DFS. LifeSize Passport User Guide... -
Page 18: Managing Video Layout
• Both video images are the same size. If you choose a screen layout that shows both video images as the same size, only the dominant speaker icon moves to indicate which participant is currently speaking. LifeSize Passport User Guide... - Page 19 Layouts 1/3 and 2/3 (No Presentation) Far End Video Layout 2: Far End and Near End video swap Near End Video positions (hides) Layout 3/3 (No Presentation) Far End Video Near End Video LifeSize Passport User Guide...
- Page 20 When you are receiving a presentation, you can choose from the following layouts: Layouts 1/6 and 2/6 Far End Presentation Layout 2: Near End Video Far End presentation (hides) and Near End video swap positions Layout 3/6 Near End Video Far End Presentation LifeSize Passport User Guide...
- Page 21 An orange camera icon indicates control of the primary (near) input. A blue camera icon in a far end video image indicates control of the far end camera. By default, the near camera is selected. LifeSize Passport User Guide...
- Page 22 Refer to “Controlling a Far End Camera” on page 21. Note: The numeric keys work as presets during a call only when you are in a call screen. LifeSize Passport User Guide...
-
Page 23: Viewing Call Statistics
Note: Skype calls do not report these statistics and therefore, they are not included for Skype calls. The following additional information appears below the Audio statistics block: the call duration LifeSize Passport User Guide... -
Page 24: Ending A Call
Lock an entry to prevent it from being removed automatically from the list. • Unlock a locked entry. • Remove an entry. • Add an entry to the local directory (if available). • Adjust the maximum number of entries that can appear. LifeSize Passport User Guide... - Page 25 1. Using the arrow keys on the remote control, select the entry you wish to add to the directory. 2. Press the button. 3. Select Save on the menu and press OK. 4. Press OK again to close the confirmation dialog. LifeSize Passport User Guide...
-
Page 26: Managing The Directory
You can copy an entry from the corporate directory to the local directory. 1. Access the directory by pressing the button from the main screen. 2. Select the Corporate directory. 3. Select the entry you wish to copy to the local directory. 4. Press the button. LifeSize Passport User Guide... -
Page 27: Troubleshooting
The following sections describe symptoms, possible causes, and potential solutions for common problems you may encounter with your LifeSize system. When experiencing a problem, visually inspect the unit. Ensure the system has not been exposed to water or heat sources or appears physically damaged. LifeSize Passport User Guide... -
Page 28: Adjusting Room Lighting
Diagnostic camera preferences for camera brightness and white balance are available only if the selected camera is connected to the codec and Ready appears as the status for the camera on the System Information page. LifeSize Passport User Guide... -
Page 29: Display Issues
Some HDTVs (particularly plasma displays) allow you to configure the native resolution of the input device from the HDTV administration interface. Poor Quality Display If the colors on the display appear incorrect, verify that the display cable is properly connected to the display. LifeSize Passport User Guide... -
Page 30: Audio Issues
Screen” on page 6 for a visual depiction and description of the network status icons. You may need to reboot a system that is not responding to commands from the remote control. To reboot the system, access User Preferences : Diagnostics : System Reboot. LifeSize Passport User Guide... -
Page 31: Accessing Administrative Features
To configure your LifeSize system from a web browser, you must have Adobe Flash Player installed and configured on your web browser. You can download the Flash Player from www.adobe.com. Refer to the LifeSize Passport Release Notes for the supported Flash Player version. Release Notes are available from the Support page of www.lifesize.com. - Page 32 Administrator Preferences : Security : General. Use the automation command line interface to manage the system through a telnet session. For more information, refer to the LifeSize Passport Automation Command Line Interface manual on the Support page of www.lifesize.com. Administration Using LifeSize MIBs LifeSize video communications systems are SNMP-enabled devices that support SNMPv3.
-
Page 33: Configuring Security Preferences
2. Enter a new password in the New Password field below User Password and press 3. Re-enter the new password in the Confirm Password field and press OK. 4. Select the Set New Password button and press OK. LifeSize Passport User Guide... - Page 34 General. Note: LifeSize Passport cannot detect a change to its IP address if the change is due to a change in networks from a wiring closet or through software, such as a change to a router configuration. Reboot the LifeSize system if the DNS changes.
- Page 35 5351. Ensure that firewalls between the system and the TFTP server are configured to allow the download through this port. • A configuration file that contains LifeSize Passport automation command line interface commands must exist at the location specified by the DHCP option. Configuring the DHCP Option Specific configuration details of DHCP servers for use with this feature vary depending on the DHCP server used and your environment.
- Page 36 <name> is the IP address or DNS name in the path. Example: For a LifeSize Passport system with a MAC address of 00:13:FA:00:12:33 and an IP address of 10.10.22.77, the path: http://example/configs/fishtank.cfg;example;ftp://example/#I.cfg resolves to search for a configuration file at the following locations: 1.
-
Page 37: Specifying The Hostname And Domain Name Service (Dns) Servers
For more information about using the command line interface, refer to the LifeSize Passport Automation Command Line Interface. This document is available from the Support page of www.lifesize.com. -
Page 38: Specifying Network Speed
Preferences : Network : General : NTP Server Hostname. Note: An NTP server address that a DHCP server passes to your system overrides an NTP server hostname or address specified in the NTP Server Hostname preference. LifeSize Passport User Guide... - Page 39 Video Call or Voice Call buttons on the main screen of the user interface and the 0x1a text entry method or screen keyboard. Refer to “Manually Dialing a Number from the Main Screen” on page 13 for information about changing the text entry mode. LifeSize Passport User Guide...
-
Page 40: Restricting Reserved Ports
Reserved Ports. LifeSize recommends that the range you choose, if other than a subset of the default range, begins with a port number greater than 10000. Note: Changing the TCP range causes an automatic reboot of the system. LifeSize Passport User Guide... -
Page 41: Configuring Firewall Settings
Required TCP and UDP ports in the range specified in Administrator Preferences : Network : Reserved Ports. For more information about specifying the range of required TCP and UDP ports, refer to “Restricting Reserved Ports” on page 40. LifeSize Passport User Guide... -
Page 42: Configuring Communications Preferences
Receiving Presentations LifeSize Passport can receive but not initiate presentations during a call through a secondary H.239 media channel. By default, the presentation function is enabled. To disable presentations access Administrator Preferences : Communications : General : Presentations. -
Page 43: Specifying H.323 Settings
Using LifeSize Passport with LifeSize Networker You can configure LifeSize Passport to work with a standalone LifeSize Networker. Access Administrator Preferences : Communications : General : LifeSize Networker IP Address to enter the IP address of the LifeSize Networker you want to associate with your system. -
Page 44: Configuring Sip Settings
By default, support for Session Initiation Protocol (SIP) is enabled on LifeSize systems. To configure SIP as the protocol to use for placing calls, configure SIP preferences in Administrator Preferences : Communications : SIP. You can also disable support for SIP LifeSize Passport User Guide... - Page 45 If you are planning on placing and receiving calls on LifeSize Passport with Microsoft Office Communications Server, LifeSize recommends that administrators choose Microsoft OCS for SIP Server Type in Administrator Preferences : Communications : SIP.
-
Page 46: Configuring System Settings
LifeSize system has HTTP access through port 80 to the LifeSize license key server. If your system does not have this access, refer to “Installing a License Key Manually” on page 48. LifeSize Passport User Guide... - Page 47 Troubleshooting a Failed Update“Troubleshooting a Failed Update” on page 48. 5. When you are finished, click the Log out button at the bottom of the screen, and then close your web browser. LifeSize Passport User Guide...
- Page 48 7. Click the Add Key button. Note: The Add Key button is available only after you copy a key in the Enter New Key box. The key and its expiration date appear in the Upgrade License box. LifeSize Passport User Guide...
-
Page 49: Restoring Default Settings
Release the Reset Button to Get This Result: blue and red The system reboots without changes to the configuration. Note: The LED may remain in this state for more than 5 seconds. Depending on your viewing angle, the LED may appear purple. LifeSize Passport User Guide... -
Page 50: Configuring Call Preferences
Selecting a Maximum Call Time You can control the amount of time that a call stays connected by selecting an option for the Maximum Call Time preference in Administrator Preferences : Calls. LifeSize Passport User Guide... -
Page 51: Enabling Telepresence
Selecting the Active Microphone LifeSize Passport can connect to more than one microphone device for audio input during calls (for example, LifeSize Focus, and LifeSize MicPod). Only one of these devices can function as the active microphone during a call. -
Page 52: Testing Primary Audio Output
DTMF Tone Volume—Select the volume level of the DTMF and key click tones. • Status Tone Volume—Select the volume level of status tones. • System Ringer Volume—Select the volume level of the system ringer. • System Ringer Tone—Select one of five preset system ringer tones. LifeSize Passport User Guide... -
Page 53: Configuring Video Behaviors
You can favor sharpness or motion as a priority for the quality of primary video that LifeSize Passport sends to the far end during a call. If you favor sharpness by selecting a smaller number for the Administrator Preferences : Video : Video Quality : Primary Video Motion preference, in lower bandwidth calls the system sends the primary video at a lower frame rate and a higher resolution. -
Page 54: Adjusting Video Encoder Quality
Disabled in Administrator Preferences : Directory : General. Disabling access to the local directory also disables the following: • saving entries from the REDIAL list to the local directory • copying corporate directory entries to the local directory • access to the Skype contact list LifeSize Passport User Guide... -
Page 55: Populating The Corporate Directory
Auto discovery enables LifeSize systems on your network to pass address information to other LifeSize systems automatically. By default, when a LifeSize system joins a network, it sends a broadcast packet to the local subnet to announce its presence. Any LifeSize system LifeSize Passport User Guide... -
Page 56: Reading From An Ldap Server
When you enable and configure LDAP preferences to populate the corporate directory, you specify the hostname, login and query parameters, and the refresh interval for reading data from a preconfigured LDAP server. LifeSize recommends that you use an LDAP server configured with an H.350 compliant schema. LifeSize Passport User Guide... -
Page 57: Configuring Appearance Preferences
Appearance : Displays. Typically, you configure display resolutions when you install your system or change a display and to troubleshoot display issues. Refer to the LifeSize Passport Installation Guide for more information. You can set the Display Energy Saver preference to Enabled for connected displays to turn off the signal that the LifeSize system sends to the display when the system goes to sleep. -
Page 58: Viewing Recent Configuration Changes
Reset the system to its default state (Administrator Preferences : System : System Reset). • Restore a system configuration using System Restore in the web administration interface (Preferences : System : System Reset : System Restore). • Enable or disable IPv6 (Administrator Preferences : Network : General) LifeSize Passport User Guide... -
Page 59: Exclusive Web Administration Features
Choose None for the Display Background Image preference in Administrator Preferences : Appearance : Backgrounds or in User Preferences : Backgrounds and then select a color for the Display Background Color preference. LifeSize Passport User Guide... -
Page 60: Using Advanced Directory Features
Saving and Restoring a System Configuration You can save and restore a system configuration only from the web administration interface. Note: System restore is not supported with the FireFox browser or other browsers based on Mozilla code. LifeSize Passport User Guide... - Page 61 For more information about editing commands in the configuration file and saving and restoring a system configuration using the command line interface, refer to LifeSize Passport Automation Command Line Interface. Note: Configuration preferences and options vary across LifeSize system software releases.
-
Page 62: Copying Screen Text To The Clipboard
Other errors may indicate a problem with restoring a specified preference or restoring the entire configuration. For a description of the error codes that can appear, see “Standard Return Codes” in the LifeSize Passport Automation Command Line Interface manual. -
Page 63: Managing Calls From The Web Administration Interface
LifeSize Partner to renew your maintenance agreement. The renewal process may require 24 to 48 hours to complete. To upgrade the software for your system, follow these steps: 1. Access www.lifesize.com/support 2. Click the Download Software button. LifeSize Passport User Guide... -
Page 64: Troubleshooting Upgrade Failures
13. Your system is ready to use. If you selected the Reset to Default State check box in step 9, you must first reconfigure your system. Refer to the LifeSize Passport Installation Guide for information about initial configuration. -
Page 65: Upgrade Error Codes
The encryption signature is invalid. This typically occurs if the image is corrupt or compromised. Decrypt failed The system was unable to decrypt the upgrade image. This typically occurs if the image is corrupt or compromised. LifeSize Passport User Guide... - Page 66 An upgrade is already in progress. The system only supports one upgrade at a time. Upgrade license expired A current license key for upgrading the system software does not exist on the device. Contact your authorized LifeSize Partner to renew your maintenance agreement. LifeSize Passport User Guide...
Need help?
Do you have a question about the Passport and is the answer not in the manual?
Questions and answers