Table of Contents
Advertisement
Advertisement
Table of Contents

Subscribe to Our Youtube Channel
Related Manuals for QUORION QMP 2000 series


Summary of Contents for QUORION QMP 2000 series
- Page 1 User Manual Electronic Cash Register QMP 2000 series...
- Page 2 The QUORION QMP 2000 series is fully customizable and yet simple to operate. Users can easily adapt it to any type of retail/scanning or hospitality system. Moreover, our dynamic software generates a compatible environment for a wide array of peripheral devices.
-
Page 3: Table Of Contents
Table of contents 1. Safety Precautions ..................5 2. QMP 2000 ....................6 2.1 The cash register and its components ..................6 2.2 Technical data ........................... 7 2.3 Interfaces and connections ......................8 2.3.1 Pin Assignment ........................9 2.3.2 Connection to PC ........................9 2.3.3 Connection to printer ...................... - Page 4 8. Using Shift Levels ..................29 8.1 PLU/Department Shift ......................29 8.2 Price Shift ..........................29 8.3 Tax Shift ..........................29 8.4 Keyboard Levels ........................30 9. Balance Functions (Tables) ................30 9.1 Open and Close a Balance ......................30 9.2 Print the Invoice ........................
-
Page 5: Safety Precautions
1. Safety Precautions This section presents important information intended to ensure safe and effective use of the QMP 2000 series. Please read this section carefully and store it in an accessible location. • Be sure the voltage of your main power net corresponds to the input voltage printed on the rating plate of the system. -
Page 6: Qmp 2000
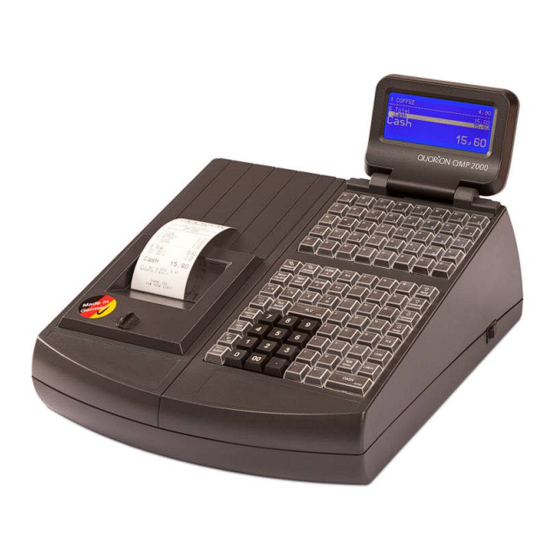
2. QMP 2000 2.1 The cash register and its components Operator display Keyboard Main switch Printer... -
Page 7: Technical Data
2 x RS232-5V; 1 x LAN (RJ45) (optional) Card Reader 1 x Magnetic Card (optional) Clerk Key Lock Magnetic Dallas i-Button (optional) Application QMP – Quorion Multi Purpose Max. Number of PLU’s 55,000 Max. Number of Departments Software Max. Number of Clerks Max. -
Page 8: Interfaces And Connections
2.3 Interfaces and connections The QMP 2000 series by default is equipped with 2xRS232, USB device. Optionally you may add further 2xRS232 interfaces and a LAN interface. All RS232 interfaces support +5VDC on pin 9 as power supply for external devices like scanner, display etc. The USB port is only prepared for PC communication. It is not to be used with USB devices, like memory sticks, scanners, printers etc. -
Page 9: Pin Assignment
6: GND 2.3.2 Connection to PC The QMP 2000 can be connected to a PC for programming, reporting and back-office. QUORiON offers a small software tool, called QProg, for this purpose. The connection can be established via USB or LAN. - Page 10 Connection via LAN In order to activate the Ethernet port for communication, you must program a valid IP ADDRESS in the cash register. This can be done in P-Mode by entering 97 on the TYPE key. The address consists of the three values IP BASE ADDRESS, SUBNET MASK and DEFAULT GATEWAY.
-
Page 11: Connection To Printer
2.3.3 Connection to printer For the connection between a QMP Cash Register and an external printer you need a standard 9 to 25-pin cross wired printer cable with one 9-pin female D-Sub connector and one 25-pin male D-Sub connector. QMP (DSUB9 female) Printer (DSUB25 male) Pin 1 Pin 1... -
Page 12: Adapter Cable For Rs232
D-SUB connector of the adapter and put the other end of the adapter in the interface socket of the QMP 2000. You can order the special adapter cable from your local QUORION dealer. If you want to make the connection yourself, please note the following specifications:... -
Page 13: Before You Start
The QMP 2000 series come with an external power supply. First, please check if the specifications printed on the label fit your local voltage. If so, connect the power pack to the QMP 2000 series. The power plug is at the rear next to the interfaces. Now connect the power supply with the power circuit and turn on the QMP 2000 series with the main switch. - Page 14 3. Open the easyload base and flip it backwards. 4. If you want to replace an empty paper roll, remove the existing one. 5. Insert a new paper roll into the paper device as shown in the image below. 6. Close the easyload base slowly and push it down until you hear a click snapping the base into place.
- Page 15 7. Cut of the excess paper using the front edge of the printer unit. Important: Make sure that the paper end of the new paper roll is cutted off straight: 8. Close the printer cover. 9. Connect the cash register to the power supply network. ...
-
Page 16: Overview
4. Overview 4.1 Operating modes The operating modes control the operation of your Cash Register. There are five different modes for various functions. The selection of an operating mode can be done either by mechanical key lock or by soft key on keyboard. -
Page 17: Names Of Keys And Their Function
4.3 Names of Keys and Their Function Key label Key name Key function Numeric Keys - used for entering numbers Receipt Feed - advances the receipt paper REC EI P T Journal Feed - advances the journal paper JO URN AL Clear CLEAR... - Page 18 Key Label Key Name Key Function No Sale - prints a reference number / opens the cash drawer - calculates sub total Sub Total - prints out receipt copy if no receipt opened TOTAL Cash Payment - used to tender payments in cash CASH Check Payment - used to tender payments in check...
-
Page 19: Sign In And Register
As long as the key is attached, you are logged into the system. If you remove the key, you will automatically log out. The QMP 2000 series is blocked until a clerk signs in again. -
Page 20: Register A Department
5.2 Register a Department Department keys may be used either to enter free prices or to select PLU’s from a list. If you press a department key without entry, you will see a list with all PLU’s which are linked to that department. Use the scroll keys or enter a number to select a certain PLU from that list. -
Page 21: Create A Plu During The Sale
“Sub total” key to confirm or the “Clear” key to exit the prompt. Once confirmed the QMP 2000 series will ask you for the price. Upon entry of the price, press the “Sub total” key again to confirm. Then enter the department to which the PLU is linked and press Subtotal to confirm. -
Page 22: Multiplication/Division
5.6 Multiplication/Division Instead of pressing the same item repeatedly, you may use the “Multiplication” key. First, enter the quantity to be rung up, CUSTOMER LOGO followed by the “Multiplication” key and then the item. 5 Department 1 17,50 3 PLU 25 3,00 Depending on the programming, the “Multiplication”... -
Page 23: Holding A Sale
CASH, CHECK and CARD. Additional tenders may be programmed if necessary. It is recommended to press the “Subtotal” key before tendering, to have the possibility to check the subtotal and to enter the tendered amount. The QMP 2000 series will then automatically calculate the change owed to the customer. -
Page 24: Tendering In Foreign Currency
5.9 Tendering in Foreign Currency In addition to the local currency the QMP 2000 series can operate with different foreign currencies, which are saved separately in the reports. Just press the “FCE” key instead of Subtotal to convert the total amount in a pre-programmed foreign currency. -
Page 25: Corrections
6. Corrections 6.1 Clearing of Inputs and Error Messages To erase an incorrect entry not yet registered, and to clear any error messages just press the “Clear” key. CLEAR 6.2 Error correction The “Error Correct” key (EC) is used to clear the last item CUSTOMER LOGO immediately. -
Page 26: Refund
6.4 Refund A refund is used to return previously sold items. The PLU’s will CUSTOMER LOGO be added to the stock and the money is returned to the REFUND customer. The turnover in the reports will be corrected. -1 PLU 1 -0,10 REFUND To refund an item, press the “Refund”... -
Page 27: Transaction Cancel
6.6 Transaction Cancel The “Transaction cancel” is used to void a complete receipt before it is finalized with a payment. Simply press the key “Transaction cancel” to automatically void all items from the current receipt. 6.7 Tender Correction With the function “Tender Correction” you may change any amount from one payment media to another. First press the key “Tender Correction”, enter the desired CUSTOMER LOGO amount and then select the payment media from which this... -
Page 28: Amount Discount/Surcharge
7.2 Amount Discount/Surcharge Similarly, it is possible to use amount rebates. The only difference is that no percentages are calculated but rather total CUSTOMER LOGO amounts such as coupons are subtracted/added. 1 PLU 1 10,00 Enter the amount directly after the item or the subtotal and 1 PLU 2 5,00 COUPON... -
Page 29: Using Shift Levels
8.2 Price Shift The QMP 2000 series allows for more than one sales price for each PLU. This is a useful function for special occasions, such as Happy Hour or item promotions. You may program an automatic price shift based on a time period or manually change the price shift via key entry. -
Page 30: Keyboard Levels
Furthermore, it can be used in hotels to save room accounts or in retail applications to save accounts per customer. The QMP 2000 series therefore support three independent memory configurations for tables, rooms and accounts. -
Page 31: Print The Invoice
9.2 Print the Invoice To invoice a table you must re-open it first. All ordered items and the subtotal will be displayed. Now press the key “Print CUSTOMER LOGO Invoice”. INVOICE You may choose to finish the table immediately by payment or Table # receive a proforma invoice. -
Page 32: Splitting A Balance
9.4 Splitting a Balance The function “Table Split” is used to create more than one invoice from the same table. This may be necessary if the guests of one table wish to pay separately, for example. To split a table, first open it and press the key “Table Split”. -
Page 33: Modifiers And Condiments
CURSOR 10. Reports The QMP 2000 series offer a wide range of reports to collect and monitor your sales data. All functions of the system have their own report memory in four periods. They can be checked separately as system reports or combined as free programmable user reports. -
Page 34: System Reports
10.1 System Reports Each function of the POS has its own system report, which is permanent in the software. Depending on the configuration, this report can contain different information such as customer count, quantity, and amount. If you press the key “SYS” in mode X or Z you will receive a list of all available system reports. Now, you can select one report with the cursor keys and confirm by pressing “SYS”... -
Page 35: User Reports
10.2 User Reports User reports are freely programmable report lists containing CUSTOMER LOGO several system reports. Hence, you have the possibility to create Daily Report your individual reports. While programming the POS, you can define what data should be printed in the “Daily Report”, for --------------------------- Total Sales instance. -
Page 36: Electronic Journal
10.3 Electronic Journal The Electronic journal will log all operations of the POS by storing a copy of each receipt printout. Depending on the programming you can do this either in binary or in ASCII text format. If you press the key “ENTER” in mode X or Z you will receive a list of all available user reports. Scrolling to the end of the list, you will find the entry “Electronic journal”. -
Page 37: Text Format
10.3.1 Text Format The Electronic journal is saved in normal text format. Journal data, saved in text format, can only be displayed and printed going backwards, beginning with the last receipt. Searching for a certain receipt number is not possible. The format of the printout depends on the programming. It is therefore possible to print out the journal in two or more columns to save paper. -
Page 38: Programming
11. Programming The programming of the QMP 2000 series is classified in two parts: configuration and file programming. First the requested functions must be activated in the configuration. This will allocate the memory for each function. Then the pre-configured functions can be filled with user data in the programming. Please note that the configuration can only be done by PC with the software QProg. -
Page 39: Easy Plu Programming
11.2 Easy PLU Programming The easy programming of PLU’s is done in manager mode (M) only. To program a PLU enter the code number of the data field you want to change and confirm with the “Subtotal” key. The following codes are available: Sales Price Cost Price... -
Page 40: File Programming
11.3 File Programming Start programming either by entering the file number directly on the “TYPE” key or by pressing the “TYPE” key without entry and selecting the file from the programming window. At the end of each line the file number is shown in brackets for reference. - Page 41 Flowchart: CODE RECORD VALUE CASH TYPE ENTER TYPE TYPE Example: Change tax rate 1 to 9.00 %: CASH TYPE ENTER TYPE CURSOR...
-
Page 42: Scanning
11.4 Scanning When scanning codes are activated in the configuration of the application it is possible to create and/or delete items on the cash-register either in Program Mode or during transaction when an item is not found. Furthermore there are some special maintenance procedures which are can be activated in Manager or programming mode. - Page 43 This command will MERGE the UPDATE and the BASE FILE. This command can be used when only new item are created. 102 – DELETE This command will DELETE the articles marked for deletion. This command can be used items were only deleted.
-
Page 44: Program Version And Test Routines
11.5 Program Version and Test Routines The QMP 2000 series have a set of test routines built-in to check certain hardware components and receive information --------------------------- about the installed drivers and software version. F: 1v-WE P: QC061010 C: QMP 2000... -
Page 45: Training Mode
13. Instructions for maintenance The QMP 2000 does not contain any components, which can be serviced or repaired by the user. Please have all maintenance performed by a qualified QUORION dealer. Unauthorized manipulations may lead to a loss of warranty. -
Page 46: Information On The Electromagnetic Compatibility And Safety
CE Conformance Important: The machine itself is to be operated only with the components supplied by QUORiON. If external components are connected, the system must be checked by the integrator. This QUORiON cash register conforms to the European Community’s 2004/108/EC EMC-directive. The cash...
Need help?
Do you have a question about the QMP 2000 series and is the answer not in the manual?
Questions and answers
THERE IS NO HOLD BUTTON ON OUR TILL BUT WHEN WE TRY TO RUN A 'Z' REPORT IT COMES UP 'STILL ON HOLD'
The QUORION QMP 2000 series shows 'still on hold' when running a 'Z' report because there are open receipts saved using the Hold function that have not been closed. All transactions on hold must be closed before a Z-report can be performed.
This answer is automatically generated
How to get to program mode on keyboard
To access program mode on the QUORION QMP 2000 series keyboard, use one of the following methods:
1. Use the Owner Program key (OWP), which allows access to mode P (Programming).
2. Alternatively, use the soft key to switch modes by pressing it repeatedly until the display shows "P" for Programming mode.
Once in Programming mode, you can program functions such as date, time, PLUs, and more.
This answer is automatically generated
La caja registradora muestra un cartel en pantalla AUDITORA LLENA como proceder para solucionar éste problema
The "AUDITORA LLENA" message indicates that the audit memory is full. To resolve this on a QUORION QMP 2000 series cash register, you need to print and/or clear the audit report. This is usually done by accessing the report or manager mode and running the appropriate financial or audit report (e.g., Z-report) to reset the memory.
If the message persists after printing the report, consult a qualified QUORION dealer, as memory clearing might require authorized service access.
This answer is automatically generated
Cómo bloquearla o desprogramarla
Hi, I'm just wondering if you would know this.... I only want the category name but not the price. So on here you have it programmed for Toast $4 comes up automatically. I don't want the price to come up (as I want to be able to just manually enter in a price. For example. I'd press the button for Dress and be able to put in a price, because each each has a different price)