Table of Contents
Advertisement
Advertisement
Table of Contents

Related Manuals for QUORION CR 20


Summary of Contents for QUORION CR 20
- Page 1 User Manual Electronic Cash Register CR 20...
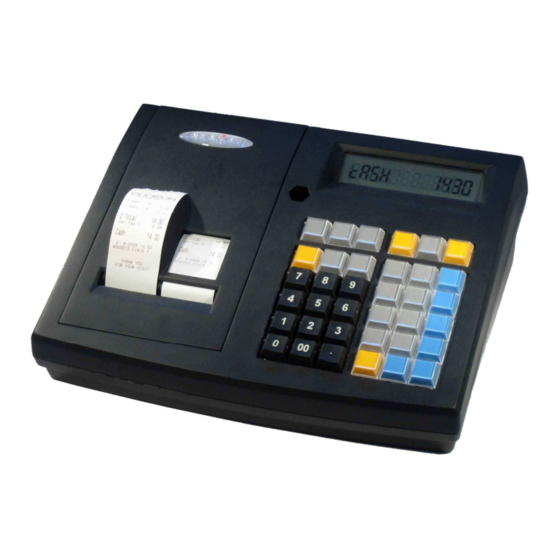
- Page 2 The QUORION CR 20 is fully customizable and yet simple to operate. Users can easily adapt it to any type of retail/scanning or hospitality system. Moreover, our dynamic software generates a compatible environment for a wide array of peripheral devices.
-
Page 3: Table Of Contents
Index 1. Safety Precautions .................. 5 2. General information ................. 6 2.1 Technical data ........................6 2.2 Components .......................... 7 2.3 Thermal printer ........................8 2.3.1 Paper Insertion ......................... 8 2.4 Switch ON / OFF cash register ..................... 9 2.4.1 Operating modes ......................9 2.5 Interfaces .......................... - Page 4 8. Reports ....................26 8.1 System Reports ........................26 8.2 User Reports........................27 8.3 Electronic Journal ....................... 29 8.3.1 Text Format ........................29 8.3.2 Binary Format ......................... 30 9. Programming ..................30 9.1 Programming of Date and Time ..................30 9.2 Easy PLU Programming......................
-
Page 5: Safety Precautions
1. Safety Precautions This section presents important information intended to ensure safe and effective use of the CR 20. Please read this section carefully and store it in an accessible location. Be sure the voltage of your main power net corresponds to the input voltage printed on the rating plate of the system. -
Page 6: General Information
2. General information 2.1 Technical data Processor 32 bit ARM 966E Program Memory 1 MB FLASH ROM Memory Data Memory 2 MB FLASH ROM Working Memory 96 kB SRAM (battery buffered) Operator Display Numeric LCD with 12 character Display Customer Display Numeric LCD with 12 character Keyboard Internal... -
Page 7: Components
2.2 Components Operator display Keyboard (36 keys) ON / OFF Key Printer Interfaces Customer Display... -
Page 8: Thermal Printer
2.3 Thermal printer 2.3.1 Paper Insertion 1. Turn the Cash Register on. 2. Using scissors cut the edge of the paper roll as shown below. 3. Open the printer cover. 4. Insert the paper roll with the correct direction. 6. Hold both edges of the paper and insert it straight into the paper funnel. The printer feeds and cuts the paper off automatically. -
Page 9: Switch On / Off Cash Register
2.4 Switch ON / OFF cash register To switch the cash register ON or OFF, please press and hold this button 3 seconds. 2.4.1 Operating modes The operating modes control the operation of your Cash Register. There are six different modes for various functions. -
Page 10: Interfaces
2.5 Interfaces The CR 20 by default is equipped with 2xRS232, USB device. All RS232 interfaces support +5VDC on pin 9 as power supply for external devices like scanner, display, QuoriLog etc. The USB port is only prepared for PC communication. It is not to be used with USB devices, like memory... -
Page 11: Connection To Pc
By default RS232 port 1 is prepared for PC communication with 57600 baud. Please note that you will probably need an adapter cable from the RJ45 connector of the CR 20 to DSUB-9 on PC (see chapter 2.5.3). If your PC does not have an RS232 port, you may use a Serial-to-USB converter. -
Page 12: Adapter Cable For Rs232
To connect standard peripheral devices you will need an adapter cable from the RJ-interface of the CR 20 to the D-SUB connector of the external device. Connect the original cable of the device to the D-SUB connector of the adapter and put the other end of the adapter in the interface socket. -
Page 13: Keyboard
2.6 Keyboard CLERK RECEIPT CURSOR CURSOR PRICE TYPE CAPS R-X-Z-M-P REFUND PRINT VOID DATE TIME CLEAR CASH TOTAL ENTER 2.6.1 Names of Keys and Their Function Key label Key name Key function Numeric Keys - used for entering numbers Receipt Feed - advances the receipt paper REC EI P T Clear... - Page 14 Key Label Key Name Key Function - used to access preset PLU items Department - used to enter items to the respective departments Received on Account - used to record payments to the drawer Paid Out - used to record payments out from the drawer Percent Plus - used to add percentage values to the total Percent Minus...
-
Page 15: Getting Started
The CR 20 come with an external power supply. First, please check if the specifications printed on the label fit your local voltage. If so, connect the power pack to the CR 20. The power plug is at the rear next to the interfaces. Now connect the power supply with the power circuit and turn on the CR 20 with the main switch. -
Page 16: Register A Department
4.2 Register a Department Department keys may be used either to enter free prices or to select PLU’s from a list. If you press a department key without entry, you will see a list with all PLU’s which are linked to that department. -
Page 17: Create A Plu During The Sale
Press the “Sub total” key to confirm or the “Clear” key to exit the prompt. Once confirmed the CR 20 will ask you for the price. Upon entry of the price, press the “Sub total” key again to confirm. Then enter the department to which the PLU is linked and press Subtotal to confirm. -
Page 18: Multiplication/Division
4.6 Multiplication/Division Instead of pressing the same item repeatedly, you may use the “Multiplication” key. First, enter the quantity to be CUSTOMER LOGO rung up, followed by the “Multiplication” key and then the item. 5 Department 1 17,50 3 PLU 25 3,00 Depending on the programming, the “Multiplication”... -
Page 19: Holding A Sale
It is recommended to press the “Subtotal” key before tendering, to have the possibility to check the subtotal and to enter the tendered amount. The CR 20 will then automatically calculate the change owed to the customer. -
Page 20: Tendering In Foreign Currency
4.9 Tendering in Foreign Currency In addition to the local currency the CR 20 can operate with different foreign currencies, which are saved separately in the reports. Just press the “FCE” key instead of Subtotal to convert the total amount in a pre-programmed foreign currency. On the... -
Page 21: Corrections
5. Corrections 5.1 Clearing of Inputs and Error Messages To erase an incorrect entry not yet registered, and to clear any error messages just press the “Clear” key. CLEAR 5.2 Error correction The “Error Correct” key (EC) is used to clear the last item CUSTOMER LOGO immediately. -
Page 22: Refund
5.4 Refund A refund is used to return previously sold items. The PLU’s CUSTOMER LOGO will be added to the stock and the money is returned to the customer. The turnover in the reports will be corrected. REFUND -1 PLU 1 -0,10 REFUND To refund an item, press the “Refund”... -
Page 23: Transaction Cancel
5.6 Transaction Cancel The “Transaction cancel” is used to void a complete receipt before it is finalized with a payment. Simply press the key “Transaction cancel” to automatically void all items from the current receipt. 5.7 Tender Correction With the function “Tender Correction” you may change any amount from one payment media to another. -
Page 24: Amount Discount/Surcharge
6.2 Amount Discount/Surcharge Similarly, it is possible to use amount rebates. The only difference is that no percentages are calculated but rather CUSTOMER LOGO total amounts such as coupons are subtracted/added. 1 PLU 1 10,00 Enter the amount directly after the item or the subtotal and 1 PLU 2 5,00 press the “(-)”... -
Page 25: Using Shift Levels
It is also possible to block the shift for either PLU’s or departments. 7.2 Price Shift The CR 20 allows for more than one sales price for each PLU. This is a useful function for special occasions, such as Happy Hour or item promotions. You may program an automatic price shift based on a time period or manually change the price shift via key entry. -
Page 26: Reports
8. Reports The CR 20 offer a wide range of reports to collect and monitor your sales data. All functions of the system have their own report memory in four periods. They can be checked separately as system reports or combined as free programmable user reports. The report memory of each function does not only contain the total sum, but also information about clerks and time periods. -
Page 27: User Reports
The following system reports are available: CUSTOMER LOGO Total Sales System Report Groups --------------------------- Departments Period 1: Standard Articles --------------------------- Tax Totals Departments Tendering Functions --------------------------- Drawer Totals Dept 1 PO and RA CCount Quantity Discount Functions Amount 10,00 Corrections Dept 2 Foreign Currencies CCount... -
Page 28: Daily Report
Flowchart: CUSTOMER LOGO Daily Report --------------------------- CODE Total Sales CASH --------------------------- ENTER Total Sales CCount Quantity Amount 10,00 --------------------------- CASH Groups ENTER --------------------------- Group 1 CCount Quantity Amount 10,00 --------------------------- The following user reports are pre-programmed: Tax Totals --------------------------- Clerk Report 16% Tax 1 All Clerk Report Gross... -
Page 29: Electronic Journal
8.3 Electronic Journal The Electronic journal will log all operations of the by storing a copy of each receipt printout. Depending on the programming you can do this either in binary or in ASCII text format. If you press the key “ENTER” in mode X or Z you will receive a list of all available user reports. Scrolling to the end of the list, you will find the entry “Electronic journal”. -
Page 30: Binary Format
PAGE 9. Programming The programming of the CR 20 is classified in two parts: configuration and file programming. First the requested functions must be activated in the configuration. This will allocate the memory for each function. Then the pre-configured functions can be filled with user data in the programming. -
Page 31: Easy Plu Programming
9.2 Easy PLU Programming The easy programming of PLU’s is done in manager mode (M) only. To program a PLU enter the code number of the data field you want to change and confirm with the “Subtotal” key. The following codes are available: Sales Price Cost Price Description... -
Page 32: File Programming
9.3 File Programming Start programming either by entering the file number directly on the “TYPE” key or by pressing the “TYPE” key without entry and selecting the file from the programming window. At the end of each line the file number is shown in brackets for reference. Please note that files, which are not activated in the configuration, will not be shown. -
Page 33: Program Version And Test Routines
TYPE ENTER TYPE CURSOR 9.4 Program Version and Test Routines The CR 20 have a set of test routines built-in to check certain hardware components and receive information --------------------------- about the installed drivers and software version. F: 1v-WE P: G0091009... -
Page 34: Training Mode
10. Training Mode The training mode is used to test all functions of the CR 20 without adding the turnover to the reports. The report memory will not be changed and all counters remain constant. Please note that in this mode all receipts will be automatically marked as „Training”. -
Page 35: Accumulator (Battery)
The letter “L” in the battery status display “Battery 75% L” indicates the recharge process. 8. Recharge adapter: Input: 100...240VAC / 50/60Hz Output: 24VDC / 1A Connection: Hollow plug 5,5mm x 2,5mm 1.50.417352 BA-englisch CR 20 QUORION CE (Stand: 12.10.09)
Need help?
Do you have a question about the CR 20 and is the answer not in the manual?
Questions and answers