Vertical SBX IP 320 User Manual
Dect cordless telephone
Hide thumbs
Also See for Vertical SBX IP 320:
- Features & operation manual (248 pages) ,
- Installation manual (148 pages) ,
- User manual (124 pages)
Table of Contents
Advertisement
Quick Links
Download this manual
See also:
User Manual
Advertisement
Table of Contents

Related Manuals for Vertical Vertical SBX IP 320


Summary of Contents for Vertical Vertical SBX IP 320
- Page 1 This manual is provided to you by Telco Depot a certified dealer that installs and supports the Vertical SBX IP 320 system. Call us at 1800-390-1200 or visit www.TelcoDepot.com DECT Cordless Telephone User Guide Release 2.0 October 2010...
-
Page 2: Revision History
Vertical Communications, Inc. reserves the right to revise this publication and to make changes in content without notice. © 2010 by Vertical Communications, Inc. All rights reserved. This publication contains proprietary and confidential information of Vertical Communications, Inc. The contents of this document may not be disclosed, copied or translated by third parties, in any form, or by any means known, or not now known or conceived, without prior explicit written permission from Vertical Communications, Inc. - Page 3 Release 2.0 October 2010...
-
Page 4: Important Safety Instructions
- i - IMPORTANT SAFETY INSTRUCTIONS NOTE -- The DECT Cordless Telephone is only intended for use with these Vertical systems: Wave IP 2500/500, MBX IP, SBX IP, XTS-IP, XTSc-IP & STSe. When using your telephone equipment, basic safety precautions should always be followed to reduce the risk of fire, electrical shock, and injury to persons, including the following: Read and understand all instructions. -
Page 5: Warnings
- ii - IMPORTANT SAFETY INSTRUCTIONS Do not use the telephone to report a gas leak in the vicinity of the leak. Unplug this product from the wall outlet and refer servicing to qualified service personnel under the following conditions: - When the power supply cord is damaged or frayed. - Page 6 - iii - WARNINGS Range Your new telephone is designed to achieve the maximum possible range by transmitting and receiving according to the highest specifications set forth by the FCC and IC. We have rated this telephone to operate at a maximum distance with the qualification that the range depends upon the environment in which the telephone is used.
-
Page 7: Save These Instructions
- iv - SAVE THESE INSTRUCTIONS Finally, it should be noted that some cordless telephones operate at frequencies that may cause interference to nearby TVs and VCRs. To minimize or prevent such interference, the base of the cordless telephone should not be placed near or on top of a TV or VCR. If interference is experienced, moving the cordless telephone farther away from the TV or VCR will often reduce or eliminate the interference. -
Page 8: One Year Limited Warranty
- v - ONE YEAR LIMITED WARRANTY WARRANTOR: Vertical Communications ELEMENTS OF WARRANTY: Vertical Communications warrants, for one year to the original retail owner, this Vertical Product to be free from defects in materials and craftsmanship with only the limitations or exclusions set out below. WARRANTY DURATION: This warranty to the original user shall terminate and be of no further effect 12 months after the date of original retail sale. -
Page 9: Table Of Contents
- vi - TABLE OF CONTENTS IMPORTANT SAFETY INSTRUCTIONS ....i WARNINGS.............. ii SAVE THESE INSTRUCTIONS ......iv ONE YEAR LIMITED WARRANTY ......v About Your DECT Cordless Telephone ........1 Features of the DECT Cordless Telephone ......2 Handset Controls & Functions ..........3 Base Unit Controls &... - Page 10 - vii - Placing a Call on Hold ............17 Retrieving Voice Messages........... 18 Setting Ringer Type and End of Range Alarm ...... 18 Transferring a Call..............18 Using the Redial Function ............. 18 Programming Functions.............. 19 Setting Up a Flexible Button..........19 Storing a One Touch Dial Number ........
- Page 11 THIS PAGE INTENTIONALLY LEFT BLANK Release 2.0 October 2010...
-
Page 12: About Your Dect Cordless Telephone
About Your DECT Cordless Telephone About Your DECT Cordless Telephone The DECT Cordless Telephone is designed and engineered to exacting standards for reliability, long life, and outstanding performance. It is designed to work with a Vertical system (Wave IP 500/2500, MBX IP, SBX IP, XTS-IP, XTSc-IP, or STSe). -
Page 13: Features Of The Dect Cordless Telephone
About Your DECT Cordless Telephone Features of the DECT Cordless Telephone Each DECT Cordless Telephone has the following features: 2-line, 16-digit LCD Display Easy Installation 4 Flexible Function Keys: Loop 1, Loop 2, Pickup & Voice Mail 4 One Touch Dial Keys Handset Volume Control Headset Jack (2.5mm) Low Battery Protection System... -
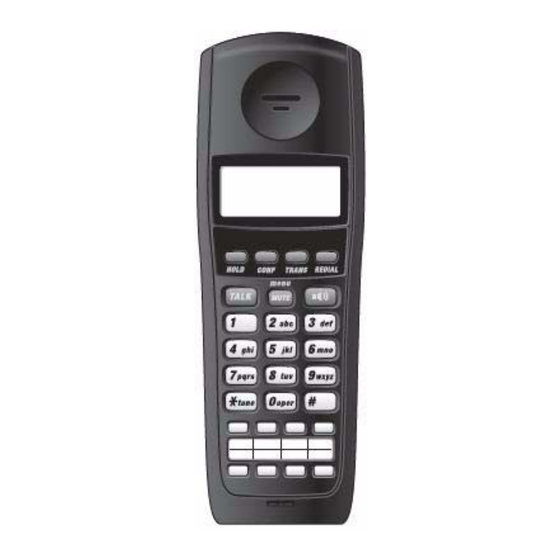
Page 14: Handset Controls & Functions
About Your DECT Cordless Telephone Handset Controls & Functions 1. LCD Display 10. Ringer on/off button 2. HOLD Key 11. Volume button 3. TRANS Key 12. REDIAL Key 4. TALK Key 13. CONF Key 5. Numeric Keypad 14. Speaker Key 6. -
Page 15: Base Unit Controls & Functions
About Your DECT Cordless Telephone Base Unit Controls & Functions 18. Power (On/Off) LED 19. DC Power Jack DECT Cordless Telephone User Guide Release 2.0 October 2010... -
Page 16: Installing Your Dect Cordless Telephone
Installing Your DECT Cordless Telephone Installing Your DECT Cordless Telephone Selecting the Installation Location Select a location for the DECT Cordless Telephone to avoid excessive heat or humidity. The Base Unit of your DECT Cordless Telephone can be placed on a desk or tabletop near a standard 120V AC outlet and telephone line jack. -
Page 17: Connecting Power To The Base And Charger Units
Installing Your DECT Cordless Telephone Connecting Power to the Base and Charger Units CHARGER UNIT NOTE -- A flashing LED on the charger indicates the handset is not seated properly, the battery is not hooked up, or the telephone is not in service. To Telephone BASE UNIT System... -
Page 18: Wall Mounting
Installing Your DECT Cordless Telephone Wall Mounting You can mount the DECT Cordless Telephone on a standard wall plate or directly on a wall. Standard Wall Plate Mounting Your DECT Cordless Telephone is designed to be mounted on a standard wall plate. To attach the wall mount stand to the Base Unit: 1. - Page 19 Installing Your DECT Cordless Telephone Direct Wall Mounting If you do not have a standard wall plate, you can mount your telephone directly on a wall. Before mounting your telephone, consider the following: Select a location away from electrical cables, pipes, or other items behind the mounting location that could be hazardous when placing screws into the wall.
- Page 20 Installing Your DECT Cordless Telephone Charging Unit Wall Mounting The Charging Unit is also designed to be wall mounted. Before mounting your charging unit, consider the following: Select a location away from electrical cables, pipes, or other items behind the mounting location that could be hazardous when placing screws into the wall.
-
Page 21: Attaching The Belt Clip To The Handset
Installing Your DECT Cordless Telephone Attaching the Belt Clip to the Handset You can use the Belt Clip to attach the Handset to your belt or pocket for convenient portability. To attach the belt clip to the handset: 1. Snap the tab out of the Belt Clip notch on the top of the Handset. -
Page 22: Installing The Handset Battery Pack
Installing Your DECT Cordless Telephone Installing the Handset Battery Pack To install the battery pack: 1. Remove the battery cover by pressing the latch and sliding the cover down and off of the Handset. 2. Connect the battery pack connector, observing correct polarity to the jack inside the battery compartment, as shown on the right. -
Page 23: Charging The Handset Battery Pack
Installing Your DECT Cordless Telephone Charging the Handset Battery Pack To charge the battery pack: 1. Place the Handset into the Charging Unit. 2. Make sure the Handset indicator illuminates. If the Handset light doesn’t illuminate, check to see that the AC Adapter is plugged in, and that the Handset is making good contact with the Charging Unit charging contacts. -
Page 24: Checking The Low Battery Indicator
Installing Your DECT Cordless Telephone Checking the Low Battery Indicator When the Battery Pack in the Handset is low and needs to be charged, the LOW message appears on the display. See the table below for what action to take when this occurs. -
Page 25: Using Your Dect Cordless Handset
Using Your DECT Cordless Handset Using Your DECT Cordless Handset The steps and procedures shown in this section assume you are using the factory default settings preprogrammed on your DECT Cordless Telephone. NOTE -- Operation of the DECT Cordless Telephone is performed using the Handset out of the Charging Unit. -
Page 26: Earpiece Volume
Using Your DECT Cordless Handset Earpiece Volume During a call … press TALK then press the vol / button on the side of the handset to select the earpiece volume of the handset. Vibrate Mode Selecting the (Ringer Off) setting shown above, places the DECT Cordless Telephone into... -
Page 27: Basic Telephone Features
Basic Telephone Features Basic Telephone Features Answering a Call When you receive a call, the Handset rings and you will see: Handset in the Charging Unit Handset out of Charging Unit Pick up the Handset. Press TALK, -or- press any key on the numeric keypad, -or- press the Hold, Redial, Conf or Trans key. -
Page 28: Forwarding A Call
Basic Telephone Features Forwarding a Call 1. Press TALK and dial feature code [640]. 2. Dial the desired Call Forward code: [6] = All Calls [7] = No Answer [8] = Busy [9] = Busy/No Answer [*] = Off-Net 3. Dial the station number where calls are to be forwarded or the desired speed bin. A confirmation tone will sound. -
Page 29: Retrieving Voice Messages
Basic Telephone Features Retrieving Voice Messages To enter the Voice Mail system to check for messages: Press the preprogrammed VM GROUP flexible button, OR dial the Voice Mail group number (440-447). You will be prompted to enter your mailbox password. Setting Ringer Type and End of Range Alarm Ringer Type End of Range Alarm... -
Page 30: Programming Functions
Programming Functions Programming Functions Setting Up a Flexible Button Flexible buttons must be set up in Administration. Contact your System Administrator. To erase a flexible button, simply program a new flexible button over the existing flexible button. (A system administrator can also set up flexible buttons in the system for all users.) Storing a One Touch Dial Number 1. -
Page 31: Troubleshooting
Troubleshooting Troubleshooting If your DECT Cordless Telephone is not performing to your expectations, try these simple steps. If you are still unable to resolve the problems, contact your system administrator. NOTE: Do not attempt to service this unit yourself. All service must be done by qualified service personnel. -
Page 32: Specifications
Specifications Specifications Frequency Control : Phase Lock Loop Modulation : DECT Operating Temperature : 0° to 50° C (+32° F to +122° F) Base Unit Receive/Transmit Frequency : 1.9 GHz Power Requirements : 10V DC from supplied AC Adapter Size : 4 1/4 in.W x 7 1/2 in.D x 2 1/4 in. -
Page 33: Registration
Registration Registration Registration 1. Press the MUTE key while in standby mode or when the LCD is showing “Not Registered”. 2. Select “Register” by using the /vol Up/Down key and then press the MUTE key to save your selection.. 3. The LCD shows the message below. Press and hold the Left key on the Base Station for 3 seconds. -
Page 34: Deregistration
Registration Deregistration 1. Press the MUTE key while in standby mode. The LCD shows the menu list mode. 2. Select “Deregister” by pressing the Up/Down keys and then press the MUTE key. 3. To select Handset or Speaker, use the Up/Down key and then press the MUTE key. »... -
Page 35: Base Registration Pin
Registration 6. The Handset will be deregistered from the base Station. Then the Handset emits a confirmation tone and goes to the menu list mode. Base Registration PIN 1. While in standby mode, press the MUTE key. The LCD shows menu list mode. 2. - Page 36 Registration DECT Cordless Telephone User Guide Release 2.0 October 2010...
- Page 37 Release 2.0 October 2010...
- Page 38 Vertical Communications, Inc. Release 2.0 October 2010 Release 2.0 October 2010...
Need help?
Do you have a question about the Vertical SBX IP 320 and is the answer not in the manual?
Questions and answers