Table of Contents
Advertisement
Quick Links
TEC Thermal Printer
B-450 SERIES
User's Manual
Original
Dec., 1998
(Revision Mar., 2001)
TABLE OF CONTENTS
OWNER'S MANUAL (TS) ..................................... EO1-33006
OWNER'S MANUAL (HS) ..................................... EO1-33019
PRODUCT DESCRIPTION ................................... EO10-33003A
MAINTENANCE MANUAL .................................... EO18-33003A
Document No. EO0-33003A
PRINTED IN JAPAN
Advertisement
Chapters
Table of Contents
Troubleshooting

Related Manuals for TEC B-450 SERIES


Summary of Contents for TEC B-450 SERIES
- Page 1 TEC Thermal Printer B-450 SERIES User's Manual Document No. EO0-33003A Original Dec., 1998 (Revision Mar., 2001) TABLE OF CONTENTS OWNER'S MANUAL (TS) ........EO1-33006 OWNER'S MANUAL (HS) ........EO1-33019 PRODUCT DESCRIPTION ........EO10-33003A MAINTENANCE MANUAL ........EO18-33003A PRINTED IN JAPAN...
- Page 2 TOSHIBA TEC Service Solution Planning Dept. (Ohito) promptly (Facsimile No. 0558-76-9842). TOSHIBA TEC cannot be held responsible for any trouble which have been caused by misprints or omissions. The following related manuals contain additional specific information on using this model and can be referred to for more detailed information available from TOSHIBA TEC sales headquarters.
- Page 4 PRINTED IN JAPAN EO0-33003A...
- Page 5 TEC Thermal Printer B-450-QQ SERIES Owner’s Manual Table of Contents...
- Page 6 "Cet appareil numérique de la classe A respecte toutes les exigences du Règlement sur le matériel brouilleur de Canada." (for CANADA only) (for QQ, QQ-PAC only) Copyright © 1999 by TOSHIBA TEC CORPORATION All Rights Reserved 570 Ohito, Ohito-cho, Tagata-gun, Shizuoka-ken, JAPAN...
-
Page 7: Safety Summary
Do not attempt to effect repairs or modifications to this equipment. If a fault occurs that cannot be rectified using the procedures described in this manual, turn off the power, unplug the machine, then contact your authorized TOSHIBA TEC representative for assistance. Meanings of Each Symbol This symbol indicates warning items (including cautions). - Page 8 • Utilize our maintenance services. After purchasing the machine, contact your authorized TOSHIBA TEC representative for assistance once a year to have the inside of the machine cleaned. Otherwise, dust will build up inside the machines and may cause a fire or a malfunction. Cleaning is particularly effective before humid rainy seasons.
-
Page 9: Table Of Contents
CAUTION: 1. This manual may not be copied in whole or in part without prior written permission of TOSHIBA TEC. 2. The contents of this manual may be changed without notification. 3. Please refer to your local Authorized Service representative with regard to any queries you may... -
Page 10: Introduction
1.1 APPLICABLE MODEL 1. INTRODUCTION Thank you for choosing the TEC B-450 Series thermal/transfer printer. This new generation high performance high quality printer is equipped with the latest hardware including the newly developed high density (11.8 dot/mm, 300 dot/inch) print head. This allows very clear print at a maximum speed of 101.6 mm/sec. -
Page 11: Specifications
2. SPECIFICATIONS EO1-33006 2.1 GENERAL SPECIFICATIONS 2. SPECIFICATIONS 2.1 GENERAL SPECIFICATIONS Model B-452-TS10-QQ Item Supply voltage 100 ~ 120V, 60Hz Power consumption 0.94 A, 47 W maximum (standby: 0.3 A, 18 W maximum) Operating temperature 5˚C ~ 40˚C Relative humidity 25% ~ 85%RH (no condensation) Dimensions 270 mm (width) x 245 mm (height) x 200 mm (depth), with Supply holder... -
Page 12: Paper (Label/Tag) Specifications
Outer diameter Ø65 mm (max.) NOTES: 1. To ensure good print quality and maximum print head life use only TOSHIBA TEC specified paper and ribbons. 2. For further information about paper and ribbon, refer to Section 10. CARE/HANDLING OF THE PAPER AND RIBBON. -
Page 13: Appearance
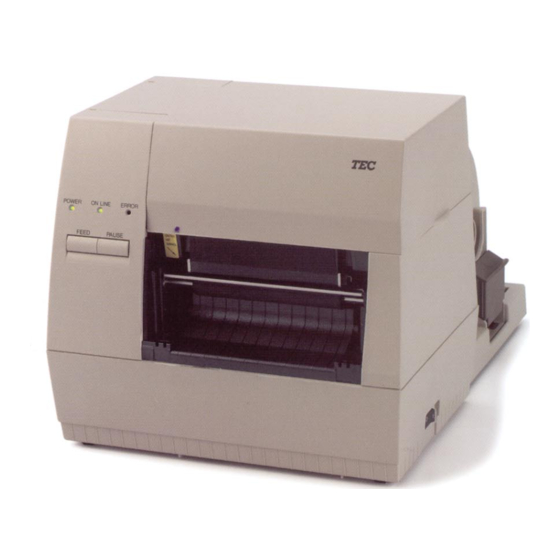
3. APPEARANCE EO1-33006 3.1 FRONT/REAR VIEW 3. APPEARANCE 3.1 FRONT/REAR VIEW Front View Rear View Optional parallel Interface Connector Paper Guide (Centronics) Top Cover DIP Switch Operation Panel Paper Guide Lock Lever Optional Keyboard Connector Power Switch Optional LAN Supply Holder AC Power Inlet Interface Connector O : OFF... -
Page 14: Dip Switch Functions
4. DIP SWITCH FUNCTIONS EO1-33006 4. DIP SWITCH FUNCTIONS 4. DIP SWITCH FUNCTIONS The DIP switches are located at the rear of the printer. WARNING! Turn the POWER OFF before changing the DIP switches. DIP SW Fig. 4-1 DIP SW Function ON/OFF Remarks... -
Page 15: Setup Procedure
EO1-33006 5. SET UP PROCEDURE 5.1 REQUIREMENTS FOR OPERATION 5. SET UP PROCEDURE 5.1 REQUIREMENTS FOR OPERATION This machine has the following requirements: • The host computer must have a serial port or centronics parallel port. • To communicate with host, either an RS-232C cable or Centronics cable is required. (1) RS-232C cable .. -
Page 16: Installation Procedure
6. INSTALLATION PROCEDURE EO1-33006 6.1 INSTALLING THE SUPPLY HOLDER UNIT 6. INSTALLATION PROCEDURE 6.1 INSTALLING THE SUPPLY HOLDER UNIT WARNING! Turn the power OFF before installing the supply holder unit. Fit the two studs on the bottom of the printer into the holes in the supply holder unit. Supply Holder Unit Fig. -
Page 17: Loading The Ribbon
7. LOADING THE RIBBON EO1-33006 7. LOADING THE RIBBON 7. LOADING THE RIBBON The printer is capable of printing in both direct thermal and thermal transfer modes. DO NOT LOAD a ribbon when using a direct thermal paper. 1. Turn the power off and open the top cover. 2. - Page 18 7. LOADING THE RIBBON EO1-33006 7. LOADING THE RIBBON 5. Set the ribbon core (supply side) by fitting the protrusion into the notch. Fig. 7-3 6. Turn the guide wheel in the arrow-indicating direction to remove any slack of the ribbon. NOTE: Make sure that the ribbon has no wrinkles and the protrusions are fitted into the notches of the ribbon cores.
-
Page 19: Loading The Paper
8. LOADING THE PAPER EO1-33006 8. LOADING THE PAPER 8. LOADING THE PAPER This supply holder accepts four sizes of label core: 38 mm, 40 mm, 42 mm and 76.2 mm. When using a paper roll of 38 mm, 40 mm or 42 mm, remove the spacers from the supply holders using the following procedure. - Page 20 8. LOADING THE PAPER EO1-33006 8. LOADING THE PAPER 3. Put the paper roll and supply holders on the supply holder unit. NOTE: Paper may be wound outside or inside. Regardless of the paper roll, the paper must be loaded so that the print side faces upward.
- Page 21 8. LOADING THE PAPER EO1-33006 8. LOADING THE PAPER NOTE: Pass the paper straight from the supply holder to paper outlet. Failure to do this may cause skew feeding or paper jam. Paper Paper Guide Platen Supply Holder A = B Fig.
- Page 22 8. LOADING THE PAPER EO1-33006 8. LOADING THE PAPER Strip type: 1 Strip the labels from the backing paper for about 200-mm long from the top edge of the label roll. 2 First push the strip lever toward the printer to release the hook, and then pull the strip lever. 3 Pass the backing paper between the strip roller and the strip guide roller.
-
Page 23: Threshold Setting
9. THRESHOLD SETTING EO1-33006 9. THRESHOLD SETTING 9. THRESHOLD SETTING For the printer to maintain a constant print position it uses the transmissive sensor to measure the amount of light passing through the gap between labels. When the paper is pre-printed, the darker (or more dense) inks can interfere with this process causing paper jam errors. -
Page 24: Care/Handling Of The Paper And Ribbon
Be sure to read carefully and understand the Supply Manual. Ask your nearest authorized TOSHIBA TEC representative for the Supply Manual. Use only paper and ribbon which meet specified requirements. Use of non-specified paper and ribbon may shorten the head life and result in problems with bar code readability or print quality. -
Page 25: General Maintenance
3. Turn the head lever to raise the print head. 4. Remove the ribbon and paper. 5. Clean the print head element with print head cleaner NOTE: Please purchase the print head cleaner from the authorized TOSHIBA TEC service representative. Print Head (Thermal Element) Print Head Cleaner (24089500013) Fig. -
Page 26: Covers
EO1-33006 11. GENERAL MAINTENANCE 11.2 COVERS 6. Clean the platen with a cloth moistened with alcohol. 7. Remove any dust or glue from the detection area of the sensors and paper path with a soft cloth. Platen Black mark/Feed gap sensor Fig. -
Page 27: Removing Jammed Paper
EO1-33006 11. GENERAL MAINTENANCE 11.3 REMOVING JAMMED PAPER 11.3 REMOVING JAMMED PAPER 1. Turn the power off. 2. Open the top cover. 3. Move the head release lever toward the front of the printer to raise the print head block. 4. - Page 28 EO1-33006 11. GENERAL MAINTENANCE 11.3 REMOVING JAMMED PAPER 2. Fit the enclosed Allen Key into the right side of the cutter unit to rotate the cutter manually. Remove the jammed paper and any paper particles from the cutter. 3. Clean the cutter with dry cloth. Allen Key Cutter Fig.
-
Page 29: Troubleshooting
If you cannot solve a problem with the following solutions, do not attempt to repair it yourself. Turn the power off, unplug the printer, then contact your TOSHIBA TEC representative for assistance. If the error lamp lights during printing, refer to the following troubleshooting to solve the problem. - Page 30 EO1-33006 12. TROUBLESHOOTING 12. TROUBLESHOOTING Error type Problem Solution CUTTER ERROR Paper is jammed in the cutter. Remove the jammed paper and feed the undamaged media through the cutter (See page 11-3). → Press the [PAUSE] key. Else Turn the power off and contact your Authorized Service representative.
-
Page 31: Appendix
EO1-33006 APPENDIX APPENDIX APPENDIX ASCII Code Chart Font Sample Barcode Sample 13-1... -
Page 32: Index
EO1-33006 INDEX INDEX INDEX AC Power inlet ........3-1 Auto media feed ........4-1 Paper ..........2-2, 10-1 Paper jam ..........12-1 Power consumption ........ 2-1 Bar code types ........2-1 Power cord ........1-1, 6-1 Power switch .......... 3-1 Print head ....... - Page 34 PRINTED IN JAPAN EO1-33006...
- Page 35 TEC Label Printer B-450-HS-QQ SERIES Owner’s Manual Table of Contents...
- Page 36 "Cet appareil numérique de la classe A respecte toutes les exigences du Règlement sur le matériel brouilleur de Canada." (for CANADA only) (for QQ only) Copyright © 2000 by TOSHIBA TEC CORPORATION All Rights Reserved 570 Ohito, Ohito-cho, Tagata-gun, Shizuoka-ken, JAPAN...
- Page 37 Do not attempt to effect repairs or modifications to this equipment. If a fault occurs that cannot be rectified using the procedures described in this manual, turn off the power, unplug the machine, then contact your authorized TOSHIBA TEC representative for assistance. Meanings of Each Symbol This symbol indicates warning items (including cautions).
- Page 38 • Utilize our maintenance services. After purchasing the machine, contact your authorized TOSHIBA TEC representative for assistance once a year to have the inside of the machine cleaned. Otherwise, dust will build up inside the machines and may cause a fire or a malfunction. Cleaning is particularly effective before humid rainy seasons.
-
Page 39: Ribbon Specifications
CAUTION: 1. This manual may not be copied in whole or in part without prior written permission of TOSHIBA TEC. 2. The contents of this manual may be changed without notification. 3. Please refer to your local Authorized Service representative with regard to any queries you may... -
Page 40: Introduction
1.1 APPLICABLE MODEL 1. INTRODUCTION Thank you for choosing the TEC B-450 Series thermal transfer printer. This new generation high performance high quality printer is equipped with the latest hardware including the newly developed high density (23.6 dots/mm 600 dots/inch) print head. This allows very clear print at a maximum speed of 50.8 mm/sec. -
Page 41: Specifications
2. SPECIFICATIONS EO1-33019 2.1 GENERAL SPECIFICATIONS 2. SPECIFICATIONS 2.1 GENERAL SPECIFICATIONS Model B-452-HS12-QQ Item Supply voltage 100 - 120V, 60Hz Power consumption 1.8 A, 140 W max. (standby: 0.22 A, 13.5 W) Operating temperature 5˚C ~ 40˚C Relative humidity 25% ~ 85%RH (no condensation) Dimensions 268 mm (width) x 244 mm (height) x 198 mm (depth), with Supply holder unit 410 mm (depth) -
Page 42: Paper (Label) Specifications
Outer diameter Ø65 mm (max.) NOTES: 1. To ensure good print quality and maximum print head life use only TOSHIBA TEC specified paper and ribbons. 2. For further information about paper and ribbon, refer to Section 10. CARE/HANDLING OF THE PAPER AND RIBBON. -
Page 43: Appearance
3. APPEARANCE EO1-33019 3.1 FRONT/REAR VIEW 3. APPEARANCE 3.1 FRONT/REAR VIEW Front View Rear View Top Cover Supply Cover Parallel Interface Operation Panel Connector (Centronics) Paper Guide Lock Lever DIP Switch Keyboard Connector Expansion I/O Power Switch Supply Holder AC Power Inlet Paper Outlet Interface Connector O : OFF... -
Page 44: Dip Switch Functions
4. DIP SWITCH FUNCTIONS EO1-33019 4. DIP SWITCH FUNCTIONS 4. DIP SWITCH FUNCTIONS The DIP switches are located at the rear of the printer. WARNING! Turn the POWER OFF before changing the DIP switches. DIP SW Fig. 4-1 DIP SW Function ON/OFF Remarks... -
Page 45: Setup Procedure
EO1-33019 5. SET UP PROCEDURE 5.1 REQUIREMENTS FOR OPERATION 5. SET UP PROCEDURE 5.1 REQUIREMENTS FOR OPERATION This machine has the following requirements: • The host computer must have a serial port or centronics parallel port. • To communicate with host, either an RS-232C cable or Centronics cable is required. (1) RS-232C cable .. -
Page 46: Installation Procedure
6. INSTALLATION PROCEDURE EO1-33019 6.1 INSTALLING THE SUPPLY HOLDER UNIT 6. INSTALLATION PROCEDURE 6.1 INSTALLING THE SUPPLY HOLDER UNIT WARNING! Turn the power OFF before installing the supply holder unit. Fit the two studs on the bottom of the printer into the holes in the supply holder unit. Fig. -
Page 47: Connecting The Power Cord And Cables
6. INSTALLATION PROCEDURE EO1-33019 6.3 CONNECTING THE POWER CORD AND CABLES 6.3 CONNECTING THE POWER CORD AND CABLES WARNING! Turn the POWER SWITCH to OFF before connecting the power cord or cables. Parallel Interface Cable (Centronics) Keyboard Interface Expansion I/O Interface Serial Interface (RS-232C) Power Cord Fig. -
Page 48: Loading The Ribbon
7. LOADING THE RIBBON EO1-33019 7. LOADING THE RIBBON 7. LOADING THE RIBBON WARNING! Be careful when handling the print head as it becomes very hot. The printer is capable of printing in thermal transfer mode only. 1. Turn the power off and open the top cover. 2. - Page 49 7. LOADING THE RIBBON EO1-33019 7. LOADING THE RIBBON 5. Set the ribbon core (supply side) by fitting the protrusion into the notch. Fig. 7-3 6. Turn the guide wheel in the direction indicated by the arrow to remove any slack on the ribbon. NOTE: Make sure that the ribbon has no wrinkles and the protrusions are fitted into the notches of the ribbon cores.
-
Page 50: Loading The Paper
8. LOADING THE PAPER EO1-330019 8. LOADING THE PAPER 8. LOADING THE PAPER WARNING! Be careful when handling the print head as it becomes very hot. This supply holder accepts four sizes of label core: 38 mm, 40 mm, 42 mm and 76.2 mm. When using a paper roll of 38 mm, 40 mm or 42 mm, remove the spacers from the supply holders using the following procedure. - Page 51 8. LOADING THE PAPER EO1-330019 8. LOADING THE PAPER 4. Put the paper roll and supply holders on the supply holder unit. NOTE: The paper must be loaded so that the print side faces upward. Paper wound inside. Fig. 8-4 5.
- Page 52 8. LOADING THE PAPER EO1-330019 8. LOADING THE PAPER 10. For details on changing the black mark sensor position according to the black mark position, refer to the Section “Setting the black mark sensor position”. When using the round or pre-printed label, refer to the Section “Setting the feed gap sensor position”...
- Page 53 8. LOADING THE PAPER EO1-330019 8. LOADING THE PAPER 13. Close the top cover, and then attach the supply cover to the supply holder unit. (Refer to section 6.2 INSTALLING THE SUPPLY COVER.) Paper loading is now complete. Top Cover Batch type: Fig.
- Page 54 8. LOADING THE PAPER EO1-330019 8. LOADING THE PAPER Setting the black mark sensor position 1 Fold over the end of the label. Then, move sensor knob A in a the horizontal direction so that the mark on the sensor cover aligns with the black mark. Remember the number that centre of the sensor knob A is positioned at.
- Page 55 8. LOADING THE PAPER EO1-330019 8. LOADING THE PAPER Setting the feed gap sensor position 1 Move sensor knob A in a horizontal direction so that the mark on the sensor cover aligns with the centre of the label gap. Remember the number that the centre of the sensor knob A is positioned at. Set sensor knob B to the same position number.
-
Page 56: Threshold Setting
9. THRESHOLD SETTING EO1-33019 9. THRESHOLD SETTING 9. THRESHOLD SETTING For the printer to maintain a constant print position it uses the transmissive sensor to measure the amount of light passing through the gap between labels. When the paper is pre-printed, the darker (or more dense) inks can interfere with this process causing paper jam errors. -
Page 57: Care/Handling Of The Paper And Ribbon
Be sure to read carefully and understand the Supply Manual. Ask your nearest authorized TOSHIBA TEC representative for the Supply Manual. Use only paper and ribbon which meet specified requirements. Use of non-specified paper and ribbon may shorten the head life and result in problems with bar code readability or print quality. -
Page 58: General Maintenance
3. Turn the head lever to raise the print head. 4. Remove the ribbon and paper. 5. Clean the print head element with print head cleaner NOTE: Please purchase the print head cleaner from the authorized TOSHIBA TEC service representative. Print Head Cleaner (24089500013) Print Head (Thermal Element) Fig. -
Page 59: Covers
EO1-33019 11. GENERAL MAINTENANCE 11.2 COVERS 6. Clean the platen with a cloth moistened with alcohol. 7. With a soft cloth, remove any dust or glue from the detection area of the sensors and paper path. Black mark/Feed gap sensor Platen Fig. -
Page 60: Removing Jammed Paper
EO1-33019 11. GENERAL MAINTENANCE 11.3 REMOVING JAMMED PAPER 11.3 REMOVING JAMMED PAPER 1. Turn the power off. 2. Open the top cover. 3. Move the head release lever toward the front of the printer to raise the print head block. 4. - Page 61 EO1-33019 11. GENERAL MAINTENANCE 11.3 REMOVING JAMMED PAPER 2. Fit the enclosed Allen Key into the right side of the cutter unit to rotate the cutter manually. Remove the jammed paper and any paper particles from the cutter. 3. Clean the cutter with dry cloth. Allen Key Cutter Fig.
-
Page 62: Troubleshooting
If you cannot solve a problem with the following solutions, do not attempt to repair it yourself. Turn the power off, unplug the printer, then contact your TOSHIBA TEC representative for assistance. If the error lamp lights during printing, refer to the following troubleshooting to solve the problem. - Page 63 EO1-33019 12. TROUBLESHOOTING 12. TROUBLESHOOTING Error type Problem Solution 1. Restart the printing by pressing HEAD ERROR This message is displayed when sending the [PAUSE] key. the head broken check command ([ESC] HD001 [LF] [NUL]) and the print head has 2.
-
Page 64: Appendix
EO1-33019 APPENDIX APPENDIX APPENDIX ASCII Code Chart Font Sample Barcode Sample 13-1... -
Page 65: Index
EO1-33019 INDEX INDEX INDEX AC Power inlet ........3-1 Paper ..........2-2, 10-1 Auto media feed ........4-1 Paper jam ..........12-1 Power consumption ........ 2-1 Power cord ........1-1, 6-2 Bar code types ........2-1 Power switch .......... 3-1 Print head ....... - Page 68 PRINTED IN JAPAN EO1-33019...
- Page 69 TEC Thermal Printer B-450 SERIES Product Description Document No. EO10-33003A Original Dec., 1998 (Revision Jan, 2001) Table Of Contents PRINTED IN JAPAN...
- Page 70 TABLE OF CONTENTS Page 1. OUTLINE OF THE SYSTEM ................1- 1 1.1 FEATURES OF THE B-450 SERIES ............1- 1 1.2 DESCRIPTION OF MODEL NUMBER ............1- 1 1.3 APPEARANCE AND DIMENSIONS (APPROXIMATE) ......1- 2 1.4 BASIC SPECIFICATIONS ................1- 4 1.5 ELECTRONICS SPECIFICATIONS ............
-
Page 71: Outline Of The System
1. OUTLINE OF THE SYSTEM EO10-33003A 1.1 FEATURES OF THE B-450 SERIES 1. OUTLINE OF THE SYSTEM 1.1 FEATURES OF THE B-450 SERIES 1) Various bar codes, characters and graphic data can be printed using either thermal transfer or thermal direct methods. (HS model supports the thermal transfer method only.) This printer can also print writable characters and logos at designated coordinates by using a graphic command. -
Page 72: Appearance And Dimensions (Approximate)
1. OUTLINE OF THE SYSTEM EO10-33003A 1.3 APPEARANCE AND DIMENSIONS (APPROXIMATE) 1.3 APPEARANCE AND DIMENSIONS (APPROXIMATE) 1.3.1 Front View/Rear View [TS model] Front View Rear View Paper Guide DIP Switch Parallel Interface Top Cover Operation Panel Paper Guide Lock Lever Connector (Centronics) Optional... - Page 73 1. OUTLINE OF THE SYSTEM EO10-33003A 1.3 APPEARANCE AND DIMENSIONS (APPROXIMATE) 1.3.2 Operation Panel POWER LED (Green) Lights when the power is turned on. ON-LINE LED (Green) 1) Flashes when communicating with a host computer. 2) On while printing. ERROR LED (Red) Lights when the printer does not operate correctly.
-
Page 74: Basic Specifications
1. OUTLINE OF THE SYSTEM EO10-33003A (Revision Date: Jan. 22, 2001) 1.4 BASIC SPECIFICATIONS 1.4 BASIC SPECIFICATIONS 1) Printing method ....TS model: Thermal direct printing or thermal transfer printing HS model: Thermal transfer printing 2) Print head (4 inches) [TS model] [HS model] 1 Total number of dots .. - Page 75 1. OUTLINE OF THE SYSTEM EO10-33003A 1.4 BASIC SPECIFICATIONS 9) Character code [TS model] PC-850 PC-8 PC-852 PC-857 [HS model] 5 PC-851 6 PC-855 PC-850 PC-8 PC-852 PC-857 A PC-1254 B PC-1257 PC-1250 PC-1251 PC-1252 PC-1253 LATIN9 ARABIC 10) Character magnification Regular font: 0.5 ~ 9.5 times (Between 0.5 and 1 times, magnification can be specified in steps of 0.1 time, thereafter, specified in steps of 0.5 times.) Outline font: 2.0 ~ 85.0 mm (magnified 0.1 mm in each direction)
-
Page 76: Electronics Specifications
1. OUTLINE OF THE SYSTEM EO10-33003A 1.5 ELECTRONICS SPECIFICATIONS 1.5 ELECTRONICS SPECIFICATIONS 1) CPU ....... V55PI (16 MHz), 120 Pin QFP (0.5 mm) 2) Memory Program: Flash ROM 2 MB Backup: EE-PROM 128 Bytes Image buffer + Work: [TS model] D-RAM 2 MB (Image buffer 1792 KB, Work 256 KB) [HS model] D-RAM 4 MB (Image buffer 3840 KB, Work 256 KB) NOTE: The 1 MB Flash ROM can be used for the QQ models manufactured before August "99 (Serial No. - Page 77 1. OUTLINE OF THE SYSTEM EO10-33003A 1.5 ELECTRONICS SPECIFICATIONS READY/BUSY (DTR) protocol • When initialized after power on, this printer becomes ready to receive data and converts the DTR signal to "High" level (READY). • The printer converts the DTR signal to "LOW" level (BUSY) when the blank positions in the receive buffer amount to 800 Bytes or less.
- Page 78 1. OUTLINE OF THE SYSTEM EO10-33003A 1.5 ELECTRONICS SPECIFICATIONS (9) Pin description Signal Pin No. Description Data line from which the printer sends data to the (Transmit Data) host (send data line). Logic "1" is "Low", and "0" "High". It is LOW (MARK) while no data is being sent.
- Page 79 1. OUTLINE OF THE SYSTEM EO10-33003A 1.5 ELECTRONICS SPECIFICATIONS (10) Interface circuit Input circuit Output circuit SN75188 or equivalent SN75189 or equivalent Fig. 1-5 Signal level Input voltage : "H" .. +3V~ + 15V Output voltage : "H" .. +6V ~ +13V "L"...
- Page 80 1. OUTLINE OF THE SYSTEM EO10-33003A 1.5 ELECTRONICS SPECIFICATIONS 4) Sensor/Switch 1 Head up switch (micro switch) The head up switch is located on the lower left side and back end of the printer frame. This switch detects that the print head is in the print position (head is down) when the print head block is lowered and the arm on the left side of the print head block turns ON the switch.
- Page 81 1. OUTLINE OF THE SYSTEM EO10-33003A 1.5 ELECTRONICS SPECIFICATIONS Slit sensor (Transmissive sensor) This sensor detects the rotation count of the ribbon slit gear and the ribbon motors. The ribbon motors torque works to take up slack in the ribbon and is dependent on the detected count. The slit sensor is a photo coupler combining an LED and a transistor.
-
Page 82: Supply Specifications
Detail specifications and other information on the paper and ribbon are described in Supply Manual by model. It is issued by and sent from TOSHIBA TEC H.Q (Sales Division) upon release of new model or manual's revision. When purchasing the supplies locally, be sure to refer to the Supply Manual for details, or trouble may occur. - Page 83 EO10-33003A 2. SUPPLY SPECIFICATIONS 2.1 PAPER Tag Paper Black Mark <Design> Max. 2.0 mm ~ 10.0 mm ø152.4 mm min. 12 15.0 mm ~ 999 mm 38, 40, 42, 76.2 mm Print Side Fig. 2-4 25.4 mm ~ 114.0 mm <Non Print Area>...
- Page 84 EO10-33003A 2. SUPPLY SPECIFICATIONS 2.1 PAPER [HS model] Label Type Auto-cut Item Batch On-demand Width (mm) 25.4 - 110.0 37.0 - 999.0 Pitch (mm) 7.0 - 999.0 25.4 - 999.0 31.0 - 993.0 Length (mm) 5.0 - 997.0 23.4 - 997.0 0.10 - 0.17 Thickness (mm) 0.10 - 0.17...
- Page 85 4 + 0.2,-0 mm 118+0, -0.5 mm Fig. 2-8 NOTE: When purchasing ribbon locally, they must meet the above size. There may be TOSHIBA TEC- approved ribbons which do not fall within the above size, however, they have no functional problem. Leader tape...
-
Page 86: Care And Handling Of The Paper And Ribbon
EO10-33003A 2. SUPPLY SPECIFICATIONS 2.3 CARE AND HANDLING OF THE PAPER AND RIBBON 2.3 CARE AND HANDLING OF THE PAPER AND RIBBON CAUTION: Be sure to read carefully and understand the Supply Manual. Use only paper and ribbon which meet specified requirements. -
Page 87: Optional Kit
(TS model only) NOTE: To purchase the OPTIONAL KIT, please contact your authorized TOSHIBA TEC represen- tative or TOSHIBA TEC Head Quarter. 3.1 CUTTER MODULE: B-7204-QM This compact cutter module uses a built-in rotary cutter. The specification is provided below: Cutting method .... - Page 88 3. OPTIONAL KIT EO10-33003A 3.2 STRIP MODULE: B-7904-H-QM 3.2 STRIP MODULE: B-7904-H-QM This strip module strips labels from the backing paper one by one using an exclusive DC motor which turns the strip roller to feed the backing paper. No backing paper take-up is provided. 1 Print speed: TS model: Max.4 ips, HS model: Max.
- Page 89 3. OPTIONAL KIT EO10-33003A 3.4 EXPANSION I/O INTERFACE BOARD: B-7704-IO-QM 4 Power supply 5V (Supplied through the DIN connector) 5V±5% 5 Memory (1) Flash memory: 8 M bit (2) SRAM: 32 K byte 6 Buzzer: Installed. 3.4 EXPANSION I/O INTERFACE BOARD: B-7704-IO-QM (TS MODEL ONLY) This interface board is used to connect the printer to external devices, such as a labeler.
- Page 90 3. OPTIONAL KIT EO10-33003A 3.5 CENTRONICS INTERFACE BOARD: B-7704-C-QM Output circuit Printer External controller, etc. (In the case of photo-coupler) OUT0 OUT6 COM2 Fig. 3-4 There are seven output circuits, and each output is an open collector. The voltage of Vcc is 24V (max.) while the operating current is 150 mA.
- Page 91 3. OPTIONAL KIT EO10-33003A 3.6 LAN I/F BOARD: B-7704-LAN-QM 3.6 LAN I/F BOARD: B-7704-LAN-QM (TS MODEL ONLY) Installing this LAN I/F board into the printer can connect the printer and the host by means of Local Area Network and 10BASE-T. (1) Connection Centronics I/F <...
- Page 92 3. OPTIONAL KIT EO10-33003A 3.6 LAN I/F BOARD: B-7704-LAN-QM (3) B-7704-LAN-QM Initial Setting before shipment TELNET Setting Item Parameter Operation Mode Socket Mode Impossible Transparent Data format for socket communi- Impossible Clear the receive buffer at communication. cation My IP Address 190.238.254.254 Possible Sub Net Address...
- Page 93 3. OPTIONAL KIT EO10-33003A 3.6 LAN I/F BOARD: B-7704-LAN-QM (4) Printer Interface (RS-232C Interface) 1) Communication mode: Full-duplex 2) Synchronization method:Start-stop synchronization 3) Transmission speed: 2400 to 19200 bps Selectable by the printer DIP switch setting Initial setting from the printer is 9600 bps. 4) Start bit: 1-bit 5) Data length:...
- Page 94 3. OPTIONAL KIT EO10-33003A 3.6 LAN I/F BOARD: B-7704-LAN-QM (6) LED Function Function ON (Green): Operating Mode ON (Orange): Diagnostic RAM Test (Power ON) ON-LINE LED Blink (Orange): RARP output, Loop Back Test (Power ON) (STATUS LED 1) Blink (Red): System Error (Synchronizes with the ERROR LED) ON (Orange) OFF: Returns to the factory default setting.
- Page 96 PRINTED IN JAPAN EO10-33003A...
- Page 97 TEC Thermal Printer B-450 SERIES Maintenance Manual Document No. EO18-33003A Original Dec., 1998 (Revision Jan, 2001) Table of Contents PRINTED IN JAPAN...
- Page 98 EO18-33003A TOC 2 TABLE OF CONTENTS Page 1. UNPACKING ...................... 1- 1 1.1 PROCEDURE ..................... 1- 1 1.2 CHECKS ..................... 1- 2 2. MAJOR UNIT REPLACEMENT ................2- 1 2.1 REPLACING THE CPU PC BOARD ............2- 1 2.2 REPLACING THE MOTOR ................. 2- 3 2.2.1 Ribbon Motor..................
- Page 99 EO18-33003A TOC 1 Page 6. DIAG. TEST OPERATION .................. 6- 1 6.1 OUTLINE OF THE DIAG. TEST OPERATION ........... 6- 1 6.1.1 When using the KB-80-QM Optional Keyboard ....... 6- 1 6.1.2 When using the operation panel ............6- 2 6.2 SELF TEST MODE (When using the KB-80-QM Optional Keyboard) ..
- Page 100 2. The contents of this manual may be changed without notification. 3. Please refer to your local Authorized Service representative with regard to any queries you may have in this manual. Copyright © 2000 by TOSHIBA TEC CORPORATION All Rights Reserved 570 Ohito, Ohito-cho, Tagata-gun, Shizuoka-ken, JAPAN...
- Page 101 1. UNPACKING EO18-33003A 1.1 PROCEDURE 1. UNPACKING 1.1 PROCEDURE 1) Open the carton. 2) Unpack the side pads (L)/(R) and cushions and the printer from the carton. 3) Unpack the accessories from the carton. Dust Cover Ass’y Dust Cover Base Carton Printer Owner’s Manual Accessory...
- Page 102 1. UNPACKING EO18-33003A 1.2 CHECKS 4) Remove the three pieces of tape from the printer. Tape Fig. 1-2 5) Open the top cover. 6) Remove the three pieces of tape and print head pad from the printer. Print Head Pad Print Head Platen Tape...
-
Page 103: Major Unit Replacement
2. MAJOR UNIT REPLACEMENT EO18-33003A 2.1 REPLACING THE CPU PC BOARD 2. MAJOR UNIT REPLACEMENT WARNING! Disconnect power cord before replacing important parts. Lubrication CAUTION: 1) Lubrication: During parts replacement 2) Kinds of oil: Kinds of oil: FLOIL G-488: 1Kg can. (Part No. 19454906001). Any machine is generally in its best condition when delivered;... - Page 104 2. MAJOR UNIT REPLACEMENT EO18-33003A 2.1 REPLACING THE CPU PC BOARD 4) Disconnect the nine harnesses from CN3 to CN5, CN9, CN12, CN13, CN14, CN20 and CN21 on the CPU PC board. CN21 CN14 CN13 CPU PC Board CN20 CN12 Fig.
-
Page 105: Replacing The Motor
2. MAJOR UNIT REPLACEMENT EO18-33003A 2.2 REPLACING THE MOTOR 2.2 REPLACING THE MOTOR Before removing the motors, refer to Section 2.1 to detach the top cover and CPU PC board. 2.2.1 Ribbon Motor 1) Remove the two PT-3x10 screws and harnesses to detach the ribbon motor attaching plate. Harness PT-3x10 Screw Ribbon Motor... - Page 106 2. MAJOR UNIT REPLACEMENT EO18-33003A 2.2 REPLACING THE MOTOR 2) Remove the four SMW-2.6x6 screws to detach the two ribbon motors from the ribbon motor attaching plate. Ribbon Motor Attaching Plate FLOIL G-488 FLOIL G-488 SMW-2.6x6 Screw Ribbon Motor Ribbon Motor Fig.
-
Page 107: Stepping Motor
2. MAJOR UNIT REPLACEMENT EO18-33003A 2.2 REPLACING THE MOTOR 2.2.2 Stepping Motor WARNING! Be careful not to get burned when handling the stepping motor since it becomes very hot while printing. 1) Remove the two PT-3x10 screws to detach the stepping motor ass’y. PT-3x10 Screw Stepping Motor Ass’y Fig. -
Page 108: Replacing The Ps Unit
2. MAJOR UNIT REPLACEMENT EO18-33003A 2.3 REPLACING THE PS UNIT 2.3 REPLACING THE PS UNIT WARNING! Replace only with the same type and rated of fuse for contin- ued protection against risk of fire. 1) Refer to Section 2.1 to detach the top cover. 2) Remove the T-3x10 screw to detach the side cover R. - Page 109 2. MAJOR UNIT REPLACEMENT EO18-33003A 2.3 REPLACING THE PS UNIT 4) Release the two hooks securing the printer unit. CPU PC Board Head Release Lever R Hook Fig. 2-10 5) Detach the printer unit from the bottom cover. Printer Unit PS Unit Bottom Cover Fig.
- Page 110 2. MAJOR UNIT REPLACEMENT EO18-33003A 2.3 REPLACING THE PS UNIT 6) Detach the PS unit from the bottom cover. Bottom Cover PS Unit Fig. 2-12 7) Disconnect the power harness from CN3 on the PS unit. Remove the SMW-4x8 screw to release the ground wire of the inlet ass’y.
- Page 111 2. MAJOR UNIT REPLACEMENT EO18-33003A 2.3 REPLACING THE PS UNIT 8) Disconnect the inlet ass’y from CN1 on the PS unit. PS Unit Inlet Ass’y Fig. 2-14 9) Replace the PS unit with a new one, and then reassemble in the reverse order of removal.
-
Page 112: Replacing The Print Head
2. MAJOR UNIT REPLACEMENT EO18-33003A 2.4 REPLACING THE PRINT HEAD 2.4 REPLACING THE PRINT HEAD CAUTION: 1. NEVER touch the element when handling the print head. 2. NEVER touch the connector pins. Touching them may cause a static elec- tric discharge which will damage the print head. 1) Push down the head release lever R to open the print head block. - Page 113 2. MAJOR UNIT REPLACEMENT EO18-33003A 2.5 REPLACING THE HEAD CONTROL PC BOARD (FOR THE B-452-HS MODEL) 2.5 REPLACING THE HEAD CONTROL PC BOARD (FOR THE B-452-HS MODEL) 1) Open the top cover. (Refer to Section 2.1.) 2) Remove the two PT-3x10 screws to detach the top cover. (Refer to Section 2.1.) 3) Disconnect the harness and flat cable from CN1 and CN2 on the head control PC board, respectively.
-
Page 114: Replacing The Media Sensor
2. MAJOR UNIT REPLACEMENT EO18-33003A 2.6 REPLACING THE MEDIA SENSOR 2.6 REPLACING THE MEDIA SENSOR 2.6.1 B-452-TS Model Replacing the Sensor PCB (TR) 1) Push down the head release lever R to open the print head block. (Refer tp Sectopm 2.4.) 2) Remove the sensor holder from the sensor holder arm. - Page 115 2. MAJOR UNIT REPLACEMENT EO18-33003A 2.6 REPLACING THE MEDIA SENSOR 4) Release the sensor holder while spreading the tabs of the sensor holder. Be careful not to break the tabs when spreading them. Sensor Holder Fixed Portion Fig. 2-21 5) Disconnect the harness from the sensor PCB (TR), and remove the sensor PCB (TR) from the sensor holder by releasing it from the two rivets.
- Page 116 2. MAJOR UNIT REPLACEMENT EO18-33003A 2.6 REPLACING THE MEDIA SENSOR Replacing the Sensor PCB (LED) 1) Open the top cover. (Refer to Section 2.1) 2) Remove the top cover. (Refer to Section 2.1.) 3) Push down the head release lever R to open the print head block. (Refer to Section 2.4.) 4) Detach the printer unit from the bottom cover.
-
Page 117: B-452-Hs Model
2. MAJOR UNIT REPLACEMENT EO18-33003A 2.6 REPLACING THE MEDIA SENSOR 2.6.2 B-452-HS Model Replacing the Sensor PCB (TR) 1) Push down the head release lever R to open the print head block. (Refer to Section 2.4.) 2) Set the sensor knob to position 5 and lift the sensor holder. 3) Push out the rivet from the back side of the sensor holder and release the sensor PCB cover from the sensor holder. - Page 118 2. MAJOR UNIT REPLACEMENT EO18-33003A 2.6 REPLACING THE MEDIA SENSOR Replacing the Sensor PCB (LED) 1) Push down the head release lever R to open the print head block. (Refer to Section 2.4.) 2) Push the sensor release lever to the direction indicated by the arrow and lift the sensor block. Sensor Release Lever Sensor Block Fig.
- Page 119 2. MAJOR UNIT REPLACEMENT EO18-33003A 2.6 REPLACING THE MEDIA SENSOR 5) Push out the rivet which secures the sensor PCB (LED) from the back side of the sensor block. 6) Disconnect the harness from the sensor PCB (LED) and remove the sensor PCB (LED) from the sensor block.
- Page 120 2. MAJOR UNIT REPLACEMENT EO18-33003A 2.7 REPLACING THE 600 DPI EXPIO PC BOARD (FOR B-452-HS MODEL) 2.7 REPLACING THE 600 DPI EXPIO PC BOARD (FOR B-452-HS MODEL) 1) Open the top cover. (Refer to Section 2.1.) 2) Remove the top cover. (Refer to Section 2.1.) 3) Disconnect the harness and flat cable from CN1 and CN3 on the 600 DPI EXPIO PC board, respectively.
-
Page 121: Installation Procedure For The Optional Equipment
3. INSTALLATION PROCEDURE FOR THE OPTIONAL EQUIPMENT EO18-33003A 3.1 CUTTER MODULE (B-7204-QM) 3. INSTALLATION PROCEDURE FOR THE OPTIONAL EQUIPMENT 3.1 CUTTER MODULE (B-7204-QM) WARNING! 1. Disconnect the power cord before installing the cutter module. 2. Be careful not to injure your fingers when installing the cutter module. 3.1.1 Packing List All the following parts are supplied with the kit. - Page 122 3. INSTALLATION PROCEDURE FOR THE OPTIONAL EQUIPMENT EO18-33003A 3.1 CUTTER MODULE (B-7204-QM) 3) Disconnect the KEY LED harness from CN14 on the CPU PC board and detach the side cover L. CPU PC Board Side Cover L CN14 KEY LED PC Board KEY LED PC Harness Fig.
- Page 123 3. INSTALLATION PROCEDURE FOR THE OPTIONAL EQUIPMENT EO18-33003A 3.1 CUTTER MODULE (B-7204-QM) 6) Remove the paper scale from the platen block. Platen Block Paper Scale Fig. 3-6 NOTE: Store the removed paper scale in a safe place so that it may be replaced should the cutter module be removed in the future.
- Page 124 3. INSTALLATION PROCEDURE FOR THE OPTIONAL EQUIPMENT EO18-33003A 3.1 CUTTER MODULE (B-7204-QM) Remove the cutter cover from the cutter unit by pressing the tab. Cutter Cover Cutter Unit Fig. 3-9 10) Pass the cutter harness through the square hole indicated in the following picture so that the 13- pin connector comes to the CPU PC board side.
- Page 125 3. INSTALLATION PROCEDURE FOR THE OPTIONAL EQUIPMENT EO18-33003A 3.1 CUTTER MODULE (B-7204-QM) 12) Pass the cutter harness under the platen and connect it to the cutter unit. Platen Cutter Harness Cutter Unit Fig. 3-12 NOTE: Be careful not to pinch the cutter harness by the tab of the cutter unit (enclosed portion) when installing the cutter unit.
- Page 126 3. INSTALLATION PROCEDURE FOR THE OPTIONAL EQUIPMENT EO18-33003A 3.1 CUTTER MODULE (B-7204-QM) 15) Fit the tabs on the reverse side of the cutter cover into the notches of the cutter unit to attach the cutter cover. Cutter Unit Cutter Cover Fig.
-
Page 127: Centronics Interface Board (B-7704-C-Qm)
3. INSTALLATION PROCEDURE FOR THE OPTIONAL EQUIPMENT EO18-33003A 3.2 CENTRONICS INTERFACE BOARD (B-7704-C-QM) 3.2 CENTRONICS INTERFACE BOARD (B-7704-C-QM) 3.2.1 Packing List All the following parts are supplied with the kit. Make sure you have all items shown below. Centronics I/F Board (1 pc.) CENTRO Flat Cable (1 pc.) Installation Manual (1 pc.) Locking Support WLS-16-0... - Page 128 3. INSTALLATION PROCEDURE FOR THE OPTIONAL EQUIPMENT EO18-33003A 3.2 CENTRONICS INTERFACE BOARD (B-7704-C-QM) 5) Fit the enclosed locking support into the Centronics I/F board. 6) Secure the Centronics I/F board to the CPU PC board with the two B-3x6 screws and locking support as follows.
-
Page 129: Expansion I/O Interface Board (B-7704-Io-Qm)
3. INSTALLATION PROCEDURE FOR THE OPTIONAL EQUIPMENT EO18-33003A 3.3 EXPANSION I/O INTERFACE BOARD (B-7704-IO-QM) 3.3 EXPANSION I/O INTERFACE BOARD (B-7704-IO-QM) 3.3.1 Packing List All the following parts are supplied with the kit. Make sure you have all items shown below Expansion I/O Interface Expansion I/O Cable (1 pc.) Installation Manual (1 pc.) - Page 130 3. INSTALLATION PROCEDURE FOR THE OPTIONAL EQUIPMENT EO18-33003A 3.3 EXPANSION I/O INTERFACE BOARD (B-7704-IO-QM) 5) Secure the expansion I/O interface board to the CPU PC board with the enclosed two B-3x6 screws and the locking support as follows. CPU PC Board B-3x6 Screw Locking Support Expansion I/O...
-
Page 131: Expansion Memory Board (B-7804-E1M-Qm)
3. INSTALLATION PROCEDURE FOR THE OPTIONAL EQUIPMENT EO18-33003A 3.4 EXPANSION MEMORY BOARD (B-7804-E1M-QM) 3.4 EXPANSION MEMORY BOARD (B-7804-E1M-QM) 3.4.1 Packing List All the following parts are supplied with the kit. Make sure you have all items shown below. NOTE: The B-7804-E1M-QM can be used for the products manufactured before August '99 (Serial No. -
Page 132: Lan I/F Board (B-7704-Lan-Qm)
3. INSTALLATION PROCEDURE FOR THE OPTIONAL EQUIPMENT EO18-33003A 3.5 LAN I/F BOARD (B-7704-LAN-QM) 3.5 LAN I/F BOARD (B-7704-LAN-QM) 3.5.1 Packing List All the following parts are supplied with the kit. Make sure you have all items shown below. Installation Manual (1 pc.) LAN Board (1 pc.) LAN Flat Cable (1 pc.) Locking Support (1 pc.) - Page 133 3. INSTALLATION PROCEDURE FOR THE OPTIONAL EQUIPMENT EO18-33003A 3.5 LAN I/F BOARD (B-7704-LAN-QM) 4) Connect the LAN flat cable to CN11 on the CPU PC board in the orientation indicated below. CPU PC Board CN11 LAN Flat Cable Fig. 3-28 5) Secure the LAN board to the CPU PC board with a locking support and two bind screws(B-3 x 6).
-
Page 134: Programmable Keyboard (Kb-80-Qm)
3. INSTALLATION PROCEDURE FOR THE OPTIONAL EQUIPMENT EO18-33003A 3.6 PROGRAMMABLE KEYBOARD (KB-80-QM) 3.6 PROGRAMMABLE KEYBOARD (KB-80-QM) WARNING! Be sure to turn the printer power OFF before connecting the KB-80-QM to the printer. 3.6.1 Installation Procedure 1) Turn off the printer power. 2) Connect the DIN cable of the KB-80-QM to the DIN connector of the B-450 printer. -
Page 135: Strip Module (B-7904-H-Qm)
3. INSTALLATION PROCEDURE FOR THE OPTIONAL EQUIPMENT EO18-33003A (Revision Date: Jan. 23, 2001) 3.7 STRIP MODULE (B-7904-H-QM) 3.7 STRIP MODULE (B-7904-H-QM) WARNING! 1. Disconnect the power cord before installing the strip module. 2. Be careful not to pinch the harnesses with the covers or strip module. Damaged harnesses may be short-circuited, causing electric shock, fire, or machine failure. - Page 136 3. INSTALLATION PROCEDURE FOR THE OPTIONAL EQUIPMENT EO18-33003A (Revision Date: Jan. 23, 2001) 3.7 STRIP MODULE (B-7904-H-QM) 3.7.2 Installation Procedure 1) Turn the power off. 2) Open the top cover and remove the two PT-3x10 screws. (Refer to Section 3.1.) 3) Disconnect the KEY LED harness from CN14 on the CPU PC board to detach the side cover L.
- Page 137 3. INSTALLATION PROCEDURE FOR THE OPTIONAL EQUIPMENT EO18-33003A (Revision Date: Jan. 23, 2001) 3.7 STRIP MODULE (B-7904-H-QM) For HS Model Open the print head block. The sensor block is fixed to the printer by the two hooks enclosed by the circles in the figure below. Release the hooks by pushing them in the direction indicated by the arrows, and remove the sensor block.
- Page 138 3. INSTALLATION PROCEDURE FOR THE OPTIONAL EQUIPMENT EO18-33003A (Revision Date: Jan. 23, 2001) 3.7 STRIP MODULE (B-7904-H-QM) 3.7 STRIP MODULE (B-7904-H-QM) 8) Install the strip sensor harness (purple) under the three tabs, and then lead it to the front of the printer.
- Page 139 3. INSTALLATION PROCEDURE FOR THE OPTIONAL EQUIPMENT EO18-33003A (Revision Date: Jan. 23, 2001) 3.7 STRIP MODULE (B-7904-H-QM) 10) Fit the strip sensor cover to the four holes in the right side of the printer. Hole Strip Sensor Harness Strip Sensor Cover Hole Paper Guide Base NOTES: 1.
- Page 140 3. INSTALLATION PROCEDURE FOR THE OPTIONAL EQUIPMENT EO18-33003A (Revision Date: Jan. 23, 2001) 3.7 STRIP MODULE (B-7904-H-QM) 12) Insert the projection on the bottom of the printer into a small hole in the strip base. Printer (Bottom View) Strip Base Projection Fig.
- Page 141 3. INSTALLATION PROCEDURE FOR THE OPTIONAL EQUIPMENT EO18-33003A (Revision Date: Jan. 23, 2001) 3.7 STRIP MODULE (B-7904-H-QM) 15) Exchange the paper scale of the platen block with the enclosed strip plate. Paper Scale Platen Block Strip Plate Exchange Fig. 3-43 16) Attach the strip module to the printer so that the upper guide plate of the right side of the strip module is inserted into slit B and the lower guide plate on the left side of the strip module is inserted into slot A.
- Page 142 3. INSTALLATION PROCEDURE FOR THE OPTIONAL EQUIPMENT EO18-33003A (Revision Date: Jan. 23, 2001) 3.7 STRIP MODULE (B-7904-H-QM) 17) Secure the strip module with the enclosed PT-3x8 screw to the printer. Printer Strip Module PT-3x8 Screw Fig. 3-45 18) Unhook the strip lever by pushing it, and open the strip module. 19) Put aside the strip sensor harness (black) and the ground wire to attach the strip plate L to the frame base with the enclosed PT-3x8 screw.
- Page 143 3. INSTALLATION PROCEDURE FOR THE OPTIONAL EQUIPMENT EO18-33003A (Revision Date: Jan. 23, 2001) 3.7 STRIP MODULE (B-7904-H-QM) 21) Fix the ground wire to the CPU PC board with the PT-3x10 screw which secure the CPU PC board. CPU PC Board Ground Wire Fig.
- Page 144 3. INSTALLATION PROCEDURE FOR THE OPTIONAL EQUIPMENT EO18-33003A (Revision Date: Jan. 23, 2001) 3.7 STRIP MODULE (B-7904-H-QM) 24) Return the platen block detached in STEP14 to the printer, and close the print head block. Print Head Block Strip Module Platen Block Fig.
- Page 145 • Replace the HEAD CONTROL PC board. (HS model) Board. Blurred print. 1. Poor quality of paper. • Use only TOSHIBA TEC specified paper. 2. Dust is attached to the paper. • Clean the print head and remove the dust from the paper.
-
Page 146: On Line Operation
5. ON LINE OPERATION EO18-33003A 5.1 RESET OPERATION 5. ON LINE OPERATION 5.1 RESET OPERATION 5.1.1 When using the KB-80-QM optional keyboard This operation restores the printer to the initial status. • Sample operation Turn the power ON. (1) The printer is in stand-by or printing. L I N E (2) Press the [PAUSE] key on the printer. - Page 147 5. ON LINE OPERATION EO18-33003A 5.1 RESET OPERATION Display Indication Table Restoration by pressing the Printer Status [RESTART] Key. LCD Message Possible / Impossible On-line mode ON LINE The head is opened in on-line mode. HEAD OPEN In a pause state Possible PAUSE ****...
- Page 148 5. ON LINE OPERATION EO18-33003A 5.1 RESET OPERATION 5.1.2 When using the operation panel To abort paper issue and clear the data transferred from the PC to the printer, use the following procedure to reset the printer. Power ON (1) Turn the power on. Power Online Error...
- Page 149 5. ON LINE OPERATION EO18-33003A 5.1 RESET OPERATION Key Function Table (Operation Panel) Key Name Function Feeds a piece of paper. [FEED] Key Feeds the paper to the print start position. When printing is performed with the print position misaligned, the printer cannot print data on a proper position, therefore, feed one or two pieces of paper to set the paper to the proper position before printing.
- Page 150 5. ON LINE OPERATION EO18-33003A 5.1 RESET OPERATION LED Indication Table (Operation Panel) Restoration by pressing Status request reset LED Indication Printer Status the [PAUSE] key command reception Possible/Impossible POWER ON LINE ERROR Possible/Impossible On-line mode Possible On-line mode Possible (during communication) The head cover is opened in on- Possible...
-
Page 151: Diag. Test Operation
6. DIAG. TEST OPERATION EO18-33003A 6.1 OUTLINE OF THE DIAG. TEST OPERATION 6. DIAG. TEST OPERATION 6.1 OUTLINE OF THE DIAG. TEST OPERATION 6.1.1 When using the KB-80-QM optional keyboard In system mode the diag. test operation is used to diagnose the printer and to set the parameters by using the [F1], [↑], [↓] and [→] keys on the operation panel. -
Page 152: When Using The Operation Panel
6. DIAG. TEST OPERATION EO18-33003A 6.1 OUTLINE OF THE DIAG. TEST OPERATION 6.1.2 When using the operation panel (1) Turn the power ON while pressing and holding Power ON the [PAUSE] key. [PAUSE] (2) Self diagnosis is performed. Power Online Error (3) Start a self diagnosis print. -
Page 153: Self Test Mode (When Using The Kb-80-Qm Optional Keyboard)
6. DIAG. TEST OPERATION EO18-33003A (Revision Date: Aug. 8, 2000) 6.2 SELF TEST MODE 6.2 SELF TEST MODE (When using the KB-80-QM Optional Keyboard) In self test mode the printer status is printed in two types of sample print. 6.2.1 Maintenance Counter and Automatic Diagnostic Printings Maintenance Counter Printing The data from (1) to (35) on a sample print A is printed. -
Page 154: Sample Print B
6. DIAG. TEST OPERATION EO18-33003A (Revision Date: Jan. 22, 2001) 6.2 SELF TEST MODE Sample Print A TL FEED 0.0km [PC] [Print Condition] (19) FEED 0.0km FEED +0.0mm • Preset count PRINT 0.0km +0.0mm (20) BACK +0.0mm (21) • Print speed : 2”/sec. - Page 155 6. DIAG. TEST OPERATION EO18-33003A (Revision Date: Jan. 22, 2001) 6.2 SELF TEST MODE 2) Parameters Item Contents Feed speed adjustment -10.0 % to +10.0 % (10) X axis fine adjustment -99.5 mm to +99.5 mm (11) Ribbon Motor Drive Voltage -15 step to 0 step (12) Character code selection...
-
Page 156: [Rank]10
6. DIAG. TEST OPERATION EO18-33003A (Revision Date: Jan. 22, 2001) 6.2 SELF TEST MODE Item Contents (33) GAIJI BLOCK The number of blocks used for Bitmap writable character: 0 to 15 (B-452-TS) / 0 to 13 (B-452-HS) (34) PCSAV BLOCK The number of blocks used for PC Save: 0 to 15 (B- 452-TS) / 0 to 13 (B-452-HS) (35) - Page 157 6. DIAG. TEST OPERATION EO18-33003A (Revision Date: Aug. 8, 2000) 6.2 SELF TEST MODE (4) HDCNF Check (B-452-HS model only) HDCNF 9F9A Print Head Historical Control Configuration data (5) EEPROM Check EEPROM Read/write check OK: Data in the check area can be properly read/ written.
- Page 158 6. DIAG. TEST OPERATION EO18-33003A (Revision Date: Aug. 8, 2000) 6.2 SELF TEST MODE (7) Sensor 1 Check 0 0 0 0 0 0 0 0 , 0 0 0 0 0 0 1 0 Head up switch status 0: Print head is closed. Slit Sensor (Rewind) 0: The detecting point is positioned outside the slit.
- Page 159 6. DIAG. TEST OPERATION EO18-33003A (Revision Date: Aug. 8, 2000) 6.2 SELF TEST MODE Description of each sensor/switch Sensor/Switch Description Head up switch Indicates whether the print head is closed. Cutter home position Indicates whether the cutter is at the home position or not. switch Strip sensor Indicates the existence of label in strip mode.
- Page 160 6. DIAG. TEST OPERATION EO18-33003A (Revision Date: Aug. 8, 2000) 6.2 SELF TEST MODE (9) Paper Empty Level Check [R]1.8V [T]4.5V Transparent sensor paper empty level Reflective sensor paper empty level (10) DIP SW Check No. : 8 7 6 5 4 3 2 1 0 0 0 0 0 0 0 0 DIP SW1 (0: OPEN)
- Page 161 6. DIAG. TEST OPERATION EO18-33003A 6.3 PARAMETER SETTING MODE 6.3 PARAMETER SETTING MODE (When using the KB-80-QM Optional Keyboard) The following 19 items are set in the parameter setting mode. The values set in this mode are printed on the sample print of the maintenance counter. Setting procedure and functions are provided below. Power off Press the [→] key.
- Page 162 6. DIAG. TEST OPERATION EO18-33003A 6.3 PARAMETER SETTING MODE Parameter Setting Mode Table Mode Name Function FEED ADJ. Using this parameter the feed length is fine adjusted. CUT ADJ. Using this parameter the cut position or strip position is fine adjusted. BACK ADJ.
-
Page 163: Feed Length Fine Adjustment
6. DIAG. TEST OPERATION EO18-33003A 6.3 PARAMETER SETTING MODE 6.3.1 Feed Length Fine Adjustment Power off Turn on the power while holding down the [SHIFT] key. < 1 > D I A G . Press the [↓]key. < 2 > P A R A M E T E R S E T Press the [→] key. -
Page 164: Cut/Strip Position Fine Adjustment
6. DIAG. TEST OPERATION EO18-33003A 6.3 PARAMETER SETTING MODE 6.3.2 Cut/Strip Position Fine Adjustment Power off Turn on the power while holding down the [SHIFT] key. < 1 > D I A G . Press the [↓] key. < 2 >... -
Page 165: Back Feed Length Fine Adjustment
6. DIAG. TEST OPERATION EO18-33003A 6.3 PARAMETER SETTING MODE 6.3.3 Back Feed Length Fine Adjustment Power off Turn on the power while hoding down the [SHIFT] key. < 1 > D I A G . Press the [↓] key. < 2 >... -
Page 166: Fig
6. DIAG. TEST OPERATION EO18-33003A 6.3 PARAMETER SETTING MODE Feed Length Fine Adjustment Example + 0.0 mm Feed Direction Fig. 6-3 - 10 mm - 10.0 mm Fig. 6-4 + 10 mm + 10.0 mm Fig. 6-5 Cut Position Fine Adjustment Example Print Head Cut Position + 0.0 mm... - Page 167 6. DIAG. TEST OPERATION EO18-33003A 6.3 PARAMETER SETTING MODE When using a label with a length of less than 33 mm : Case 1 Condition: Issue command [ESC]XS, feed command [ESC]T and eject command [ESC]IB are received. Label pitch: 33.0 mm or less, with cut, feed gap sensor, cut position fine adjustment value ± 10 mm or less, and issue mode set to C (cut).
- Page 168 6. DIAG. TEST OPERATION EO18-33003A 6.3 PARAMETER SETTING MODE Strip Position Fine Adjustment Example Print Head Label + 0.0 mm Platen Fig. 6-10 Strip Shaft Backing Paper Print Head + 3.0 mm + 3.0 mm Platen Fig. 6-11 Strip Shaft Backing Paper Print Head - 3.0 mm...
- Page 169 6. DIAG. TEST OPERATION EO18-33003A 6.3 PARAMETER SETTING MODE Back Feed Length Fine Adjustment Example + 0.0 mm Feed Direction Fig. 6-14 Print start position +3.0 mm +3.0 mm Fig. 6-15 -3.0 mm -3.0 mm Fig. 6-16 6-19...
-
Page 170: X Axis Fine Adjustment
6. DIAG. TEST OPERATION EO18-33003A 6.3 PARAMETER SETTING MODE 6.3.4 X Axis Fine Adjustment Power off Turn on the power while holding down the [SHIFT] key. < 1 > D I A G . Press the [↓] key. < 2 >... - Page 171 6. DIAG. TEST OPERATION EO18-33003A 6.3 PARAMETER SETTING MODE X Axis Fine Adjustment Example Feed direction Top first printing + 0.0 mm Fig. 6-17 Bottom first printing -50.0 mm -50.0 mm Fig. 6-18 + 50.0 mm +50.0 mm Fig. 6-19 NOTES: 1.
-
Page 172: Print Tone Fine Adjustment (Thermal Transfer Print)
6. DIAG. TEST OPERATION EO18-33003A 6.3 PARAMETER SETTING MODE 6.3.5 Print Tone Fine Adjustment (Thermal Transfer Print) Power off Turn on the power while holding down the [SHIFT] key. < 1 > D I A G . Press the [↓] key. <... -
Page 173: Print Tone Fine Adjustment (Thermal Direct Print)
6. DIAG. TEST OPERATION EO18-33003A 6.3 PARAMETER SETTING MODE 6.3.6 Print Tone Fine Adjustment (Thermal Direct Print) Power off Turn on the power while holding down the [SHIFT] key. < 1 > D I A G . Press the [↓] key. <... -
Page 174: Font Code Selection
6. DIAG. TEST OPERATION EO18-33003A 6.3 PARAMETER SETTING MODE 6.3.7 Font Code Selection Power off Turn on the power while holding down the [SHIFT] key. < 1 > D I A G . Press the [↓] key. < 2 > P A R A M E T E R S E T Press the [→] key seven times. -
Page 175: Font Zero Selection
6. DIAG. TEST OPERATION EO18-33003A 6.3 PARAMETER SETTING MODE 6.3.8 Font Zero Selection Power off Turn on the power while holding down the [SHIFT] key. < 1 > D I A G . Press the [↓] key. < 2 > P A R A M E T E R S E T Press the [→] key eight times. -
Page 176: Transmission Control Mode Selection
6. DIAG. TEST OPERATION EO18-33003A 6.3 PARAMETER SETTING MODE 6.3.9 Transmission Control Mode Selection Power off Turn on the power while holding down the [SHIFT] key . < 1 > D I A G . Press the [↓] key. • XON/XOFF AUTO: XON/XOFF mode (XON at power on, XOFF at power off) <... -
Page 177: Control Code Selection
6. DIAG. TEST OPERATION EO18-33003A 6.3 PARAMETER SETTING MODE 6.3.10 Control Code Selection Power off Turn on the power while holding down the [SHIFT] key. < 1 > D I A G . Press the [↓] key. < 2 > P A R A M E T E R S E T Press the [→] key ten times. -
Page 178: Ribbon Take-Up Motor Voltage Fine Adjustment
6. DIAG. TEST OPERATION EO18-33003A 6.3 PARAMETER SETTING MODE 6.3.11 Ribbon Take-up Motor Voltage Fine Adjustment Power off Turn on the power while holding down the [SHIFT] key. < 1 > D I A G . Press the [↓] key. <... -
Page 179: Ribbon Feed Motor Voltage Fine Adjustment
6. DIAG. TEST OPERATION EO18-33003A 6.3 PARAMETER SETTING MODE 6.3.12 Ribbon Feed Motor Voltage Fine Adjustment Power off Turn on the power while holding down the [SHIFT] key. < 1 > D I A G . Press the [↓] key. <... - Page 180 6. DIAG. TEST OPERATION EO18-33003A 6.3 PARAMETER SETTING MODE 6.3.13 Strip Wait Status Setting Power off Turn on the power while holding down the [SHIFT] key. < 1 > D I A G . Press the [↓] key. < 2 >...
- Page 181 6. DIAG. TEST OPERATION EO18-33003A 6.3 PARAMETER SETTING MODE 6.3.14 Threshold Manual Fine Adjustment for the Black Mark Sensor Power off Turn on the power while holding down the [SHIFT] key. < 1 > D I A G . Press the [↓] key. <...
- Page 182 6. DIAG. TEST OPERATION EO18-33003A 6.3 PARAMETER SETTING MODE 6.3.15 Threshold Manual Fine Adjustment for the Feed Gap Sensor Power off Turn on the power while holding down the [SHIFT] key. < 1 > D I A G . Press the [↓] key. <...
-
Page 183: Kanji Code Selection
6. DIAG. TEST OPERATION EO18-33003A 6.3 PARAMETER SETTING MODE 6.3.16 Kanji Code Selection Power off Turn on the power while holding down the [SHIFT] key. < 1 > D I A G . Press the [↓] key. < 2 > P A R A M E T E R S E T Press the [PAUSE] key sixteen times. -
Page 184: Feed Speed Adjustment
6. DIAG. TEST OPERATION EO18-33003A 6.3 PARAMETER SETTING MODE 6.3.17 Feed Speed Adjustment After using the printer for a long period of time, the platen will abrade, causing a shrunk printing. In such case, use the following procedure to store a fine adjustment value of timing pulse cycle which drives the stepping motor in EEPROM. - Page 185 6. DIAG. TEST OPERATION EO18-33003A 6.3 PARAMETER SETTING MODE [Example of Adjustment] Pre-print Pre-print +0.0% Feed Direction Fig. 6-20 Print out became shrunk. +0.0% Print is out of po- sition due to a shrunk printing. Fig. 6-21 +2.0% Adjust the feed speed to print in the correct posi- tion.
-
Page 186: Character Code 5Ch Selection
6. DIAG. TEST OPERATION EO18-33003A 6.3 PARAMETER SETTING MODE 6.3.18 Character Code 5CH Selection Power off Turn on the power while holding down the [SHIFT] key. < 1 > D I A G . Press the [↓] key. < 2 >... -
Page 187: Euro Font Code Setting
6. DIAG. TEST OPERATION EO18-33003A 6.3 PARAMETER SETTING MODE 6.3.19 Euro Font Code Setting Power off Turn on the power while holding down the [SHIFT] key. < 1 > D I A G . Press the [↓] key. < 2 >... -
Page 188: Test Print Mode (When Using The Kb-80-Qm Optional Keyboard)
6. DIAG. TEST OPERATION EO18-33003A 6.4 TEST PRINT MODE 6.4 TEST PRINT MODE (When using the KB-80-QM Optional Keyboard) Eight kinds of test prints are provided in the test print mode. When performing the test print, 7 parameters should be set. The default parameter at power on is as below: •... - Page 189 6. DIAG. TEST OPERATION EO18-33003A 6.4 TEST PRINT MODE From (B) of the preceding page. 5000 (Print count 5000) Set the print count from those at the 1000 (Print count 1000) right by pressing the [↓] key or (Print count 500) Press the [C] key.
- Page 190 6. DIAG. TEST OPERATION EO18-33003A 6.4 TEST PRINT MODE From (D) of the preceding page. Set the issue mode type [ S ] N O C U T Select the issue mode type from [S] NO CUT those at the right by pressing (Batch printing without cut) the [↓] key or [↑] [C] WITH CUT...
- Page 191 6. DIAG. TEST OPERATION EO18-33003A 6.4 TEST PRINT MODE From (E) of the preceding page. < 3 > T E S T P R I N T Press the [→] key. C O N D I T I O N Press the [→] key.
- Page 192 6. DIAG. TEST OPERATION EO18-33003A 6.4 TEST PRINT MODE When “AUTO PRINT” is selected, 5 pcs. of the 3-dot slant line labels, bar code labels and character labels are printed respectively after one label is fed. Test Print Sample • Slant line (1 dot) •...
- Page 193 6. DIAG. TEST OPERATION EO18-33003A 6.4 TEST PRINT MODE Auto paper feed At a test print with the cut mode being specified, the auto paper feed (advancing the paper four about 10 mm to prevent the leading edge of the paper from winding onto the platen) is performed after printing or feeding.
-
Page 194: Thermistor Check
6. DIAG. TEST OPERATION EO18-33003A 6.5 SENSOR SETTING MODE (When using the KB-80-QM Optional Keyboard) 6.5 SENSOR SETTING MODE (When using the KB-80-QM Optional Keyboard) Thermistor check and black mark/feed gap sensor settings are provided in the sensor setting mode. The value set in this mode is printed as data of sensor 2 in Automatic diagnosis printing in self test mode. -
Page 195: Black Mark Sensor Adjustment
Holding the [RESTART] key down until an asterisk ( * ) is displayed. Align the white part of the (More than 3 seconds.) TEC specified paper with the black mark sensor. F L E C T . ] 3 . 8 V * (See NOTE 2.) -
Page 196: Feed Gap Sensor Adjustment
( * ) is displayed. Feed Gap Sensor (More than 3 seconds.) Align the backing paper of the TEC specified label with the feed gap sensor. A N S . ] 4 . 1 V * (See NOTE 2.) Indicates the adjustment is complete. -
Page 197: Sensor Setting Mode (When Using The Operation Panel)
6. DIAG. TEST OPERATION EO18-33003A 6.6 SENSOR SETTING MODE (When using the operation panel) 6.6 SENSOR SETTING MODE (When using the operation panel) Power OFF (1) Turn the power OFF. DIPSW (2) Set the DIP switches to enter the manual threshold setting mode. -
Page 198: Threshold Setting (When Using The Operation Panel)
6. DIAG. TEST OPERATION EO18-33003A (Revision Date: Aug. 8, 2000) 6.7 THRESHOLD SETTING (When using the operation panel) 6.7 THRESHOLD SETTING (When using the operation panel) For the printer to maintain a constant print position it uses the transmissive sensor to measure the amount of light passing through the gap between labels. -
Page 199: Ram Clear Mode (When Using The Kb-80-Qm Optional Keyboard)
6. DIAG. TEST OPERATION EO18-33003A 6.8 RAM CLEAR MODE (When using the KB-80-QM Optional Keyboard) 6.8 RAM CLEAR MODE (When using the KB-80-QM Optional Keyboard) In RAM clear mode, various data written on the EEP-ROM can be initialized. There are two clear functions; Maintenance counter clear and parameter clear in the parameter setting mode. - Page 200 6. DIAG. TEST OPERATION EO18-33003A (Revision Date: Aug. 8, 2000) 6.8 RAM CLEAR MODE (When using the KB-80-QM optional keyboard) Function Mode Name PARAMETER CLEAR Item Initial Value X axis fine adjustment 0 mm Character code selection PC-850 Font zero selection “0”...
-
Page 201: Maintenance Counter Clear
6. DIAG. TEST OPERATION EO18-33003A 6.8 RAM CLEAR MODE (When using the KB-80-QM optional keyboard) 6.8.1 Maintenance Counter Clear Power off Turn on the power while holding down the [SHIFT] key . < 1 > D I A G . Press the [↓] key four times. -
Page 202: Parameter Clear
6. DIAG. TEST OPERATION EO18-33003A 6.8 RAM CLEAR MODE (When using the KB-80-QM optional keyboard) 6.8.2 Parameter Clear Power off Turn on the power while holding down the [SHIFT] key . < 1 > D I A G . Press the [↓] key four times. <... -
Page 203: Ram Clear Mode (When Using The Operation Panel)
6. DIAG. TEST OPERATION EO18-33003A 6.9 RAM CLEAR MODE (When using the operation panel) 6.9 RAM CLEAR MODE (When using the operation panel) 6.9.1 Maintenance Counter Clear Power OFF (1) Turn the power OFF. DIPSW (2) Set the DIP switches to enter the maintenance counter clear mode. - Page 204 6. DIAG. TEST OPERATION EO18-33003A 6.10 LAN I/F SETTING MODE (When using the KB-80-QM Optional Keyboard) 6.10 LAN I/F SETTING MODE (When using the KB-80-QM optional keyboard) Each address setting of LAN I/F (The following operations can be performed when the LAN I/F PC board is installed to the printer.) is available in this mode.
- Page 205 6. DIAG. TEST OPERATION EO18-33003A 6.10 LAN I/F SETTING MODE (When using the KB-80-QM optional keyboard) LAN I/F Initial Setting before shipment Initial Parameter Socket Mode Operation Mode Transparent Data format for socket communication Clear the receive buffer at connection. 190.238.254.254 My IP Address (Common) 0.0.0.0 (Not Used)
-
Page 206: Head Broken Element Check (B-452-Hs Model)
6. DIAG. TEST OPERATION EO18-33003A 6.11 HEAD BROKEN ELEMENT CHECK (B-452-HS MODEL) 6.11 HEAD BROKEN ELEMENT CHECK (B-452-HS MODEL) The printer automatically performs the head broken element check. The result of the head broken element check is indicated in the display. Power off Turn on the power while holding down the [FEED]... -
Page 207: Floppy Disk
Program Download FDK (3.5”, 2 HD, 1.44 MB) Model Name B-452-QQ/QP INSTALL KIT V1.0A Revision Version Master FDK creation date 15th November 1996 FMRM00XXXXX: 1200 Check sum (main) 3400 Check sum (Boot) Software No. V001. 002 FDK Version Copyright 1998 TEC CORPORATION All Rights Reserved Fig. 7-2... - Page 208 7. PROGRAM DOWN LOAD FOR PRINTER EO18-33003A 7.3 DOWN LOAD PROCESURE (DOS Version) 7.3 DOWN LOAD PROCEDURE (DOS Version) (1) Turn off the printer. (2) Set the DIP switch #8 ON to enter the program download mode. (3) Turn the PC power on. (4) Turn the printer power on.
-
Page 209: Error Code
7. PROGRAM DOWN LOAD FOR PRINTER EO18-33003A 7.4 ERROR CODE (13) When an error occurs, the following message is displayed together with the error code in line The following error occurred during transmission. (ERROR=##) Press any key to retry. Error code Doing so will revert to the displayed described in step (6). - Page 210 7. PROGRAM DOWN LOAD FOR PRINTER EO18-33003A 7.5 DOWNLOAD PROCEDURE (WINDOWS Version) 7.5 DOWNLOAD PROCEDURE (WINDOWS Version) Turn the PC power on. While running Windows 95 or Windows 98, insert Setup Disk (1/2) into the PC floppy drive. Click on the START button then highlight RUN and click on RUN. When the RUN display appears, as in below, type in A: \setup and click on OK.
- Page 211 7. PROGRAM DOWN LOAD FOR PRINTER EO18-33003A 7.5 DOWNLOAD PROCEDURE (WINDOWS Version) After click OK in the previous screen, the following message screen appears. Click on the button to accept the directory or change the directory if desired. Fig. 7-6 When the install process is completed, the following screen display will appear.
- Page 212 7. PROGRAM DOWN LOAD FOR PRINTER EO18-33003A 7.5 DOWNLOAD PROCEDURE (WINDOWS Version) For B-452-TS model Select the download section and device. For the RS-232C interface, select COM1 or COM2 port. For the centronics interface, select LPT1 port. File Name Firmware Version Program Creation Date Program Size Device...
-
Page 213: Error Message
7. PROGRAM DOWN LOAD FOR PRINTER EO18-33003A 7.6. ERROR MESSAGE The program is downloaded to the PC. When the download is completed successfully, “Complete” is displayed. Complete When the download failed, an error message is diplayed. Error Message 7.6 ERROR MESSAGE When the download failed, the following error messages are displayed. - Page 214 8. PROGRAM DOWN LOAD FOR KEYBOARD EO18-33003A 8.1 OUTLINE 8. PROGRAM DOWN LOAD FOR KEYBOARD 8.1 OUTLINE The file loading loads (writes) BASIC program file or data file sent from the PC via an RS-232C cable to the flash memory. This section describes how to use the file loading. 8.2 SETUP 1) The KB-80-QM enters the downloading mode in the maintenance mode.
-
Page 215: Down Load Procedure
8. PROGRAM DOWN LOAD FOR KEYBOARD EO18-33003A 8.4 DOWN LOAD PROCEDURE 8.4 DOWN LOAD PROCEDURE 8.4.1 Program download mode Turn on the power by pressing the [.] key. 2 . D A T A O W N L O A D Press the [3] key to enter the download mode. - Page 216 8. PROGRAM DOWN LOAD FOR KEYBOARD EO18-33003A 8.4 DOWN LOAD PROCEDURE 8.4.2 Program file maintenance mode (Deleting program files) Turn on the power by pressing the [.] key. 2 . D A T A O W N L O A D Press the [1] key to enter the program file maintenance mode.
- Page 217 8. PROGRAM DOWN LOAD FOR KEYBOARD EO18-33003A 8.5 DOWNLOAD PROCEDURE (WINDOWS Version) 8.5 DOWNLOAD PROCEDURE (WINDOWS Version) Turn the PC power on. While running Windows 95 or Windows 98, insert Setup Disk (1/2) into the PC floppy drive. Click on the START button then highlight RUN and click on RUN. When the RUN display appears, as in below, type in A: \setup and click on OK.
- Page 218 8. PROGRAM DOWN LOAD FOR KEYBOARD EO18-33003A 8.5 DOWNLOAD PROCEDURE (WINDOWS Version) After click on OK in the previous screen, the following message screen appears. Click on the button to accept the directory or change the directory if desired. Fig. 8-5 The following program group selection screen appears.
- Page 219 8. PROGRAM DOWN LOAD FOR KEYBOARD EO18-33003A 8.5 DOWNLOAD PROCEDURE (WINDOWS Version) 10) Connect the printer to the PC with the RS-232C cable. 11) Turn the printer power on. 12) Copy the all files in the Program Download FDK to the directory of “kb80pdl for SE”. The directory is created in the Program Files as a default.
- Page 222 PRINTED IN JAPAN EO18-33003A...
Need help?
Do you have a question about the B-450 SERIES and is the answer not in the manual?
Questions and answers