Table of Contents
Advertisement
Quick Links
Advertisement
Table of Contents

Subscribe to Our Youtube Channel
Related Manuals for Sagem PHONEFAX 39 TDS


Summary of Contents for Sagem PHONEFAX 39 TDS
- Page 1 User manual...
-
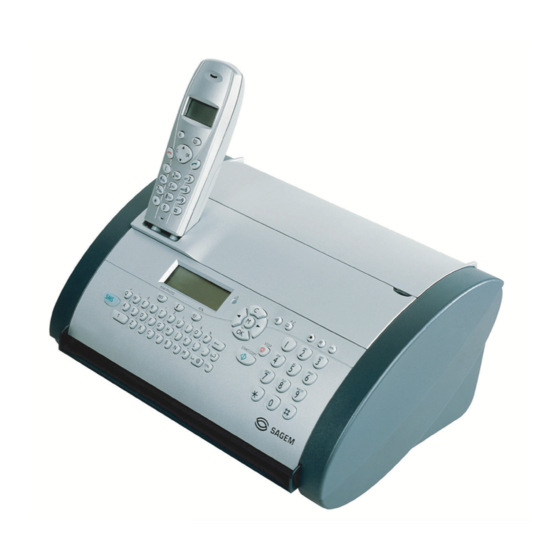
Page 2: Description Of The Machine
Description of the machine 1 Power supply cable with power plug 9 Printer roller 2 Document feeder and paper tray cover 10 Scanner lid 3 Paper tray 11 Holder for Plug’n’Print card 4 Document holder 12 Front ink fi lm compartment 5 Paper feed fl... -
Page 3: Key Assignment On The Fax Machine
Key assignment on the fax machine { press twice briefl y: to forward a call (for devices with from the fax machine to all cordless hand- built-in answering sets; press once briefl y and digit a key: to machine) RES to select a higher resolu- forward a call from the fax machine to a ON/OFF to activate tion when copying or sending... - Page 4 Key assignment for cordless handset Display symbols R press briefl y: to call the last à if the à symbol lights up the number dialled, long press: call up battery is charged. If the ì symbol recently received calls with calling appears on the display the battery is party identifi...
-
Page 5: Table Of Contents
Contents Installation .......7 SMS W ........25 Packaging...............7 SMS settings............25 Connection............7 Disable SMS printing..........25 Ink fi lm ..............8 Reading SMS messages........25 Loading paper............9 Sending SMS messages........26 Removing paper ..........11 Printing SMS messages ........26 Additional devices..........11 Deleting SMS messages........26 Easy Install ............12 Other SMS functions..........26 ISDN connection..........12 Disable SMS reception ........27... -
Page 6: Safety Instructions
Ensure safe cable laying (danger of stumbling, Safety damage to the cable or the fax machine). Disconnect the fax machine from the mains and instructions telephone line before cleaning the surface of the machine. Pease read all warning notices and instructions Never use liquid or gaseous cleaning agents and follow them precisely. -
Page 7: Installation
Installation Connection Telephone socket Packaging Connect the telephone cable to the fax machine by inserting it in the socket identifi ed with LINE. The following items are included in the packag- Next connect the telephone plug to the line ing: socket on the wall. -
Page 8: Ink Film
Before you use the handset for the fi rst time the batteries need to charge for at least 12 hours. v For use with SAGEM ink fi lms only! The handset should never be placed on the cradle without its batteries. This could Removing the ink film permanently damage the handset. -
Page 9: Loading Paper
Loading the ink film 5 Break out the new Plug’n’Print card and insert it in the slot to the left of the ink fi lm com- 1 Carefully remove the rubber rings from the partments. new ink fi lm. Take care not to damage the ink fi... - Page 10 2a If you want to use the paper feeder for only a 4 Insert the document holder in the appropriate short while, fl ip up the paper support. In this opening on the paper refi ll fl ap. case, you can insert up to 15 sheets of paper. 2b If you will be using the paper feeder constant- ly, fl...
-
Page 11: Removing Paper
If you intend using special auxiliary devices with 7 Close the paper feed fl ap. your fax machine, please contact your dealer. If you wish to receive faxes via modem, you must set your fax machine to MANUAl RECEPTION. EXT socket You can connect additional devices to the same telephone socket by using the socket labeled EXT on your machine. -
Page 12: Easy Install
2 You can switch on the PABX operation using v If you connect additional devices to sepa- rate sockets (e. g. in separate rooms) your PABX: YES fax switch cannot control them (which means that your machine behaves like PABX: NO any ordinary machine). -
Page 13: Basic Settings
Basic settings Your name 1 Select function 14 by pressing M, 14 and If you want to keep a note of the factory settings OK on your fax machine. on your machine for later, we recommend print- 2 Enter your name using the alphabetic keypad. ing out a function list before you change any of the settings: Press once M and twice OK. -
Page 14: Ringer Volume
For the cordless handset You can change the ringing tones not only on your fax machine but also on your cordless hand- set: 1 Select function 31 by pressing /, 31 on the cordless handset. 2 Now use / to select one of the ringing tones. -
Page 15: Fax Switch
Fax switch Set SM mode The built-in fax switch enables you to phone and Display Possible settings fax from the same telephone connection and use tAM rings: 0, 1, 2, 3, 4, 5, 6, 7, additional devices. The fax switch separates fax and voice messages. -
Page 16: External Answering Machine
For machines without a built-in answer machine Settings example: the fax switch is disabled in this setting, i. e. your Answering machine rings device immediately switches over to fax recep- FAX RINGS: tion and will not ring, when calls are received (the caller hears a whistling tone). -
Page 17: Telephone
Telephone Telephone book a on the fax machine Making a call The memory in your fax machine can store about 50 names and numbers (devices without answer- 1 To make a call, press the ( button on the ing machine) or about 200 names and number cordless handset and key in the number. -
Page 18: Telephone Book M On The Cordless Handset
4 All numbers saved in the telephone book of Telephone book m on your fax machine will be displayed. Select the the cordless handset entry you want to save using u and con- fi rm with OK. You can also store telephone numbers in the 5 The saved entry will appear on the screen. -
Page 19: Easylink
If a call had been received during your absence or while you were on a phone call, the symbol I will appear on the display of your fax machine. The telephone numbers of the last ten received calls are stored. 1 Press L on your fax machine for two sec- onds. - Page 20 Incoming call Cordless handset Fax machine Other telephone You want to accept a Devices without built- Depending on the type Press ( both for an call. in answering machine: of telephone. external call and for a Not possible call that is forwarded If you lift the handset by your fax machine Devices with built-in...
-
Page 21: Fax & Copy
Fax & Copy 3 Move the document guide so that it rests on the document. Write clearly and legibly. Only use pens with dark ink (black or dark-blue, not yellow, orange or light green). The following points are the most common causes of errors when sending faxes: v Don’t send …... -
Page 22: Broadcast
Fax reception without paper 2 Press M, 46 and OK on your fax machine. Select the desired group from 1 to 5 using If there is no more paper in the feeder or if the u. Press OK. ink fi lm is empty, an incoming fax will be stored in memory (storage capacity for devices without 3 Use u to select SEND FAX? and press built-in answering machine approx. -
Page 23: Transmission And Error Reports
Transmission and error Polled reception reports By means of this function documents which have been prepared for collection from another Your fax machine can print a transmission report fax machine can be retrieved. every time you have sent a document. This way you are given confi... -
Page 24: Send Later
3 The operation is interrupted as soon as you Copy remove the document. You can use your fax machine to make copies of Polling codes work in accordance with the an original. Resolution FINE is set by default. In ITU international standard. However, there addition, you can also select resolution PHOTO are manufacturers who use other processes (see Image quality). -
Page 25: Sms W
The NO. for transm. and the NO. for re- SMS W cept. are needed in order to use SMS services. In some countries these numbers may be identical. (not available in all countries) You can send and receive SMS (Short Message Disable SMS printing Service) messages with your fax machine. -
Page 26: Sending Sms Messages
Sending SMS messages 5 Press OK. The messages will be printed out. 1 Press the SMS button. You can also print SMS messages by pressing M, 63 and OK on your fax machine. 2 Press u to select SEND SMS. 3 Press OK. -
Page 27: Disable Sms Reception
Disable SMS reception If you operate another SMS-compatible cordless phone on the same line there is no guarantee that a particular SMS will be received on your fax ma- chine or on the other cordless handset. However, you can only receive SMS messages on one device at any one time. -
Page 28: Answering Machine B
Answering Listening to messages 1 If the PLAY button fl ashes on your fax ma- machine b chine, this means that messages have been recorded for you. New messages are indicated on your cordless handset by the b symbol. (for devices with built-in answering Press PLAY to listen to the fi... -
Page 29: Forwarding Messages
Forwarding messages Recording a conversation Your fax machine can automatically forward all You can record a telephone conversation with incoming messages to another telephone number. your fax machine. Enter the telephone number to which you wish 1 Press REC during a telephone conversation. recorded calls to be forwarded. -
Page 30: Remote Control On The Fax Machine
Internal memo 3 Then you can enter commands as usual or terminate the remote control by replacing the You can record a personal message with this handset. function. Messages can be heard on the fax machine itself or by remote control from a tel- Overview of commands ephone. -
Page 31: Remote Control On The Cordless Handset
Remote control on the cordless handset You can control the answering machine functions of your fax machine from your cordless handset. Preparing the cordless handset for remote access 1 Press /, until you get to option 6. Press The following functions are available for you to listen to your messages. -
Page 32: Cordless Handset
Cordless Registering a cordless handset on more than one fax machine You can register a cordless handset on up to four handset fax machines. 1 Register your cordless handset automatically on the fi rst fax machine, as described above. Registering and deregis- 2 On the second fax machine, press M, 71 tering a cordless hand- and OK. -
Page 33: Internal Phone Calls
Internal phone calls Muting If you have registered more than one cordless If you are making a phone call and want to talk handset on your fax machine you can make inter- to someone in the room without the person on nal calls between two handsets. -
Page 34: Hints And Tips
Hints and Tips 5 Close the panel so that it also clicks into place. Delivery service You can order ink fi lms and cleaning accessories at your local dealer or directly. Paper jam 1 The display shows Paper jam. 2 Open the operation panel by lifting in the middle. -
Page 35: Service Code
The following codes are at your disposal: 4 Carefully remove the document either from the front or the back. Code No. 7117 This code erases all your modifi cations to the fac- tory settings. The fax machine will therefore react in exactly the same way as on fi... -
Page 36: Troubleshooting
2 Open the operation panel by lifting in the 7 Insert paper (see Installation / Loading pa- middle. When you hear a soft click, the panel per). is engaged. Cleaning the document feed roller … when a black stripe appears at the top of a copy. - Page 37 Problems when faxing or printing Faxes are of poor quality. Change the resolution setting to FINE or PHOTO. Check the document or set a higher contrast with function 47 (see chapter Fax & Copy / Con- trast). Test the fax machine by making a copy. If your copy is faultless the correspondent’s fax machine might be defective.
-
Page 38: Appendix
35 Ringer types............ 14 Appendix (selection between ten ringer types) Others Functions 44 Dialling list ............. 18 (print out of stored names and numbers) To print a list of functions, press once M and twice OK. 45 Service code ..........28, 36 (disable SMS reception) Setup (deleting personal settings) -
Page 39: Technical Data
Technical data Fax switch DAY/NIGHT/TIMER Dimensions 318 × 202 × 146 mm without paper tray Compatibility ITU Group 3 Weight about 2 kg Connection type outside line (PSTN) Power consumption stand by: about 2,4 W extension (PABX) telephoning: about 4 W Flash times outside line (PSTN): 100 ms... -
Page 40: Guarantee
SAGEM Communication Austria GmbH shall ATTENTION! have no liability under the guarantee in respect (UK Terms and Conditions) SAGEM SA is the European Number 1 in fax • damage, defects breakdown or malfunction and offers a complete range of fax terminals due to:... - Page 41 Please note that only SAGEM ink fi lms should be used. Your SAGEM guarantee does not cover damage to your fax machine that may be caused...
-
Page 45: Index
Telephone book en- Index try on the cordless Calling line identifi ca- Easylink 19 handset 18 tion 18 Easy Install 12 Telephone book Care 35 Economy operating Activate answering entry on the fax Clean the scanner glass mode 16 machine 28 machine 17 Entry Additional devices 11... - Page 46 Forwarding Registering and Forwarding to other reregistering a cordless Key assignment Packaging 7 cordless handsets handset of the original For the cordless Paper type 32 handset 4 Fax reception with- Forwarding to the Registering a cordless For the fax machine out paper 22 fax machine 33 handset on more than...
- Page 47 Speaker volume For the cordless handset 14 Telephone book en- For the fax machine try on the cordless handset 18 Special fax switch set- Telephone book on tings 15 the fax machine 17 Start key 3 Stop key 3 Store VIP code 29 Telephone book en- Volume...
- Page 48 This electronic facility contains recyclable material. At the end of use of this facility please inform yourself about the corresponding recycling demands of your country. Technical changes and errors excepted. Copyright © 2004 SAGEM Communication Austria GmbH 5103 506 XXXX.1 (M3 SPFX XXXX)
Need help?
Do you have a question about the PHONEFAX 39 TDS and is the answer not in the manual?
Questions and answers