Table of Contents
Advertisement
Instal
\
NOTE
TO EQUIPMENT
OWNER:
Thank you for purchasing
a Gree E-TAC. Please read this Owner's
Information
Manual carefully
before installing
and using this appliance.
Keep this manual for future reference.
For your convenience,
please record the model and serial numbers
of your new equipment
in the
spaces provided. This information,
along with the installation
data and dealer contact information,
will be helpful should your system require maintenance
or service.
UNIT INFORMATION
Model
#
Serial
#
DEALERSHIP
CONTACT
INFORMATION
Company Name:
Address:
INSTALLATION
INFORMATION
Date Installed
Phone Number:
Technician Name:
Advertisement
Table of Contents

Related Manuals for Gree E-TAC


Summary of Contents for Gree E-TAC
- Page 1 Instal NOTE TO EQUIPMENT OWNER: Thank you for purchasing a Gree E-TAC. Please read this Owner's Information Manual carefully before installing and using this appliance. Keep this manual for future reference. For your convenience, please record the model and serial numbers...
-
Page 2: Table Of Contents
UNIT FEATURES .................. 4 - 5 ELECTRICAL DATA .................. INS'FALLATION Chassis Installation ................Retrofit Sleeve Preparation ............... Installation of"Gree Wall Sleeve Using Non-Gree Grille ..........Insta11Unit Into Wall Sleeve ..............SYSTEM CONFIGURATION Ventilation Control ................Adjusting Air Direction ................. Dipswitches .................. -
Page 3: Safety Considerations
GENERAL SAFETY CONSIDERATIONS Recognize safety information. This is the safety-alert Thank you for choosing the Gree E-TAC! You can feel confident in your selection because of the pride symbol _. When you see this symbol on the unit and in craftsmanship... -
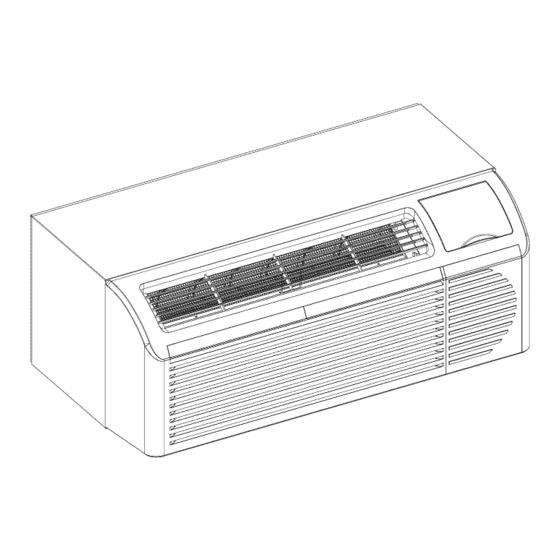
Page 4: Unit Features
-where water pipes might freeze. If the unit is configured for the freeze protection feature to be Fig. 2 - E-TAC Front Panel active (which is the default condition), then-whenever power is supplied... -
Page 5: Unit Features
UNIT FEATURES CONTINUED * Unit Configuration = There are many different * Limit Setpoint Range = The unit can be configuration possibilities, through both dipswitches configured to limit the controlling setpoint range. The and the digital keypad, that allow you to configure display will always show the complete setpoint range,... -
Page 6: Electrical Data
ELECTRICAL DATA Groundin_ safety protection, the unit is grounded through the service cord plug or through separate ELECTRICAL SHOCK HAZARD ground wire provided on hard wired units. Be sure Failure to follow this warning could result in personal that the branch circuit or general purpose... -
Page 7: Chassis Installation
(be sure outdoor grille is installed on the sleeve). See Table 3 Manufacturer Wall Sleeve Part Number for details. Gree engineering must approve any other General Electric Metal Sleeve RAB71 retrofit application. Plastic Sleeve RAB77 For competitive retrofit applications,... -
Page 8: Retrofit Sleeve Preparation
Gree sleeve is used with existing non-Gree grille. Use of a Gree wall sleeve with a non-Gree grille requires installation of an Accessory Baffle Kit (see Fig. 7), which ensures a good seal between... -
Page 9: Insta11Unit Into Wall Sleeve
INSTALL UNIT INTO WALL SLEEVE 1. Carefully remove shipping tape from the front panel and vent door. See Fig° 8o 2. Remove shipping screw from the vent door, if present. See Fig. 9. 3. Remove front panel. See Fig. 10. 4. -
Page 10: System Configuration
SYSTEM CONFIGURATION VENTILATION CONTROL The ventilation control lever is located at left side of unit, behind front panel. NOTE: The vent door shipping hardware must removed before using vent control lever. See figure 9, When set at CLOSE, only the air inside the room is circulated and filtered. -
Page 11: Dipswitches
SWITCHES Auxiliary dip switch controls are located behind front panel, through an opening below the control panel. To access, remove front panel. See Fig. 10. switches are accessible without opening control box. Unit must powered Switches effectively change their status. See Table 5 - Dip Switch Functions for functions each dip switch position. -
Page 12: Keypad Configuration
KEYPAD CONFIGURATION Key_pad Configuration Indoor Temperature Displa_Z: Allows further configuration of system to desired Change between showing setpoint only on the display application. Changes do not take affect until power is during heating and cooling modes "SP" or displaying cycled on the unit. room temperature during heating and cooling... -
Page 13: Auxiliary Controls
AUXILIARY CONTROLS WALL THERMOSTAT TERMINAL IMPORTANT: Only trained, qualified personnel should access electrical panel on unit and install electrical accessories. Please contact your local electrical contractor, dealer, distributor assistance. Thermostat Wire Routing Fig. 22 - Terminal Connector Removal and Replacement Thermostat wire is field... -
Page 14: Wall Thermostat Terminal
Freeze Guard protection. See Fig. 25 for terminal connections. INTELLIGENT SELF-CHECKING CONTROL Your E-TAC has a computer board that continuously checks key components of the unit to ensure they are operating properly. Under normal operation, unit status indicator (STATUS, on main PCB), light is steadily ON. -
Page 15: Operation
Room humidity will decrease moisture will evaporate, TEMP CONTROL FAN, MODE& OPERATION Fig. 26 - E-TAC CONTROLS ABOUT THE CONTROLS ON YOUR UNIT 4. FAN SPEED NOTE: In case of a power failure, the unit will Set fan operation for HI, MED, LO and AUTO speed. -
Page 16: Care And Cleaning
CARE AND CLEANING FRONT PANEL CASE FILTERS IMPORTANT: TURN UNIT BEFORE Turn unit off and disconnect power supply. CLEANING To clean, use water and a mild detergent. DO NOT use bleach or abrasives. Some commercial cleaners may damage the plastic parts. -
Page 17: Preventative Maintenance
PREVENTATIVE MAINTENANCE Preventative maintenance is essential to proper unit operation, efficiency and longevity. To ensure equipment operates properly, it must be properly maintained. Equipment operation should be checked and verified several times during each year. During regular unit inspection and maintenance, follow guidelines below:... -
Page 18: Troubleshooting
TROUBLESHOOTING POSSIBLE CAUSES SOLUTHONS UNiT DOES NOT START . Unit may have become unplugged . Check that plug is plugged securely in wall receptacle. . Fuse may have blown Note :Plug has a test/reset button on it. Make sure that the plug * Circuit breaker may have been tripped has not tripped. - Page 19 CONVERSION TABLE R25:20.0k_ (Tolerance tEF ] Rrnin. [k£_] Rnorn. [k£_] Rrna×. [k£_] 32.0 64.46 65.89 67.34 33,0 62=68 64=03 65=40 34,0 60=95 62=23 63=53 35,0 59=27 60=48 61,71 36,0 57=65 58=80 59=96 37,0 56=07 57,16 58=26 38=0 54,54 55,58 56,62 39,0 53=06 54=04...
- Page 20 R=TCONVERSION TABLE (cont.) R25:20.0k_ (Tolerance tEF] Rrnin. [k£_] Rnorn. [k£_] Rrna×. [k£_] 97=0 12=30 12=45 12=60 98,0 12,02 12,17 12,32 99,0 11 =75 11 =90 12,04 100=0 11 =48 11 =63 11 =77 101 =0 11 =22 11 =37 11 =51 102=0 10=97 11 =11...
- Page 21 16RD(BK) 15RD 15BU!:_ _! 14YE 12BU HEATER LEGEND Relay C!_UiU_ard Ois_ Cireu_ _ard Corn #r_ssor Capacitor U, _ Eiectric Heater Rely Compressor Re_ay Com£ressor Motor Outdoor Fan Motor hdoor Pen Motor OU_UBE Outdoor Coi_ Sensor ROOM Com2r_sor Over_o_ Transformer TRiN-24V Tra_former 24 Volt ConP_¢lor TUBE...
- Page 22 15RD 17BU ÷_ 4RD HEATER LEGEND Main Circuit Board Rei_uCircuit _ard BisplaIy Circuit _ard Compressor Ca_citor Pan Motor Capacitor Lt, _ Eiectric H_ter Rei87 C£_£ressor Re_ay Outdoor Pan Motor indoor Fan Motor OU_UBE Outdoor Co_ Sensor ROOM Room Air Temp. Sensor Trar_former TRiN,_24V Trar_lormer 24 VoR Conreetor...
-
Page 23: Warranty
NOT BE RESPONSIBLE FOR: CLEANING REQUIRED PRIORTOWARRANTY REPAIR. TWO-YEAR PARTS AND LABOR LIMITED WARRANTY - During the first two years after purchase, GREE will, through its authorized independent servicing dealer or service Standard maintenance, cbaning or damage resulting from failure... - Page 24 © IF YOUR AIR CONDITIONER DOES NOT WORK, FOLLOW THESE STEPS IN ORDER: 3. CONTACT THE DISTRIBUTOR SERVING YOUR AREA. Your dealer can give you CHECK THE THINGS YOU CAN DO YOURSELF. These include being sure his name or you can consult your yellow pages. air conditioner is plugged in firmly in an appropriate...
Need help?
Do you have a question about the E-TAC and is the answer not in the manual?
Questions and answers