Table of Contents
Advertisement
Advertisement
Table of Contents

Related Manuals for ASCOM Eurit 30


Summary of Contents for ASCOM Eurit 30
- Page 1 Operating Manual ascom Eurit 30...
-
Page 2: Operating And Display Elements
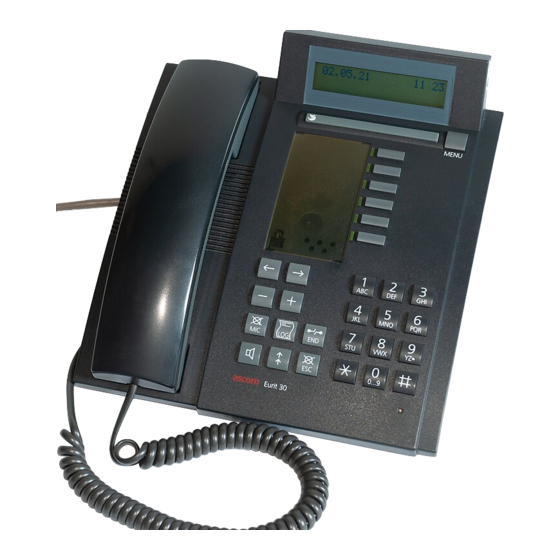
Operating and display elements 9 8 7 6 Display symbols Listen by loudspeaker Alarm Handsfree Lock Call forwarding Display overrun (upper line) Mute (MIC off) Additional functions (lower line) Call-back... - Page 3 Operating and display elements 1 The display Your telephone is equipped with a two-line, alphanumeric display. Upper line: status display, name and number of your call partner Lower line: status-dependent menu 2 Foxkey (multi-function key) The functions available under the Foxkey are shown on the lower display line. When a function appears in this line, press the Foxkey to activate it.
-
Page 4: Table Of Contents
Swiss quality product. Eurit 30 is intended for connection to the Euro- ISDN. If the Eurit 30 is to be connected to a PBX, please refer to the chapter on “PBX connection”. Please read this operating manual carefully to make the most of all the advantages of... - Page 5 Using the extended-feature functions ................9 Date and time ....................... 9 Caller ID display ......................9 Initiating an enquiry call/setting up a second call ............9 Terminating an enquiry call/second call ................ 10 Brokering (switching between calls) ................10 Call transfer ........................ 10 Initiating a three-way conference call ................
- Page 6 Connected Line Identification Presentation/Restriction (COLP/COLR) ......24 Using a headset ......................25 Programming auto-dial keys ..................25 Deleting auto-dial keys ....................26 PBX connection ......................27 Programming the public access code ................27 Call transfer by replacing the handset ................27 Keypad information ....................
-
Page 7: Installation And Startup
Installation and startup Contents of the packet Telephone base unit Handset, including connection cable Telephone connection cable Operating Manual Feet Perspex cover Connecting the handset and the telephone After unpacking the telephone, connect the handset to the base unit by plugging the handset connection cable into the small socket on the base of the telephone. -
Page 8: Positioning The Telephone
Installation and startup Positioning the telephone Before using the telephone for the first time, please read the section on safety precautions in this operating manual. Make sure your telephone is placed on a hard surface with no objects directly in front of it. (The voice quality could be impaired during hands-free operation). In view of the extensive range of surfacing materials used on furniture, it is impossible to guarantee that the base of the telephone (e.g. -
Page 9: Making A Call
Making a call On-hook dialling Enter the number you wish to call, lift the handset or press the loudspeaker key. Auto-dialling Press the relevant auto-dial key once or twice for the preprogrammed number, lift the handset or press the loudspeaker key. Last number redialling Press the last number redial key, several times if necessary, to retrieve one of the 9 last-dialled numbers,... -
Page 10: Direct Name Dialling
Making a call Direct name dialling This allows you to search for a number by entering the person’s name. Enter the first letter of the name to display the first name listed under this letter. to scroll through the alphabetical list until the name is displayed. -
Page 11: Using The Extended-Feature Functions
Using the extended-feature functions Your telephone’s user-friendly menu system allows you easy access to the following extended features. Date and time The date and the time are supplied automatically from the ISDN so do not have to be set manually. When the telephone is first connected, or after a power cut, the time display will flash. -
Page 12: Terminating An Enquiry Call/Second Call
Using the extended-feature functions Terminating an enquiry call/second call Terminate the enquiry call/second call by pressing the END key. Dial: Press the Foxkey under “->1” to return to the first call. ->1 You can also terminate an enquiry call by pressing the programmed auto-dial key (see “Programming auto-dial keys”). -
Page 13: Terminating A Three-Way Conference Call
Using the extended-feature functions Terminating a three-way conference call To speak to both call partners separately again, press the preprogrammed auto-dial key again. If the telephone is connected to a PBX, please refer to the relevant section in your PBX operating manual. -
Page 14: Call Waiting/Accepting A Second Call
Using the extended-feature functions Call waiting/accepting a second call This service may have to be requested separately, depending on your ISDN connection. If another call comes in while you are on the telephone, you are alerted to this by a short ringing tone and the waiting caller’s number is displayed. -
Page 15: Unanswered Calls
Using the extended-feature functions Unanswered calls If someone has tried to reach you, the text “Calls: 1” appears on your display. To call this number back, press the Foxkey below 06.06.95 09:42 “Calls:1” and lift the handset or press the loudspeaker Calls: 1 to delete the entry, press the Foxkey below “del”. -
Page 16: Calling Line Identification Restriction (Clir)
Using the extended-feature functions Calling Line Identification Restriction (CLIR) This service must be requested from your telecoms provider. If you are a subscriber to this service, you can suppress the display of your number on the called party’s telephone. With the handset on-hook, press the MIC key. An acknowledgement message is briefly displayed. -
Page 17: Programming Your Telephone
Programming your telephone When programming, leave the handset on-hook. If you lift the handset during programming, the procedure is aborted. The programming procedure is also automatically aborted if you receive a call while programming. The menu system The menu-driven system makes your telephone very simple to operate. The Foxkey and MENU key allow you to access the various menus and submenus with ease. -
Page 18: Menus
Programming your telephone Menus Use the MENU key to access the first menu level: a) Name list (directory) b) Telephone settings c) Functions d) Installations Press the Foxkey under to scroll through the relevant sub-menus. a) Name List (Directory) The name list can store approximately 150 names and numbers. b) Telephone settings The following settings can be programmed: –... -
Page 19: Name List (Directory)
Programming your telephone Name list (directory) Use the keypad to store a name as follows. To repeat a letter use the cursor key. Example: Press the MENU key repeatedly until the menu “Name Name List List” is displayed. Press the Foxkey under “new”. Enter, for example, the name HUSTON. -
Page 20: Setting The Ringing Melody / Volume
Programming your telephone The type of call forwarding can be set by pressing the Call Forward A: off Foxkey under “uncond” (unconditional), “busy” or ok uncond busy “delayed”: uncond Call is forwarded immediately busy Call is forwarded if your telephone is busy delayed Call is forwarded after a fixed delay (approx. -
Page 21: Multiple Subscriber Numbers (Msn)
Programming your telephone Multiple Subscriber Numbers (MSN) Every telephone can be assigned up to three numbers, i.e. your telephone will only ring if one of the programmed numbers has been dialled. Each number has a different ringing melody and information text, in order to distinguish between incoming calls to the different numbers. The ringing delay facility acts as a type of automatic call transfer. -
Page 22: Deleting The Call Charge Total
Programming your telephone Deleting the call charge total Press the MENU key as often as required until Functions “Functions” is displayed. Press the Foxkey repeatedly under until “Charge Total” is displayed. Charges: DM 10.40 Press the Foxkey under “change”. change Press the Foxkey under “del”... -
Page 23: Programming A Hotline
Programming your telephone Programming a hotline This function allows you to temporarily programme an important number for automatic dialling whenever the handset is lifted and any key is pressed. Press the MENU key as often as required until Functions “Functions” is displayed. Press the Foxkey under repeatedly until “Hotline”... -
Page 24: Setting The Date
Programming your telephone Setting the date Press the MENU key repeatedly until you reach the menu Installation “Installation”. Press the Foxkey repeatedly under until you reach “Date”. Date: 11.01.95 Press the Foxkey under “change”. change Enter the actual date. Press the Foxkey under “ok” to store. Date: 13.05.95 Setting the display language... -
Page 25: Suppress Call Waiting
Programming your telephone Suppress call waiting You can suppress the call waiting function if you do not want to be disturbed by a second incoming call. Press the MENU key as often as required until Installation “Installation” is displayed. Press the Foxkey under repeatedly until “Call-Waiting”... -
Page 26: Programming The Call Parking Code
Programming your telephone Programming the call parking code If you wish to set your own call parking code rather than the preset code: Press the MENU key as often as required until Installation “Installation” is displayed. Press the Foxkey under repeatedly until “Call-Id”... -
Page 27: Using A Headset
Press the Foxkey under “on” and “ok” to switch on Headset: off headset operation. For optimum performance we recommend using a headset from the Ascom range. For further information please contact the appointed dealer from whom the telephone was purchased. -
Page 28: Deleting Auto-Dial Keys
Programming your telephone Function No. Function Call Forward A on/off Call Forward B on/off Call Forward C on/off Park/retrieve call MCID (registration) Initiate/terminate three-way conference call Call transfer (ECT) on public line Call transfer (ECT) in PBX Initiate/terminate enquiry call, switch between calls MSN A;... -
Page 29: Pbx Connection
PBX connection The following should be taken into account when operating the Eurit 30 in conjunction with a PBX. For detailed information on the following, please refer to your PBX operating manual. Programming the public access code When the telephone is operated in conjunction with a PBX, the public access code may have to be programmed to ensure, for instance, that the numbers on the caller list are dialled correctly. -
Page 30: Keypad Information
PBX connection Keypad information Keypad information allows you to control your PBX functions (e.g. call transfer). For further details please refer to your PBX operating manual. a) Keypad pre-dialling is pressed first, keypad information is automatically sent to the PBX. b) Keypad during call Press the MENU key repeatedly until “Suppl. -
Page 31: Important Information
Important information Data protection during power cut Out of consideration for the environment, no batteries are used. The programmed settings and the name list remain in memory for at least 48 hours even in the absence of a power supply. Service menu To access the service menu, press key 1 in the “Installation”... -
Page 32: Safety Precautions
Eurit 30 is manufactured in accordance with quality control systems accepted by the BZT. The Eurit 30 is designed for connection to the public ISDN and meets the requirements defined in the following standards or standardization documents: I-CTR 3 (prTBR3, NET3) -
Page 33: Guarantee
Your telephone is covered by a 12-month guarantee from the date of purchase. Keep the receipt as proof of the purchase date. Within the guarantee period, Ascom will repair free of charge all defects caused by faulty material or production errors, and reserves the right to choose whether to repair the fault or replacing the telephone. - Page 35 Manufactured in Switzerland by: Ascom Zelcom AG Eichtal CH-8634 Hombrechtikon...
Need help?
Do you have a question about the Eurit 30 and is the answer not in the manual?
Questions and answers