Table of Contents
Advertisement
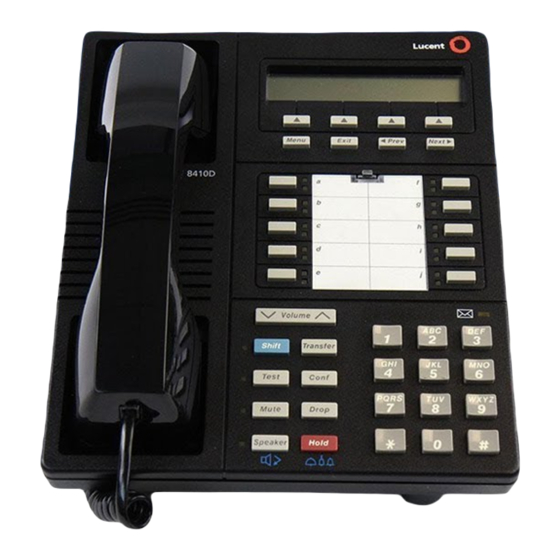
Your 8410D is a multi-appearance digital telephone. The display, along with the softkeys and display control buttons,
offers valuable added functionality. To familiarize yourself with the buttons and features on your 8410D telephone,
refer to the figure below and then read the following explanations.
Call appearances/feature buttons
At least three of these 10 buttons are devoted to incoming and outgoing calls (call appearances) and are labeled
with an extension number; the remaining buttons access features (feature buttons) and are labeled with a
feature name. Each has a red light telling you this is the line you are using or this is the line you will get when
you lift your handset. The green status light next to each call appearance and feature button tells you the line
or feature is being used.
Conference button
For setting up conference calls. This button is labeled <Conf>.
Dial pad
The standard 12-button pad for dialing phone numbers and accessing features. The letters "Q" and "Z" have
been added to the appropriate dial pad keys for directory access, and the "5" button on your dial pad has raised
bars for visually-impaired users.
About Your Telephone
1
Advertisement
Table of Contents

Related Manuals for Alcatel-Lucent 8410D


Summary of Contents for Alcatel-Lucent 8410D
-
Page 1: Telephone Overview
About Your Telephone Your 8410D is a multi-appearance digital telephone. The display, along with the softkeys and display control buttons, offers valuable added functionality. To familiarize yourself with the buttons and features on your 8410D telephone, refer to the figure below and then read the following explanations. - Page 2 Display A 2-line by 24-character display. Display control buttons These four buttons are labeled Menu, Exit, Prev, and Next. <Menu> is used to enter Softkey Mode and access the first feature option screen. <Exit> is used for exiting the Display Mode and returning to Normal (call-handling) Mode. <Prev>...
- Page 3 Test button When the telephone is initially powered up, the green light next to <Test> flashes if the link with the switch is not (or not yet) operational. The light changes to steady green when the telephone is able to communicate with the switch, and then goes off after a short period of time.
- Page 4 Conventions Conventions Used in Procedure Descriptions <xxxxx> This represents a call appearance button, which is used exclusively for placing or receiving calls. The button has a red light and a green status light and is labeled with an extension number (shown as xxxxx). <Feature>...
-
Page 5: Feature Finder
Feature Finder Abbreviated Dialing (AD) Allows you to store selected telephone numbers for quick and easy dialing. Each number can be a complete or partial telephone number, an extension number, or a feature code. Numbers on your personal list are programmable by you. - Page 6 Use as a handy quick reference source for extension number information. Display Feature This section includes the procedures for seven display features you may use with the 8410D telephone. However, note that the display, along with the softkeys and display control buttons, can also be used for accessing up to 12 softkey features.
- Page 7 Hold Puts a call on hold until you can return to it. While a call is on hold, you can place another call, activate another feature, answer a waiting call, or leave your telephone to do another task. Use when you have a call you don't want to drop, but have to interrupt briefly to do something else.
- Page 8 Speakerphone Allows you to place and answer calls or access other voice features without lifting the handset. Use the built-in speakerphone any time you prefer hands-free communication, both speaking and listening, or for group conference situations. Stored Number Allows you to check the number stored on an Abbreviated Dialing button or as an item on an Abbreviated Dialing list.
-
Page 9: Abbreviated Dialing
Abbreviated Dialing Note: Before you can use this feature, AD buttons must first be assigned by your system manager. (These AD locations can be assigned to actual buttons, or you may be able to access them with the softkeys.) If you hear the intercept tone while programming, start over from the beginning. - Page 10 To place an AD call Press the selected <AD xxxxx>. [ringback tone] The call is automatically dialed. Note: Before you can use this feature, AD buttons must first be assigned by your system manager. A programmed number in your personal list can be up to 24 digits and characters. You can also program a number on an Automatic Dialing button that is not stored in your personal list.
-
Page 11: Call Coverage
[ringback tone] The call is automatically dialed. Audix To retrieve a message when your Message light is on See the Audix Documentation for instructions. Automatic Callback You can access this feature with the softkeys only if the feature's abbreviation, AutCB, appears on the second line of one of the feature option screens. -
Page 12: Call Forwarding All Calls
To answer a call for a coworker for whom you are a coverage point Press <xxxxx> of the incoming call when the ringing begins or the green light flashes. Note: The call is not at your telephone until the green light is flashing. To leave a message for a coworker to call the original caller's extension Press <Cvr CallBk>... -
Page 13: Call Pickup
To cancel Call Forwarding While on-hook, press <Menu> and then press the softkey below CFrwd [dial tone] or, if CFrwd is not available on your display, press <Call Fwd> (while on-hook) or dial the Call Forward Cancel code #2 (while off-hook). [confirmation tone] Your calls will now ring at your own telephone. - Page 14 [dial tone] The held call light continues to flutter; the current call light also flutters. You are given a new call appearance. Press <xxxxx> of the call on hold (first call). Press <Conf> again. All parties are now connected. Announce the call. To drop the last party added to a conference call Press <Drop>.
- Page 15 Display, Softkeys, and Control Buttons Entering Softkey Mode and Viewing the Three Feature Option Screens There are three separate feature option screens. Each of these screens allows you to select from four different features. You can enter Softkey Mode by pressing the display option button labeled <Menu>. The following is an example of a feature option screen.
- Page 16 Spres Abbreviated Dialing Suppress Stats ACD Agent Statistics Stop Abbreviation Dialing Stop/ Indefinite Wait Timer Timer TmDay (or DayTm) Date and Time View Stored Number * A <Call Display> button should be administered if access to System Directory is provided. It is also desirable for <Next Display>...
-
Page 17: Handset Volume
Exit To exit any display feature and return to normal display Press <Exit>. The display shows call information for the active call appearance. Handset Volume To raise or lower the receive level volume of the handset While handset is off-hook, press the Volume control button. Press the right half of the Volume control button to raise the volume. - Page 18 To answer a new call while active on another Press <Hold>. The green light next to the held call flutters. Press <xxxxx> of the incoming call. You are connected to the incoming call. Inspect You can access this feature with the softkeys only if the feature's abbreviation, Inspt, appears on the second line of one of the feature option screens.
-
Page 19: Normal Display
To prevent the other party from hearing you (to mute the handset or speakerphone microphone) Press <Mute>. The red light next to <Mute> goes on, and the other party cannot hear you. When you are ready to resume conversation with the other party, press <Mute> again. The red light next to <Mute>... -
Page 20: Send All Calls
The ringing pattern you are hearing is displayed. Note: You can also press <Next> or <Prev> to cycle through all eight ringing patterns. If you want to save the ringing pattern currently being played, do not press <Ring> anymore. You will hear the selected ringing pattern two more times, and then it will automatically be saved. - Page 21 To cancel Send All Calls While on-hook, press <Menu> and then press the softkey below SAC again or, if SAC is not available on your display, press <Send Calls> again (while on-hook) or dial the Send All Calls Cancel code #3 (while off-hook). [confirmation tone] Speakerphone To place or answer a call without lifting the handset, or to use the speakerphone with any feature...
-
Page 22: Stored Number
Press <Mute> again to resume talking to party. The red light next to <Mute> goes off and other party can hear you again. To end a call Press <Speaker> again to hang up. The red light next to <Speaker> goes off. Stored Number You can access this feature with the softkeys only if the feature's abbreviation, View, appears on the second line of one of the feature option screens. - Page 23 To see the date and time Press <Menu> and then press the softkey below TmDay or, if TmDay is not available on your display, press <Date/Time>. The display returns to Normal Mode after a few seconds. Note: The telephone gets this information automatically, you will not need to set it. Timer You can access this feature with the softkeys only if the feature name, Timer, appears on the second line of one of the feature option screens.
-
Page 24: Tones And Their Meanings
Tones and Their Meanings Ringing tones are produced by an incoming call. Feedback tones are those which you hear through the handset (receiver) or the speaker. Ringing Tones 1 ring - A call from another extension. 2 rings - A call from outside or from the attendant. 3 rings - An Automatic Callback call you placed has been connected. -
Page 25: Troubleshooting
Troubleshooting Problem Solution A feature does not work as noted in this Reread the procedure and try again. guide. For many features you must lift the handset before you can use the feature. Check with your system manager to be sure this feature is administered on your telephone.
Need help?
Do you have a question about the 8410D and is the answer not in the manual?
Questions and answers