
Subscribe to Our Youtube Channel
Related Manuals for Alcatel-Lucent 8088


Summary of Contents for Alcatel-Lucent 8088
- Page 1 8088 Smart DeskPhone OmniPCX Enterprise Business User Manual 8AL90333ENAA ed01-1620 R200...
- Page 2 The 8088 Smart DeskPhone can be provided with or without an embedded camera. All video features described in this manual are available with the 8088 Smart DeskPhone with camera or if you have connected an external camera to the phone.
-
Page 3: Table Of Contents
1 GETTING TO KNOW YOUR TELEPHONE.................... 6 1.1 P ..........................6 HONE DESCRIPTION ......................7 1.2 D ESCRIPTION OF THE CONNECTORS ......................... 8 1.3 P ERMANENT FEATURES KEYS 1.4 A .......................... 9 BOUT THE HOMEPAGE ............................12 1.5 N AVIGATION ...................... - Page 4 4 VIDEO CALL ............................26 4.1 V ............................26 IDEO CALL ..........................26 4.2 S TART A VIDEO CALL ......................27 4.3 M UNMUTE THE VIDEO CALL ‘ 4.4 H '....................27 HOW THE PICTURE IN PICTURE ....................27 4.5 D ISPLAY VIDEO IN FULLSCREEN MODE ........................
- Page 5 8.10 I ALE I ® W ..........40 NSTALL THE NTERNATIONAL LUETOOTH IRELESS HANDSET ) ................40 8.11 U ® NINSTALL A LUETOOTH DEVICE UNPAIRING 8.12 H ..........................41 EARING AID KIT ..........................41 8.13 P HONE WALLPAPER ........................41 8.14 P HONE SCREENSAVER 8.15 C...
-
Page 6: Getting To Know Your Telephone
1 Getting to know your telephone 1.1 Phone description Sensitive LCD wide screen with ambient light sensor. Embedded HD Video camera with shutter. Swipe the shutter right or left to use or hide the camera. This feature depends on the model of your telephone. Permanent feature keys: quick access to the phone's main features. -
Page 7: Description Of The Connectors
1.2 Description of the connectors Various connections to allow phone extensions. Add-on module connector (SATA type). Two Universal Serial Bus (USB) ports (1.1/2.0) to connect an external camera, audio equipment, a low smartphone charger or USB stick. HDMI® 1.4 output for screen replication and for dedicated HD video display. 10/100/1000 Mbps Ethernet connectors to a PC (RJ45). -
Page 8: Permanent Features Keys
1.3 Permanent features keys They are located just below the touch screen. Mute key. During a call, press this key to stop your contact from hearing you. As long as the mute feature is activated, the mute key stays lit (blue). Press this key to deactivate the mute feature. Turn down the volume. -
Page 9: About The Homepage
1.4 About the homepage Homepage in standard mode Homepage in business mode (Business Choose your homepage Settings Application Homepage Business if enabled, the phone displays homepage in business mode otherwise in standard mode. Personal area This area displays information about the user's phone and configuration, including last name, first name, avatar, and routing. - Page 10 Date, time and connectivity area This area displays time, date, connectivity and customization information (wake-up on, intercom mode on). USB Accessory or storage device connected to USB port. Bluetooth® device pairing in progress. Bluetooth® device connected (Other than your Bluetooth® handset). Headset plugged in.
- Page 11 Active area This area is reserved for running applications and for previews of applications selected by the user. When you start an application, it is displayed in the active zone. If no application has been launched, the active zone displays the application previews that you have preset on the homepage.
-
Page 12: Navigation
1.5 Navigation The phone set homepage can be viewed in standard or advanced mode. Scroll your finger up or down to get the page or menus scrolling vertically (in advanced mode), or scroll right or left to get the page scrolling horizontally. (in standard mode only). Homepage in standard mode Homepage in business mode (Business Make your selection by pressing the right icon on the sensitive screen. -
Page 13: Bluetooth® Wireless Handset
1.6 Bluetooth® Wireless handset Off-hook/On-hook: press this key to take or terminate a call Volume/Mute: Short successive presses to change the handset volume level (3 levels) Long press to activate or deactivate mute mode Location of the battery If the Bluetooth®... -
Page 14: Install A Comfort Wired Handset
Your set is equipped with an HDMI 1.4 output for a better video experience. The 8088 Smart DeskPhone can be connected to a large screen or video projector. Moreover, an external camera can be connected to the phone to broadcast the entire room. Your deskphone can easily find its place in a meeting room. -
Page 15: Using Your Telephone
2 Using your telephone 2.1 Making a call Use one of the following: o Dial directly the number for your call. o Lift the receiver Enter the destination number. Press the on-hook/off-hook key of the Bluetooth® device. (Bluetooth® Wireless handset) Dial the destination number. -
Page 16: Make A Call Using The Personal Phone Book (Contacts)
2.2 Make a call using the personal phone book (Contacts) Contacts Select the contact to call Information regarding your contact is displayed on the screen. Press the call icon to call your contact. If there are several numbers for the same contact, select the desired number. 2.3 Using call by name ... -
Page 17: Call Back One Of The Last Numbers Dialed
2.5 Call back one of the last numbers dialed Open the dialpad. Select the contact to call in the list of last number dialed. Press the call icon to call your contact / Call your contact directly by selecting the badge. 2.6 Redialing the last number dialed (redial) ... -
Page 18: Ignore Call
2.9 Ignore call A call is received: Use one of the following: Ignore Press on the On-hook key on the permanent features keys panel. Your phone no longer rings but your caller still hears the ringing tone. You can still answer the call after you have ignored it. 2.10 Using the telephone in 'Hands free' mode You are in communication. -
Page 19: Mask My Identity
2.13 Mask my identity You can hide your identity before sending your call. Use one of the following: o Select the feature o Press your information area in the top left corner of the screen. User Information Press on anonymous icon to activate or deactivate the secret identity. -
Page 20: Consulting Your Voice Mailbox
2.17 Consulting your voice mailbox Usually a non answered call is automatically forwarded to the voicemail box. You are notified of a new voicemail message (notification zone). The number of new voice messages is displayed. Use one of the following: o Press the voicemail messages notification button in the top middle area of the screen. -
Page 21: Immediate Forward To Voice Mailbox
2.19 Immediate forward to voice mailbox Use one of the following: Press the User services key. o Press your information area in the top left corner of the screen. Routing profile Immediate forward to voicemail Forward is activated (The forward key lights blue if configured so in: Settings Device Phone... -
Page 22: Set An Alarm
Delete a routing profile Use one of the following: Press the User services key. o Press your information area in the top left corner of the screen. Routing profile Delete Delete a routing profile. Confirm. You can not delete a predefined routing profile. -
Page 23: During A Conversation
3 During a conversation 3.1 Putting a caller on hold You are in communication: On hold Your call is placed on hold. Your caller hears on-hold music or a tone until you pick the call up again. Recover the call on hold ... -
Page 24: Receiving A Second Call
3.3 Receiving a second call During a conversation, another person is trying to call you Name or no. of the caller displayed for 3 seconds. Your are alerted with 3 beeps. Answer call The first call is on hold. Ignore incoming call. -
Page 25: Mute, So That Your Caller Cannot Hear You
You are in communication with a first caller. A second caller is on hold. You want to connect the first caller with the second. Transfer The two callers are connected. 3.6 Mute, so that your caller cannot hear you During the call, you do not wish your caller to hear you. -
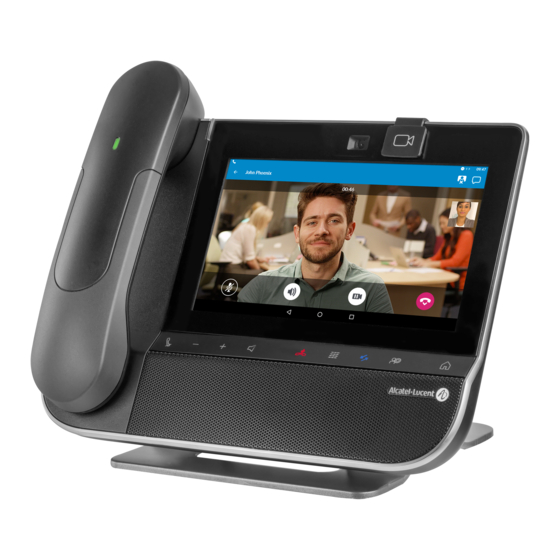
Page 26: Video Call
4 Video call 4.1 Video call To use this feature, both your phone and your caller's phone must have the feature enabled. The phones must also be able to handle video. During a video call, the screen comprises two areas. The main screen shows your callers video and the 'picture in the picture' screen in the bottom right of the main screen shows your video. -
Page 27: Mute/Unmute The Video Call
4.3 Mute/unmute the video call During a video call, either person can freeze video transmission. Audio transmission is not frozen. Press anywhere on the 'picture in the picture' on the screen to mute your video. Your caller will no longer see your video. ... -
Page 28: Contacts Management
5 Contacts management 5.1 Define a contact Contacts Add new contact Fill in the contact file. You must provide at least a last name. Back Your contact is added to the directory. For external numbers, we recommend you use canonical address formats comprising '+', followed by the country code (e.g. -
Page 29: Make A Call Using The Personal Phone Book (Contacts)
5.3 Make a call using the personal phone book (Contacts) Contacts Select the contact to call. Information regarding your contact is displayed on the screen. Press the call icon to call your contact. If there are several numbers for the same contact, select the desired number. 5.4 Modify a contact ... -
Page 30: Define A Contact As A Favorite (Favorites)
To remove a contact from Favorites Favorites Select your favorite contact. Favorites The feature associated led goes off. 5.7 Define a contact as a favorite (Favorites) Most frequently called contacts can be defined as a favorite. Favorite contacts are displayed in the application Favorites. ... -
Page 31: Programming A Direct Shortcut For A Contact
5.8 Programming a direct shortcut for a contact. In standard mode, you can program a direct call shortcut on your homepage. Add a shortcut key Press and hold on the screen to enter in the edition mode of the homepage. ... -
Page 32: Keypad
6 Keypad At any time, you can show or hide the keypad by swiping up or down the bottom of the screen. 6.1 Change the keyboard type While editing text, you can change the keyboard type to match the language you are writing: AZERTY, QWERTY, QWERTZ, Cyrillic. -
Page 33: Write In Uppercase
6.3 Write in uppercase By default, the written characters are in lowercase. Press this key once. The next character will be written in uppercase and then you will automatically switch to lowercase. Press this key twice. The associated key light is on. Uppercase mode is used for all written characters. -
Page 34: File Manager
7 File Manager This application allows you to manage audio files and images. My files Select the file type you want: o Audio o Picture Select where to read the files from: files stored on the phone or on the connected USB device, or both. -
Page 35: Copy A File From The External Storage Device To The Phone Internal Memory
7.2 Copy a file from the external storage device to the phone internal memory My files Select the file type you want: o Audio o Picture Filters Select the storage device. Select the file to copy. ... -
Page 36: Play All Audio Files
7.4 Play all audio files My files Audio Filters: Display the files for the selected storage device (The phone internal memory or external storage device). Play all: Listening of all audio files has started. Stop listening: Stop all. -
Page 37: Advanced Settings
8 Advanced settings 8.1 Define the phone language Settings Device Phone configuration Language Select the language of your choice. Back to homepage. 8.2 Adjusting the audio functions Settings Device Audio Your handset allows you to set different ring tones depending on the type of incoming call. o On-site ringing o Off-site ringing o Special ringing... -
Page 38: Adjusting The Ringer Volume
8.6 Adjusting the ringer volume Settings Device Audio Ringing volume Adjusting the ringer volume (0 to 9). 8.7 Install a jack accessory (headset, handsfree, loudspeaker) By default, the audio jack of your telephone can be used to connect a headset, hands-free kit or loudspeaker. -
Page 39: Install A Bluetooth® Device (Pairing)
After selecting the accessory type, you must specify the jack accessory: Jack accessory o Headset o Handsfree o Loudspeaker 8.9 Install a Bluetooth® device (pairing) You can use Bluetooth® devices such as handsets or headsets with your phone. To use your Bluetooth®... -
Page 40: Install The Ale International Bluetooth® Wireless Handset
8.10 Install the ALE International Bluetooth® Wireless handset Settings Device Bluetooth® Scan The set scans for available Bluetooth® devices. Your Bluetooth® device needs to be prepared for pairing. Take the handset off the hook and switch it off, then press and hold both handset buttons at the same time. You will hear a 3- note tone and the LED will flash green and orange. -
Page 41: Hearing Aid Kit
8.12 Hearing aid kit If you are using your phone with a hearing device, you must install and activate the hearing aid device (HAC) to avoid hearing discomfort. Settings Device Audio Hearing aid Enable the feature: The hearing aid kit is activated. 8.13 Phone wallpaper You can change the wallpaper on your phone. -
Page 42: Customize The User Picture
Add an image for your personal screensaver The images have to be stored in the phone memory. Supported image formats are: bmp, jpeg, png. For optimal display, the image dimensions must be 800 x 480. My files Picture ... -
Page 43: Change The Theme (Skin) Of Your Phone
8.16 Change the theme (skin) of your phone Settings Device Phone configuration Select the current theme in the configuration page. The available theme list is displayed on the screen. Select the desired new theme from the list. ... -
Page 44: Reset User Data
To display the QR code in the homepage: Settings Application Homepage QR Code preview if enabled, the QR code of the phone is displayed in the homepage in business mode. Back to homepage. 8.19 Reset user data Using the reset feature will erase: ... -
Page 45: Contactsync
9 ContactSync 9.1 Introduction This application is for synchronizing your address book between your phone and the Outlook application. It supports synchronization of the Outlook data placed locally, for example in a local Outlook archive file. The default maximum number of contacts you can synchronize between your phone and your PC is 500. However, your administrator can increase this to up to 1,000. - Page 46 2. Read and agree the license Agreement. 3. Select the application destination folder on your PC (make sure you have the necessary administration rights to install the application in the selected folder). 4. Follow the installation steps. 8AL90333ENAAed01 46 /...
-
Page 47: Uninstalling The Application
9.4 Uninstalling the application There are two different ways for uninstalling the application: Uninstall the application via the Windows settings. Run the installation executable file and select the 'Remove' option. 9.5 Repairing the application If the application becomes corrupted, you can repair it. 1. - Page 48 1. You can define: The profile and the Outlook folder to use for synchronizing contacts. The default profile and Outlook folder will be used for synchronizing unless you specify a folder and profile. You can change the profile and folder used. You can define a profile for synchronizing the contacts.
- Page 49 The port used by PC for synchronization: if default port cannot be used on the PC you can change it. If you modify the port used by the application, you have to do the same modification on the phone side. Secured connection: while communicating between Contact-Sync and the device, both unsecured HTTP or secured HTTPS protocols can be used.
-
Page 50: Synchronize Your Phone And Your Pc
9.7 Synchronize your phone and your PC Before starting synchronization please make sure both the phone and PC software are properly configured. Start synchronization Use one of the following: Synchronization (If enabled in the synchronization settings) Settings Application Synchronization ... -
Page 51: Troubleshooting
9.8 Troubleshooting Below is a troubleshooting guide that can help you resolve any problems that might occur. Installation says you do not have write You are probably not permitted to change the folder in which you are permissions in this folder trying to install PC Sync. -
Page 52: Guarantee And Clauses
10 Guarantee and clauses Safety Instructions Changes or modifications to the equipment not expressly approved by the party responsible for compliance could void the user's authority to operate the equipment. Magnets could affect the functioning of pacemakers and implanted heart defibrillators. Keep a safe distance between your pacemaker or implant defibrillator and the handset which includes magnetic elements: 4 centimeters (1,6 inches) at least. - Page 53 Regulatory Statements EUROPE This equipment is in compliance with the essential requirements of Radio Equipment Directive (RED) 2014/53/EU and with Directive 2011/65/UE (ROHS). The Declaration of Conformity may be obtained from: ALE International 32 avenue Kléber – 92700 Colombes, France ebg_global_supportcenter@al-enterprise.com USA and Canada This device complies with Part 15 of the FCC Rules and with RSS210 of Industry Canada.
- Page 54 Phone description Wideband loudspeaker for optimized sound. Arrival of a new call (Flashing). An adjustable and stable foot. 3.5 mm and 4 pin stereo headset jack. Microphone. Various connections to extend phone capability: HDMI connector for better video experience, wired handset connector, USB...
- Page 55 Homepage Keys dedicated to specific features Make your selection by pressing the right icon on the sensitive Some keys appear only when certain features are accessed. screen. In standard mode, personalize the homepage by pressing and holding. Call back the selected caller in the call log. Scroll through the application area pages (advanced mode) or the application bar (business mode).
Need help?
Do you have a question about the 8088 and is the answer not in the manual?
Questions and answers