
Related Manuals for Doro 5045


Summary of Contents for Doro 5045
- Page 1 5035/5045 English Cordless Telephone with Hands Free Speaker (Model 5045 includes answering machine) User Guide...
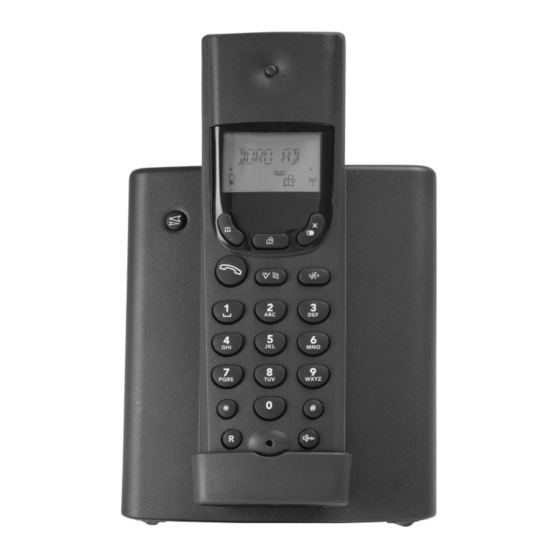
- Page 2 Picture shows 5045. 1 Phonebook 2 5 Menu/Recall button 2 Phonebook 1 6 Volume (5035)/Hands Free Speaker (5045) button 3 Talk/Call end button 7 Caller Identification (CID) button 4 Number and Menu buttons 8 OK/Intercom button (Scroll – buttons 1 & 3, Delete –...
-
Page 3: Table Of Contents
Tone / Pulse Dialling.....15 Troubleshooting ....27 Line Adaptation....16 UK........28 Recall Button Timing ..16 Guarantee......28 PBX Function...... 17 Australia and New Zealand 29 Handset Volume Control Guarantee......29 (5045 only) ......17 REN (RN for New Zealand) 30 www.doro.com... -
Page 4: Installation
- Base unit - Line cord - 2 batteries Models 5035+1/5045+1 are also supplied with an extra handset including batteries, base unit and mains adapter. Connection 1. Connect the mains adapter to the Y socket of the base unit and to an electrical wall socket. -
Page 5: Batteries
When the telephone is installed for the first time, the batteries must be charged for 24 hours before using the telephone. Use DORO original batteries only. The guarantee does not cover any damage caused by incorrect batteries. The handset is charged with the keypad facing outwards. Please dispose of any batteries in a responsible and environmentally friendly manner. -
Page 6: Range
To reduce the risk of possible interference please do not locate the base unit near any electrical equipment e.g. TV’s, computers, fridges, telecom equipment etc or close to radiators, metal pipes or window frames. Also ensure the base unit is not exposed to direct sunlight, excessive heat, damp or high humidity locations. www.doro.com... -
Page 7: The Display
Intercom call. Phonebook 2. Shown within range of the base unit. Flashes when out of range. 5045 only: Upper row: Answering machine settings. Lower row: The indicator is lit when the answering machine is activated. New incoming messages (ICM) on the answering machine. -
Page 8: Operation
Volume Control 5035: The earpiece volume may be adjusted during a call by pressing 5045: The volume is adjusted by accessing the menu, please refer to page 17. The display will show the selected volume: +=low, ++=medium, +++=high, and ++++=maximum. -
Page 9: Handset Paging
The hands free button is located on the back of the handset (5035), and on the front of the handset (5045). If you wish, you can switch between handset and hands free during a call. 1. Enter the required telephone number. -
Page 10: Phone Book
3.......... D E F 3 4.......... G H I 4 5.......... J K L 5 6.......... M N O 6 7.......... P Q R S 7 8.......... T U V 8 9.......... W X Y Z 9 0.......... 0 www.doro.com... - Page 11 1. Select the phonebook from which you wish to delete the entry by pressing the corresponding button: 2. Scroll to the desired memory by pressing < < > > 3. Press 4. Press to confirm the settings. 5. Press the relevant Phone book button to return to standby mode. www.doro.com...
-
Page 12: Caller Identification
4. Enter a name by pressing the corresponding number button until the required letter is displayed, please refer to the table on page 10. Press to delete or make changes. 5. When the entire name has been entered, press . The telephone will return to the standby mode. www.doro.com... -
Page 13: Settings
Although the caller may be stored in one of the phone books, the first ringer signal may still be the regular signal until the number has been identified. The telephone’s ringing signal does not follow the line signal, ie it may continue to ring for up to 7 seconds after answering a call. www.doro.com... -
Page 14: Register A New Handset Or Base Unit
(max 90 seconds). If registration is unsuccessful repeat this procedure. De-register a Handset Handsets can easily be de-registered from a base. 1. Press 2. Press the keypad digits 3. Enter the PIN code (1111 for this model). 4. Press WARNING! DO NOT deregister the main handset. www.doro.com... -
Page 15: De-Register All Other Handsets
3. Press repeatedly until the display shows 2/5. 4. Scroll using to the desired setting (TONE/PULSE). Press to confirm < < > > setting and move to the next programming sequence, alternatively. 5. Press to exit the Menu system. www.doro.com... -
Page 16: Line Adaptation
4/5. - UK (3/4 - Australia). 4. Scroll using to the desired setting ( =normal, < < > > =270-600ms). Press to confirm setting and move to the next programming sequence, alternatively. 5. Press to exit the Menu system. www.doro.com... -
Page 17: Pbx Function
4. Scroll using to the desired setting (YES=on, NO=off). Press < < > > confirm. 5. Press to exit the Menu system. Handset Volume Control (5045 only) 1. Press 2. Scroll using until flashes in the display. Press < < > >... -
Page 18: Expanded System
More about placement of the base units on the next page. IMPORTANT! Automatic switching between base units (handset handover) will not occur while a call is in progress. www.doro.com... -
Page 19: Multiple Handsets
3. Transfer the call by pressing . Answer the call by pressing on one of the other handsets. If you decide not to transfer the call, press on your handset to return to the external caller. www.doro.com... -
Page 20: The Answering Machine (5045 Only)
English The Answering Machine (5045) About the Answering Machine The answering machine has to be turned on in order to receive messages. On incoming calls the telephone will be answered after the selected number of rings (please refer to page 23). -
Page 21: Using The Answering Machine
English The Answering Machine (5045) Checking your OGM 1. Ensure the symbol is visible within the display, and the button located on the back of the handset is illuminated. 2. The total number of (new) recorded ICM’s will now be announced. -
Page 22: Personal Message - Memo
English The Answering Machine (5045) Personal Message - MEMO MEMO – is a personal message recorded directly onto the answering machine without dialling. This means that the machine may be used as an electronic notebook, where messages, reminders or other notes to family members or colleagues can be recorded. -
Page 23: Number Of Rings
English The Answering Machine (5045) Number of Rings The number of rings before the answering machine answers can be selected between 2, 3, 4, 5 or TOLL SAVER. 1. Press 2. Scroll using until flashes in the display. Press < <... -
Page 24: Recording Quality / Time
English The Answering Machine (5045) Recording Quality / Time There are two choices of recording quality/time. A - high quality recordings (total time 5 minutes maximum). B - standard quality recordings (total time 7 minutes maximum). 1. Press 2. Scroll using until flashes in the display. -
Page 25: Out Of Memory
English The Answering Machine (5045) Out of Memory The answering machines maximum recording capacity will be either 5 or 7 minutes (depending on the selected sound quality). This time is shared between the OGM, MEMO and ICM messages. If the memory is full, no new ICM messages will be accepted until the existing messages have been played and erased. -
Page 26: Remote Control
English The Answering Machine (5045) Remote Control This machine can be remotely accessed using an ordinary tone dialling telephone. Dial the telephone number to which the answering machine is connected, after the OGM has been played enter your Four digit remote code. -
Page 27: Other
Some telephones only output a short tone beep when buttons are pressed, and this may not be enough to activate remote control. Please use a separate tone transmitter in these cases. Also try holding the buttons down longer, approximately 1 second per digit. www.doro.com... -
Page 28: Guarantee
9AM - 5PM Monday-Friday excluding Bank Holidays. Alternatively, E-mail on: tech@doro-uk.com You can contact us in writing: Consumer Support Group, Doro UK Ltd., 22 Walkers Road, North Moons Moat, Redditch, Worcestershire, B98 9HE, (regarding any Spares or Technical query), or Telephoning (Spares only): 01527 584377 Web site: www.doro-uk.com... -
Page 29: Australia And New Zealand
(As a matter of precaution, we recommend disconnecting the telephone during a thunderstorm). This guarantee does not affect your statutory rights. AUSTRALIA NEW ZEALAND DORO Australia Pty Ltd Atlas Gentech (NZ) Limited PO Box 6760 Private Bag 14927 Baulkham Hills BC NSW 2153... -
Page 30: Ren (Rn For New Zealand)
Answering Machines Please note when set to answer after 2 rings this product may block CID information when used in conjunction with certain distinctive ring signals (FaxAbility). www.doro.com... - Page 32 www.doro.com...
Need help?
Do you have a question about the 5045 and is the answer not in the manual?
Questions and answers