Table of Contents

Related Manuals for Doro 5055


Summary of Contents for Doro 5055
- Page 1 ������ �� �������� ����� Manual doro 5055/5065R Downloaded from: http://www.guardianalarms.net...
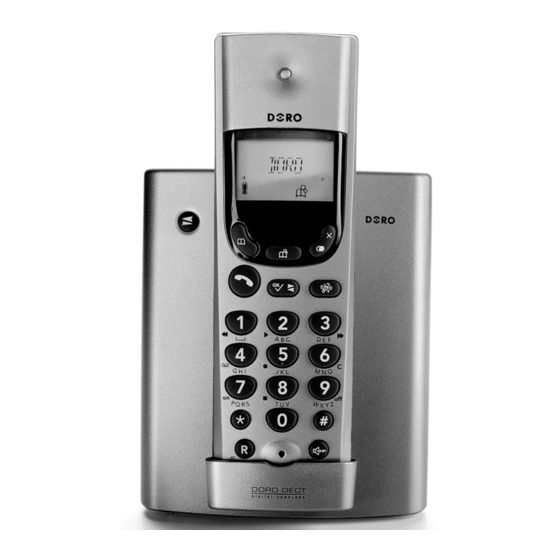
- Page 2 Picture shows 5065R. 1 Phonebook 2 2 Phonebook 1 3 Talk/Call end button 4 Keypad/Answering machine function buttons 5 Menu/Recall button 6 Volume (5055)/Hands Free Speaker (5065R) button 7 Caller Identifi cation (CID) button 8 OK/Intercom button 9 Redial/Erase button...
-
Page 3: Table Of Contents
Tone / Pulse Dialling ...20 Line Adaptation ...20 Recall Button Timing...21 PBX Function ...21 Handset Volume Control (5065R only) ...22 www.doro.com Index Expanded System General Information... 23 Multiple Handsets ... 23 Base Unit Placement ... 24 Multiple Base Units... 24 Intercom Function ... -
Page 4: Installation
The package should include the following items: - Handset - Base unit - 2 batteries Models 5055+1/5065R+1 are also supplied with an extra handset including batteries, charger and electrical mains adapter. Connection 1. Connect the mains adapter to the an electrical wall socket. - Page 5 Only for models with an extra handset (5065R+1/5055+1): 8. Connect the mains adapter to the Y socket of the charger pod and to an electrical wall socket. 9. Remove the battery cover from the back of the handset. Insert the batteries into the handset ensuring correct battery polarity is observed.
-
Page 6: Batteries
When the telephone is installed for the fi rst time, the batteries must be charged for 24 hours before using the telephone. Use DORO original batteries only. The guarantee does not cover any damage caused by incorrect batteries. -
Page 7: Range
300 metres. In a densely populated area, house, apartment, etc. the range of the telephone will be reduced. Try to get the best range by relocating the base unit. The ideal location for the base unit is a high and unobstructed place. -
Page 8: The Display
Shown within range of the base unit. Flashes when out of range. 5065R only: Upper row: Answering machine settings. Lower row: The indicator is lit when the answering machine is activated. New incoming messages (ICM) on the answering machine. Handset volume control. Installation www.doro.com www.doro.com... -
Page 9: Operation
Volume Control 5055: The earpiece volume may be adjusted during a call by pressing 5065R: The volume is adjusted by accessing the menu, please refer to page 22. -
Page 10: Optional Network Services
The timer helps you keep track of how long the call lasts. Operation keys. Contact your network followed by the extension number to transfer on the handset is on the base again. www.doro.com www.doro.com... -
Page 11: Hands Free Function
It is therefore essential that there are no loud noises in the immediate surroundings of the telephone, as this will disrupt the speaker function. www.doro.com Operation is located on the back of the handset (5055), again. English . The hands... -
Page 12: Phone Book
English Using the Phone Book There are two Phone Books which will store a total of 20 (10+10) telephone numbers (25 digits maximum) and names (10 characters maximum), this allows a stored phone number to be dialled using fewer button presses than if dialled manually. - Page 13 1. Select a Phone book by pressing the corresponding button 2. Scroll through the entries using 3. Press , the displayed telephone number will now be dialled. Changing Numbers 1. Select the phonebook into which you wish to change the entry by pressing the corresponding button: 2.
-
Page 14: Caller Identifi Cation
If a name is attached to the telephone number and stored in the phone book, the name will be shown while the phone is ringing. The call log will store up to 10 telephone numbers, which can easily be retrieved for viewing and dialling. - Page 15 Caller Identifi cation Messages Besides showing telephone numbers, the display may also show a message. ****** No information was received, e.g. when receiving an international call, voicemail (Optional Network Services required), secret or blocked numbers. Removing a Number 1. Press 2.
-
Page 16: Settings
English Description of the menu system The telephone has a menu system, controlled by the following buttons: Activates and deactivates the menu system. Move one step forward and/or confi rm selected option. Used to erase/correct. Scroll through the menu alternatives. -
Page 17: The Handset Ringer
Although the caller may be stored in one of the phone books, the fi rst ringer signal may still be the regular signal until the number has been identifi ed. The telephone’s ringing signal does not follow the line signal, ie it may continue to ring for up to 7 seconds after answering a call. -
Page 18: Register A New Handset Or Base Unit
2. Press the keypad digits 3. Enter the PIN code (1111 for this model). 4. Press Settings until starts fl ashing in the display. Press starts fl ashing in the display. Press . Press (1111 for this model) www.doro.com www.doro.com... -
Page 19: De-Register All Other Handsets
Type of Caller ID (CID) Dependant on your network sytem requirements the Caller ID settings may need to be adjusted. If the telephone has been purchased in Australia this setting will be displayed as 1/4. 1. Press 2. Scroll using 3. -
Page 20: Tone / Pulse Dialling
) to exit the Menu system. 5. Press Line Adaptation On some telephone networks and PBX systems, it may be necessary to adjust the microphone level. If the telephone has been purchased in Australia this setting will be displayed as 2/4. -
Page 21: Recall Button Timing
PBX Function This telephone has a PBX function that will automatically insert a pause between the fi rst and second digits of the telephone number before dialling. For example: When the function is activated (see below), dialling a phone number ie: ”0123456”, the phone will dial: “0” followed by a pause, and then the remaining part of the number: “123456”. -
Page 22: Handset Volume Control (5065R Only)
2. Scroll using 3. Scroll using +++=high, and ++++=maximum). Press ) to exit the Menu system. 4. Press Settings until fl ashes in the display. Press to the desired setting (+=low, ++=medium, to confi rm. to confi rm. www.doro.com www.doro.com... -
Page 23: Expanded System
Expanded System General Information DECT (Digital Enhanced Cordless Telephone) technology offers superior performance, clarity and security using its completely digital method of transmission. You can: - Use (register) up to 4 handsets with the same base unit. - Use (register) up to 2 base units with the same handset. -
Page 24: Base Unit Placement
More about placement of the base units on the next page. IMPORTANT! Automatic switching between base units (handset handover) will not occur while a call is in progress. www.doro.com... -
Page 25: Intercom Function
3. Answer the call by pressing the call has been answered press If you decide not to transfer the call, press to the external caller. www.doro.com on one of the other handsets. on one of the other handsets. on one of the other handsets, when on one of the other handsets, when on your handset. -
Page 26: The Answering Machine
About the Answering Machine The answering machine has to be turned on in order to receive messages. On incoming calls the telephone will be answered after the selected number of rings (please refer to page 23). When the answering machine answers an incoming call, the caller will... -
Page 27: Outgoing Message (Ogm)
2. The total number of (new) recorded ICM’s will now be announced. 3. Press to stop playback. 4. Press 5. Your current OGM will now be replayed. 6. At any point you can press www.doro.com to stop playback. English... -
Page 28: Using The Answering Machine
7 ...Switching On the answering machine (the 8 ...Stop 9 ...Switching Off the answering machine (the will fl ash in the display and also the to stop playback. Function recording press display will show display will no longer show www.doro.com www.doro.com... -
Page 29: Personal Message - Memo
) to exit the Menu system. 6. Press www.doro.com until fl ashes in the display. Press English until the correct day of... -
Page 30: Number Of Rings
) to exit the Menu system. 5. Press until fl ashes in the display. Press to the required setting (2, 3, 4, 5 or TOLL). Press until fl ashes in the display. Press www.doro.com www.doro.com... -
Page 31: Recording Quality / Time
3. The display will show 1/1. Scroll using setting. --) + (-- = play OGM and record ICM --) = ANN only. 4. Press www.doro.com until fl ashes in the display. Press to the required setting (A/B). Press English to the required... -
Page 32: Out Of Memory
The answering machine can be remotely turned on, so long as the electrical supply is connected and live. 1. Dial the telephone number to which the answering machine is connected. After approximately 9 rings the machine will answer and a tone will be heard. -
Page 33: Remote Control
If the machine doesn’t respond correctly to the remote control commands, try pressing the telephone buttons for a longer or shorter time. In normal cases, the answering machine should react to tones approximately 0.5 – 1 seconds in length, but longer tones may be necessary on certain telephone networks. -
Page 34: Other
Test the equipment on a known working line. If the product works then the fault is with the line. Please inform your local telephone company. No Number Shown in Display when Ringing - In order for this feature to function, you must subscribe to the Caller Identifi cation service from your network provider. - Page 35 - If the function Announcement only is activated the caller cannot leave a message. If the telephone still does not work, contact the place of purchase. Don’t forget the receipt or copy of the invoice. www.doro.com Other...
-
Page 36: Guarantee
9AM - 5PM Monday-Friday excluding Bank Holidays. Alternatively, E-mail on: tech@doro-uk.com You can contact us in writing: Consumer Support Group, Doro UK Ltd., 22 Walkers Road, North Moons Moat, Redditch, Worcestershire, B98 9HE, (regarding any Spares or Technical query), or Telephoning (Spares only): 01527 584377 Web site: www.doro-uk.com... -
Page 37: Australia And New Zealand
Electro Magnetic Radiation (EMR) This telephone complies with applicable safety requirements for exposure to radio waves. The mean power of this telephone is not greater than 11.5 mW. This is below the 20mW limit at which testing is required. Guarantee This product is guaranteed for a period of 12 months from the date of purchase. -
Page 38: Ren (Rn For New Zealand)
REN (RN for New Zealand) The REN (Ringer Equivalence Number) or (RN) is of signifi cance only if you wish to connect more than 1 telephone to your telephone line. A standard telephone line has a maximum REN capacity of 3 (RN of 5). - Page 40 English Version 1.2...
Need help?
Do you have a question about the 5055 and is the answer not in the manual?
Questions and answers