Table of Contents
Advertisement
Advertisement
Table of Contents

Related Manuals for Peco T8000


Summary of Contents for Peco T8000
- Page 1 OPERATING MANUAL T8000 Non-Programmable Models T8500 Programmable Models Performance PRO Series ™ • Large 8 square inch blue display • 7 available outputs, including economizer • SD memory card interface • 365-day, 20 holiday programmability • 7-day, 5-1-1, 5-2 programming T8000 Se ri es...
-
Page 2: T8000 Thermostat The Peco Performance Pro T8000 Series
Digital (SD) card capability (card not included), and optional humidity control (T8532-IAQ only). The T8000 Series can be powered by 24 VAC or batteries or both (recommended). The T8000 Series can control up to 7 outputs and monitor three external sensors. The T8000 Series mounts onto any PECO Performance PRO Series wallplate. -
Page 3: Table Of Contents
Table of Contents T8000 Thermostat The PECO Performance PRO T8000 Series ..................2 Quick reference: Default Display mode ....................5 Quick reference: Home Display mode & navigation ................6 Quick reference: T8000 Home Display screen ...................7 Key operation ............................8 Set the clock, month, and day ......................11 Select Fahrenheit or Celsius temperature ..................12... - Page 4 • This product, when installed, will be part of an engineered system whose specifications and performance characteristics are not designed nor controlled by PECO. • All wiring and applications must conform to local and national building codes and ordinances Applications and national codes must be reviewed prior to installation to assure the installation is functional and safe.
-
Page 5: Quick Reference: Default Display Mode
QUICK REFERENCE: DEFAULT DISPLAY MODE QUICK REFERENCE: DEFAULT DISPLAY MODE QUICK REFERENCE: DEFAULT DISPLAY MODE Default Display The factory programmed settings show the time, temperature, and setpoint. This is called the Default Display. The Default Display appears after a short period of inactivity. The Default Display can be custom configured to show user-selected items only (see Service Menu 520 in “Performance PRO T8000 Series Installation Guide”). -
Page 6: Quick Reference: Home Display Mode & Navigation
QUICK REFERENCE: HOME DISPLAY MODE & NAVIGATION QUICK REFERENCE: HOME DISPLAY MODE & NAVIGATION QUICK REFERENCE: HOME DISPLAY MODE & NAVIGATION Home Display The Performance PRO T8000 Series has two ▲/ ▼(Up and Down) keys and four soft keys (1-3; 6 below). -
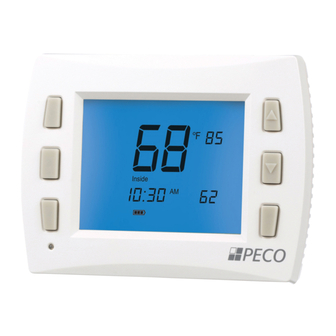
Page 7: Quick Reference: T8000 Home Display Screen
QUICK REFERENCE: T8000 HOME DISPLAY SCREEN QUICK REFERENCE: T8000 HOME DISPLAY SCREEN QUICK REFERENCE: T8000 HOME DISPLAY SCREEN Current day Current temperature System key (see p. 11) (see p. 12) Press to enter Displays Fan/Auto/ system settings: On when activated Off/Heat/Cool/ (see pp. -
Page 8: Key Operation
KEY OPERATION KEY OPERATION KEY OPERATION System key Used to control the operating mode of the Performance PRO T8000 Series thermostats. The options available are dependent on System Type selected in Service Menu 110 (see Advanced Configuration in “Performance PRO T8000 Series Installation Guide”). System modes are: HEAT –... - Page 9 KEY OPERATION (CONT.) KEY OPERATION (CONT.) KEY OPERATION (CONT.) Fan key Used with two different menu options: ON - Continuous fan operation. AUTO - Fan is activated only when there is demand for heat or cool, with some exceptions. Note: Several Service Menu options affect the fan operation (See Advanced Confi guration in the “Performance PRO T8000 Series Installation Guide.”) More key Used to view more menu options.
- Page 10 After the Filter Indicator icon appears, pressing Done will restart the filter timer. Secure Digital (SD) Icon appears (flashes) when SD card is inserted. Optional SD card not provided. SD card functionality allows user to upload/download settings to/from a PECO-formatted SD card (see also “Load SD card settings”).
-
Page 11: Set The Clock, Month, And Day
SET THE CLOCK, MONTH, AND DAY SET THE CLOCK, MONTH, AND DAY SET THE CLOCK, MONTH, AND DAY PRESS ANY KEY TO BEGIN Press to view menu options. In clock mode press ▲/ ▼to select clock hour. More Press to access menu options. Clock Press ▲/ ▼... -
Page 12: Select Fahrenheit Or Celsius Temperature
SELECT FAHRENHEIT OR CELSIUS TEMPERATURE SELECT FAHRENHEIT OR CELSIUS TEMPERATURE SELECT FAHRENHEIT OR CELSIUS TEMPERATURE Press the lower left and lower right keys After entering the Service Menu mode, press Next continuously until menu “260” appears. simultaneously for about fi ve seconds. Back, Next, and appear. -
Page 13: Select The Fan Mode
SELECT THE FAN MODE SELECT THE FAN MODE SELECT THE FAN MODE PRESS ANY KEY TO BEGIN Press to set fan operation. In Fan mode, p ress ▲/ ▼to select desired option. Press ▲/ ▼ to select “On,” or “Auto.” Note: Selected option fl ashes. -
Page 14: Select System Mode
SELECT SYSTEM MODE SELECT SYSTEM MODE SELECT SYSTEM MODE PRESS ANY KEY TO BEGIN Press to select system Setpoint is displayed on the right side of the screen. System preferences. Note: Selected option fl ashes. Press ▲/ ▼ to select Heat, Cool, Auto, Off, or (Emergency). -
Page 15: Reset Filter Timer
RESET FILTER TIMER RESET FILTER TIMER RESET FILTER TIMER PRESS ANY KEY TO BEGIN The Filter Indicator serves as a reminder to change the furnace fi lter (see note below). When the fi lter timer expires, the Filter Indicator will be lit continuously. From the Default Display, press any key to enter the mode. -
Page 16: Program The Thermostat (T8500 Models Only)
PROGRAM THE THERMOSTAT (T8500 MODELS ONLY) PROGRAM THE THERMOSTAT (T8500 MODELS ONLY) PROGRAM THE THERMOSTAT (T8500 MODELS ONLY) Each day has two or four scheduled events (Occupied1, Occupied2, Unocc1, and Unocc2) per day, depending on Service Menu configuration. Each event can be programmed with a start time and Heat and Cool Setpoints. -
Page 17: Program Scheduled Events
PROGRAM SCHEDULED EVENTS PROGRAM SCHEDULED EVENTS PROGRAM SCHEDULED EVENTS PRESS ANY KEY TO BEGIN Schedule two or four events per day: Press Select Day to underline highlighted day to which a scheduled event will be applied. Occupied1, Occupied2, Unocc1, and Unocc2. Press to view options. - Page 18 PROGRAM SCHEDULED EVENTS PROGRAM SCHEDULED EVENTS PROGRAM SCHEDULED EVENTS PRESS ANY KEY TO BEGIN Press ▲/ ▼ to select a scheduled event Press ▲/ ▼to select a desired Heat Setpoint for the (e.g, Occupied1, etc.), then Next. currently selected scheduled event (Occupied1). Press ▲/ ▼to schedule start time for event (in 15-minute periods), then Next.
-
Page 19: Program Override
PROGRAM OVERRIDE PROGRAM OVERRIDE PROGRAM OVERRIDE PRESS ANY KEY TO BEGIN Override allows application of temporary heat Example shows how to select a Cool Setpoint for a or cool settings. (Example uses System Auto.) temporary period in System Auto mode. Press Override, or ▲/ ▼key. -
Page 20: Select Humidity Setpoints
SELECT HUMIDITY SETPOINTS SELECT HUMIDITY SETPOINTS SELECT HUMIDITY SETPOINTS PRESS ANY KEY TO BEGIN If the thermostat is model T8532-IAQ, a Adjust the Dehumidify Setpoint. humidity sensor is present. A humidity sensor allows user to set dehumidify and humidify control setpoints. Press to view options. -
Page 21: Program A Holiday
PROGRAM A HOLIDAY PROGRAM A HOLIDAY PROGRAM A HOLIDAY PRESS ANY KEY TO BEGIN 20 holidays may be programmed. System Press to view more options. More type shown supports 1-HEAT and 1-COOL. Press to enter menu. Holiday Press ▲/ ▼to select holiday number (1-20). - Page 22 PROGRAM A HOLIDAY (CONT.) PROGRAM A HOLIDAY (CONT.) PROGRAM A HOLIDAY (CONT.) PRESS ANY KEY TO BEGIN Now select the Heat and Cool Setpoints for the same holiday number (e.g., “1”). Press ▲/ ▼to select the Heat Setpoint, then Next. Press ▲/ ▼to select the Cool Setpoint, then Next.
-
Page 23: Load Sd Card Settings
LOAD SD CARD SETTINGS LOAD SD CARD SETTINGS LOAD SD CARD SETTINGS PRESS ANY KEY TO BEGIN Use the SD card to transfer customized When the SD card is inserted, the SD icon begins flashing. Icon stops flashing when processing data. settings to or from the thermostat. -
Page 24: T8000 Series Product Specifications
PO Box 82189, Portland, OR 97282 www.pecomanufacturing.com © Copyright 2010. PECO, Inc. All Rights Reserved. P/N 70477 3220-2266 REV 00 09/10 PECO is a registered trademark of PECO, Inc. The PECO Performance PRO and the PECO logo are trademarks and/or service marks of PECO, Inc.
Need help?
Do you have a question about the T8000 and is the answer not in the manual?
Questions and answers