Table of Contents
Advertisement
Advertisement
Table of Contents

Subscribe to Our Youtube Channel
Related Manuals for Peco T180


Summary of Contents for Peco T180
- Page 1 T180 Programmable ThermosTaT owner’s manual Ta/Tb180...
-
Page 2: Table Of Contents
ConTenTs Page General ..........................4 Front Panel Reference ...................... 5 Display Reference ......................6 Saving Changes ........................ 10 UP and DOWN Button Operation ..................11 System Button Operation ....................11 Fan Button Operation ......................13 Program Button Operation ....................14 .................... -
Page 3: Important Note
• Retain these instructions for future reference. This product, when installed, will be part of an engineered system whose specifications and performance characteristics are not designed or controlled by PECO. • If at any time your system does not operate properly, contact a qualified service person. -
Page 4: General
general The T180 Thermostat is a wall-mounted digital control for 2 or 4 pipe fan coil applications. The thermostat can be set for 7-day, 5/2-day, 5/1/1-day, or 1-day programmable operation. Different heating and cooling setpoints and times are programmable for 4 time periods per day. The thermostat can also be set to nonprogrammable (manual) operation. -
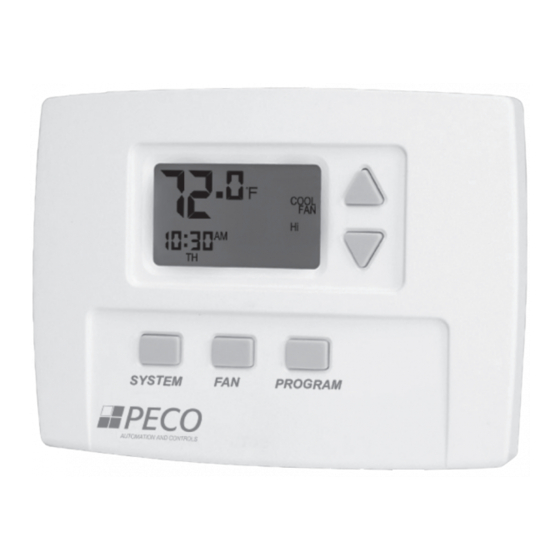
Page 5: Front Panel Reference
FronT Panel reFerenCe Liquid Crystal Display with a blue backlight UP ▲and DOWN ▼Buttons SYSTEM Button FAN Button PROGRAM Button SYSTEM PROGRAM PAGE 6... -
Page 6: Display Reference
DIsPlaY reFerenCe PAGE 7... - Page 7 System Mode Display HEAT – indicates the system is in heating mode. COOL – indicates the system is in cooling mode. AUTO – indicates the system will automatically changeover between heating and cooling modes as the room temperature varies. OFF – turns off the entire system. SETBACK –...
- Page 8 DIsPlaY reFerenCe (cont.) Programming Commands SET – enters thermostat into custom program mode which allows you to specify a unique times and temperatures for a particular day or group of days. COPY – simplifies programming by allowing you to copy all of an individual day’s settings to another day or group of day.
- Page 9 Program Override Commands HOLD – indicates thermostat is in manual operation. (Programmed settings are off, but not lost.) HOLD HRS – during programming, lights up in conjunction with clock digits; allows program to be put on hold for up to 24 hours. HOLD DAYS –...
-
Page 10: Saving Changes
saVIng Changes As you navigate your thermostat, be aware of the thermostat’s save and exit protocol: • The thermostat automatically saves all the changes you make, as you make them. • When you are in the SYSTEM or FAN menus: –... -
Page 11: Up And Down Button Operation
▲AND ▼BUTTON OPERATION The ▲and ▼buttons function in two ways: • When you are in the default display, you can press ▲to increase, or ▼to decrease, the current temperature setpoint. This will override programmed temperature settings until the next programmed time period (Wake, Day, Evening, or Sleep). •... - Page 12 sYsTem buTTon oPeraTIon (cont.) MENU DESCRIPTION SETBACK Setback mode is an energy saving feature that minimizes the heating and cooling when the room is not occupied. Setback mode overrides the programmed time and temperature settings by telling the thermostat to instead use the setback setpoint for heating and cooling.
-
Page 13: Fan Button Operation
Fan buTTon oPeraTIon Pressing FAN will light up the six fan mode options described below. Press FAN to scroll through the options. As you scroll, the current option will be blinking. To select the blinking option, wait for the five-second timeout, which saves your option and returns you to the thermostat’s default display. -
Page 14: Program Button Operation
Program buTTon oPeraTIon Function Overview Pressing PROGRAM lights up five program mode options, described below. Press ▲or ▼buttons to scroll through the options. As you scroll, the current option will be blinking. To select the blinking option, press PROGRAM again and you will be taken to the menu associated with that option. MENU DESCRIPTION CLOCK... -
Page 15: Setting The Clock And Day
Setting the Clock & Day 1. Press PROGRAM once. 2. Press ▲or ▼to scroll until “CLOCK” is blinking. To select, press PROGRAM once. 3. Press ▲or ▼to scroll through “24Hr”, “AM”, “PM” options. “24Hr” sets your thermostat to a 24- hour clock. -
Page 16: Programming Time & Temperature Settings
Programming Time & Temperature Settings Your thermostat’s programming feature allows you to divide up a 24-hour day into four time periods (referred to as “Wake”, “Day”, “Evening”, and “Sleep”), and give each time period its own setpoint temperatures. Your “Heat Setpoint temperature” tells your heating system the room temperature to maintain during cold weather. -
Page 17: Custom Program
Custom Program Begin by planning your program. Use the “Custom Program Worksheet” to plan your program time periods and temperatures you want during each period. You must program four periods for each day. Fill in the complete table, as it will serve as a record of your programs, then follow this procedure: 1. -
Page 18: Copy Feature
preprogrammed ENERGY STAR program. 4. Press ▲or ▼to scroll through the four time periods. To select your preference, press PROGRAM once. 5. Press ▲or ▼to scroll to the desired starting hour. To select, press PROGRAM once. 6. Press ▲or ▼to scroll to the desired starting minute. To select, press PROGRAM once. -
Page 19: Time & Temperature Programming Example
PROGRAM once. 4. Press ▲or ▼to scroll to the day or group of days you want to copy to. To select, press PROGRAM once. Your selection has been saved and you have exited program mode. Time & Temperature Programming Example In this example, the thermostat user wants to program the weekend with a different schedule from the Factory Program. -
Page 20: Overriding The Program
Now you’re done setting up the Wake period, and ready to set up the other three time periods for Saturday and Sunday: • Program the Day period for SASU by repeating steps 1 through 8, but in Step 4, select “DAY”. -
Page 21: Setting Up A Permanent Hold
hold; “HRS” allows you to specify 0-24 hours hold. To select your preference, press PROGRAM once. 4. Press ▲or ▼to scroll to the desired length of time. To select, press PROGRAM once. The thermostat is now on hold for the time period you selected, unless you decide to turn it off earlier. -
Page 22: Custom Program Worksheet
CusTom Program worksheeT Time Period start Time heat setpoint Cool setpoint Temperature Temperature Wake Monday Evening Sleep Wake Tuesday Evening Sleep Wake Wednesday Evening Sleep PAGE 23... - Page 23 Wake Thursday Evening Sleep Wake Friday Evening Sleep Wake Saturday Evening Sleep Wake Sunday Evening Sleep PAGE 24...
- Page 24 Email: sales@pecomanufacturing.com PO Box 82189, Portland, OR 97282 www.pecomanufacturing.com © Copyright 2008. PECO, Inc. All Rights Reserved. P/N LCT180OMO9O8 PAGE 72 PECO is a registered trademark of PECO, Inc. The PECO logo is a trademark and/or service mark of PECO, Inc.
Need help?
Do you have a question about the T180 and is the answer not in the manual?
Questions and answers