Table of Contents
Advertisement
Available languages
Available languages
Quick Links
Advertisement
Table of Contents

Related Manuals for Ronix RH-4705


Summary of Contents for Ronix RH-4705
- Page 1 BENZIN - GENERATOR 3200W RH-4705 www.ronixtools.com...
-
Page 3: Technische Daten
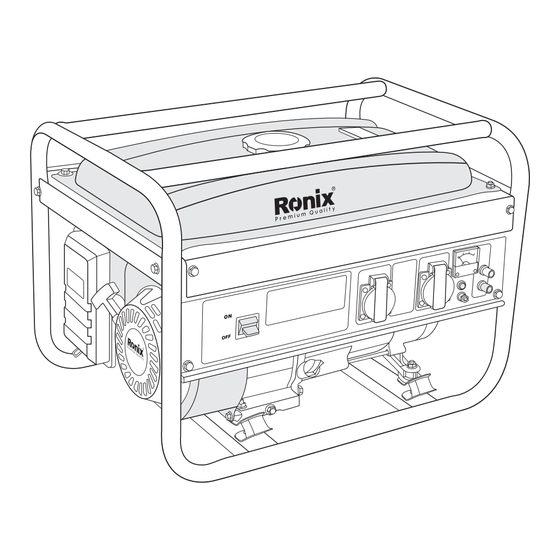
TECHNISCHE DATEN RH-4705 Modell Modell LB170F 4stroke air cooled engine Hubraum 210cc Leistung Motor Zündsystem Start Manual Kraftstofftankkapazität Dauerbetrieb Kraftstoffart Unleaded Petrol Generatortyp Single phase Nennspannung 220V Frequenz 50Hz Wicklungsmaterial Copper Generator Nennstrom 12.1-13 A Nennleistung 2800-3000 W Maximale Leistung... - Page 4 GERÄTEKOMPONENTEN 1- Kraftstofftank 2- Luftfilterabdeckung 3- Motorschalter 4- Ölverschluss 5- Startergriff 6- Wechselstromsteckdose 7- Voltmeter 8- Gleichstromausgang 9- Erdung 10- Rahmen VORWORT WARNUNG! - Weist auf die Möglichkeit von Tod oder schweren Verletzungen hin, wenn die Anweisungen nicht befolgt werden. Benzin-Generator 3200W...
- Page 5 WARNUNG! - Weist auf eine starke Möglichkeit schwerer persönlicher Verletzungen, Lebensverlust und Schäden an der Ausrüstung hin, wenn die Anweisungen nicht befolgt werden. VORSICHT: - Weist auf die Möglichkeit von persönlichen Verletzungen oder Schäden an der Ausrüstung hin, wenn die Anweisungen nicht befolgt werden. HINWEIS: - Gibt hilfreiche Informationen.
- Page 6 - Füllen Sie den Kraftstofftank nicht mit Kraftstoff, während der Motor läuft. Rauchen Sie nicht oder verwenden Sie offenes Feuer in der Nähe des Kraftstofftanks. Achten Sie darauf, keinen Kraftstoff zu verschütten. Während des Betankens. Wenn Kraftstoff verschüttet wird, wischen Sie ihn ab und lassen Sie ihn trocknen, bevor Sie den Motor starten.
- Page 7 Struktur oder jedem Gebäude entfernt, einschließlich der Überkopfzone. WARNUNG! - Schließen Sie den Generator nicht ein und bedecken Sie ihn nicht mit einer Box. Der Generator verfügt über ein eingebautes Gebläsekühlsystem und kann überhitzen, wenn er eingehüllt ist. Wenn der Generator zum Schutz vor Witterungseinflüssen während der Nichtbenutzung abgedeckt wurde, entfernen Sie die Abdeckung und halten Sie sie während des Generatorbetriebs weit von der Umgebung entfernt.
- Page 8 WARNUNG! - Betreiben Sie den Generator nicht im Regen, bei nasser oder feuchter Witterung oder mit nassen Händen. - Der Bediener kann einen schweren elektrischen Schlag erleiden, wenn der Generator durch Regen oder Schnee nass wird. WARNUNG! - Wenn der Generator nass ist, wischen Sie ihn gut ab und trocknen Sie ihn, bevor Sie ihn starten.
- Page 9 WARNUNG! - Der Motor wird während und nach dem Betrieb extrem heiß. - Halten Sie brennbare Materialien weit vom Generatorbereich entfernt. - Berühren Sie keine Teile des heißen Motors, insbesondere nicht den Auspuffbereich, da dies zu schweren Verbrennungen führen kann. WARNUNG! - Halten Sie Kinder und alle Zuschauer in sicherer Entfernung von Arbeitsbereichen.
- Page 10 WARNUNG! - Schalten Sie immer den Wechselstrom-Schutzschalter des Generators aus und trennen Sie Werkzeuge oder Geräte, wenn sie nicht in Gebrauch sind, bevor Sie Wartungsarbeiten, Einstellungen oder die Installation von Zubehör und Anbaugeräten durchführen. HINWEIS: - Stellen Sie sicher, dass der Motor gestoppt ist, bevor Sie Wartungs, Service- oder Reparaturarbeiten durchführen.
- Page 11 oder höher (SG, SH oder SJ wird empfohlen). SAE 10W-30 oder 10W 40 wird für den allgemeinen, allwettertauglichen Gebrauch empfohlen. Wenn ein Öl mit einfacher Viskosität verwendet wird, wählen Sie die geeignete Viskosität für die durchschnittliche Temperatur in Ihrer Region. ÜBERPRÜFUNG DES KRAFTSTOFFS IM MOTOR WARNUNG! - Betanken Sie nicht beim Rauchen oder in der Nähe offener Flammen...
- Page 12 KRAFTSTOFFMENGE Kraftstofffiltersieb bis zur “LEVEL”-Position: (15 l / 3,95 Gallonen) WARNUNG! - Stellen Sie sicher, dass Sie jede Warnung überprüfen, um Brandgefahr zu vermeiden. - Füllen Sie den Tank nicht nach, während der Motor läuft oder heiß ist. - Schließen Sie das Kraftstoffventil vor dem Betanken mit Kraftstoff. - Achten Sie darauf, dass kein Staub, Schmutz, Wasser oder andere Fremdkörper in den Kraftstoff gelangen.
-
Page 13: Tägliche Inspektion
- Halten Sie den Generator fern von offenen Flammen. Nicht rauchen! - Stellen Sie den Generator auf eine stabile und ebene Fläche. - Blockieren Sie die Lüftungsschlitze des Generators nicht mit Papier oder anderen Materialien. ERDEN DES GENERATORS - Um den Generator mit der Erde zu verbinden, schließen Sie das Erdungskabel des Generators an den Erdungsspieß... - Page 14 Intervalle der periodischen Wartung. ES IST AUCH ERFORDERLICH, DASS DER BENUTZER DIE WARTUNG UND EINSTELLUNGEN AN DEN UNTEN AUFGEFÜHRTEN EMISSIONSRELEVANTEN TEILEN DURCHFÜHRT, UM DAS EMISSIONSKONTROLLSYSTEM EFFEK- TIV ZU HALTEN. Das Emissionskontrollsystem besteht aus folgenden Teilen: - Vergaser und interne Teile - Ansaugkrümmer, falls zutreffend - Luftfilterelemente - Zündkerze...
- Page 15 Ersetzen Sie das Luftfilterelement. Clean fuel filter Reinigen und justieren Sie die Zündkerze und die Elektroden. Ersetzen Sie die Zündkerze. Entfernen Sie Kohlenstoff vom Zylinderkopf. (Hinweis 2) Überprüfen und justieren Sie das Ventilspiel. (Hinweis 2) Reinigen und justieren Sie den Vergaser.
-
Page 16: Vorbereitung Für Die Lagerung
HINWEIS: - Die erste Ölwechsel sollte nach den ersten zwanzig (20) Betriebsstunden durchgeführt werden. Danach sollte das Öl alle hundert (100) Stunden gewechselt werden. Bevor Sie das Öl wechseln, überprüfen Sie, ob eine geeignete Entsorgungsmöglichkeit für das Altöl vorhanden ist. HINWEIS: - Was die Verfahren für diese Punkte betrifft, verweisen Sie bitte auf das SERVICEHANDBUCH oder konsultieren Sie Ihren nächsten... - Page 17 Sie die folgende Tabelle. - Wenn Ihr Generator immer noch nicht startet oder keine Elektrizität erzeugt, wenden Sie sich an Ihren nächsten Händler oder Service-Shop für weitere Informationen oder Korrekturmaßnahmen. WENN DER MOTOR NICHT STARTET: Überprüfen Sie, ob der Choke-Hebel Stellen Sie den Choke-Hebel auf in der richtigen Position ist.
- Page 18 WENN AM REZEPTAKEL KEINE ELEKTRIZITÄT ERZEUGT WIRD: Nachdem Sie sichergestellt haben, dass die Gesamtleistung des elektrischen Geräts innerhalb der zulässigen Grenzen liegt Überprüfen Sie, ob der und keine Defekte am Gerät Wechselstrom-Schutzschalter auf vorliegen, schalten Sie den “EIN” steht. Wechselstromschutzschalter auf “EIN”.
- Page 19 GASOLINE GENERATOR 3200W RH-4705...
-
Page 20: Specifications
SPECIFICATIONS RH-4705 Model Model LB170F 4stroke air cooled Type engine Displacement 210cc Power Engine Ignition System Start Manual Fuel Tank Capacity Continuous Working Fuel Type Unleaded Petrol Type Single phase Voltage 220V Frequency 50Hz Winding Material Copper Generator Rated Amperage 12.1-13 A... -
Page 21: Parts List
PARTS LIST 1- fuel tank 2- Air filter cover 3- Engine switch 4- Oil plug 5- Recoil starter handle 6- Ac socket 7- Voltmeter 8- Dc output 9- Earth 10- Frame FOREWORD WARNING! - Indicates a possibility of death or serious injury if instructions are not followed. -
Page 22: Safety Instructions
WARNING! - Indicates a strong possibility of severe personal injury, loss of life and equipment damage if instructions are not followed. CAUTION: - Indicates a possibility of personal injury or equipment damage if instructions are not followed. NOTE: - Gives helpful information. - If a problem should arise, or if you have any questions about the generator, consult an authorized dealer or service shop WARNING! - Page 23 during refueling. If fuel is spilt, wipe it off and let dry before starting the engine. STOP WARNING! - Do not place in flammables near the generator. - Be careful not to place fuel, matches, gunpowder, oily cloths, straw, trash, or any other in flammables near the generator. WARNING! - Do not operate the generator inside a room, cave, tunnel, or other insufficiently ventilated area.
- Page 24 away from the area during generator use. WARNING! - Operate the generator on a level surface. - It is not necessary to prepare a special foundation for the generator. However, the generator will vibrate on an irregular surface, so choose a level place without surface irregularities.
- Page 25 WARNING! - Do not contact the generator to a commercial power line. Connection to a commercial power line may short circuit the generator and ruin it or cause electric shock hazard. Use the transfer switch for connecting to domestic circuit. WARNING! - no smoking while handling the battery.
-
Page 26: Pre-Operation Checks
the power tool or appliance that you intend to use. All operators must read, understand and follow the tool/appliance owners manual. Tool and appliance applications and limitations must be understood. Follow all directions given on labels and warnings. Keep all instruction manuals and literature in a safe place for future reference. -
Page 27: Check Engine Fuel
Öleinfülldeckel (Ölmessstab) Obere Markierung Untere Markierung - Change oil if contaminated. (See “How-To” Maintenance.) - Oil capacity (Upper level): 0.6L/0.15Gal RECOMMENDED ENGINE OIL: - Use 4-stroke automotive detergent oil of API service class SE or higher grade (SG, SH or SJ is recommended). SAE 10W-30 or 10W-40 is recommended for general, all-temperature use. -
Page 28: Check Generator Surroundings
FULL LEVEL EMPTY Fuel tank cap Fuel filter screen FUEL AMOUNT Up to “LEVEL” position: (15L/3.95Gal) WARNING! - Make sure you review each warning in order to prevent fire hazard. - Do not refill tank while engine is running or hot. - Close fuel valve before refueling with fuel. -
Page 29: Grounding The Generator
- Keep exhaust pipe clear of foreign objects. - Keep generator away from open flame. No smoking! - Keep generator on a stable and level surface. - Do not block generator air vents with paper or other material. GROUNDING THE GENERATOR - To ground the generator to the earth, connect the grounding log of the generator to the grounding spike driven into the earth or to the conductor which has been already grounded to the earch. - Page 30 - Turn the AC circuit breaker to the position “OFF”. - Open the fuel valve. - Set choke lever to close if the engine Choke Lever OPEN CLOSE - Recoil starter model Gasoline Generator 3200w...
-
Page 31: Using Electric Power
- Pull the starter handle slowly until passing the compression point (resistance will be felt), then return the handle to its original position and pull briskly. procedures with choke lever returned to “OPEN” position. - Do not fully pull out the rope. - After starting, allow the starter handle to return to its original position while still holding the handle. - Page 32 NOTE: - Allow the engine about 3 minutes to cool down at no-load before stopping. DC APPLICATION (ONLY FOR CHARGING 12 VOLT BATTERY) - The exclusive DC cable is come with your generator set (included in the package). DC Circuit Breaker - DC circuit breaker is turned off to shut down the DC power, when the DC is over the usage range or the battery is defective.
-
Page 33: Battery Charging Procedures
BATTERY CHARGING PROCEDURES: - Stop engine. - Remove all connections from battery. - Insert the plug of exclusive DC cable into DC receptacle. - Connect positive (red) clip of DC cable to positive (+) terminal on battery, and then connect negative (black) clip of DC cable to negative (-) terminal on battery. - Page 34 level of battery. Measure the specific gravity of electrolyte fluid by means of hydrometer every one hour during battery charging. Make sure if the DC circuit breaker is not turned off. Battery charging is completed when the specific gravity is in the range of 1.26 to 1.28 STOPPING THE GENRATOR - Turn off the power switch of the electric equipment and unplug the cord...
-
Page 35: Wattage Information
ELECTRIC STARTER MODEL - Turn the key switch to the STOP position. - Close the fuel valve. OIL SENSOR (IF APPLICABLE) - The oil sensor detects the fall in oil level in the crankcase and automatically stops the engine when the oil level falls below a predetermined level. - When engine has stopped automatically, switch off generator’s AC circuit breaker, and check the oil level. -
Page 36: Maintenance Schedule
- Electrical appliances and tools normally come with a label indicating voltage, cycles/ Hz, amperage (amps) and electrical power needed to run the appliance or tool. - Check with your nearest dealer or service center with questions regarding power surge of certain appliances or power tools. - Electrical loads such as incandescent lamps and hot plates require the same wattage to start as is needed to maintain use- Loads such as fluorescent lamps require 1.2 to 2 times the indicate wattage during start-up. -
Page 37: Periodic Maintenance
PERIODIC MAINTENANCE Periodic maintenance is vital to safe and efficient operation of your generator check the table below for periodic maintenance intervals. IT IS ALSO NECESSARY FOR THE USER OF THIS GENERATOR TO CONDUCT THE MAINTENANCE AND ADJUSTMENTS ON THE EMISSION RELATED PARTS LISTED BELOW TO KEEP THE EMISSION CONTROL SYSTEM EFFECTIVE. - Page 38 (Every 100 Clean spark plug hours) Clean air cleaner Replace air cleaner element Clean fuel filter Clean and adjust spark plug and electrodes Replace spark plug Remove carbon from cylinder head (*Note 2) Check and adjust valve clearance ...
-
Page 39: Preparation For Storage
Check rotor Check stator Replace engine mount NOTE: - Initial oil change should be performed after first twenty (20) hours of operation. thereafter change oil every hundred (100) hours. Before changing oil, check for a suitable way to dispose of old oil. NOTE: - As to the procedures for these items, please refer to the SERVICE MANUAL or consult your nearest service dealer. -
Page 40: Troubleshooting
TROUBLESHOOTING - When generator engine fails to start after several attempts, or if no electricity is available at the output socket, check the following chart. - If your generator still fails to start or generate electricity, contact your nearest dealer or service shop for further information or corrective procedures. - Page 41 WHEN NO ELECTRICITY IS GENERATED AT RECEPTACLE: After making sure that the total wattage of the electrical appliance is within permissible limits and there are no defects Check to make sure AC circuit in the appliance, turn the AC breaker is in the “ON” position. circuit breaker to the “ON”...
- Page 44 www.ronixtools.com...
Need help?
Do you have a question about the RH-4705 and is the answer not in the manual?
Questions and answers