Table of Contents
Advertisement
Available languages
Available languages
Quick Links
Advertisement
Table of Contents

Related Manuals for Ronix RH-4793


Summary of Contents for Ronix RH-4793
- Page 1 GASOLINE INVERTER GENERATOR-2.2KW RH-4793 www.ronixtools.com...
-
Page 3: Technische Daten
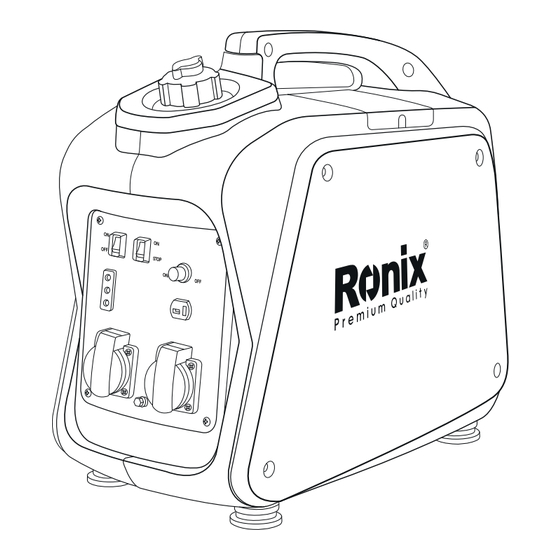
TECHNISCHE DATEN RH - 4793 Auspuffsystem Invertergenerator AC-Spannung 220V/50Hz Maximale Leistung 2.2KW Generator Nennleistung Leistungsfaktor DC-Ausgang 12V / 4A 5V 3A modell Motortyp XY156F Luftgekühlter 4-Takt-OHV Bohrung×Hub mm×mm Benzinmotor Hubraum 56×46 Maximale Leistung des Motors 114cc Kraftstoff 2.5KW/4500U/min Kraftstofftankkapazität Gasoline Motor Dauerbetrieb bei Nennleistung 4.1 liters... - Page 4 GERÄTEKOMPONENTEN 2 12 21 22 1- Wirtschaftsregler 2- Motorschalter 3- Kraftstofftank 4- Zündkerze 5- Schalldämpfer 6- Tragegriff 7- Chokehebel Gasoline Inverter Generator-2.2Kw...
-
Page 5: Auspuffgase Sind Giftig
8- AC-Kontrollleuchte 9- Überlastanzeigeleuchte 10- Ölwarnleuchte 11- Erdungsklemme 12- Gleichstromschutzschalter 13- Gleichstromsteckdose 14- Wechselstromsteckdose 15- Basis 16- Kraftstofffilter 17- Tankdeckel 18- Kraftstoffpumpe 19- Seilzugstarter 20- Kraftstoffhahn 21- Öleinfülldeckel 22- Luftfilterabdeckung 23- USB SICHERHEITSHINWEISE AUSPUFFGASE SIND GIFTIG Betreiben Sie den Motor niemals in geschlossenen Räumen, da dies zu Bewusstlosigkeit und Tod führen kann. - Page 6 - Halten Sie die Maschine aufrecht, um Kraftstofflecks aus dem Vergas- er oder dem Tank zu vermeien. MOTOR UND SCHALDÄMPFER KÖNNEN HEISS SEIN - Stellen Sie die Maschine an einem Ort auf, an dem Fußgänger oder Kinder die Maschine nicht berühren können. - Vermeiden Sie das Platzieren von brennbaren Materialien in der Nähe des Auspuffauslasses während des Betriebs.
- Page 7 Hinweis: Verwenden Sie dazu ein Erdungsblei mit ausreichender Stromkapazität - Durchmesser: 0,12 mm (0,005 Zoll) pro Ampere - Beispiel: 10 Ampere - 1,2 mm (0,055 Zoll) VERBINDUNGSHINWEISE - Vermeiden Sie es, den Generator an eine kommerzielle Stromquelle anzuschließen. - Verbinden Sie den Generator nicht parallel mit einem anderen Generator.
- Page 8 WARNUNG! - Füllen Sie den Tank nicht nach, während der Motor läuft oder heiß ist. - Schließen Sie den Kraftstoffhahn vor dem Betanken. - Achten Sie darauf, keinen Staub, Schmutz, Wasser oder andere Fremdkörper in den Kraftstoff gelangen zu lassen. - Füllen Sie nicht über die Oberkante des Kraftstofffilters, da dieser bei Erwärmung später überlaufen kann.
- Page 9 MOTORÖL ÜBERPRÜFEN Stellen Sie sicher, dass das Motoröl den oberen Füllstand des Öleinfülllochs erreicht. Fügen Sie bei Bedarf Öl hinzu. - Entfernen Sie den Öleinfülldeckel und überprüfen Sie den Ölstand. - Wenn der Ölstand unterhalb der unteren Markierung liegt, füllen Sie mit geeignetem Öl bis zur oberen Markierung auf.
- Page 10 MOTORSCHALTER Der Motorschalter steuert das Zündsystem. ON (Betrieb): Das Zündkreislauf wird eingeschaltet. Der Motor kann gestartet werden. ENGINE SWITCH STOP WIRTSCHAFTSREGELUNGSSCHALTER: Wenn der Wirtschaftsregler auf “ON” gestellt wird, regelt die Economy Steuerungseinheit die Motordrehzahl entsprechend der angeschlossenen Last. Das Ergebnis sind eine bessere Kraftstoffverbindung und weniger Lärm.
- Page 11 DC PROTECTOR TANKDECKEL MIT LUFTENTLÜFTUNGSKNOPF Der Tankdeckel ist mit einem Luftentlüftungsknopf ausgestattet, um den Kraftstofffluss zu stoppen. Der Luftentlüftungsknopf muss einmal im Uhrzeigersinn von der geschlossenen Position gedreht werden. Dadurch kann Kraftstoff zum Vergaser fließen und der Motor läuft. Wenn der Motor nicht in Betrieb ist, drehen Sie den Luftentlüftungsknopf gegen den Uhrzeigersinn, bis er handfest ist, um den Kraftstofffluss zu stoppen.
-
Page 12: Wartung
WARTUNG WARTUNGSTABELLE - Regelmäßige Wartung ist für die beste Leistung und sicheren Betrieb unerlässlich. Die Wartungsintervalle sind wie folgt: Teile Maßnahmen Überprüfen Sie den Zustand, passen Sie den Zündkerze Abstand an und reinigen Sie die Zündkerze. Ersetzen Sie sie bei Bedarf. Überprüfen Sie den Ölstand ... - Page 13 Überprüfen Sie auf Undichtigkeiten. Ziehen Sie die Dichtung nach oder ersetzen Sie sie bei Bedarf. Auspuffsystem Schalldämpfersieb überprüfen. Reinigen oder ersetzen, wenn nötig. Prüfen Sie den Betrieb des Vergaser Choke am Vergaser. Untersuchen Sie Abkühlungssystem den Ventilator auf Beschädigungen.
- Page 14 - Entfernen Sie den Öleinfülldeckel. - Stellen Sie eine Ölwanne unter den Motor. Neigen Sie den Generator, um das Öl vollständig abzulassen. - Setzen Sie den Generator wieder auf eine ebene Fläche. - Füllen Sie Motoröl bis zum oberen Füllstand auf. - Installieren Sie den Öleinfülldeckel.
- Page 15 VORSICHT: - Achten Sie darauf, dass keine Fremdkörper in das Kurbelgehäuse gelangen. - Neigen Sie den Generator nicht beim Hinzufügen von Motoröl, da dies zu Überfüllung und Motorschäden führen kann. - Reinigen Sie den Ölfilter alle 100 Stunden. LUFTFILTER: Die Pflege eines sauberen Luftfilters ist sehr wichtig. Schmutz, der durch unsachgemäß...
- Page 16 VORSICHT: Der Motor sollte niemals ohne das Element laufen; dies kann zu übermäßigem Verschleiß von Kolben und/oder Zylinder führen. REINIGUNG UND EINSTELLUNG DER ZÜNDKERZE - Entfernen Sie die Abdeckung. - Überprüfen Sie auf Verfärbungen und entfernen Sie den Kohlenstoff. - Überprüfen Sie den Zündkerzentyp und den Abstand. - Installieren Sie die Zündkerze.
- Page 17 WARNUNG! - Stellen Sie sicher, dass der Tankdeckel fest verschlossen ist. SCHALLDÄMPFERSIEB: WARNUNG! - Der Motor und der Schalldämpfer werden sehr heiß, nachdem der Motor gelaufen ist. - Berühren Sie den Motor und den Schalldämpfer nach dem Betrieb nicht mit einem Teil Ihres Körpers oder Ihrer Kleidung, solange sie noch heiß...
-
Page 18: Fehlersuche
fänger aus dem Schalldämpfer zu hebeln. - Entfernen Sie die Kohlenstoffablagerungen auf dem Schalldämpfersieb und dem Funkenfänger mit einer Drahtbürste. Beachten Sie beim Reinigen, die Drahtbürste vorsichtig zu verwenden, um das Schalldämpfersieb und den Funkenfänger nicht zu beschädigen oder zu zerkratzen. - Installieren Sie das Schalldämpfersieb - Installieren Sie die Abdeckung. -
Page 19: Kraftstoff Ablassen
- Defektes Zündsystem: Fachhändler konsultieren. UNZUREICHENDE KOMPRESSION - Abgenutzter Kolben und Zylinder: Fachhändler konsultieren. GENERATOR PRODUZIERT KEINE LEISTUNG Sicherheitsvorrichtung (AC) auf “AUS” → Motor stoppen und neu starten. → Sicherheitsvorrichtung (DC) auf “AUS” Drücken Sie zur Rückstellung des Gleichstromschutzschalters. LAGERUNG Langzeitlagerung erfordert vorbeugende Maßnahmen gegen Verschlechterung. - Page 20 GASOLINE INVERTER GENERATOR-2.2 KW RH-4793...
-
Page 21: Technical Specification
TECHNICAL SPECIFICATION RH - 4793 Model Type Inverter Generator Ac Voltage 220V/50Hz Max. Output 2.2KW Generator Rated Output Power Factor Dc Output 12V / 4A 5V 3A Usb Socket Model XY156F Air-cooled, 4-cycle, OHV, Type Gasoline Engine Bore×Stroke Mm×Mm 56×46 Displacement 114cc Max. -
Page 22: Parts List
PARTS LIST 2 12 21 22 1- Economy control switch 2- Engine switch 3- Fuel tank 4- Spark plug 5- Muffler 6- Carrying handle 7- Choke lever Gasoline Inverter Generator-2.2Kw... -
Page 23: Safety Information
8- AC pilot light 9- Overload indicator light 10- Oil warning light 11- Ground (earth) terminal 12- DC protector 13- DC receptacle 14- AC receptacle 15- Base 16- Fuel filter 17- Fuel tank cap 18- Fuel pump 19- Recoil starter 20- Fuel cock 21- Oil filler cap 22- Air filter cover... -
Page 24: Engine And Muffler May Be Hot
ENGINE AND MUFFLER MAY BE HOT - Place the machine in a place where pedestrians or children are not likely to touch the machine. - Avoid placing any flammable materials near the exhaust outlet during operation. - Keep the machine at least 1m (3ft) from buildings or other equipment, or the engine may overheat. -
Page 25: Pre-Operation Check
NOTE: Use ground (earth) lead of sufficient current capacity. - Diameter: 0.12mm (0.005in)/ampere - EX: 10 Ampere --1.2mm (0.055in) CONNECTION NOTES - Avoid connecting the generator to a commercial power outlet. - Avoid connecting the generator in parallel with any other generator. PRE-OPERATION CHECK NOTE: - Pre-operation checks should be made each time the generator is used. -
Page 26: Check Engine Oil
WARNING! - Do not refill the tank while the engine is running or hot. - Close the fuel cock before refueling with fuel. - Be careful not to admit dust, dirt, water, or other foreign objects into fuel. - Do not fill above the top of the fuel filter or it may overflow when the fuel heats up later and expands. -
Page 27: Oil Warning System
OIL WARNING SYSTEM When the oil level falls below the lower level, the engine stops automatically. Unless you refill with oil, the engine will not start again. ENGINE SWITCH The engine switch controls the ignition system. 1- ON (run) Ignition circuit is switched on. The engine can be started. 2- OFF (stop) Ignition circuit is switched off. -
Page 28: Economy Control Switch
ECONOMY CONTROL SWITCH When the economy control switch is turned “ON”, the economy control unit control the engine speed according to the connected load. The results are better fuel connection and less noise. ECON.SW DC CIRCUIT PROTECTOR The DC circuit protector turns off automatically when the load exceeds the generator rated output. -
Page 29: Operation
OPEN CLOSE FUEL COCK The fuel cock is used to supply fuel from the tank to the carburetor. OPERATION NOTE: - The generator has been shipped without engine oil. Fill with oil or it will not start. - Do not tilt the generator when adding engine oil. This could result in overfilling and damage to the engine STARTING THE ENGINE User Manual... - Page 30 NOTE: - Before starting the engine, do not connect the electric apparatus. - Open the fuel tank air vent to the OPEN position. OPEN - Turn the fuel cock lever to the ON position. - Turn the engine switch to the ON position. STOP - When first time to use the generator sets, pressing the primer bulb 6 Gasoline Inverter Generator-2.2Kw...
- Page 31 times after refuel gasoline - Turn the choke lever to the CHOKE position. Not necessary if the engine is warm. CHOKE - Pull the starter handle slowly until resistance is felt. This is the Compression point. Return the handle to its original position and pull swiftly.
-
Page 32: Using Electric Power
- Warm up the engine without a load for a few minutes. USING ELECTRIC POWER AC APPLICATION - Check the AC pilot lamp for proper voltage. - Turn off the switch(es) of the electrical appliance(s) before connecting to the generator. - Insert the pulg(s) of the electrical appliance(s) into the receptacle. -
Page 33: Overload Indicator Light
OVERLOAD INDICATOR LIGHT The overload indicator light comes on when an overload of a connected electrical device is detected, the inverter unit overheats, or the AC output voltage rises. The electronic breaker will then activate, stopping power to the generation in order to protect the generator and any connected electric devices. - Page 34 stopped and then restarted. - The overload indicator light may come on for a few seconds at first when using electric devices that require a large starting current, such as a compressor or a submergible pump. However, this is not a malfunction. DC APPLICATION (OPTION) This usage is applicable to 12V battery charging only.
-
Page 35: Stopping The Engine
CAUTION: - Be sure the economy control switch is turned OFF while charging the battery. STOPPING THE ENGINE - Turn off the power switch of the electric apparatus or disconnect any electric devices. - Turn the engine switch to STOP position. ECON SWITCH - Turn the fuel cock lever to OFF. -
Page 36: Maintenance Chart
- Turn the fuel tank cap air vent knob counterclockwise to the CLOSED position. CLOSE MAINTENANCE MAINTENANCE CHART - Regular maintenance is most important for the best performance and safe operation. Item Remarks Check condition Spark adjust gap and Plug clean. - Page 37 Clean fuel cock Fuel filter. Replace if Filter necessary Check choke Choke operation Check and adjust Valve when engine i Clearance s cold. Check fuel hose for crack or Fuel Line damage. Replace if necessary. Check for leakage. Retighten or replace ...
-
Page 38: Engine Oil Replacement
ENGINE OIL REPLACEMENT - Place the machine on a level surface and warm up the engine for several minutes. Then stop the engine and turn the fuel cock knob to OFF. Turn the fuel tank cap air vent knob clockwise. - Loosen the screw and remove the cover. -
Page 39: Air Filter
- Add engine oil to the upper level. - Install the oil filler cap - Install the cover and tighten the screw - Recommended engine oil - API Service “ SJ” CAUTION: - Be sure no foreign material enters the crankcase. - Do not tilt the generator when adding engine oil. - Page 40 CAUTION: The engine should never run without the element; excessive piston and/ or cylinder wear may result. CLEANING AND ADJUSTING SPARK PLUG - Remove the cover. - Check for discoloration and remove the carbon. - Check the spark plug type and gap. - Install the spark plug.
-
Page 41: Muffler Screen
- Standard electrode color: Tan Color - Standard Spark Plug: - Spark Plug Gap: 0.6-0.7 mm (0.024-0.028 in) FUEL TANK FILTER - Remove the fuel tank cap and filter. - Clean the filter with solvent. If damaged, replace. - Wipe the filter and insert it. WARNING! - Be sure the tank cap is tightened securely. -
Page 42: Troubleshooting
- Remove the cover. - Remove the muffler screen. - Use the flathead screwdriver to pry the spark arrester out from the muffler. - Remove the carbon deposits on the muffler screen and spark arrester using a wire brush. - Install the muffler screen. - Install the cover. -
Page 43: Generator Won't Produce Power
- Spark plug dirty with carbon or wet….Remove carbon or wipe the spark plug dry. - Faulty ignition system….Consult dealer. COMPRESSION INSUFFICIENT - Worn out piston and cylinder….Consult dealer. GENERATOR WON’T PRODUCE POWER → Safety device (AC) to “OFF” Stop the engine, then restart. →... - Page 44 www.ronixtools.com...
Need help?
Do you have a question about the RH-4793 and is the answer not in the manual?
Questions and answers