Advertisement
Intended Use
- This product is designed to be an acoustical reflector for vocal or instrumental groups. Shells may also be used as a backdrop or as a screen for other functions such as speeches and ceremonies.
- This product is intended for indoor use in normal ambient temperature and humidity conditions.
- This product is intended to be assembled and used only as described in these instructions.
Product Terminology
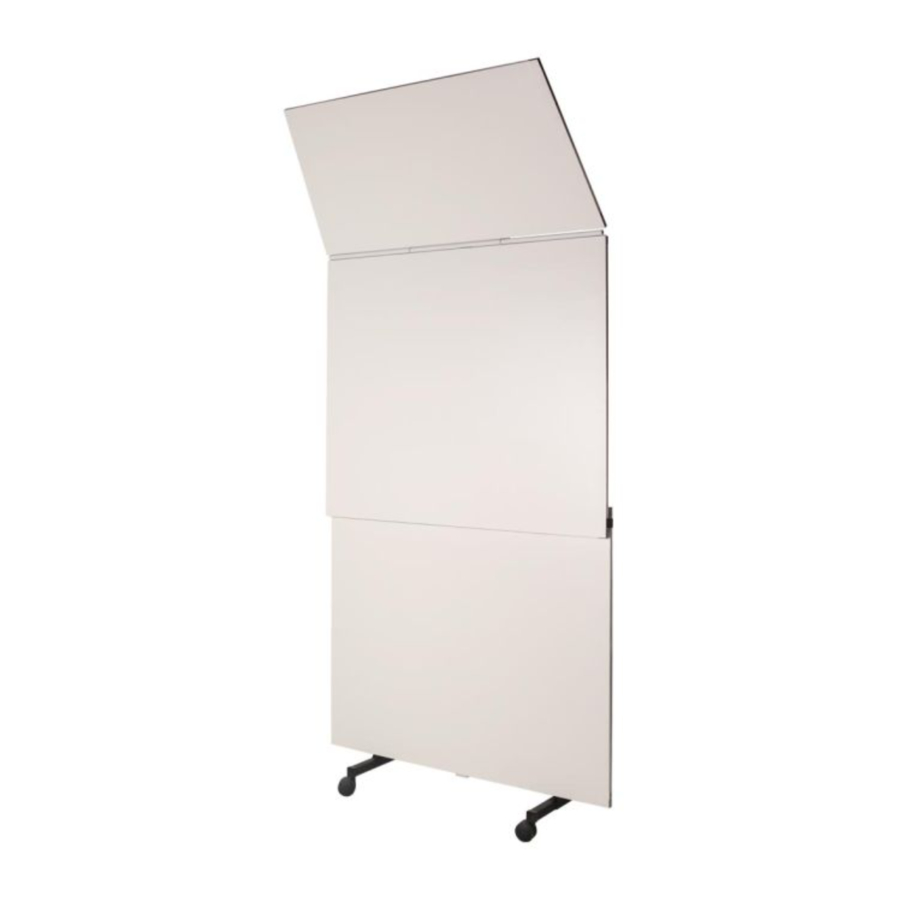
A Legacy Basic Acoustical Shell includes a base on casters, a support frame and three acoustical reflector panels.

The following terms are used throughout these instructions:
- Shell - One complete unit
- Base - The assembly that supports the frame and panels
- Canopy Panel - The highest panel Can be either tapered or rectangular shaped
- Middle Panel - The panel between the canopy and lower panels
- Lower Panel - The lowest panel
- Raising - Setting up a shell
- Lowering - Taking down a shell
- Storage Position - When a shell is folded down
- Performance Position - When a shell is fully raised
Storing the Shells
In their Storage Position, the shells can pass through a 35" x 79" (889 x 2007 mm) opening (a typical 36" [914 mm] door)
A single shell unit is 72"w x 77"h x 31-1/2"d (1829 x 1956 x 800 mm)
Each additional shell will "nest" with the others as shown, requiring an additional 10" (254 mm) of depth per unit

Store the shells in a space that is clean and dry Avoid spaces with high heat, extreme cold, or very humid conditions
Never leave a shell in the Performance Position for more than a week at a time
Always lower the shells to their Storage Position between events and rehearsals

- To prevent damage, fold the crank handle in before storing or transporting shells.
- To prevent damage, transport shells individually and never nested in a group.
- Do not use a powered device such as a fork lift to transport the shells.
Moving the Shells
- Never move the Legacy Basic Acoustical Shell more than a few feet when it is in the Performance Position.
- Always have the Legacy Basic Acoustical Shell in the Storage Position when moving to different locations.
- Do not move the shell if the canopy panel is raised.
One person can move and steer a single shell All four wheels are swivel casters, so steering the shell requires special attention.
If a shell is nested with other shells, prevent damage by having two people move the shell away from the other shells and through any door openings.
If a shell must be moved more than a few feet to the performance space, carefully roll it sideways at a slow pace. Slow down for corners and when moving through doorways.
The swivel casters are heavy-duty, but moving the shells over thresholds should be done carefully and at a slow speed. Use a ramp to move the shells over curbs or steps. Always move the shells sideways when going up or down a ramp.
To avoid fingerprints on the panels, have clean hands or wear clean gloves..
Arranging the Shells
Each shell is 72" (1839 mm) wide The Canopy panels on the shell can be tapered to provide a "tight" enclosure when the shell is set up on a 19' (5791 mm) radius and the canopy is set at a 45° angle – the most common arrangement for choral groups Shells with rectangular canopies can be used for other arrangements to accomplish desired effects.
While they are still in the Storage Position, arrange the shells as desired, in a row or arc.
Check for overhead clearance and for fit with risers and other equipment in the performance space.
Roll the shells about 6" (152 mm) apart, to allow clearance for raising them to the Performance Position.

Raising the Shell
Raise the shells to the Performance Position in a well-lit area.
Raise the shells to the Performance Position one at a time.
It is recommended that one person stand behind the shell to serve as a spotter, to prevent raising the shell into an obstacle or another shell.
- Make sure that anyone operating the Legacy Basic Acoustical Shell has read and understands these instructions.
- Never move the Legacy Basic Acoustical Shell more than a few feet when it is in the Performance Position.
- Always have the Legacy Basic Acoustical Shell in the Storage Position when moving to different locations.
- Roll the shell as close to the final Performance Position as possible.
- Insert a stop pin into both of the brackets to set the canopy panel performance angle.
- Use the top set of holes to set the canopy panel performance angle to 45°.
- Use the middle set of holes to set the canopy panel performance angle to 60°.
- Use the bottom set of holes to set the canopy panel performance angle to 75°.
- Do not insert stop pins to set the canopy panel performance angle to 90°.
![warning]() NOTICE
NOTICE
Stop pin placement must be in the same set of holes on both brackets.
 NOTICE
- Lift the canopy panel to raise it to the set position. The canopy panel will stop at the preset performance angle when the stop pins contact the bracket.

- Pull out and unfold the crank handle located on the back side of the shell.
![]()
- Turn the crank handle clockwise slowly to raise the panels.|The crank will stop when the panels reach the shell's maximum height.
![]()


Do not force the crank handle or the crank mechanism could be damaged.
Lowering the Shell
- Turn the crank handle counter-clockwise until the shell is completely lowered.
![]()
![]()
Do not force the crank handle or the crank mechanism could be damaged. - Pull out and fold in the crank handle located on the back side of the shell.
![]()
- Pull down on the canopy panel to lower it down to the Storage Position.

![]()
The canopy panel is under tension.
Pull down carefully while standing to the side.


Replacement Parts

| Item | Qty | Description | Item | Qty | Description |
| 1 | 1 | Lift Mechanism Basic Cover | 9 | 1 | Plastic Folding Handle |
| 2 | 12 | 8 x 5/8" Hex Head Screw | 10 | 1 | 5/16-18 x 2-3/4" Capscrew |
| 3 | 4 | Caster Stem 3" x 2" | 11 | 1 | Crank Handle |
| 4 | 1 | Basic Fixed Panel | 12 | 1 | 5/16" Helical Lock Washer |
| 5 | 1 | Main Frame | 13 | 2 | Plug-In Foot Assembly |
| 6 | 1 | Carrier Panel Assembly | 14 | 4 | 3/8-16 x 2-1/2" Hex Head Capscrew |
| 7 | 6 | Pilot Bearing Panel | 15 | 4 | 3/8-16 Lock Nut |
| 8 | 2 | Main Pin | 16 | 1 | 1" ID x 1" Long Cap |
Maintenance
Cleaning
Use a soft, damp cloth to clean all surfaces. Never hose down the shells or soak any components.
For smudges or fingerprints, dampen a cloth with any standard non-abrasive household cleaner and wipe clean.
Mechanical Check
Periodically (every three or four uses) check for loose or damaged parts and for loose fasteners
Replace or repair damaged parts promptly. Refer to the "Replacement Parts"
Do not make adjustments to the lift mechanism.
Contact Wenger Corporation customer service for repair options.
Panel Repair
Panels are of lightweight composite construction and made of durable materials. If accidentally damaged, repairs can be made with common fillers and paint.
Do not remove the canopy or middle panels.
Contact Wenger Corporation Customer Service for repair options.
Safety Precautions
Throughout this document you may find cautions and warnings which are defined as follows:

Failure to follow the instruction could result in serious injury or damage to property
Failure to follow the instruction could result in minor injury or damage to property
Read all of these safety instructions before using the equipment
- Make sure anyone assembling, installing or using this product has read and understands these instructions.
- Failure to comply with Warnings and Cautions in this document or on the equipment can result in damage to property or injury.
- Never use the Legacy Basic Acoustical Shell to support scenery, signs, lighting, etc.
- Never use the Legacy Basic Acoustical Shell outdoors.
- To prevent damage, fold the crank handle in before storing or transporting shells.
- Never move the Legacy Basic Acoustical Shell more than a few feet when it is in the Performance Position.
- Do not force the crank handle or the crank mechanism could be damaged.
- To prevent damage, transport shells individually and never nested in a group.
- Always have the Legacy Basic Acoustical Shell in the Storage Position when moving to different locations.
- Do not move the shell if the canopy panel is raised.
- Do not use a powered device such as a fork lift to transport the shells.
Questions?
Call:
USA: (800) 4WENGER (493-6437)
Worldwide: +1-507-455-4100
Documents / Resources
References
Download manual
Here you can download full pdf version of manual, it may contain additional safety instructions, warranty information, FCC rules, etc.
Advertisement


Need help?
Do you have a question about the Legacy and is the answer not in the manual?
Questions and answers