Table of Contents
Advertisement
Quick Links
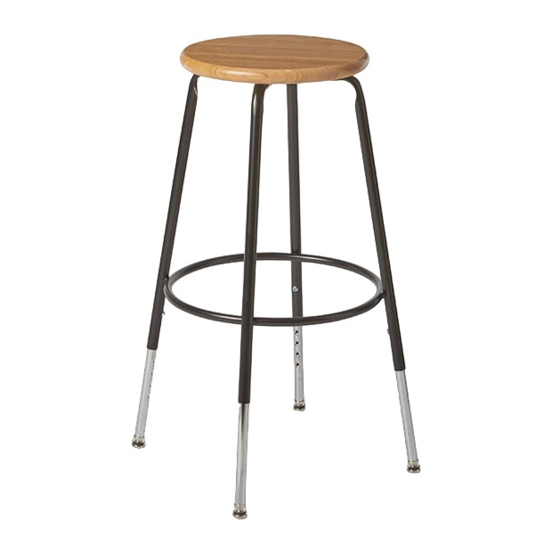
Standard
Ensemble Stool
with Wood Seat
Contents
Important User Information . . . . . . . . . . . . . . . . . . . . . . . . . . .2
General . . . . . . . . . . . . . . . . . . . . . . . . . . . . . . . . . . . . . .2
Manufacturer . . . . . . . . . . . . . . . . . . . . . . . . . . . . . . . . . .2
Intended Use . . . . . . . . . . . . . . . . . . . . . . . . . . . . . . . . . .2
Warranty . . . . . . . . . . . . . . . . . . . . . . . . . . . . . . . . . . . . .2
Note: Please read and understand these instructions before starting the assembly.
Note: Examine the following pages. If you need additional information, contact the
Wenger Corporation using the information below.
©Wenger Corporation 2016
Wenger Corporation, 555 Park Drive, P.O. Box 448, Owatonna, Minnesota 55060-0448
Questions? Call.....USA: (800) 4WENGER (493-6437) • Worldwide: +1(507) 455-4100 • www.wengercorp.com
Assembly and Operation Instructions
Premier
Ensemble Stool
with Padded and
Upholstered Seat
Parts List (Wood Seat Model) . . . . . . . . . . . . . . . . . . . . . . . . .3
Assembly . . . . . . . . . . . . . . . . . . . . . . . . . . . . . . . . . . . . . . . . .5
Operation . . . . . . . . . . . . . . . . . . . . . . . . . . . . . . . . . . . . . . . . .8
Troubleshooting . . . . . . . . . . . . . . . . . . . . . . . . . . . . . . . . . . . .8
Printed in China 03/16
Ensemble Stool
Standard
Ensemble Stool
with Polyurethane Seat
Part #104D002-02
Advertisement
Table of Contents

Subscribe to Our Youtube Channel
Related Manuals for Wenger Ensemble


Summary of Contents for Wenger Ensemble
-
Page 1: Table Of Contents
Troubleshooting ........8 Note: Please read and understand these instructions before starting the assembly. Note: Examine the following pages. If you need additional information, contact the Wenger Corporation using the information below. ©Wenger Corporation 2016 Printed in China 03/16 Part #104D002-02 Wenger Corporation, 555 Park Drive, P.O. Box 448, Owatonna, Minnesota 55060-0448... -
Page 2: Important User Information
Printed and bound in the United States of America. The information in this manual is subject to change without notice and does not represent a commitment on the part of Wenger Corporation. Wenger Corporation does not assume any responsibility for any errors that may appear in this manual. -
Page 3: Parts List (Wood Seat Model)
Part List (Wood Seat Model) Item Description Item Qty Description Seat (Wood) Split Ring Lock Washer, M6 Spacer Machine Screw, 6 x 15 Primary Leg Assembly Wood Screw, 6 x 35 *For use on Wood Seat Models only Secondary Leg Assembly Machine Screw, 6 x 35 *For use on Upholstered or Polyurethane Seat Models only Foot Ring Wing Nut *Quantities may vary, extras can be discarded. -
Page 4: Parts List (Upholstered & Polyurethane Seat Models)
Part List (Upholstered & Polyurethane Seat Models) Item Description Item Qty Description Seat (Upholstered or Polyurethane) Split Ring Lock Washer, M6 Spacer Machine Screw, 6 x 15 Primary Leg Assembly Wood Screw, 6 x 35 *For use on Wood Seat Models only Secondary Leg Assembly Machine Screw, 6 x 35 *For use on Upholstered or Polyurethane Seat Models only Foot Ring Wing Nut *Quantities may vary, extras can be discarded. -
Page 5: Assembly
Assembly 1. Attach the Primary Leg Assembly to the Seat. a. With the crimped side facing away from the Seat (1), align the Primary Leg Assembly (3) and two Spacers (2) with one set of pilot holes in the bottom of the Seat. b. - Page 6 Assembly (continued) 2. Attach the Secondary Leg Assembly to the Seat. a. With the crimped side facing toward from the Seat (1) and straddling the Primary Leg, align the Secondary Leg Assembly (4) and two Spacers (2) with the remaining set of pilot holes in the bottom of the Seat.
- Page 7 Assembly (continued) 3. Position the Foot Ring (5) to fit under the tabs of the Leg Assemblies. 4 Attach the Foot Ring to the Leg Assemblies using four M6 Split Ring Lock Washers (6) and four 6 x 15 Machine Screws (7) from the bottom as shown. 6 x 15 Machine Screw Foot Ring M6 Split Ring Lock Washer Fit the foot ring under the tabs of the legs.
-
Page 8: Operation
Operation The height of the Ensemble Stool is adjustable. 1. Unscrew the Wing Nut (10) from each leg. 2. Slide the Inner Leg to adjust the height. 3. Tighten the Wing Nut (10) to secure the new height. Outer Leg...
Need help?
Do you have a question about the Ensemble and is the answer not in the manual?
Questions and answers