Advertisement
Quick Links
®
iArmor
BEFORE INSTALLATION
REMOVE CONTENTS FROM BOX. VERIFY ALL PARTS ARE
PRESENT. READ INSTRUCTIONS CAREFULLY BEFORE
STARTING INSTALLATION. ASSISTANCE IS RECOMMEND-
ED. THANK YOU FOR CHOOSING OUR PRODUCT!
*ROCKER PANEL MOUNT
*NO DRILLING / TRIMMING REQUIRED
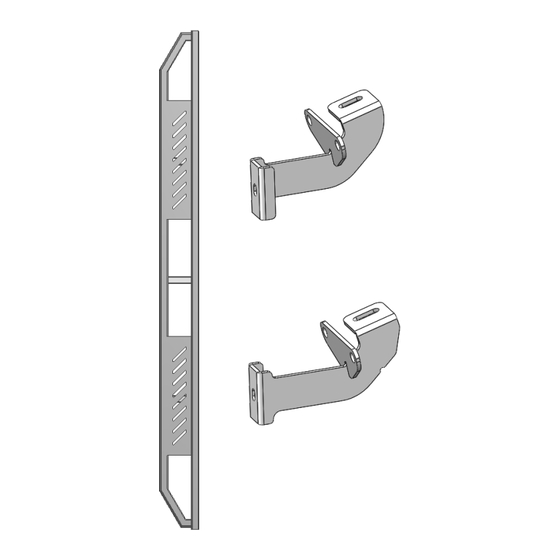
PART LIST
Driver Front Mounting
Bracket (DFM)
Driver Rear Mounting
Bracket (DRM)
Driver Side Step Bar
iArmor
by APS
Customer Support: info@iarmorauto.com
Torque Value
Fastener Size
6mm
8mm
10mm
12mm
14mm
Front
Passenger Front Mounting
Passenger Rear Mounting
X6
Adjustment Spacer
1
®
PART#: IA-S219
Tightening Torque (ft-lbs)
6-7
16-18
31-32
56-58
92-94
Bracket (PFM)
Bracket (PRM)
Passenger Side Step Bar
Rev. 20220101
Required
X
√
√
X
X
Advertisement

Subscribe to Our Youtube Channel
Related Manuals for APS iArmor IA-S219


Summary of Contents for APS iArmor IA-S219
- Page 1 ® ® iArmor by APS PART#: IA-S219 Torque Value BEFORE INSTALLATION Fastener Size Tightening Torque (ft-lbs) Required REMOVE CONTENTS FROM BOX. VERIFY ALL PARTS ARE PRESENT. READ INSTRUCTIONS CAREFULLY BEFORE STARTING INSTALLATION. ASSISTANCE IS RECOMMEND- 16-18 √ ED. THANK YOU FOR CHOOSING OUR PRODUCT!
- Page 2 iArmor ® M10 Nylon Lock Nut M10 Large Flat Washer M10 Bolt Plate M8X1.25-35mm Hex Bolt M8 Large Flat Washer M8 Nylon Lock Nut Spacer U Bracket M8 Hex Nut M8 Lock Washer M8X1.25-55mm Carriage Bolt The instruction here is for your reference only. We strongly et to the M10 Bolt Plate with the included (1) M10 Flat Large...
- Page 3 iArmor ® STEP 3 (2) M8X1.25-35mm Hex Bolts (4) M8 Large Flat Washers (2) M8 Nylon Lock Nuts Move to the Passenger Side Rear Mounting location. Repeat Steps 1—2 to install the Passenger Rear Mounting Bracket (PRM), (Fig 4). Do not fully tighten at this time. (2) M8X1.25-35mm Hex Bolts (4) M8 Large Flat Washers (2) M8 Nylon Lock Nuts...
- Page 4 iArmor ® STEP 5 STEP 7 NOTE: Depending on the vehicle, model and year, the front of Move to the driver side of the vehicle. Repeat Steps 1-6 to in- the running board may by close to or make contact with front stall driver side step bar.
Need help?
Do you have a question about the iArmor IA-S219 and is the answer not in the manual?
Questions and answers