Advertisement
Quick Links
DTP3 T 212 D • Setup Guide
IMPORTANT NOTE:
Go to
www.extron.com
before connecting the product to the power source.
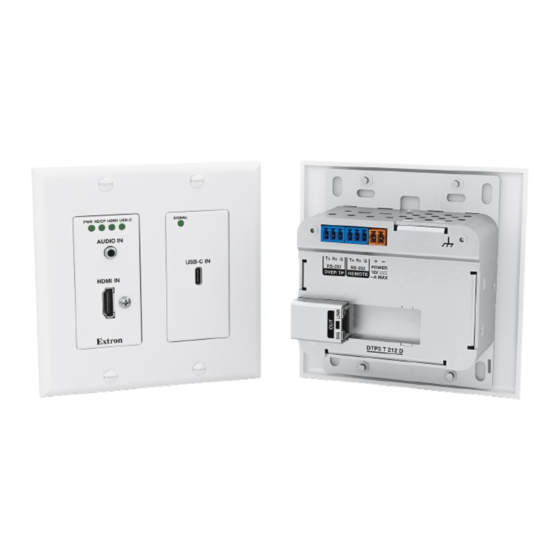
The DTP3 T 212 D is a two input, decorator-style, multi-format transmitter consisting of HDMI and USB-C inputs as well as an
analog audio input and a DTP/HDBaseT output. The transmitter supports resolutions up to 4096x2160 @ 60 Hz at 4:4:4 chroma
sampling. It extends HDMI, USB-C/DisplayPort, bi-directional RS-232, and remote power up to 330 feet (100 m).
This guide provides quick start instructions for an experienced installer to set up and operate the DTP3 T 212 D. For full installation,
configuration, and operation details, see the DTP3 T 212 D User Guide, available at www.extron.com.
PWR
HDCP
HDMI USB-C
SIGNAL
AUDIO IN
A
HDMI IN
B
D
Front View
Audio input
A
HDMI input
B
USB-C input
C
Figure 1.
DTP3 T 212 D Front, Top, and Rear Panels
Installation
Step 1 — Disconnect Power
Turn off or disconnect all equipment power sources.
Step 2 — Prepare the Mounting Site
ATTENTION:
• Installation and service must be performed by authorized
personnel.
• L'installation et l'entretien doivent être effectués par le
personnel autorisé uniquement.
• The unit must be installed in accordance with the National
Electrical Code and with local electrical and safety codes.
• L'unité doit être installée conformément au National Electric
Code et aux normes électriques et de sécurité locales.
for the complete DTP3 T 212 D user guide, installation instructions, and specifications
USB-C IN
C
Top View
Config port
D
DTP/HDBT toggle switch
E
Send Power toggle switch
F
H
I
J
E FG
Rear View
Reset button
G
Over TP RS-232 port
H
Remote RS-232 port
I
Wall opening is
flush with edge of box.
Cable
Clamp
Signal
Output
Cable
Figure 2.
Tx
Rx G
Tx
Rx G
POWER
RS-232
RS-232
12V
OVER TP
REMOTE
--A MAX
DTP3 T 212 D
TP output
J
Power port
K
Wall Stud
Screws or
Nails
EO
VI D
SW
TO
AU
B- C
US
M I
IN
B -C
HD
U S
CP
HD
R
PW
IN
D IO
A U
M I
IN
H D
G
N FI
CO
e
Extron
DTP3 T 212 D
Decorator-Style Faceplate
Wall Box Installation
K
Side View
1
Advertisement

Related Manuals for Extron electronics DTP3 T 212 D


Summary of Contents for Extron electronics DTP3 T 212 D
- Page 1 It extends HDMI, USB-C/DisplayPort, bi-directional RS-232, and remote power up to 330 feet (100 m). This guide provides quick start instructions for an experienced installer to set up and operate the DTP3 T 212 D. For full installation, configuration, and operation details, see the DTP3 T 212 D User Guide, available at www.extron.com.
- Page 2 Use a wall box with a depth of at least 3.0 inches (7.6 cm). Alternatively, the included mud ring (MR 200) can be used. For more information, see the DTP3 T 212 D User Guide. Place the wall box against the installation surface and mark the opening guidelines.
- Page 3 1 on page 1) — Connect a USB-C cable to a computer to update firmware via Product Configuration Software (PCS) (see the DTP3 T 212 D Help File) or Firmware Loader (see the Firmware Loader Help File for details).
- Page 4 (see the DTP3 T 212 D User Guide for more details on the reset modes).
Need help?
Do you have a question about the DTP3 T 212 D and is the answer not in the manual?
Questions and answers
How can I purchase the DTP3 p 212 D av