Extron electronics DTP3 T 202 EU/MK Setup Manual
Hide thumbs
Also See for DTP3 T 202 EU/MK:
- User manual (47 pages) ,
- Setup manual (4 pages) ,
- User manual (39 pages)
Advertisement
Quick Links
DTP3 T 202 EU/MK • Setup Guide
IMPORTANT NOTE:
Go to
www.extron.com
before connecting the product to the power source.
This guide provides instructions for an experienced installer to install the Extron DTP3 T 202 EU/MK wallplate transmitter into an EU or MK
two-gang junction box or European cable channel system. The two-input transmitter sends USB-C
330 feet (100 meters) over shielded CAT 6A cable. It supports video resolutions up to 4K/60 @ 4:4:4, and complies with HDCP 2.3. For full
installation, configuration, and operation details, see the DTP3 T 202 EU/MK User Guide.
A
Rear and Side
(Make connections before installation)
TP output
A
Send Power toggle switch
B
DTP/HDBT toggle switch
C
Power port
D
Over TP RS-232 port
E
Figure 1.
DTP3 T 202 EU/MK Front, Rear, and Side Panels
Installation
Planning
CAUTION:
Failure to check these items may result in personal injury or property damage.
ATTENTION:
La non-vérification des éléments listés ci-dessous peut provoquer des blessures ou dommages matériels.
1.
Check that the installation meets the building, electrical, and safety codes.
2.
Ensure there is enough space in the junction box or Euro channel for the cables and rear panel connectors when the DTP3 transmitter
is completely connected and mounted.
NOTE:
The transmitter require 36 mm (1.4 inch) minimum depth.
3.
For additional details and considerations on mounting and cabling, see the DTP3 T 202 EU/MK User Guide at www.extron.com.
Step 1 — Install the junction box or Euro channel
NOTE:
If you are mounting the device to a wall or furniture, skip to
If you are mounting the device using a junction box or the Euro channel, install the appropriate junction box or Euro channel
according to the requirements of the manufacturer (refer to the manufacturer for more details). This may require creating an opening in the
mounting surface. For accuracy, use a template or the mounting enclosure to mark the cut guidelines. To avoid making an opening too big,
cut inside the marked guidelines.
for the complete user guide, installation instructions, and specifications
B
SEND
OFF
PWR
DTP
HDBT
DTP3 T 202 EU/MK
Rear
C
G H
Remote RS-232 port
F
Configuration port
G
Reset button
H
HDCP status LEDs
I
D
E
F
Tx Rx G
Tx Rx G
HDCP
HDMI USB-C
RESET
CONFIG
Front
I
step 2
on page 2.
video, HDMI, audio, and control up to
®
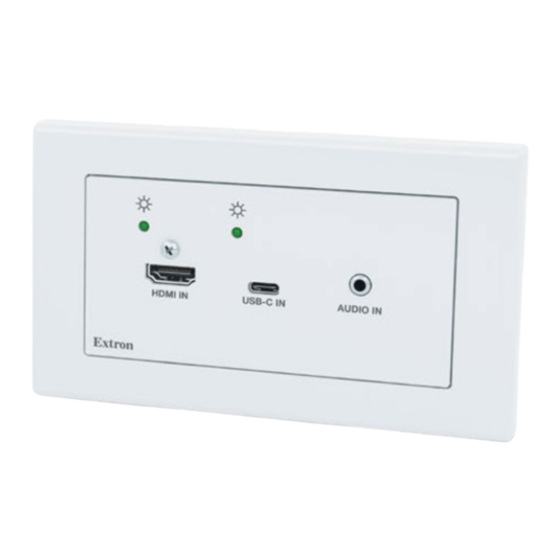
M
HDMI IN
USB-C IN
J
K
Front
(Make connections after installation)
HDMI input
J
USB-C input
K
Audio input
L
Power and Status LEDs
M
AUDIO IN
L
1
Advertisement

Subscribe to Our Youtube Channel
Related Manuals for Extron electronics DTP3 T 202 EU/MK


Summary of Contents for Extron electronics DTP3 T 202 EU/MK
- Page 1 This guide provides instructions for an experienced installer to install the Extron DTP3 T 202 EU/MK wallplate transmitter into an EU or MK two-gang junction box or European cable channel system. The two-input transmitter sends USB-C video, HDMI, audio, and control up to ®...
- Page 2 D IO D IO B -C B -C B -C B -C Mounting Frame Mounting Frame DTP3 T 202 EU/MK DTP3 T 202 EU/MK DTP3 T 202 EU/MK Figure 2. EU Installation Figure 3. MK Installation NOTE: Only two screws are shown in figure 2. Use four long screws to ensure the mounting plate is secure.
- Page 3 DTP3 T 202 EU/MK • Setup Guide (Continued) Step 4 — Make the side and rear panel connections Pins: TP output (see figure 1 on page 1) — Connect a DTP or HDBT receiving device to the TP output TIA/EIA T...
- Page 4 Rear View Side View is being powered up (see the DTP3 T 202 EU/MK User Guide for more details on the reset modes). Send Power Diagram Local...
Need help?
Do you have a question about the DTP3 T 202 EU/MK and is the answer not in the manual?
Questions and answers