Advertisement
Quick Links
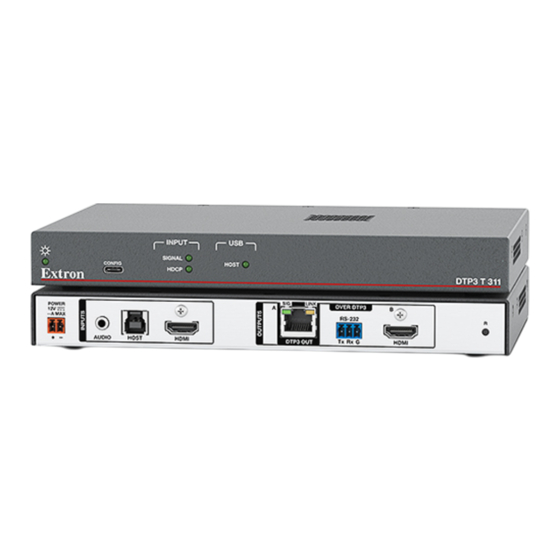
DTP3 TR 311 • Setup Guide
IMPORTANT NOTE:
www.extron.com
Go to
before connecting the product to the power source.
This guide provides quick start instructions for an experienced installer to set up and operate the DTP3 T 311 transmitter and
DTP3 R 311 receiver. These DTP3 digital video Extenders can extend the following up to 230 feet (70 meters), using shielded
twisted pair cabling:
•
HDMI digital video signal to 4K @ 60 Hz (4:4:4) (can include embedded digital audio)
•
Optional analog audio
•
Bidirectional RS‑232 control
NOTE:
Maximum transmission distances vary with resolutions used, cable types, and environment (see the
DTP3 T/R 311 User Guide a
USB
Computer
4K/60
USB
HDMI
SIG
LINK
POWER
A
12V
2.8 MAX
AUDIO
HOST
HDMI
DTP3 OUT
Extron
DTP3 T 311
Transmitter
Figure 1.
Typical DTP3 T/R 311 Transmitter and Receiver Application
Installation
Turn off and disconnect all equipment power sources and mount the transmitter and receiver Extender units as required. The
units can be mounted in a variety of locations using optional Extron mounting accessories (see
the compatible mounting options).
Rear Panel Connections
POWER
12V
2.8 A MAX
AUDIO
DTP3 T 311
G G G
B B B
POWER
12V
1.0 A MAX
DTP3 R 311
N N N
Figure 2.
DTP3 T/R 311 Rear Panel Connectors and Features
for the complete user guide, installation instructions, and specifications
t
www.extron.com
Table
Microphone
4K/60
HDMI
Extron
OVER DTP3
B
RS-232
R
DTP3 R 311
Tx Rx G
HDMI
Receiver
CAT6A Cable
up to 230' (70 m)
HOST
HDMI
C C C
A A A
SIG
LINK
SEND
PWR
OFF
DTP3 IN
I I I
•
USB HID and USB 2.0
•
Remote power (receiver to transmitter)
for full specifications).
75" Touch Display
USB
Extron
SB 33 A 75-80 Sound Bar
SIG
LINK
POWER
SEND
OVER DTP3
12V
PWR
1.0 A MAX
RS-232
OFF
DTP3 IN
Tx Rx G
HDMI
POWER
STANDBY
Camera
SIG
LINK
OVER DTP3
A
Tx Rx G
DTP3 OUT
F F F
OVER DTP3
RS-232
Tx Rx G
HDMI
M M M
J J J
DTP3 T 311 DTP3 R 311
Audio
1
3
L
R
R
2
4
DEVICES
AUDIO
USB
www.extron.com
B
RS-232
HDMI
D D D
E E E
1
3
L
2
4
DEVICES
L L L
to determine
R
H H H
R
R
AUDIO
K K K
O O O
1
Advertisement

Related Manuals for Extron electronics DTP3 TR 311


Summary of Contents for Extron electronics DTP3 TR 311
- Page 1 DTP3 TR 311 • Setup Guide IMPORTANT NOTE: www.extron.com Go to for the complete user guide, installation instructions, and specifications before connecting the product to the power source. DTP3 T 311 DTP3 R 311 This guide provides quick start instructions for an experienced installer to set up and operate the DTP3 T 311 transmitter and DTP3 R 311 receiver.
- Page 2 DTP3 TR 311 • Setup Guide (Continued) Transmitter Features HDMI input port (see figure 2 on page 1) — Connect an HDMI cable between this port and the HDMI output port (or DVI port, with an appropriate adapter) of the digital video source. The transmitter also accepts embedded digital audio on this port.
- Page 3 ATTENTION: • Do not connect these devices to a telecommunications or computer data network. • Ne connectez pas ces appareils à des données informatiques ou à un réseau de télécommunications. Send Power switch — Set the switch as desired: OFF (default) — Do not send power. The transmitter must receive power from an optional local power supply. SEND PWR –...
- Page 4 Front Panel Connection and Indicators INPUT SIGNAL HOST CONFIG HDCP DTP3 T 311 A A A B B B C C C E E E INPUT DEVICES SIGNAL HOST CONFIG HDCP DTP3 R 311 D D D F F F Figure 3.
Need help?
Do you have a question about the DTP3 TR 311 and is the answer not in the manual?
Questions and answers